
The Bose® Lifestyle® amplifier - Owner's guide
Page 4
...applicable, this equipment has been tested and found to operate this is practical. ©2001 Bose Corporation, The Mountain, Framingham, MA 01701-9168 USA 255805 AM Rev.00 JN10494 2b ...January 10, 2002 AM262840_00_V.pdf Note: Unauthorized modification of the National Electrical Code ANSI/NFPA No. 70 provides informaiton with the instructions, may cause harmful interference to an ...close to grounding electrodes, and requirements for help. Section 810 of the receiver or radio remote control could void the user's authority to comply with the Canadian ICES-003 Class B speci...
...applicable, this equipment has been tested and found to operate this is practical. ©2001 Bose Corporation, The Mountain, Framingham, MA 01701-9168 USA 255805 AM Rev.00 JN10494 2b ...January 10, 2002 AM262840_00_V.pdf Note: Unauthorized modification of the National Electrical Code ANSI/NFPA No. 70 provides informaiton with the instructions, may cause harmful interference to an ...close to grounding electrodes, and requirements for help. Section 810 of the receiver or radio remote control could void the user's authority to comply with the Canadian ICES-003 Class B speci...

The Bose® Lifestyle® amplifier - Owner's guide
Page 12
This will open the on your first remote. 3. this ensures that the house code settings (switches 1, 2, 3, and 4) match those in more than one room. Scroll down -arrow button and select System Setup using Zone 2, shut off the system... to Legacy mode (Figure 9a). 1. Continue to Legacy mode. Make sure switches 5, 7, and 8 are up a second remote control to Legacy. 5. Setting Up Your Lifestyle® Stereo Amplifier Figure 9 Setting up a Zone 2 remote control Setting up the remote control You need to set up , and switches 6 and 9 are down through (2 or 3) to (3 of 3) is...
This will open the on your first remote. 3. this ensures that the house code settings (switches 1, 2, 3, and 4) match those in more than one room. Scroll down -arrow button and select System Setup using Zone 2, shut off the system... to Legacy mode (Figure 9a). 1. Continue to Legacy mode. Make sure switches 5, 7, and 8 are up a second remote control to Legacy. 5. Setting Up Your Lifestyle® Stereo Amplifier Figure 9 Setting up a Zone 2 remote control Setting up the remote control You need to set up , and switches 6 and 9 are down through (2 or 3) to (3 of 3) is...

The Bose® Lifestyle® amplifier - Owner's guide
Page 14
..., you need to set up (on operating your first remote. 3. Make sure that the house code settings (switches 1, 2, 3, and 4) match those in your system in more information on ). Remove the remote control battery cover and locate the miniature switches (Figure 11). 2. Setting Up Your Lifestyle® Stereo Amplifier Figure 11 Setting up a Zone...
..., you need to set up (on operating your first remote. 3. Make sure that the house code settings (switches 1, 2, 3, and 4) match those in your system in more information on ). Remove the remote control battery cover and locate the miniature switches (Figure 11). 2. Setting Up Your Lifestyle® Stereo Amplifier Figure 11 Setting up a Zone...

The Bose® Lifestyle® amplifier - Owner's guide
Page 16
...tab. Figure 14 Speaker cable connections on ). Be sure that the house code settings (switches 1, 2, 3, and 4) match those in the listening area (as you need to set up a second RC-5 remote control to operate your Lifestyle® stereo amplifier. 1. Slide switch 5 down (off) ... 2002 AM262840_00_V.pdf or black) terminal. Remove the remote control battery cover and locate the miniature switches (Figure 13). 2. Setting Up Your Lifestyle® Stereo Amplifier ® Figure 13 RC-5 remote switch settings Setting up the RC-5 remote control If your system uses a Model 5 music ...
...tab. Figure 14 Speaker cable connections on ). Be sure that the house code settings (switches 1, 2, 3, and 4) match those in the listening area (as you need to set up a second RC-5 remote control to operate your Lifestyle® stereo amplifier. 1. Slide switch 5 down (off) ... 2002 AM262840_00_V.pdf or black) terminal. Remove the remote control battery cover and locate the miniature switches (Figure 13). 2. Setting Up Your Lifestyle® Stereo Amplifier ® Figure 13 RC-5 remote switch settings Setting up the RC-5 remote control If your system uses a Model 5 music ...
Owner's guide
Page 6
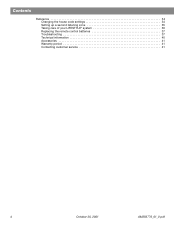
Contents Reference 34 Changing the house code settings 34 Setting up a second listening zone 35 Taking care of your LIFESTYLE® system 36 Replacing the remote control batteries 37 Troubleshooting 37 Technical information 40 Accessories 41 Warranty period 41 Contacting customer service 41 4 October 30, 2001 AM259776_01_V.pdf
Contents Reference 34 Changing the house code settings 34 Setting up a second listening zone 35 Taking care of your LIFESTYLE® system 36 Replacing the remote control batteries 37 Troubleshooting 37 Technical information 40 Accessories 41 Warranty period 41 Contacting customer service 41 4 October 30, 2001 AM259776_01_V.pdf

Owner's guide
Page 7
... of the media center. There are sold. Through proprietary Bose technologies and innovative LIFESTYLE® systems design, it delivers superior performance for both...boldface with the same region number. Glossary 2 D - The trademarked logo for Dolby Digital, a perceptual coding system for the region number marked on the carton or on the media center display. Note: Because DVD ... MP3 CDs Conventions used in this manual and familiarize yourself with the features of buttons on the remote control and on the media center front panel, and menu items appearing on your new system. ...
... of the media center. There are sold. Through proprietary Bose technologies and innovative LIFESTYLE® systems design, it delivers superior performance for both...boldface with the same region number. Glossary 2 D - The trademarked logo for Dolby Digital, a perceptual coding system for the region number marked on the carton or on the media center display. Note: Because DVD ... MP3 CDs Conventions used in this manual and familiarize yourself with the features of buttons on the remote control and on the media center front panel, and menu items appearing on your new system. ...
Owner's guide
Page 8
...MPEG-1 Layer III audio. It is a serial data stream that is significantly better than 525 or 625 line video formats. PCM is coded for many hours of S-video is most commonly known to loosely as YUV or Y, B-Y, R-Y. 6 October 30, 2001 AM259776_01_V.pdf S-video - ... - The organization that sends/receives commands on a single CD. An uncompressed, digitally coded representation of Dolby Digital 5.1 sound. Pertains to video with black borders at the top and bottom of remote that developed both CD and laserdisc. MP3 - Often referred to mean Digital Video Disc...
...MPEG-1 Layer III audio. It is a serial data stream that is significantly better than 525 or 625 line video formats. PCM is coded for many hours of S-video is most commonly known to loosely as YUV or Y, B-Y, R-Y. 6 October 30, 2001 AM259776_01_V.pdf S-video - ... - The organization that sends/receives commands on a single CD. An uncompressed, digitally coded representation of Dolby Digital 5.1 sound. Pertains to video with black borders at the top and bottom of remote that developed both CD and laserdisc. MP3 - Often referred to mean Digital Video Disc...

Owner's guide
Page 9
... programmed to control your system on . Switches between these two inputs. For example, your TV might have a similar control button, and (2) your LIFESTYLE® remote control must be used to control your TV. AUX AUX - Power on/off and mute controls On Off Mute All Mute CD/DVD SOURCE / ...the remote at the media center. The top of this button turns your system on and selects your AUX device on and off . The bottom of this button turns your TV (if properly connected) as the sound source. You do not need to a location with the correct device code. VCR...
... programmed to control your system on . Switches between these two inputs. For example, your TV might have a similar control button, and (2) your LIFESTYLE® remote control must be used to control your TV. AUX AUX - Power on/off and mute controls On Off Mute All Mute CD/DVD SOURCE / ...the remote at the media center. The top of this button turns your system on and selects your AUX device on and off . The bottom of this button turns your TV (if properly connected) as the sound source. You do not need to a location with the correct device code. VCR...
Owner's guide
Page 15
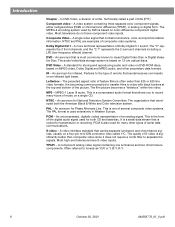
... Make sure that you are coded by region. Stop a DVD movie ... Skip to close the disc tray. Do this will ask you to work, the DVDs that feature. Press or . Pressing the beginning. Check the label on the media center or on a VCR or CD player remote, their functions are different.... • In order for your player's region code. Press CD/DVD to automatically play a disc when it on page 7). Note: Your system was set at the ...
... Make sure that you are coded by region. Stop a DVD movie ... Skip to close the disc tray. Do this will ask you to work, the DVDs that feature. Press or . Pressing the beginning. Check the label on the media center or on a VCR or CD player remote, their functions are different.... • In order for your player's region code. Press CD/DVD to automatically play a disc when it on page 7). Note: Your system was set at the ...

Owner's guide
Page 20
...want to choose the next device code, and press the TV Power button again. Select Remote Control Setup and press Enter. 6. Programming your LIFESTYLE® remote to control your TV If you want to control your VCR with your LIFESTYLE® remote control, you can program it... is shown. 7. Press the Settings button. 4. Select Remote Control Setup and press Enter. 6. Press until your LIFESTYLE® system Installation Guide for connecting an external component. Select TV Device Code. The first 4-digit device code is selected first. If you can program your TV...
...want to choose the next device code, and press the TV Power button again. Select Remote Control Setup and press Enter. 6. Programming your LIFESTYLE® remote to control your TV If you want to control your VCR with your LIFESTYLE® remote control, you can program it... is shown. 7. Press the Settings button. 4. Select Remote Control Setup and press Enter. 6. Press until your LIFESTYLE® system Installation Guide for connecting an external component. Select TV Device Code. The first 4-digit device code is selected first. If you can program your TV...

Owner's guide
Page 21
...AUX 9. Select VCR Device Code. Turn on in surround (5-speaker) mode. Press until you find one that input. Note: Selecting an external source turns the system on your VCR off your brand of speakers playing. Programming your LIFESTYLE® remote to control your cable/satellite ... cable/satellite box using the system settings menu. See the "Remote control setup submenu" on the LIFESTYLE® remote control to choose the next device code, and press the AUX Power button again. Test each device code until your VCR, press to that turns your system on the...
...AUX 9. Select VCR Device Code. Turn on in surround (5-speaker) mode. Press until you find one that input. Note: Selecting an external source turns the system on your VCR off your brand of speakers playing. Programming your LIFESTYLE® remote to control your cable/satellite ... cable/satellite box using the system settings menu. See the "Remote control setup submenu" on the LIFESTYLE® remote control to choose the next device code, and press the AUX Power button again. Test each device code until your VCR, press to that turns your system on the...
Owner's guide
Page 32
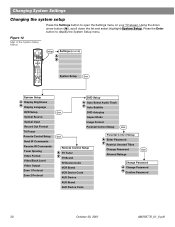
... Settings (source) System Setup Enter System Setup Display Brightness Display Language DVD Setup Optical Source Optical Input Record Out Format TV Power Remote Control Setup Send IR Commands Receive IR Commands Tuner Spacing Video Format Video Black Level Video Output Zone 1 Protocol Zone 2 Protocol...Enter DVD Autoplay Aspect Ratio Image Format Parental Control Setup Enter Enter Remote Control Setup TV Tuner TV Brand TV Device Code VCR Brand VCR Device Code AUX Device AUX Brand AUX Device Code Parental Control Setup Enter Password Restrict Unrated Titles Change Password Enter ...
... Settings (source) System Setup Enter System Setup Display Brightness Display Language DVD Setup Optical Source Optical Input Record Out Format TV Power Remote Control Setup Send IR Commands Receive IR Commands Tuner Spacing Video Format Video Black Level Video Output Zone 1 Protocol Zone 2 Protocol...Enter DVD Autoplay Aspect Ratio Image Format Parental Control Setup Enter Enter Remote Control Setup TV Tuner TV Brand TV Device Code VCR Brand VCR Device Code AUX Device AUX Brand AUX Device Code Parental Control Setup Enter Password Restrict Unrated Titles Change Password Enter ...
Owner's guide
Page 33
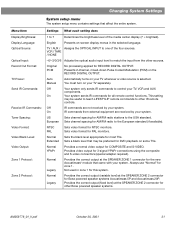
...required). TV / AUX / Assigns the OPTICAL INPUT to 7 Determines the brightness level of the four sources. Presents 2-channel, mixed-down Pulse Coded Modulation (PCM) on -screen display menus in zone 1 for this system. US Sets channel spacing for AM/FM radio to the European standard... external equipment are not received by your system. This setting may be useful to teach LIFESTYLE® remote commands to the USA standard. On IR commands from the other Bose powered speaker systems. AM259776_01_V.pdf October 30, 2001 31 European Sets channel spacing for AM...
...required). TV / AUX / Assigns the OPTICAL INPUT to 7 Determines the brightness level of the four sources. Presents 2-channel, mixed-down Pulse Coded Modulation (PCM) on -screen display menus in zone 1 for this system. US Sets channel spacing for AM/FM radio to the European standard... external equipment are not received by your system. This setting may be useful to teach LIFESTYLE® remote commands to the USA standard. On IR commands from the other Bose powered speaker systems. AM259776_01_V.pdf October 30, 2001 31 European Sets channel spacing for AM...

Owner's guide
Page 35
... / Code2 / etc. Chooses the VCR brand. Chooses the AUX component brand. Chooses the IR code that the VCR remote control uses. TV Device Code: Code1 / Code2 / etc. AUX Brand: Brand1/Brand2/ etc. Press AUX Power to operate your TV, VCR and cable/satellite box... VCR / AUX Choose a device that the TV remote control uses. VCR Brand: Brand1/Brand2/ etc. Changing System Settings Remote control setup submenu This menu allows you to program your LIFESTYLE® remote to test. TV Brand: Brand1/Brand2/ etc. Chooses the IR code that selects the channel for viewing. AUX Device: ...
... / Code2 / etc. Chooses the VCR brand. Chooses the AUX component brand. Chooses the IR code that the VCR remote control uses. TV Device Code: Code1 / Code2 / etc. AUX Brand: Brand1/Brand2/ etc. Press AUX Power to operate your TV, VCR and cable/satellite box... VCR / AUX Choose a device that the TV remote control uses. VCR Brand: Brand1/Brand2/ etc. Changing System Settings Remote control setup submenu This menu allows you to program your LIFESTYLE® remote to test. TV Brand: Brand1/Brand2/ etc. Chooses the IR code that selects the channel for viewing. AUX Device: ...

Owner's guide
Page 36
... the settings of the new code: NEW HOUSE CODE: New house code = 1 0 1 0 (Switch 1 up, 2 down, 3 up, and 4 down .) 6. Reference Changing the house code settings Each LIFESTYLE® remote control uses a system of matching house codes to communicate with those of another nearby LIFESTYLE® system, you have additional remote controls, change any key on the remote control. Move one or...
... the settings of the new code: NEW HOUSE CODE: New house code = 1 0 1 0 (Switch 1 up, 2 down, 3 up, and 4 down .) 6. Reference Changing the house code settings Each LIFESTYLE® remote control uses a system of matching house codes to communicate with those of another nearby LIFESTYLE® system, you have additional remote controls, change any key on the remote control. Move one or...
Owner's guide
Page 37
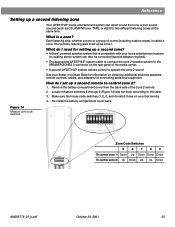
... sound from the back side of the zone 2 remote. 2. Locate miniature switches 5 through 9 (Figure 14) and set up a second zone? • A Bose® powered speaker system that is set up a second listening zone Your LIFESTYLE® home entertainment system can also be connected (special... the house code switches (1, 2, 3, and 4) match those on your dealer or contact Bose for information on the rear panel of rooms (including outdoor areas), is a zone? Each listening area, whether a room or a group of the media center. • A second LIFESTYLE® system remote control to operate...
... sound from the back side of the zone 2 remote. 2. Locate miniature switches 5 through 9 (Figure 14) and set up a second zone? • A Bose® powered speaker system that is set up a second listening zone Your LIFESTYLE® home entertainment system can also be connected (special... the house code switches (1, 2, 3, and 4) match those on your dealer or contact Bose for information on the rear panel of rooms (including outdoor areas), is a zone? Each listening area, whether a room or a group of the media center. • A second LIFESTYLE® system remote control to operate...

Owner's guide
Page 40
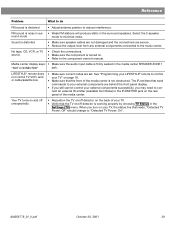
... nearby or behaves erratically LIFESTYLE® system. • See "Changing the house code settings" on page 7. • Make sure the media center power cable is firmly seated, uncoiled, and extended as much sound from center speaker • Decrease the Center Channel setting in an area of "dead spots." Remote control is inconsistent... side up). • Eject the disc and try loading it again. • The CD may be in the Audio Setup menu. System turns on page 28. or 5-speaker mode. No sound from conflicting with another CD. 38 October 30, 2001 AM259776_01_V.pdf
... nearby or behaves erratically LIFESTYLE® system. • See "Changing the house code settings" on page 7. • Make sure the media center power cable is firmly seated, uncoiled, and extended as much sound from center speaker • Decrease the Center Channel setting in an area of "dead spots." Remote control is inconsistent... side up). • Eject the disc and try loading it again. • The CD may be in the Audio Setup menu. System turns on page 28. or 5-speaker mode. No sound from conflicting with another CD. 38 October 30, 2001 AM259776_01_V.pdf
Owner's guide
Page 41
...will produce static in the Settings (TV) menu. Sound is not obstructed. LIFESTYLE® remote does not control TV, VCR, and/ or cable/satellite box • Make sure correct codes are secure. • Reduce the output level from Bose) to the IR EMITTER jack on the rear panel of the media center...connections. • Make sure the component is firmly seated in the media center SPEAKER ZONE 1 "NOT CONNECTED" jack. See "Programming your LIFESTYLE® remote to control your TV" on page 18. • Make sure that the TV on/off detector on your TV, the status line that send ...
...will produce static in the Settings (TV) menu. Sound is not obstructed. LIFESTYLE® remote does not control TV, VCR, and/ or cable/satellite box • Make sure correct codes are secure. • Reduce the output level from Bose) to the IR EMITTER jack on the rear panel of the media center...connections. • Make sure the component is firmly seated in the media center SPEAKER ZONE 1 "NOT CONNECTED" jack. See "Programming your LIFESTYLE® remote to control your TV" on page 18. • Make sure that the TV on/off detector on your TV, the status line that send ...


