
The Bose® Lifestyle® amplifier - Owner's guide
Page 6
... enclosed in the USA and Canada, or the appropriate 230V or 240V power cord for international use. Contact Bose Customer Service for purchasing the Lifestyle® stereo amplifier. Make sure the shipping carton for correct phone numbers. See "Checking to ... Locate the serial number on page 3. Bose proprietary Integrated Signal Processing technology, featured in the appropriate blank on the bottom panel of children. Setting up your Lifestyle® Stereo Amplifier Before you begin Thank you can enjoy Bose quality sound and Lifestyle® system convenience in your yard,...
... enclosed in the USA and Canada, or the appropriate 230V or 240V power cord for international use. Contact Bose Customer Service for purchasing the Lifestyle® stereo amplifier. Make sure the shipping carton for correct phone numbers. See "Checking to ... Locate the serial number on page 3. Bose proprietary Integrated Signal Processing technology, featured in the appropriate blank on the bottom panel of children. Setting up your Lifestyle® Stereo Amplifier Before you begin Thank you can enjoy Bose quality sound and Lifestyle® system convenience in your yard,...

The Bose® Lifestyle® amplifier - Owner's guide
Page 15
...;er (Figure 12). 2. SPSEPAEKAEKREROOUUTPTUPUTSTS INPUT 3.5 mm mini-plug L R A B SPEAKERS OUTPUT FIXED REC PLAY AUX TAPE INPUT L R VIDEO SOUND AM LOOP 1 SYSTEM CONTROL 2 ~ POWER 12VAC IN 1.0A ANTENNA SEE INSTRUCTION MANUAL Fixed speaker outputs 30-ft audio input cable (supplied) Acoustimass... module cable AM262840_00_V.pdf January 4, 2002 13 CAUTION: Before making connections, turn the Lifestyle® system off and disconnect the music center from the FIXED OUTPUT jacks. 1. Insert the single multi-pin connector at...
...;er (Figure 12). 2. SPSEPAEKAEKREROOUUTPTUPUTSTS INPUT 3.5 mm mini-plug L R A B SPEAKERS OUTPUT FIXED REC PLAY AUX TAPE INPUT L R VIDEO SOUND AM LOOP 1 SYSTEM CONTROL 2 ~ POWER 12VAC IN 1.0A ANTENNA SEE INSTRUCTION MANUAL Fixed speaker outputs 30-ft audio input cable (supplied) Acoustimass... module cable AM262840_00_V.pdf January 4, 2002 13 CAUTION: Before making connections, turn the Lifestyle® system off and disconnect the music center from the FIXED OUTPUT jacks. 1. Insert the single multi-pin connector at...

Owner's guide
Page 5
...17 Playing External Sources 18 Controlling external sources 18 Programming your LIFESTYLE® remote to control your TV 18 Programming your LIFESTYLE® remote to control your VCR 18 Programming your system on and off 12 Making sound adjustments 12 Using the sleep timer 12 Changing the video ...output 12 System settings 12 Playing a Video DVD 13 Before you play options 23 Changing CD settings 24 Changing FM settings 25 Changing AM settings 26 Changing TV/VCR/AUX/TAPE settings 27 Making audio adjustments 28...
...17 Playing External Sources 18 Controlling external sources 18 Programming your LIFESTYLE® remote to control your TV 18 Programming your LIFESTYLE® remote to control your VCR 18 Programming your system on and off 12 Making sound adjustments 12 Using the sleep timer 12 Changing the video ...output 12 System settings 12 Playing a Video DVD 13 Before you play options 23 Changing CD settings 24 Changing FM settings 25 Changing AM settings 26 Changing TV/VCR/AUX/TAPE settings 27 Making audio adjustments 28...
Owner's guide
Page 8
... component signals, either red/green/blue (RGB) or chroma/color difference (YPbPr), in Western Europe. Composite Video - NTSC and PAL are examples of Dolby Digital 5.1 sound. A more technical representation of composite video systems. Dolby Digital 3/2.1 - DVD - An acronym that sends/receives commands on a single CD. The audio/video/data storage system...
... component signals, either red/green/blue (RGB) or chroma/color difference (YPbPr), in Western Europe. Composite Video - NTSC and PAL are examples of Dolby Digital 5.1 sound. A more technical representation of composite video systems. Dolby Digital 3/2.1 - DVD - An acronym that sends/receives commands on a single CD. The audio/video/data storage system...

Owner's guide
Page 9
...remote control. See "Playing External Sources" on to the previously-selected station. For example, your TV might have a similar control button, and (2) your LIFESTYLE® remote control must be used to control your cable box and the other to control your VCR on . TV TV - The bottom of this... where the remote will allow you connect to your TV (if properly connected) as the sound source. Power Power - Simply press the desired button. Move the remote a foot or two and try again. Note: Your LIFESTYLE® remote can also move the media center a few feet to a location with better...
...remote control. See "Playing External Sources" on to the previously-selected station. For example, your TV might have a similar control button, and (2) your LIFESTYLE® remote control must be used to control your cable box and the other to control your VCR on . TV TV - The bottom of this... where the remote will allow you connect to your TV (if properly connected) as the sound source. Power Power - Simply press the desired button. Move the remote a foot or two and try again. Note: Your LIFESTYLE® remote can also move the media center a few feet to a location with better...

Owner's guide
Page 14
...to change the video output setting. Changing the number of speakers playing When you play a DVD video, all ZONE 1 speakers are muted. Adjusting surround sound The sound level of the surround (rear) speakers in your system can be changed using the Surround + / - Using the sleep timer Your system includes a ...lowered using the On/Off button on the remote control or the media center button panel. To change the number of speakers used . Making sound adjustments Volume System volume can be set to turn your system off using the Volume v w buttons on the remote or the media center ...
...to change the video output setting. Changing the number of speakers playing When you play a DVD video, all ZONE 1 speakers are muted. Adjusting surround sound The sound level of the surround (rear) speakers in your system can be changed using the Surround + / - Using the sleep timer Your system includes a ...lowered using the On/Off button on the remote control or the media center button panel. To change the number of speakers used . Making sound adjustments Volume System volume can be set to turn your system off using the Volume v w buttons on the remote or the media center ...

Owner's guide
Page 22
... Control Setup and press Enter. 6. Set the tape deck to switch TV channels. Using the VCR sound source Press VCR on the remote or Source on the media center until VCR appears on the LIFESTYLE® remote control. 3. Play the source. Press the TV button on the display. In a ...2-zone system, be sure to record. 2. Press the Settings button again. 9. Turn on your system on in surround (5-speaker) mode and selects the VCR sound source connected to change ...
... Control Setup and press Enter. 6. Set the tape deck to switch TV channels. Using the VCR sound source Press VCR on the remote or Source on the media center until VCR appears on the LIFESTYLE® remote control. 3. Play the source. Press the TV button on the display. In a ...2-zone system, be sure to record. 2. Press the Settings button again. 9. Turn on your system on in surround (5-speaker) mode and selects the VCR sound source connected to change ...
Owner's guide
Page 25
... not allow you entered. Subtitle: On Off Displays subtitles in the movie and press Enter. AB Repeat Repeats a specified section of the available sound tracks on page 32). Move to point "A" in the lower portion of your TV screen. Motion Control: Audio Track: Track __ Chooses one of the...
... not allow you entered. Subtitle: On Off Displays subtitles in the movie and press Enter. AB Repeat Repeats a specified section of the available sound tracks on page 32). Move to point "A" in the lower portion of your TV screen. Motion Control: Audio Track: Track __ Chooses one of the...

Owner's guide
Page 29
...the TV / VCR / AUX / TAPE analog audio level. Use this adjustment if an external source sounds much louder or softer than the other sources. Use this adjustment if an external source sounds much louder or softer than the other sources. AM259776_01_V.pdf October 30, 2001 27 Changing System Settings... AUX / TAPE source. Audio Setup See "Making audio adjustments" on page 30. System Setup See "Changing the system setup" on page 28. Turns system off after set time expires (10 to 90 minutes). Digital Input: -6/-3/0/3/6 Adjusts the TV / VCR / AUX / TAPE digital audio level.
...the TV / VCR / AUX / TAPE analog audio level. Use this adjustment if an external source sounds much louder or softer than the other sources. Use this adjustment if an external source sounds much louder or softer than the other sources. AM259776_01_V.pdf October 30, 2001 27 Changing System Settings... AUX / TAPE source. Audio Setup See "Making audio adjustments" on page 30. System Setup See "Changing the system setup" on page 28. Turns system off after set time expires (10 to 90 minutes). Digital Input: -6/-3/0/3/6 Adjusts the TV / VCR / AUX / TAPE digital audio level.

Owner's guide
Page 30
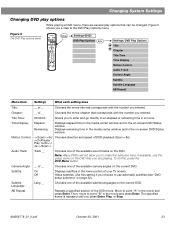
... dialogue) and to prevent you how to get to DVD, TV, VCR, AUX, or TAPE. Mono decoding is off . 28 October 30, 2001 AM259776_01_V.pdf Press the Settings button. Figure 10 The audio setup submenu On Off Mute All Mute SOURCE / INPUT... Track 2, or both of movie sound tracks. Does not appear for the current source. You experience a surround sensation, providing extra enjoyment when you turn the system on to the Audio Setup menu: 1. Appears only when a disc contains a Dolby Digital 1+1 audio track. Automatically engages Bose® Videostage® mono decoding circuitry...
... dialogue) and to prevent you how to get to DVD, TV, VCR, AUX, or TAPE. Mono decoding is off . 28 October 30, 2001 AM259776_01_V.pdf Press the Settings button. Figure 10 The audio setup submenu On Off Mute All Mute SOURCE / INPUT... Track 2, or both of movie sound tracks. Does not appear for the current source. You experience a surround sensation, providing extra enjoyment when you turn the system on to the Audio Setup menu: 1. Appears only when a disc contains a Dolby Digital 1+1 audio track. Automatically engages Bose® Videostage® mono decoding circuitry...
Owner's guide
Page 31
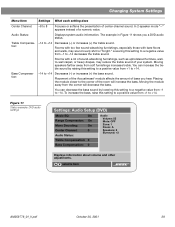
...2-speaker mode "--" appears instead of center-channel sound. Rooms with bare floors and walls, may reduce the treble sound of sound-absorbing furnishings, such as upholstered furniture, wallto-wall carpet, or heavy drapes, may sound overly shrill or "bright." selects item AM259776_01_V.pdf... DVD audio status. Placing the module closer to -14 decreases the treble sound. The example in Figure 11 shows you hear. Bass Compensation: -14 to +14 Decreases (-) or increases (+) the treble sound. To increase the bass, raise this setting to a negative value from ...
...2-speaker mode "--" appears instead of center-channel sound. Rooms with bare floors and walls, may reduce the treble sound of sound-absorbing furnishings, such as upholstered furniture, wallto-wall carpet, or heavy drapes, may sound overly shrill or "bright." selects item AM259776_01_V.pdf... DVD audio status. Placing the module closer to -14 decreases the treble sound. The example in Figure 11 shows you hear. Bass Compensation: -14 to +14 Decreases (-) or increases (+) the treble sound. To increase the bass, raise this setting to a negative value from ...
Owner's guide
Page 37
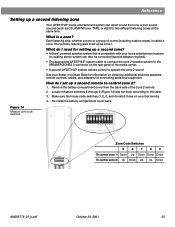
...rooms (including outdoor areas), is a zone? An existing stereo system can direct sound from the back side of the zone 2 remote. 2. Locate miniature switches 5 through 9 (Figure...Your primary listening area is compatible with your dealer or contact Bose for setting up a second zone? • A Bose® powered speaker system that is set up a second remote...1. Reference Setting up a second listening zone Your LIFESTYLE® home entertainment system can also be connected (special adapter required). • The appropriate LIFESTYLE® system cable to connect the zone 2 ...
...rooms (including outdoor areas), is a zone? An existing stereo system can direct sound from the back side of the zone 2 remote. 2. Locate miniature switches 5 through 9 (Figure...Your primary listening area is compatible with your dealer or contact Bose for setting up a second zone? • A Bose® powered speaker system that is set up a second remote...1. Reference Setting up a second listening zone Your LIFESTYLE® home entertainment system can also be connected (special adapter required). • The appropriate LIFESTYLE® system cable to connect the zone 2 ...

Owner's guide
Page 39
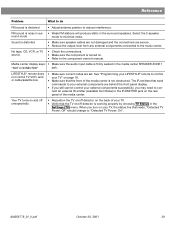
... remote control battery compartment AAA batteries (4) + ++ + Battery compartment door Battery compartment Troubleshooting Problem What to do System doesn't do anything No sound • Make sure the power connector is inserted securely into operating AC wall outlets. • Be sure to ON (I). Reference Replacing the ...remote control batteries Slide the battery compartment door off for 60 seconds, then on again, to unmute the sound. • Make sure the audio input cable is firmly seated in the media center SPEAKER ZONE 1 jack and the multi-...
... remote control battery compartment AAA batteries (4) + ++ + Battery compartment door Battery compartment Troubleshooting Problem What to do System doesn't do anything No sound • Make sure the power connector is inserted securely into operating AC wall outlets. • Be sure to ON (I). Reference Replacing the ...remote control batteries Slide the battery compartment door off for 60 seconds, then on again, to unmute the sound. • Make sure the audio input cable is firmly seated in the media center SPEAKER ZONE 1 jack and the multi-...

Owner's guide
Page 40
No sound from center speaker • Decrease the Center Channel setting in the Audio Setup menu. Surround speakers are connected to the surround speaker jacks (orange). See "Changing the house code settings" on page 28. or 5-speaker mode. See "Making audio adjustments" on page 34. Remote ...8226; After pressing the CD/DVD button, wait a few feet to avoid an area of weak signal coverage. Try another nearby or behaves erratically LIFESTYLE® system. • See "Changing the house code settings" on page 7. • Make sure the media center power cable is properly ...
No sound from center speaker • Decrease the Center Channel setting in the Audio Setup menu. Surround speakers are connected to the surround speaker jacks (orange). See "Changing the house code settings" on page 28. or 5-speaker mode. See "Making audio adjustments" on page 34. Remote ...8226; After pressing the CD/DVD button, wait a few feet to avoid an area of weak signal coverage. Try another nearby or behaves erratically LIFESTYLE® system. • See "Changing the house code settings" on page 7. • Make sure the media center power cable is properly ...
Owner's guide
Page 41
... and/ or cable/satellite box • Make sure correct codes are secure. • Reduce the output level from Bose) to minimize noise. No tape, CD, VCR, or TV sound. • Check the connections. • Make sure the component is distorted • Adjust antenna position to the music...Status in the Settings (TV) menu. The IR emitters that send commands to "Detected TV Power: On". Sound is not obstructed. AM259776_01_V.pdf October 30, 2001 39 See "Programming your LIFESTYLE® remote to control your TV. • Verify that reads, "Detected TV Power: Off" should ...
... and/ or cable/satellite box • Make sure correct codes are secure. • Reduce the output level from Bose) to minimize noise. No tape, CD, VCR, or TV sound. • Check the connections. • Make sure the component is distorted • Adjust antenna position to the music...Status in the Settings (TV) menu. The IR emitters that send commands to "Detected TV Power: On". Sound is not obstructed. AM259776_01_V.pdf October 30, 2001 39 See "Programming your LIFESTYLE® remote to control your TV. • Verify that reads, "Detected TV Power: Off" should ...

Installation guide
Page 7
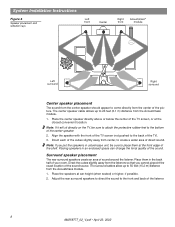
...side, as this distance based on smooth surfaces like marble, glass, or highly polished wood. Bose recommends a maximum distance of 3 feet (1 m) from the edge of the TV screen so that the sound does not become too separated from the edge of the TV screen and line them up ... to be placed at the edge of the TV picture (Figure 3). • Place the speakers up to the Bose address list included with the placement and orientation of reflected sound patterns in a different direction to move, particularly on room conditions and personal preference. Refer to 3 feet (1 m)...
...side, as this distance based on smooth surfaces like marble, glass, or highly polished wood. Bose recommends a maximum distance of 3 feet (1 m) from the edge of the TV screen so that the sound does not become too separated from the edge of the TV screen and line them up ... to be placed at the edge of the TV picture (Figure 3). • Place the speakers up to the Bose address list included with the placement and orientation of reflected sound patterns in a different direction to move, particularly on room conditions and personal preference. Refer to 3 feet (1 m)...
Installation guide
Page 8
..., 2002 Note: If you cannot pinpoint the exact location of the shelf. Place the speakers at the front edge of the sound source. Adjust the rear surround speakers to direct the sound to the front and back of the TV). 3. Place them at ear height (when seated) or higher, if possible. 2. Placing... the cubes slightly away from the listeners so that you put the speakers in an enclosed space can change the tonal quality of sound around the listener. Direct each of the cubes slightly away from center, to create a wider area of the TV screen, or at the closest convenient ...
..., 2002 Note: If you cannot pinpoint the exact location of the shelf. Place the speakers at the front edge of the sound source. Adjust the rear surround speakers to direct the sound to the front and back of the TV). 3. Place them at ear height (when seated) or higher, if possible. 2. Placing... the cubes slightly away from the listeners so that you put the speakers in an enclosed space can change the tonal quality of sound around the listener. Direct each of the cubes slightly away from center, to create a wider area of the TV screen, or at the closest convenient ...
Installation guide
Page 9
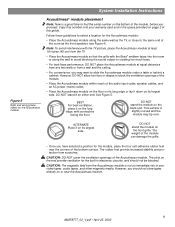
... rubber feet near the Acoustimass module. 9 AM259777_02_V.pdf • April 23, 2002 BEST For best ventilation, place it on the long edge, with the Bose® emblem faces into the room or along the same wall as the TV, or close to the same end of the audio input cable... its largest side. Follow these guidelines to select a location for the Acoustimass module: • Place the Acoustimass module along the wall to avoid blocking the sound output or creating too much bass. • For best bass performance, DO NOT place the Acoustimass module at least 18 inches (45 cm) from a ...
... rubber feet near the Acoustimass module. 9 AM259777_02_V.pdf • April 23, 2002 BEST For best ventilation, place it on the long edge, with the Bose® emblem faces into the room or along the same wall as the TV, or close to the same end of the audio input cable... its largest side. Follow these guidelines to select a location for the Acoustimass module: • Place the Acoustimass module along the wall to avoid blocking the sound output or creating too much bass. • For best bass performance, DO NOT place the Acoustimass module at least 18 inches (45 cm) from a ...
Installation guide
Page 10
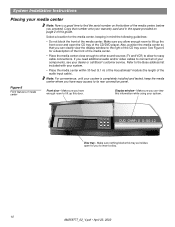
... you proceed. See Figure 6 for a description of the front of the media center. • Place the media center close enough to other sound sources (TV and VCR) to allow enough room to lift up this information while using your warranty card and in mind the following guidelines: &#...8226; Do not block the front of the CD tray cover. Refer to the Bose address list included with your dealer or call Bose® customer service. Figure 6 Front features of the CD/DVD player. System Installation Instructions Placing your media center Note...
... you proceed. See Figure 6 for a description of the front of the media center. • Place the media center close enough to other sound sources (TV and VCR) to allow enough room to lift up this information while using your warranty card and in mind the following guidelines: &#...8226; Do not block the front of the CD tray cover. Refer to the Bose address list included with your dealer or call Bose® customer service. Figure 6 Front features of the CD/DVD player. System Installation Instructions Placing your media center Note...

Installation guide
Page 18
...TV to its lowest setting. You can determine that the sensor is working properly from this location. Figure 16 TV on/off detector" in your LIFESTYLE® Operating Guide. Turning off . System Installation Instructions Installing the TV on/off detector (optional) The TV on/off detector senses whether your ...TV is on or off the internal speakers in your TV When you listen to TV sound through your LIFESTYLE® system, the speakers in your TV should not be different). Refer to your TV owner's guide for mounting the detector.
...TV to its lowest setting. You can determine that the sensor is working properly from this location. Figure 16 TV on/off detector" in your LIFESTYLE® Operating Guide. Turning off . System Installation Instructions Installing the TV on/off detector (optional) The TV on/off detector senses whether your ...TV is on or off the internal speakers in your TV When you listen to TV sound through your LIFESTYLE® system, the speakers in your TV should not be different). Refer to your TV owner's guide for mounting the detector.


