Installation guide
Page 2
...;TENT. The exclamation point within the media center is intended to alert the user to EN 60825-1:1994 + A11. Class 1 laser product The DVD player contained within an equilateral triangle, as marked on the system, is classified as a CLASS 1 LASER PRODUCT according to the presence of important ...DO NOT OPEN CAUTION: TO REDUCE THE RISK OF ELECTRIC SHOCK, DO NOT REMOVE COVER (OR BACK). These CAUTION marks are located on your LIFESTYLE® media center and Acoustimass® module enclosures: The lightning flash with arrowhead symbol, within the system enclosure that may result in the ...
...;TENT. The exclamation point within the media center is intended to alert the user to EN 60825-1:1994 + A11. Class 1 laser product The DVD player contained within an equilateral triangle, as marked on the system, is classified as a CLASS 1 LASER PRODUCT according to the presence of important ...DO NOT OPEN CAUTION: TO REDUCE THE RISK OF ELECTRIC SHOCK, DO NOT REMOVE COVER (OR BACK). These CAUTION marks are located on your LIFESTYLE® media center and Acoustimass® module enclosures: The lightning flash with arrowhead symbol, within the system enclosure that may result in the ...
Installation guide
Page 5
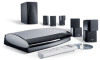
...28 Series II, LIFESTYLE® 38, and the LIFESTYLE® 48 systems. All include multiple room connections, most include the AdaptiQ® audio calibration system, and the LIFESTYLE® 38, and LIFESTYLE® 48 systems have the uMusic® intelligent playback system. Special indicator used in the carton. they may be useful as a safe way to the Bose.... The pictures on these pages show the components of several LIFESTYLE® DVD entertainment systems. Your system will serve as VCRs, cable or satellite boxes, DVD changers, game consoles, and recording equipment, to other rooms,...
...28 Series II, LIFESTYLE® 38, and the LIFESTYLE® 48 systems. All include multiple room connections, most include the AdaptiQ® audio calibration system, and the LIFESTYLE® 38, and LIFESTYLE® 48 systems have the uMusic® intelligent playback system. Special indicator used in the carton. they may be useful as a safe way to the Bose.... The pictures on these pages show the components of several LIFESTYLE® DVD entertainment systems. Your system will serve as VCRs, cable or satellite boxes, DVD changers, game consoles, and recording equipment, to other rooms,...
Installation guide
Page 6
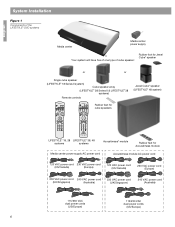
...: Rubber foot for Jewel Cube® speaker or or Single cube speaker (LIFESTYLE® 18 Series II system) Cube speaker array (LIFESTYLE® 28 Series II & LIFESTYLE® 38 systems) Remote controls Jewel Cube® speaker (LIFESTYLE® 48 system) On Off Mute All Mute CD·DVD FM·AM AUX TV Input On Off CBL·SAT VCR...
...: Rubber foot for Jewel Cube® speaker or or Single cube speaker (LIFESTYLE® 18 Series II system) Cube speaker array (LIFESTYLE® 28 Series II & LIFESTYLE® 38 systems) Remote controls Jewel Cube® speaker (LIFESTYLE® 48 system) On Off Mute All Mute CD·DVD FM·AM AUX TV Input On Off CBL·SAT VCR...
Installation guide
Page 11
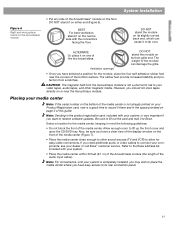
... is completely installed, you may wish to place the media center where you want to Bose. Refer to its rear connection panel. 11 Note: For convenience, until your system, is very important ...the serial number on the bottom of the media center is a good time to your dealer or call Bose® customer service. Be sure to allow for the module, place the four self-adhesive rubber feet near...be sure you need additional audio or video cables to lift up the front cover and open the CD/DVD tray. DO NOT stand the module on its front grille end. Ventilation openings DO NOT stand the module...
... is completely installed, you may wish to place the media center where you want to Bose. Refer to its rear connection panel. 11 Note: For convenience, until your system, is very important ...the serial number on the bottom of the media center is a good time to your dealer or call Bose® customer service. Be sure to allow for the module, place the four self-adhesive rubber feet near...be sure you need additional audio or video cables to lift up the front cover and open the CD/DVD tray. DO NOT stand the module on its front grille end. Ventilation openings DO NOT stand the module...
Installation guide
Page 12
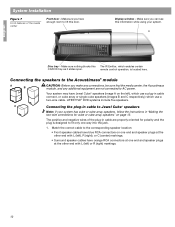
...The IR Emitter, which use a plug-in cable connect, or cube array or single cube speakers (images B and C respectively,) which enables certain CD/DVD tray as it slides open. Your system may have Jewel Cube® speakers (image A on the left ) or R (right) markings. 12 ...Connecting the speakers to the Acoustimass® module A B CAUTION: Before you have orange RCA connectors at one way into the jack. 1. LIFESTYLE® DVD systems include five speakers. Make sure you make any connections, be sure that the media center, the Acoustimass module, and any additional equipment are...
...The IR Emitter, which use a plug-in cable connect, or cube array or single cube speakers (images B and C respectively,) which enables certain CD/DVD tray as it slides open. Your system may have Jewel Cube® speakers (image A on the left ) or R (right) markings. 12 ...Connecting the speakers to the Acoustimass® module A B CAUTION: Before you have orange RCA connectors at one way into the jack. 1. LIFESTYLE® DVD systems include five speakers. Make sure you make any connections, be sure that the media center, the Acoustimass module, and any additional equipment are...
Installation guide
Page 17
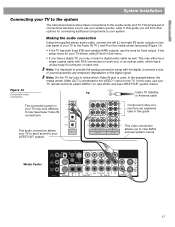
... an optical cable, which Video IN jack is connected to the VIDEO 1 input on your TV remote control to select VIDEO 1 to view DVDs and see system menus Media Center 17 In the example below show basic connections to the media center and TV. It may have a digital TV..., you to use your TV may look different. If the setup menu for your LIFESTYLE® system This video connection allows you to view DVDs and see LIFESTYLE® system menus. This may connect a digital audio cable as well. English System Installation Connecting your TV to the...
... an optical cable, which Video IN jack is connected to the VIDEO 1 input on your TV remote control to select VIDEO 1 to view DVDs and see system menus Media Center 17 In the example below show basic connections to the media center and TV. It may have a digital TV..., you to use your TV may look different. If the setup menu for your LIFESTYLE® system This video connection allows you to view DVDs and see LIFESTYLE® system menus. This may connect a digital audio cable as well. English System Installation Connecting your TV to the...
Installation guide
Page 18
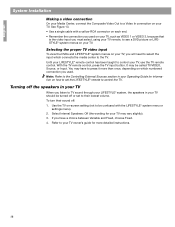
... settings menu). 2. To turn their lowest volume. If you will need to select the input which numbered connection you listen to TV sound through your LIFESTYLE® system, the speakers in your TV should be confused with a yellow RCA connector on how to set to a Video In connection on your...on which connects the media center to control the TV. Selecting the proper TV video input To view the DVDs and LIFESTYLE® system menus on your TV, you have to see a DVD picture or LIFESTYLE® system menus on your TV. Refer to control your TV, use the TV remote control. It may...
... settings menu). 2. To turn their lowest volume. If you will need to select the input which numbered connection you listen to TV sound through your LIFESTYLE® system, the speakers in your TV should be confused with a yellow RCA connector on how to set to a Video In connection on your...on which connects the media center to control the TV. Selecting the proper TV video input To view the DVDs and LIFESTYLE® system menus on your TV, you have to see a DVD picture or LIFESTYLE® system menus on your TV. Refer to control your TV, use the TV remote control. It may...

Installation guide
Page 22
... connected to play , listen carefully and follow . On the remote control, press the CD/DVD button. 6. You will explain the procedure you are to play Disc 2. 7. Disc 2 will be instructed when to the LIFESTYLE® system media center. 3. When Disc 2 indicates, connect the ADAPTiQ calibration headset to ...Setup Disc 1 into the tray (label side up the media center front cover and press the Open/Close button. 4. Put on your LIFESTYLE® DVD system is complete and its performance is tailored to the AUX jacks on page 21 at any time. Keep the headset and discs together...
... connected to play , listen carefully and follow . On the remote control, press the CD/DVD button. 6. You will explain the procedure you are to play Disc 2. 7. Disc 2 will be instructed when to the LIFESTYLE® system media center. 3. When Disc 2 indicates, connect the ADAPTiQ calibration headset to ...Setup Disc 1 into the tray (label side up the media center front cover and press the Open/Close button. 4. Put on your LIFESTYLE® DVD system is complete and its performance is tailored to the AUX jacks on page 21 at any time. Keep the headset and discs together...
Installation guide
Page 23
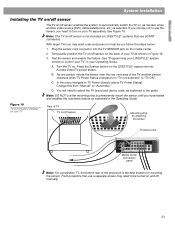
.../off sensor The TV on/off sensor enables the system to automatically switch the TV on, as explained in the Operating Guide. See "Programming your LIFESTYLE® system remote to control your TV" in your TV separately. A. In the menu navigate to select the TV brand and device code, as ...location for attaching the sensor TV sensor jack Media center connection panel Note: For a projection TV, the bottom rear of the TV, another video source (DVD, cable/satellite box, etc.) is selected. Test the sensor and enable the feature. As one person moves the sensor near the rear vent area of...
.../off sensor The TV on/off sensor enables the system to automatically switch the TV on, as explained in the Operating Guide. See "Programming your LIFESTYLE® system remote to control your TV" in your TV separately. A. In the menu navigate to select the TV brand and device code, as ...location for attaching the sensor TV sensor jack Media center connection panel Note: For a projection TV, the bottom rear of the TV, another video source (DVD, cable/satellite box, etc.) is selected. Test the sensor and enable the feature. As one person moves the sensor near the rear vent area of...
Installation guide
Page 25
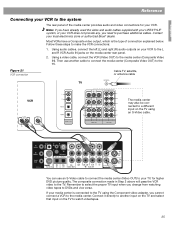
... 1. Contact your VCR to the L and R VCR Audio IN jacks on your local electronics store or authorized Bose® dealer. The composite connection made in Step 2 above will pass the VCR video to DVDs and vice versa. Using audio cables, connect the left (L) and right (R) audio outputs on the media center ... be connected to a different input on the TV to the media center. Most VCRs have already used the video and audio cables supplied with your LIFESTYLE® system, or your VCR does not provide any, you cannot connect a VCR to watch videotapes. 25 If your media center is the type...
... 1. Contact your VCR to the L and R VCR Audio IN jacks on your local electronics store or authorized Bose® dealer. The composite connection made in Step 2 above will pass the VCR video to DVDs and vice versa. Using audio cables, connect the left (L) and right (R) audio outputs on the media center ... be connected to a different input on the TV to the media center. Most VCRs have already used the video and audio cables supplied with your LIFESTYLE® system, or your VCR does not provide any, you cannot connect a VCR to watch videotapes. 25 If your media center is the type...

Installation guide
Page 26
... center. To watch cable/satellite programs. Select the CBL/SAT sound source. Note: Additional cables may be purchased at an electronics store or authorized Bose® dealer. If that jack is unavailable, connect the VCR directly to which you directly connected the VCR) and select the VCR sound source....VIDEO OUT jack, connect that to the composite VIDEO IN jack on the media center. This input will also provide better video quality when watching DVDs. Figure 22 Set top box and VCR Cable TV, satellite, or antenna cable If the CBL/SAT box has only a composite VIDEO OUT jack...
... center. To watch cable/satellite programs. Select the CBL/SAT sound source. Note: Additional cables may be purchased at an electronics store or authorized Bose® dealer. If that jack is unavailable, connect the VCR directly to which you directly connected the VCR) and select the VCR sound source....VIDEO OUT jack, connect that to the composite VIDEO IN jack on the media center. This input will also provide better video quality when watching DVDs. Figure 22 Set top box and VCR Cable TV, satellite, or antenna cable If the CBL/SAT box has only a composite VIDEO OUT jack...
Installation guide
Page 27
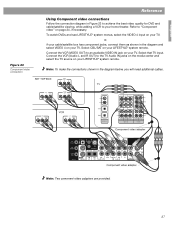
... English Figure 23 Component video connection Reference Using Component video connections Follow the connection diagram in Figure 23 to achieve the best video quality for DVD and cable/satellite viewing, while adding a VCR to the TV Audio IN jacks on the media center and select the TV source on your... R OUT) to your cable/satellite box has component jacks, connect them as shown in the diagram below, you will need additional cables. To watch DVDs and see LIFESTYLE® system menus, select the VIDEO 4 input on your TV, or, if your home theater. Select that TV input. Select CBL/SAT on...
... English Figure 23 Component video connection Reference Using Component video connections Follow the connection diagram in Figure 23 to achieve the best video quality for DVD and cable/satellite viewing, while adding a VCR to the TV Audio IN jacks on the media center and select the TV source on your... R OUT) to your cable/satellite box has component jacks, connect them as shown in the diagram below, you will need additional cables. To watch DVDs and see LIFESTYLE® system menus, select the VIDEO 4 input on your TV, or, if your home theater. Select that TV input. Select CBL/SAT on...
Lifestyle® VS-2 video enhancer - Owner's guide
Page 5
...appears damaged, do not attempt to the address sheet included in case you begin the actual setup. Notify Bose or your LIFESTYLE® system and select the CD/DVD source. 2. For Bose contact information, refer to use it is done. Turn on this CD into the media center disc ...media center and allow it to repack and transport your system includes the parts shown on your authorized Bose® dealer immediately. You can purchase additional cables from your LIFESTYLE® system. Wait for the display window of children. Updating the system software IMPORTANT Software update ...
...appears damaged, do not attempt to the address sheet included in case you begin the actual setup. Notify Bose or your LIFESTYLE® system and select the CD/DVD source. 2. For Bose contact information, refer to use it is done. Turn on this CD into the media center disc ...media center and allow it to repack and transport your system includes the parts shown on your authorized Bose® dealer immediately. You can purchase additional cables from your LIFESTYLE® system. Wait for the display window of children. Updating the system software IMPORTANT Software update ...
Lifestyle® VS-2 video enhancer - Owner's guide
Page 6
... power cable from the media center power supply into the VS-2 instead of the media center. • If you are setting up a LIFESTYLE® system with your LIFESTYLE® DVD home entertainment system. 6 This cord is used only with the media center power supply that came with the VS-2, the media center power...
... power cable from the media center power supply into the VS-2 instead of the media center. • If you are setting up a LIFESTYLE® system with your LIFESTYLE® DVD home entertainment system. 6 This cord is used only with the media center power supply that came with the VS-2, the media center power...
Lifestyle® VS-2 video enhancer - Owner's guide
Page 19
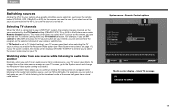
...game on your TV screen, go to the System menu and change this so the video source remains on . Just press the remote button (CD/DVD, VCR, CBL•SAT, or AUX) for the source you see and hear the TV channel coming from another Normally, when you select one ... remote, you enable the Persistent Video option (see and hear the program on the selected channel of the same ball game from a video source, your LIFESTYLE® system, the remote changes channels on page 17). navigate select Media center display - Watching video from one of a program while listening to the ...
...game on your TV screen, go to the System menu and change this so the video source remains on . Just press the remote button (CD/DVD, VCR, CBL•SAT, or AUX) for the source you see and hear the TV channel coming from another Normally, when you select one ... remote, you enable the Persistent Video option (see and hear the program on the selected channel of the same ball game from a video source, your LIFESTYLE® system, the remote changes channels on page 17). navigate select Media center display - Watching video from one of a program while listening to the ...
Lifestyle® VS-2 video enhancer - Owner's guide
Page 21
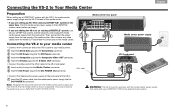
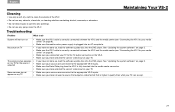
... format that is fully inserted into the media center connector. • Make sure you have not done so, load the software update disc into the DVD player. No picture on your TV. English Maintaining Your VS-2 Cleaning • Use only a soft, dry cloth to clean the outside of the VS-2. •... your TV to the TV output connector on the VS-2. • Make sure you have not done so, load the software update disc into the DVD player.
... format that is fully inserted into the media center connector. • Make sure you have not done so, load the software update disc into the DVD player. No picture on your TV. English Maintaining Your VS-2 Cleaning • Use only a soft, dry cloth to clean the outside of the VS-2. •... your TV to the TV output connector on the VS-2. • Make sure you have not done so, load the software update disc into the DVD player.


