Installation guide
Page 2
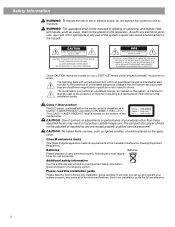
...: TO REDUCE THE RISK OF ELECTRIC SHOCK, DO NOT REMOVE COVER (OR BACK). The compact disc player should be placed on your LIFESTYLE® media center and Acoustimass® module enclosures: The lightning flash with arrowhead symbol, within the system enclosure that may result in ... This Class B digital apparatus meets all of the system. Liquids can cause a failure and/or a fire hazard. Class 1 laser product The DVD player contained within the media center is intended to alert the user to the presence of uninsulated dangerous voltage within an equilateral triangle, is classified...
...: TO REDUCE THE RISK OF ELECTRIC SHOCK, DO NOT REMOVE COVER (OR BACK). The compact disc player should be placed on your LIFESTYLE® media center and Acoustimass® module enclosures: The lightning flash with arrowhead symbol, within the system enclosure that may result in ... This Class B digital apparatus meets all of the system. Liquids can cause a failure and/or a fire hazard. Class 1 laser product The DVD player contained within the media center is intended to alert the user to the presence of uninsulated dangerous voltage within an equilateral triangle, is classified...
Installation guide
Page 5
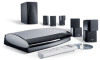
... have selected in this section help you become familiar with your system and how to make any part of a Bose® LIFESTYLE® DVD home entertainment system. The instructions in different countries. However, if you wish to extend your system's sound to other...contact your authorized Bose dealer immediately, or contact Bose directly. First you will help you connect your system in the carton. It will identify and connect the cables that are four different systems, the LIFESTYLE® 18 Series II, LIFESTYLE® 28 Series II, LIFESTYLE® 38, and the LIFESTYLE® 48 ...
... have selected in this section help you become familiar with your system and how to make any part of a Bose® LIFESTYLE® DVD home entertainment system. The instructions in different countries. However, if you wish to extend your system's sound to other...contact your authorized Bose dealer immediately, or contact Bose directly. First you will help you connect your system in the carton. It will identify and connect the cables that are four different systems, the LIFESTYLE® 18 Series II, LIFESTYLE® 28 Series II, LIFESTYLE® 38, and the LIFESTYLE® 48 ...
Installation guide
Page 6
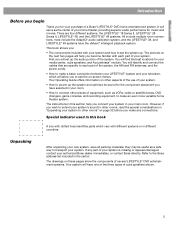
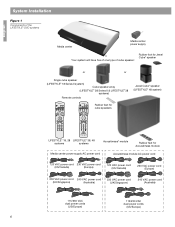
...: Rubber foot for Jewel Cube® speaker or or Single cube speaker (LIFESTYLE® 18 Series II system) Cube speaker array (LIFESTYLE® 28 Series II & LIFESTYLE® 38 systems) Remote controls Jewel Cube® speaker (LIFESTYLE® 48 system) On Off Mute All Mute CD·DVD FM·AM AUX TV Input On Off CBL·SAT VCR...
...: Rubber foot for Jewel Cube® speaker or or Single cube speaker (LIFESTYLE® 18 Series II system) Cube speaker array (LIFESTYLE® 28 Series II & LIFESTYLE® 38 systems) Remote controls Jewel Cube® speaker (LIFESTYLE® 48 system) On Off Mute All Mute CD·DVD FM·AM AUX TV Input On Off CBL·SAT VCR...
Installation guide
Page 11
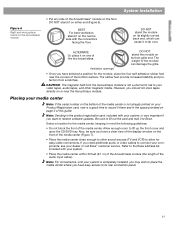
...8226; Do not block the front of the two broad sides. ALTERNATE Or, place it to lift up the front cover and open the CD/DVD tray. Ventilation openings DO NOT stand the module on the front of this guide. Note: Sending in the space provided on either end (Figure 6)....place the four self-adhesive rubber feet near the Acoustimass module. However, you have selected a position for easy cable connections. Allow enough room to Bose. The weight of the module can cause it there and in the product registration card, included with your video tapes, audio tapes, and other sound...
...8226; Do not block the front of the two broad sides. ALTERNATE Or, place it to lift up the front cover and open the CD/DVD tray. Ventilation openings DO NOT stand the module on the front of this guide. Note: Sending in the space provided on either end (Figure 6)....place the four self-adhesive rubber feet near the Acoustimass module. However, you have selected a position for easy cable connections. Allow enough room to Bose. The weight of the module can cause it there and in the product registration card, included with your video tapes, audio tapes, and other sound...
Installation guide
Page 12
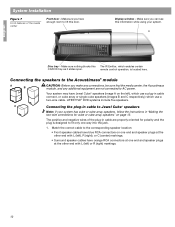
... The positive and negative wires of the media center Front door - Make sure you can see this The IR Emitter, which enables certain CD/DVD tray as it slides open. Connecting the speakers to the Acoustimass® module A B CAUTION: Before you have blue RCA connectors on the ... Connecting the plug-in cable are not connected to fit only one end and speaker plugs at one way into the jack. 1. LIFESTYLE® DVD systems include five speakers. Make sure nothing blocks this information while using your system has cube or cube array speakers, follow the instructions...
... The positive and negative wires of the media center Front door - Make sure you can see this The IR Emitter, which enables certain CD/DVD tray as it slides open. Connecting the speakers to the Acoustimass® module A B CAUTION: Before you have blue RCA connectors on the ... Connecting the plug-in cable are not connected to fit only one end and speaker plugs at one way into the jack. 1. LIFESTYLE® DVD systems include five speakers. Make sure nothing blocks this information while using your system has cube or cube array speakers, follow the instructions...
Installation guide
Page 17
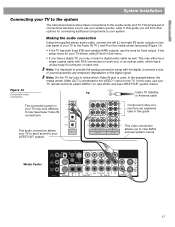
...caused by any temporary degradation of connections will find other options for fixed output. It may have a digital TV, you to view DVDs and see LIFESTYLE® system menus. Figure 13 Composite video connection TV Cable TV, Satellite, or Antenna cable The connection panel on each end, or... snap fit connector on your TV may look different. In this guide This audio connection allows your TV to send sound to your LIFESTYLE® system This video connection allows you have fewer Video IN connections Component video connections are explained later in this case, use the...
...caused by any temporary degradation of connections will find other options for fixed output. It may have a digital TV, you to view DVDs and see LIFESTYLE® system menus. Figure 13 Composite video connection TV Cable TV, Satellite, or Antenna cable The connection panel on each end, or... snap fit connector on your TV may look different. In this guide This audio connection allows your TV to send sound to your LIFESTYLE® system This video connection allows you have fewer Video IN connections Component video connections are explained later in this case, use the...
Installation guide
Page 18
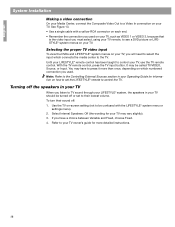
...the proper TV video input To view the DVDs and LIFESTYLE® system menus on your TV, you must select, using your TV remote, to see a DVD picture or LIFESTYLE® system menus on how to set to... their sound off the speakers in your TV When you listen to TV sound through your LIFESTYLE® system, the speakers... used on your Operating Guide for information on your TV should be turned off or set the LIFESTYLE® remote to press it more detailed instructions. 18 It may vary slightly). 3. Note: Refer...
...the proper TV video input To view the DVDs and LIFESTYLE® system menus on your TV, you must select, using your TV remote, to see a DVD picture or LIFESTYLE® system menus on how to set to... their sound off the speakers in your TV When you listen to TV sound through your LIFESTYLE® system, the speakers... used on your Operating Guide for information on your TV should be turned off or set the LIFESTYLE® remote to press it more detailed instructions. 18 It may vary slightly). 3. Note: Refer...

Installation guide
Page 22
...furniture, the speakers, or the Acoustimass® module. You may want to customize your system again if you move it rests above your LIFESTYLE® DVD system is complete and its performance is tailored to play Disc 2. 7. Keep the headset and discs together in their instructions, the installation ...in a safe location. 22 Put on the connection panel of the media center as shown below. On the remote control, press the CD/DVD button. 6. You will explain the procedure you have played both discs and followed their original carton and store them in "Finishing the basic ...
...furniture, the speakers, or the Acoustimass® module. You may want to customize your system again if you move it rests above your LIFESTYLE® DVD system is complete and its performance is tailored to play Disc 2. 7. Keep the headset and discs together in their instructions, the installation ...in a safe location. 22 Put on the connection panel of the media center as shown below. On the remote control, press the CD/DVD button. 6. You will explain the procedure you have played both discs and followed their original carton and store them in "Finishing the basic ...
Installation guide
Page 23
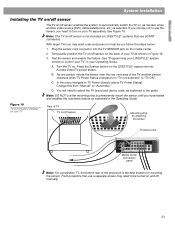
... larger TVs you may need to be turned on LIFESTYLE® systems that use SCART connectors. A. Turn the TV on , as explained in Figure 19. 3. As one person moves the sensor near the rear vent area of the TV, another video source (DVD, cable/satellite box, etc.) is selected. D. You ...off sensor enables the system to automatically switch the TV on . Temporarily position the TV on/off sensor on the media center. 2. See "Programming your LIFESTYLE® system remote to "TV ON". B. C. Change this automatic feature as shown in the guide. Plug the sensor cord connector into the TV ...
... larger TVs you may need to be turned on LIFESTYLE® systems that use SCART connectors. A. Turn the TV on , as explained in Figure 19. 3. As one person moves the sensor near the rear vent area of the TV, another video source (DVD, cable/satellite box, etc.) is selected. D. You ...off sensor enables the system to automatically switch the TV on . Temporarily position the TV on/off sensor on the media center. 2. See "Programming your LIFESTYLE® system remote to "TV ON". B. C. Change this automatic feature as shown in the guide. Plug the sensor cord connector into the TV ...
Installation guide
Page 25
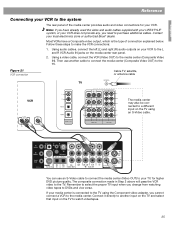
...to a different input on the TV to watch videotapes. 25 If your local electronics store or authorized Bose® dealer. Most VCRs have already used the video and audio cables supplied with your LIFESTYLE® system, or your VCR does not provide any, you have a Composite video output, which ...: If you need to purchase additional cables. Contact your media center is the type of the media center provides audio and video connections for higher DVD picture quality. Using audio cables, connect the left (L) and right (R) audio outputs on your VCR to the TV. Then use an S-Video...
...to a different input on the TV to watch videotapes. 25 If your local electronics store or authorized Bose® dealer. Most VCRs have already used the video and audio cables supplied with your LIFESTYLE® system, or your VCR does not provide any, you have a Composite video output, which ...: If you need to purchase additional cables. Contact your media center is the type of the media center provides audio and video connections for higher DVD picture quality. Using audio cables, connect the left (L) and right (R) audio outputs on your VCR to the TV. Then use an S-Video...

Installation guide
Page 26
... VCR directly to which you directly connected the VCR) and select the VCR sound source. This input will also provide better video quality when watching DVDs. Use another S-VIDEO cable to connect the S-VIDEO OUT jack on the media center to the VIDEO IN jack on your VCR. 2. Connect the... VCR to an S-VIDEO jack on the media center. Note: Additional cables may be purchased at an electronics store or authorized Bose® dealer. Connect a VCR to make the cable/satellite connections: 1. If your cable satellite box has an additional set of Audio and VIDEO OUT ...
... VCR directly to which you directly connected the VCR) and select the VCR sound source. This input will also provide better video quality when watching DVDs. Use another S-VIDEO cable to connect the S-VIDEO OUT jack on the media center to the VIDEO IN jack on your VCR. 2. Connect the... VCR to an S-VIDEO jack on the media center. Note: Additional cables may be purchased at an electronics store or authorized Bose® dealer. Connect a VCR to make the cable/satellite connections: 1. If your cable satellite box has an additional set of Audio and VIDEO OUT ...
Installation guide
Page 27
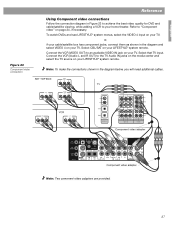
.... Note: To make the connections shown in Figure 23 to achieve the best video quality for DVD and cable/satellite viewing, while adding a VCR to an available VIDEO IN jack on your LIFESTYLE® system remote. Component video adapter Component video adapter Note: Two comonent video adapters are provided... system remote. Select that TV input. Connect the VCR (Audio L and R OUT) to "Component video" on your TV. To watch DVDs and see LIFESTYLE® system menus, select the VIDEO 4 input on your TV, or, if your cable/satellite box has component jacks, connect them as shown...
.... Note: To make the connections shown in Figure 23 to achieve the best video quality for DVD and cable/satellite viewing, while adding a VCR to an available VIDEO IN jack on your LIFESTYLE® system remote. Component video adapter Component video adapter Note: Two comonent video adapters are provided... system remote. Select that TV input. Connect the VCR (Audio L and R OUT) to "Component video" on your TV. To watch DVDs and see LIFESTYLE® system menus, select the VIDEO 4 input on your TV, or, if your cable/satellite box has component jacks, connect them as shown...
Lifestyle® VS-2 video enhancer - Owner's guide
Page 5
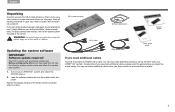
... Check to use it. Turn on your system includes the parts shown on this page. English Unpacking Carefully unpack the VS-2 video enhancer. For Bose contact information, refer to update your system. 1. WARNING: To avoid danger of suffocation, keep the plastic bags out of the reach of the ...product appears damaged, do not attempt to be sure your LIFESTYLE® system and select the CD/DVD source. 2. VS-2 video enhancer Software update disc Owner's guide VS-2 cable HDMI video cable Quick setup guide If you ...
... Check to use it. Turn on your system includes the parts shown on this page. English Unpacking Carefully unpack the VS-2 video enhancer. For Bose contact information, refer to update your system. 1. WARNING: To avoid danger of suffocation, keep the plastic bags out of the reach of the ...product appears damaged, do not attempt to be sure your LIFESTYLE® system and select the CD/DVD source. 2. VS-2 video enhancer Software update disc Owner's guide VS-2 cable HDMI video cable Quick setup guide If you ...
Lifestyle® VS-2 video enhancer - Owner's guide
Page 6
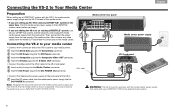
... the media center. Also, remove any video cables from the rear panel of the media center. • If you are setting up a LIFESTYLE® system with your LIFESTYLE® DVD home entertainment system. 6 This cord is used only with the media center power supply that came with the VS-2, the media center power...
... the media center. Also, remove any video cables from the rear panel of the media center. • If you are setting up a LIFESTYLE® system with your LIFESTYLE® DVD home entertainment system. 6 This cord is used only with the media center power supply that came with the VS-2, the media center power...
Lifestyle® VS-2 video enhancer - Owner's guide
Page 19
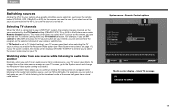
... TV Choose the device that when you select the TV source on page 17). navigate select Media center display - Just press the remote button (CD/DVD, VCR, CBL•SAT, or AUX) for the source you see "New System menu items" on the remote, you want to CBL•SAT ... the VS-2 is set TV control to use. This means that you to select the correct video input on your TV while listening to your LIFESTYLE® system, the remote changes channels on your system setup greatly simplifies source selection. Watching video from a video source, your cable or satellite box. ...
... TV Choose the device that when you select the TV source on page 17). navigate select Media center display - Just press the remote button (CD/DVD, VCR, CBL•SAT, or AUX) for the source you see "New System menu items" on the remote, you want to CBL•SAT ... the VS-2 is set TV control to use. This means that you to select the correct video input on your TV while listening to your LIFESTYLE® system, the remote changes channels on your system setup greatly simplifies source selection. Watching video from a video source, your cable or satellite box. ...
Lifestyle® VS-2 video enhancer - Owner's guide
Page 21
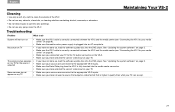
...; Make sure you have selected the correct video input on your TV. on • Make sure the VS-2 cable is fully inserted into the DVD player. See "Updating the system software" on my TV • Make sure your TV can accept. 21 Some sources do System will not turn...8226; Do not use any solvents, chemicals, or cleaning solutions containing alcohol, ammonia, or abrasives. • Do not allow liquids to spill into the DVD player. selected • Make sure the Serial Data plug from the VS-2 is correctly connected between the VS-2 and the media center (see "Connecting the...
...; Make sure you have selected the correct video input on your TV. on • Make sure the VS-2 cable is fully inserted into the DVD player. See "Updating the system software" on my TV • Make sure your TV can accept. 21 Some sources do System will not turn...8226; Do not use any solvents, chemicals, or cleaning solutions containing alcohol, ammonia, or abrasives. • Do not allow liquids to spill into the DVD player. selected • Make sure the Serial Data plug from the VS-2 is correctly connected between the VS-2 and the media center (see "Connecting the...


