
The Bose® Lifestyle® amplifier - Owner's guide
Page 6
...for instructions on page 3. Figure 1 Contents of the shipping carton 30-ft audio input cable PN197406 Lifestyle® stereo amplifier Owner's guide Power cord* USA/Canada (120V) * The Lifestyle® stereo amplifier includes a 120V AC (mains) power cord for use ...supplied with your Lifestyle® Stereo Amplifier Before you begin Thank you with Bose non-powered environmental speakers or Bose non-powered accessory speakers ONLY. See "Checking to see if you want to add Bose® non-powered environmental speakers or Bose non-powered accessory speakers to your product...
...for instructions on page 3. Figure 1 Contents of the shipping carton 30-ft audio input cable PN197406 Lifestyle® stereo amplifier Owner's guide Power cord* USA/Canada (120V) * The Lifestyle® stereo amplifier includes a 120V AC (mains) power cord for use ...supplied with your Lifestyle® Stereo Amplifier Before you begin Thank you with Bose non-powered environmental speakers or Bose non-powered accessory speakers ONLY. See "Checking to see if you want to add Bose® non-powered environmental speakers or Bose non-powered accessory speakers to your product...

The Bose® Lifestyle® amplifier - Owner's guide
Page 7
...;ow. Figure 4 Wall mounting • To mount the amplifier on all electrical equipment, it according to either your Lifestyle® system or the accessory speakers, consider the following guidelines. See Figure 5 on a horizontal surface like a floor or shelf (Figure 3), the ampli&#... Setting Up Your Lifestyle® Stereo Amplifier Selecting a location for your Lifestyle® stereo amplifier Select a location for your amplifier: • Locate the amplifier indoors and within the reach of the supplied 30-foot audio input cable. • Place...
...;ow. Figure 4 Wall mounting • To mount the amplifier on all electrical equipment, it according to either your Lifestyle® system or the accessory speakers, consider the following guidelines. See Figure 5 on a horizontal surface like a floor or shelf (Figure 3), the ampli&#... Setting Up Your Lifestyle® Stereo Amplifier Selecting a location for your Lifestyle® stereo amplifier Select a location for your amplifier: • Locate the amplifier indoors and within the reach of the supplied 30-foot audio input cable. • Place...

The Bose® Lifestyle® amplifier - Owner's guide
Page 11
...SPEAKER ZONES 2 output jack on the rear panel of the amplifier. 3. Insert the red RCA piggyback connector into the L (left) INPUT jack. Insert the single-connector end of the audio input cable into the SYSTEM CONTROL jack on the rear panel of the amplifier. Figure 8 Cable connections between the Lifestyle...® media center and the Lifestyle® stereo amplifier Lifestyle® SA-1 stereo amplifier rear panel Lifestyle® media center rear panel 30-ft audio input cable (supplied) AM262840_00_V....
...SPEAKER ZONES 2 output jack on the rear panel of the amplifier. 3. Insert the red RCA piggyback connector into the L (left) INPUT jack. Insert the single-connector end of the audio input cable into the SYSTEM CONTROL jack on the rear panel of the amplifier. Figure 8 Cable connections between the Lifestyle...® media center and the Lifestyle® stereo amplifier Lifestyle® SA-1 stereo amplifier rear panel Lifestyle® media center rear panel 30-ft audio input cable (supplied) AM262840_00_V....

The Bose® Lifestyle® amplifier - Owner's guide
Page 13
... (Figure 10). 2. Insert the single multi-pin connector at one end of the audio input cable into the SPEAKER ZONES 2 output jack on the rear panel of the amplifier. Setting Up Your Lifestyle® Stereo Amplifier Connecting the Lifestyle® stereo amplifier to a Model 20 music center ® Figure 10...
... (Figure 10). 2. Insert the single multi-pin connector at one end of the audio input cable into the SPEAKER ZONES 2 output jack on the rear panel of the amplifier. Setting Up Your Lifestyle® Stereo Amplifier Connecting the Lifestyle® stereo amplifier to a Model 20 music center ® Figure 10...

The Bose® Lifestyle® amplifier - Owner's guide
Page 15
... LOOP 1 SYSTEM CONTROL 2 ~ POWER 12VAC IN 1.0A ANTENNA SEE INSTRUCTION MANUAL Fixed speaker outputs 30-ft audio input cable (supplied) Acoustimass module cable AM262840_00_V.pdf January 4, 2002 13 At the other connections. Setting Up Your Lifestyle® Stereo Amplifier Connecting the Lifestyle® stereo amplifier to a Model 5 music center In systems using a Model...
... LOOP 1 SYSTEM CONTROL 2 ~ POWER 12VAC IN 1.0A ANTENNA SEE INSTRUCTION MANUAL Fixed speaker outputs 30-ft audio input cable (supplied) Acoustimass module cable AM262840_00_V.pdf January 4, 2002 13 At the other connections. Setting Up Your Lifestyle® Stereo Amplifier Connecting the Lifestyle® stereo amplifier to a Model 5 music center In systems using a Model...

The Bose® Lifestyle® amplifier - Owner's guide
Page 16
...first remote. 3. For recommended wire sizes and lengths, see "Wire recommendations" on operating your Lifestyle® system owner's guide for more than one room. Notice which speaker cable is connected to the R (right) output on the amplifier 14 January 4, 2002 AM262840_00_V....pdf Press the black terminal tab. One wire is connected to the L (left speaker cable to the SPEAKER OUTPUT L terminals in your Lifestyle® stereo amplifier CAUTION: DO NOT connect the amplifier to the L output. Make sure that...
...first remote. 3. For recommended wire sizes and lengths, see "Wire recommendations" on operating your Lifestyle® system owner's guide for more than one room. Notice which speaker cable is connected to the R (right) output on the amplifier 14 January 4, 2002 AM262840_00_V....pdf Press the black terminal tab. One wire is connected to the L (left speaker cable to the SPEAKER OUTPUT L terminals in your Lifestyle® stereo amplifier CAUTION: DO NOT connect the amplifier to the L output. Make sure that...

The Bose® Lifestyle® amplifier - Owner's guide
Page 18
... a Model 20 music center, make sure the audio input cable is inserted into SPEAKER ZONE 2. • If using a Model 5 music center for home theater (Lifestyle® 12 or Lifestyle® 8 systems), make sure the amplifier audio input cable is plugged into any sprays near the amplifier....player or the source connected to AUX is turned on page 14. 16 January 4, 2002 AM262840_00_V.pdf Protecting outdoor wiring Although some Bose® speakers are connected and the knobs tightened down. If the problem still exists, contact your system owner's guide. Do not use a silicone...
... a Model 20 music center, make sure the audio input cable is inserted into SPEAKER ZONE 2. • If using a Model 5 music center for home theater (Lifestyle® 12 or Lifestyle® 8 systems), make sure the amplifier audio input cable is plugged into any sprays near the amplifier....player or the source connected to AUX is turned on page 14. 16 January 4, 2002 AM262840_00_V.pdf Protecting outdoor wiring Although some Bose® speakers are connected and the knobs tightened down. If the problem still exists, contact your system owner's guide. Do not use a silicone...

The Bose® Lifestyle® amplifier - Owner's guide
Page 19
... to Bose. Right and left stereo channels are heard on the wrong speakers. • Check the speaker cable connections to be sure the cable connected to the SPEAKER OUTPUTS L at the amplifier are connected at the other cable from its speaker, and connect that end of the cable to the speaker that ...to the speaker on the left in the speaker. If the speaker plays, the problem is set too high and is in your Lifestyle® stereo amplifier" on the amplifier. to -. • See "Connecting speakers to your listening area. • Check the speaker cable connections to...
... to Bose. Right and left stereo channels are heard on the wrong speakers. • Check the speaker cable connections to be sure the cable connected to the SPEAKER OUTPUTS L at the amplifier are connected at the other cable from its speaker, and connect that end of the cable to the speaker that ...to the speaker on the left in the speaker. If the speaker plays, the problem is set too high and is in your Lifestyle® stereo amplifier" on the amplifier. to -. • See "Connecting speakers to your listening area. • Check the speaker cable connections to...

Owner's guide
Page 7
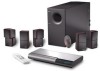
...speaker ® arrays ® Audio input cable Music center power pack AC power cord Surround speaker cables (orange connectors) AA batteries Remote control ® CD magazine ® Front speaker cables (blue connectors) FM antenna Rubber feet Stereo cable Test CD AM antenna THE BOSE SPECIAL EDITION LIFESTYLE MUSIC SYSTEM CD ® Lifestyle... Use care when you remove the protective plastic film from the bottom of the Lifestyle® music center before setting up your Lifestyle® 25 system contains the parts identified in Figure 1. Figure 1 What comes with your ...
...speaker ® arrays ® Audio input cable Music center power pack AC power cord Surround speaker cables (orange connectors) AA batteries Remote control ® CD magazine ® Front speaker cables (blue connectors) FM antenna Rubber feet Stereo cable Test CD AM antenna THE BOSE SPECIAL EDITION LIFESTYLE MUSIC SYSTEM CD ® Lifestyle... Use care when you remove the protective plastic film from the bottom of the Lifestyle® music center before setting up your Lifestyle® 25 system contains the parts identified in Figure 1. Figure 1 What comes with your ...

Owner's guide
Page 8
... 1. Contact Bose Customer Service (see "Fine-tuning your system" on the inside back cover). Place them close to the size of speaker placement and room acoustics, see listings on page 22. The center cable allows the center speaker to be ...cables allow the cube speakers to be placed up to 3 feet (1 m) from the left and right front speakers should appear to your speakers. Setting Up Select the locations for your speakers. You may obtain rubber feet (part no. 178321), free of the picture (Figure 2). CAUTION: Choose a stable and level surface for your Lifestyle® 25...
... 1. Contact Bose Customer Service (see "Fine-tuning your system" on the inside back cover). Place them close to the size of speaker placement and room acoustics, see listings on page 22. The center cable allows the center speaker to be ...cables allow the cube speakers to be placed up to 3 feet (1 m) from the left and right front speakers should appear to your speakers. Setting Up Select the locations for your speakers. You may obtain rubber feet (part no. 178321), free of the picture (Figure 2). CAUTION: Choose a stable and level surface for your Lifestyle® 25...

Owner's guide
Page 9
...Bose® customer service. 3. Do not place the module on the end provide ventilation for the module, place the four self-adhesive rubber feet near the corners of your ear, the better. For proper ventilation, place it within 30 feet (9.1 m) of the Acoustimass module (the length of the audio input cable, speaker cables..., and an electric outlet. 5. Acoustimass module Follow these guidelines to avoid blocking the port or creating too much bass. 6. Place the module along the wall to select a location for cable length. Place the music...
...Bose® customer service. 3. Do not place the module on the end provide ventilation for the module, place the four self-adhesive rubber feet near the corners of your ear, the better. For proper ventilation, place it within 30 feet (9.1 m) of the Acoustimass module (the length of the audio input cable, speaker cables..., and an electric outlet. 5. Acoustimass module Follow these guidelines to avoid blocking the port or creating too much bass. 6. Place the module along the wall to select a location for cable length. Place the music...

Owner's guide
Page 10
...appropriate wire into the matching left front, center, and right front jacks. a. Align the connector at one speaker cable to the cube speaker array Connect the speakers and music center Once you begin connecting the system. For information on pages 23-24. 8 December 20...The wire marked with the audio input cable (Figure 6). 1. Connect the wire end of your dealer, electronics store, or call Bose® customer service. To lengthen the cable, use RCA extension cables or splice in Figure 6. a. Extend the audio input cable as much as needed. 1. Setting Up...
...appropriate wire into the matching left front, center, and right front jacks. a. Align the connector at one speaker cable to the cube speaker array Connect the speakers and music center Once you begin connecting the system. For information on pages 23-24. 8 December 20...The wire marked with the audio input cable (Figure 6). 1. Connect the wire end of your dealer, electronics store, or call Bose® customer service. To lengthen the cable, use RCA extension cables or splice in Figure 6. a. Extend the audio input cable as much as needed. 1. Setting Up...

Owner's guide
Page 11
... into AUDIO INPUT AUDIO INPUT SURROUND RIGHT FRONT RIGHT LEFT CENTER LEFT OUTPUTS TO CUBE SPEAKERS Setting Up Left front speaker Left surround speaker Multi-pin connector into SPEAKER ZONE 1 Power jack Audio input cable L TAPE IN RL R TAPE OUT AC power pack Figure 7 Dual voltage Acoustimass module... a power outlet until you complete all connections. Connecting the music center power pack The Lifestyle® music center comes with either a 100V, 120V, 230V, or 240V power pack. Use only the Bose® power pack model specified for your area: • Model PS71, 120V in ...
... into AUDIO INPUT AUDIO INPUT SURROUND RIGHT FRONT RIGHT LEFT CENTER LEFT OUTPUTS TO CUBE SPEAKERS Setting Up Left front speaker Left surround speaker Multi-pin connector into SPEAKER ZONE 1 Power jack Audio input cable L TAPE IN RL R TAPE OUT AC power pack Figure 7 Dual voltage Acoustimass module... a power outlet until you complete all connections. Connecting the music center power pack The Lifestyle® music center comes with either a 100V, 120V, 230V, or 240V power pack. Use only the Bose® power pack model specified for your area: • Model PS71, 120V in ...

Owner's guide
Page 12
...must be recorded in stereo format. If needed, cables are many electronics stores, or call Bose®customer service. It is to connect components directly to the Lifestyle® music center, and select the source from the Lifestyle® remote or control panel. (1) To direct.... The next easiest option is an internal/external speakers switch, select external speakers. Look for the video, not as the switching center to the appropriate TV inputs. Note: Your Lifestyle® 25 system includes one 6-foot (1.8 m) stereo cable to the stereo position. Match red connectors to right...
...must be recorded in stereo format. If needed, cables are many electronics stores, or call Bose®customer service. It is to connect components directly to the Lifestyle® music center, and select the source from the Lifestyle® remote or control panel. (1) To direct.... The next easiest option is an internal/external speakers switch, select external speakers. Look for the video, not as the switching center to the appropriate TV inputs. Note: Your Lifestyle® 25 system includes one 6-foot (1.8 m) stereo cable to the stereo position. Match red connectors to right...

Owner's guide
Page 13
...video signal must be connected to the Lifestyle® music center. If the audio signal passes through two coaxial cable connections (like the connection from a cable TV box), in Figure 11. Note: Selecting VIDEO 1 or 2 on the music center. Do not connect any speakers to the TV.) • Connect...outputs, connect your stereo VCR to the music center. Figure 12 Connecting components to the music center inputs Cable TV Laserdisc (3) To connect components directly to the Lifestyle® music center If you choose which sound source to hear. The video signal should not be ...
...video signal must be connected to the Lifestyle® music center. If the audio signal passes through two coaxial cable connections (like the connection from a cable TV box), in Figure 11. Note: Selecting VIDEO 1 or 2 on the music center. Do not connect any speakers to the TV.) • Connect...outputs, connect your stereo VCR to the music center. Figure 12 Connecting components to the music center inputs Cable TV Laserdisc (3) To connect components directly to the Lifestyle® music center If you choose which sound source to hear. The video signal should not be ...

Owner's guide
Page 14
... connect a turntable, you need a phono preamplifier (with RIAA equalization). Consult your Lifestyle® system, matching the red connector to R (right), white (or black) connector to L (left and right speakers then play the same monaural sound. See Figure 13. Figure 13 Connecting other components...(available at electronics stores) to the music center TAPE IN jacks. Note: The Lifestyle® 25 system cannot turn a connected component on or off. Setting Up Other connections Use standard RCA audio cables to connect other components L TAPE IN RL R TAPE OUT Other component VCR, TV...
... connect a turntable, you need a phono preamplifier (with RIAA equalization). Consult your Lifestyle® system, matching the red connector to R (right), white (or black) connector to L (left and right speakers then play the same monaural sound. See Figure 13. Figure 13 Connecting other components...(available at electronics stores) to the music center TAPE IN jacks. Note: The Lifestyle® 25 system cannot turn a connected component on or off. Setting Up Other connections Use standard RCA audio cables to connect other components L TAPE IN RL R TAPE OUT Other component VCR, TV...

Owner's guide
Page 17
...Setting house codes indicator CD elapsed time Stop and AM/FM station indicator frequency display Source indicators AM187718_01_V.pdf Mute indicator Random play all cable and power connections before turning on the system. Then plug in the selected zone. pressing CD, AM/FM, TAPE, or AUX selects...down) keys to raise or lower the volume. • Use the MUTE key on the remote control to silence speakers in the zone controlled by that remote. Operating Your Lifestyle® 25 System CAUTION: Be sure the three shipping screws on the bottom of the door (Figure 18). • To play...
...Setting house codes indicator CD elapsed time Stop and AM/FM station indicator frequency display Source indicators AM187718_01_V.pdf Mute indicator Random play all cable and power connections before turning on the system. Then plug in the selected zone. pressing CD, AM/FM, TAPE, or AUX selects...down) keys to raise or lower the volume. • Use the MUTE key on the remote control to silence speakers in the zone controlled by that remote. Operating Your Lifestyle® 25 System CAUTION: Be sure the three shipping screws on the bottom of the door (Figure 18). • To play...

Owner's guide
Page 25
...area, whether a room or a group of two listening zones: the Lifestyle® 25 speakers in zone 1 and Acoustimass® powered speaker system in zone 2 Using two listening zones The Lifestyle® 25 system can direct sound from one radio station can also use special ...ZONE 1, slide it is referred to as zones. • Use an appropriate Lifestyle® system cable to connect a second Bose® powered speaker system to the SPEAKER ZONE 2 jack on obtaining additional powered speakers, remote controls, cables, and adapters for ZONE 2, using a paper clip, ballpoint pen, or similar ...
...area, whether a room or a group of two listening zones: the Lifestyle® 25 speakers in zone 1 and Acoustimass® powered speaker system in zone 2 Using two listening zones The Lifestyle® 25 system can direct sound from one radio station can also use special ...ZONE 1, slide it is referred to as zones. • Use an appropriate Lifestyle® system cable to connect a second Bose® powered speaker system to the SPEAKER ZONE 2 jack on obtaining additional powered speakers, remote controls, cables, and adapters for ZONE 2, using a paper clip, ballpoint pen, or similar ...

Owner's guide
Page 29
... 25 to match the house code settings. • Change the house code setting to Bose. Display shows a flashing box for listings). • Adjust antenna position to reduce interference. • Make sure speaker cables are not damaged and the connections are connected properly. • Adjust antenna position to the component owner's manual. Try another nearby Lifestyle...
... 25 to match the house code settings. • Change the house code setting to Bose. Display shows a flashing box for listings). • Adjust antenna position to reduce interference. • Make sure speaker cables are not damaged and the connections are connected properly. • Adjust antenna position to the component owner's manual. Try another nearby Lifestyle...

Owner's guide
Page 32
..., 26, 27 cable TV 10 CD 4, 5, 10, 12, 15-21, 23, 26-29 CD changer 4, 16, 18, 19 CD magazine 5, 18 center speaker 6, 26 cleaning 28 compact disc 15, 18 connections 8, 9, 11-13, 26, 27 controls 2, 7, 10, 16, 17, 22, 25, 29 cube speaker array 8, 29 cube speakers 6, 29 customer service... SKIP 16, 19, 20 SOURCE SELECT 16, 19-21 speaker cable 5-8, 27 speaker placement 6, 7, 22 station presets 17 STOP 16, 19, 20 STORE 17, 20, 25 SURROUND 4, 11, 15, 17, 26 surround 4-8, 10, 17, 26 surround (rear) speakers 7 surround cables 8 surround speakers 4, 7, 8, 26 switches 14, 23, 25 T TAPE 11, 12, 15-17, 21, 23,...
..., 26, 27 cable TV 10 CD 4, 5, 10, 12, 15-21, 23, 26-29 CD changer 4, 16, 18, 19 CD magazine 5, 18 center speaker 6, 26 cleaning 28 compact disc 15, 18 connections 8, 9, 11-13, 26, 27 controls 2, 7, 10, 16, 17, 22, 25, 29 cube speaker array 8, 29 cube speakers 6, 29 customer service... SKIP 16, 19, 20 SOURCE SELECT 16, 19-21 speaker cable 5-8, 27 speaker placement 6, 7, 22 station presets 17 STOP 16, 19, 20 STORE 17, 20, 25 SURROUND 4, 11, 15, 17, 26 surround 4-8, 10, 17, 26 surround (rear) speakers 7 surround cables 8 surround speakers 4, 7, 8, 26 switches 14, 23, 25 T TAPE 11, 12, 15-17, 21, 23,...


