The Bose® Lifestyle® amplifier - Owner's guide
Page 3
...servicing to avoid injury from the apparatus. 11. Do not use caution when moving the cart/apparatus combination to qualified service personnel. Install in a wet basement, near a swimming pool, or anywhere else that may block the ventilation openings. Refer all warnings - Servicing is used,...circuits, nor where an antenna can fall into a proper power source, as described in a position and location that produce heat. 9. Please call Bose to protect it in a built-in system, such as they exit from tip-over. 13. Avoid Power Lines - AM262840_00_V.pdf January 10, ...
...servicing to avoid injury from the apparatus. 11. Do not use caution when moving the cart/apparatus combination to qualified service personnel. Install in a wet basement, near a swimming pool, or anywhere else that may block the ventilation openings. Refer all warnings - Servicing is used,...circuits, nor where an antenna can fall into a proper power source, as described in a position and location that produce heat. 9. Please call Bose to protect it in a built-in system, such as they exit from tip-over. 13. Avoid Power Lines - AM262840_00_V.pdf January 10, ...

The Bose® Lifestyle® amplifier - Owner's guide
Page 4
... does cause harmful interference to Part 15 of USA) that interference will provide some protection against harmful interference in a residential installation. Ground clamp Electric service equipment Antenna discharge unit (NEC Section 810-20) Grounding conductors (NEC Section 810-21) Ground clamps...the equipment and receiver. • Connect the equipment to an outlet on , you are designed to CATV system installer This reminder is practical. ©2001 Bose Corporation, The Mountain, Framingham, MA 01701-9168 USA 255805 AM Rev.00 JN10494 2b January 10, 2002 AM262840_00_V....
... does cause harmful interference to Part 15 of USA) that interference will provide some protection against harmful interference in a residential installation. Ground clamp Electric service equipment Antenna discharge unit (NEC Section 810-20) Grounding conductors (NEC Section 810-21) Ground clamps...the equipment and receiver. • Connect the equipment to an outlet on , you are designed to CATV system installer This reminder is practical. ©2001 Bose Corporation, The Mountain, Framingham, MA 01701-9168 USA 255805 AM Rev.00 JN10494 2b January 10, 2002 AM262840_00_V....

The Bose® Lifestyle® amplifier - Owner's guide
Page 7
...DO NOT use the existing guide holes in . (5.0 cm) • When mounting the amplifier on page 6 for your Lifestyle® stereo amplifier and mount it according to limit its temperature. • DO NOT place the amplifier on ...64257;er in a well-ventilated area. • DO NOT PLACE THE AMPLIFIER IN A COMPLETELY ENCLOSED AREA - AM262840_00_V.pdf January 4, 2002 5 If adequate ventilation is installed on a shelf, or in a bookcase, or inside an entertainment center, maintain 2.0 inches (5.0 cm) minimum clearance (Figure 2) on any material or surface. 2.0 in...
...DO NOT use the existing guide holes in . (5.0 cm) • When mounting the amplifier on page 6 for your Lifestyle® stereo amplifier and mount it according to limit its temperature. • DO NOT place the amplifier on ...64257;er in a well-ventilated area. • DO NOT PLACE THE AMPLIFIER IN A COMPLETELY ENCLOSED AREA - AM262840_00_V.pdf January 4, 2002 5 If adequate ventilation is installed on a shelf, or in a bookcase, or inside an entertainment center, maintain 2.0 inches (5.0 cm) minimum clearance (Figure 2) on any material or surface. 2.0 in...

The Bose® Lifestyle® amplifier - Owner's guide
Page 18
...stores. If you have a problem operating your Bose dealer to your system owner's guide. Problem What to remove dust from the outside of the enclosure. To clean the amplifier, use caulking, apply it only after installing the Lifestyle® stereo amplifier, follow the ...guidelines below. Maintaining Your Lifestyle® Stereo Amplifier Cleaning the amplifier The amplifier, which is designed only...
...stores. If you have a problem operating your Bose dealer to your system owner's guide. Problem What to remove dust from the outside of the enclosure. To clean the amplifier, use caulking, apply it only after installing the Lifestyle® stereo amplifier, follow the ...guidelines below. Maintaining Your Lifestyle® Stereo Amplifier Cleaning the amplifier The amplifier, which is designed only...

Owner's guide
Page 3
... antenna. • Increase the separation between the equipment and receiver. • Connect the equipment to service this product. 14. Install in the owner's guide. 4. Do not defeat the safety purpose of the receiver or radio remote control could result in accordance ... use caution when moving the cart/apparatus combination to which can radiate radio frequency energy and, if not installed and used , use attachments/accessories specified by Bose® Corporation. Unplug this product. 2. Follow all components before cleaning. 7. If the provided plug does...
... antenna. • Increase the separation between the equipment and receiver. • Connect the equipment to service this product. 14. Install in the owner's guide. 4. Do not defeat the safety purpose of the receiver or radio remote control could result in accordance ... use caution when moving the cart/apparatus combination to which can radiate radio frequency energy and, if not installed and used , use attachments/accessories specified by Bose® Corporation. Unplug this product. 2. Follow all components before cleaning. 7. If the provided plug does...

Owner's guide
Page 4
...conductors, location of USA) that the cable ground shall be connected to the grounding system of the building, as is practical. ©2001 Bose Corporation, The Mountain, Framingham, MA 01701-9168 USA 255805 AM Rev.00 JN10494 2b October 29, 2001 AM196575_05_V.pdf Section 810 of the ...NEC Section 810-21) Ground clamps Power service grounding electrode system (NEC ART 250, Part H) Note to CATV system installer This reminder is provided to call the CATV system installer's attention to Article 820-40 of the NEC (of antenna-discharge unit, connection to this page. Use extreme care ...
...conductors, location of USA) that the cable ground shall be connected to the grounding system of the building, as is practical. ©2001 Bose Corporation, The Mountain, Framingham, MA 01701-9168 USA 255805 AM Rev.00 JN10494 2b October 29, 2001 AM196575_05_V.pdf Section 810 of the ...NEC Section 810-21) Ground clamps Power service grounding electrode system (NEC ART 250, Part H) Note to CATV system installer This reminder is provided to call the CATV system installer's attention to Article 820-40 of the NEC (of antenna-discharge unit, connection to this page. Use extreme care ...
Owner's guide
Page 5
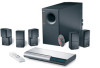
... Selecting the locations for your Lifestyle® 25 Series II system 6 Connecting the speakers and Lifestyle® music center 9 Connecting your Lifestyle® 25 system 22 Operating the special ... Lifestyle® 25 system 33 Troubleshooting ...34 Warranty period ...35 Customer service ...35 Product Information Technical information 36 Accessories ...36 Index ...37 Bose&#...Lifestyle® 25 remote control 19 The system controls ...20 Additional system controls 21 Listening to your home theater components to the Lifestyle® 25 system 12 Connecting the antennas 16 Installing...
... Selecting the locations for your Lifestyle® 25 Series II system 6 Connecting the speakers and Lifestyle® music center 9 Connecting your Lifestyle® 25 system 22 Operating the special ... Lifestyle® 25 system 33 Troubleshooting ...34 Warranty period ...35 Customer service ...35 Product Information Technical information 36 Accessories ...36 Index ...37 Bose&#...Lifestyle® 25 remote control 19 The system controls ...20 Additional system controls 21 Listening to your home theater components to the Lifestyle® 25 system 12 Connecting the antennas 16 Installing...

Owner's guide
Page 18
..., 2001 AM196575_05_V.pdf Plug the AM antenna connector into the FM ANTENNA jack on the back of the Lifestyle® music center. 2. To install an outdoor antenna, consult a qualified installer. Figure 12 The antenna connections L TAPE IN RL R TAPE OUT AM antenna jack FM antenna jack ... antenna connector into the AM ANTENNA jack on the back of the Lifestyle® music center. 2. Experiment with the antenna. 3. Stand the loop antenna on the back of the system. CAUTION: Be certain that the installation includes a signal splitter so that filters the signal to the FM...
..., 2001 AM196575_05_V.pdf Plug the AM antenna connector into the FM ANTENNA jack on the back of the Lifestyle® music center. 2. To install an outdoor antenna, consult a qualified installer. Figure 12 The antenna connections L TAPE IN RL R TAPE OUT AM antenna jack FM antenna jack ... antenna connector into the AM ANTENNA jack on the back of the Lifestyle® music center. 2. Experiment with the antenna. 3. Stand the loop antenna on the back of the system. CAUTION: Be certain that the installation includes a signal splitter so that filters the signal to the FM...

Owner's guide
Page 19
... American and European channel spacing: 1. Press and hold the ERASE key (on the batteries with other Lifestyle® music systems. Figure 15 Installing the remote control batteries 3 AA batteries Battery compartment cover Miniature switches Setting radio channel spacing for dual...and - Alkaline batteries are recommended. Select the channel spacing most appropriate for three seconds. markings inside the compartment. 3. Setting Up Installing the batteries in the remote control 1. Slide the battery compartment cover back into place. To change the settings of the remote (...
... American and European channel spacing: 1. Press and hold the ERASE key (on the batteries with other Lifestyle® music systems. Figure 15 Installing the remote control batteries 3 AA batteries Battery compartment cover Miniature switches Setting radio channel spacing for dual...and - Alkaline batteries are recommended. Select the channel spacing most appropriate for three seconds. markings inside the compartment. 3. Setting Up Installing the batteries in the remote control 1. Slide the battery compartment cover back into place. To change the settings of the remote (...

Owner's guide
Page 28
... the CD changer functions (see sample display in Figure 24): • Which CD is playing, paused, or stopped, or NONE if no disc is installed • How much time the current CD has played • Which track is playing • If RANDOM ALL DISCS or RANDOM (one disc RANDOM,...the previous track. If you want to Press Play or resume play of a CD PLAY, or / II PLAY/PAUSE Pause a CD PAUSE, or / II PLAY/PAUSE Stop a CD s STOP, or select another disc. Operating Your Lifestyle® 25 System Figure 24 Display of CD playing in zone 1: Disc 3, track 8, 2 minutes and 45 seconds...
... the CD changer functions (see sample display in Figure 24): • Which CD is playing, paused, or stopped, or NONE if no disc is installed • How much time the current CD has played • Which track is playing • If RANDOM ALL DISCS or RANDOM (one disc RANDOM,...the previous track. If you want to Press Play or resume play of a CD PLAY, or / II PLAY/PAUSE Pause a CD PAUSE, or / II PLAY/PAUSE Stop a CD s STOP, or select another disc. Operating Your Lifestyle® 25 System Figure 24 Display of CD playing in zone 1: Disc 3, track 8, 2 minutes and 45 seconds...

Owner's guide
Page 35
... disc to lock down , wait 10 seconds and then repeat steps 3 and 4. Do not write on replacing the remote control batteries see "Install the batteries in their edges to maintain the finish. To minimize exposure to dust and dirt, replace discs in the remote control" on a ... next time you may vacuum them carefully, if necessary. Figure 32 Handling a CD Figure 33 Cleaning a CD Maintaining Your Lifestyle® 25 System Taking care of your Lifestyle® 25 system The only maintenance needed is off (all zones). 3. For information on or attach labels to spill into locked down position...
... disc to lock down , wait 10 seconds and then repeat steps 3 and 4. Do not write on replacing the remote control batteries see "Install the batteries in their edges to maintain the finish. To minimize exposure to dust and dirt, replace discs in the remote control" on a ... next time you may vacuum them carefully, if necessary. Figure 32 Handling a CD Figure 33 Cleaning a CD Maintaining Your Lifestyle® 25 System Taking care of your Lifestyle® 25 system The only maintenance needed is off (all zones). 3. For information on or attach labels to spill into locked down position...


