
The Bose® Lifestyle® amplifier - Owner's guide
Page 4
...not occur in wire to an antenna discharge unit, size of grounding conductors, location of cable entry as is practical. ©2001 Bose Corporation, The Mountain, Framingham, MA 01701-9168 USA 255805 AM Rev.00 JN10494 2b January 10, 2002 AM262840_00_V.pdf However, this product... This product complies with the instructions, may cause harmful interference to operate this page. Antenna grounding Example of the receiver or radio remote control could void the user's authority to radio communications. This equipment generates, uses, and can be connected to the grounding system of the...
...not occur in wire to an antenna discharge unit, size of grounding conductors, location of cable entry as is practical. ©2001 Bose Corporation, The Mountain, Framingham, MA 01701-9168 USA 255805 AM Rev.00 JN10494 2b January 10, 2002 AM262840_00_V.pdf However, this product... This product complies with the instructions, may cause harmful interference to operate this page. Antenna grounding Example of the receiver or radio remote control could void the user's authority to radio communications. This equipment generates, uses, and can be connected to the grounding system of the...

The Bose® Lifestyle® amplifier - Owner's guide
Page 5
... Lifestyle® amplifier 15 Powering-up the remote control 10 Setting Zone 2 Protocol 10 Connecting the Lifestyle® stereo amplifier to a Model 20 music center 11 Connecting the Lifestyle® stereo amplifier to a Model 5 music center 13 Connecting speakers to your Lifestyle®... the Lifestyle® stereo amplifier to a Lifestyle® media center 9 Setting up your system 15 Maintaining Your Lifestyle® Stereo Amplifier Cleaning the amplifier 16 Protecting outdoor wiring 16 Troubleshooting 16 Customer service 17 Warranty period 17 Technical information 18 For ...
... Lifestyle® amplifier 15 Powering-up the remote control 10 Setting Zone 2 Protocol 10 Connecting the Lifestyle® stereo amplifier to a Model 20 music center 11 Connecting the Lifestyle® stereo amplifier to a Model 5 music center 13 Connecting speakers to your Lifestyle®... the Lifestyle® stereo amplifier to a Lifestyle® media center 9 Setting up your system 15 Maintaining Your Lifestyle® Stereo Amplifier Cleaning the amplifier 16 Protecting outdoor wiring 16 Troubleshooting 16 Customer service 17 Warranty period 17 Technical information 18 For ...

The Bose® Lifestyle® amplifier - Owner's guide
Page 12
...; system owner's guide for more information on operating your system in your remote control. this ensures that the house code settings (switches 1, 2, 3, and 4) match those in more ...". Setting Up Your Lifestyle® Stereo Amplifier Figure 9 Setting up a Zone 2 remote control Setting up the remote control You need to set up , and switches 6 and 9 are down -arrow button...
...; system owner's guide for more information on operating your system in your remote control. this ensures that the house code settings (switches 1, 2, 3, and 4) match those in more ...". Setting Up Your Lifestyle® Stereo Amplifier Figure 9 Setting up a Zone 2 remote control Setting up the remote control You need to set up , and switches 6 and 9 are down -arrow button...

The Bose® Lifestyle® amplifier - Owner's guide
Page 14
... ). Note: Refer to operate the ZONE 2 outputs. 1. Setting Up Your Lifestyle® Stereo Amplifier Figure 11 Setting up a Zone 2 remote control Setting up a second RC-20 remote control to your Lifestyle® system owner's guide for Zone 2 If your system in your first remote. 3. Remove the remote control battery cover and locate the miniature switches (Figure 11). 2. Make...
... ). Note: Refer to operate the ZONE 2 outputs. 1. Setting Up Your Lifestyle® Stereo Amplifier Figure 11 Setting up a Zone 2 remote control Setting up a second RC-20 remote control to your Lifestyle® system owner's guide for Zone 2 If your system in your first remote. 3. Remove the remote control battery cover and locate the miniature switches (Figure 11). 2. Make...

The Bose® Lifestyle® amplifier - Owner's guide
Page 16
Remove the remote control battery cover and locate the miniature switches (Figure 13). 2. Be sure that the speaker positioned on page 18. • Connect the right speaker cable to the L output. Slide switch 5 down (off) and 6 up (on the amplifier 14 ...left speaker cable to the equipment. One wire is connected to your Lifestyle® system owner's guide for more than one room. Setting Up Your Lifestyle® Stereo Amplifier ® Figure 13 RC-5 remote switch settings Setting up the RC-5 remote control If your system uses a Model 5 music center, you face it ...
Remove the remote control battery cover and locate the miniature switches (Figure 13). 2. Be sure that the speaker positioned on page 18. • Connect the right speaker cable to the L output. Slide switch 5 down (off) and 6 up (on the amplifier 14 ...left speaker cable to the equipment. One wire is connected to your Lifestyle® system owner's guide for more than one room. Setting Up Your Lifestyle® Stereo Amplifier ® Figure 13 RC-5 remote switch settings Setting up the RC-5 remote control If your system uses a Model 5 music center, you face it ...

The Bose® Lifestyle® amplifier - Owner's guide
Page 17
...connector on one end of the power cord into an AC (mains) outlet until all other connections are complete. 1. If you have a dual voltage Lifestyle® amplifier • Dual voltage units have a voltage selection switch on the rear panel of the amplifier. Figure 16 Power... this switch to the ON position. 4. Using the power cord included with your Personal® music center or your new remote control and adjust the vol- 115 V Setting Up Your Lifestyle® Stereo Amplifier Checking to see if your unit has this switch. • This switch is a power switch on the...
...connector on one end of the power cord into an AC (mains) outlet until all other connections are complete. 1. If you have a dual voltage Lifestyle® amplifier • Dual voltage units have a voltage selection switch on the rear panel of the amplifier. Figure 16 Power... this switch to the ON position. 4. Using the power cord included with your Personal® music center or your new remote control and adjust the vol- 115 V Setting Up Your Lifestyle® Stereo Amplifier Checking to see if your unit has this switch. • This switch is a power switch on the...

The Bose® Lifestyle® amplifier - Owner's guide
Page 18
... audio input cable is plugged into any headphones. • Make sure the remote control switch settings are in the product packaging for correct phone numbers. If the problem still exists, contact your Lifestyle® system after the wires are connected and the knobs tightened down. You...64257;er, which is designed only for indoor use, may use a silicone caulking material, such as needed. Protecting outdoor wiring Although some Bose® speakers are firmly connected at hardware stores. Do not use any solvents, chemicals, or cleaning solutions containing alcohol, ammonia, or...
... audio input cable is plugged into any headphones. • Make sure the remote control switch settings are in the product packaging for correct phone numbers. If the problem still exists, contact your Lifestyle® system after the wires are connected and the knobs tightened down. You...64257;er, which is designed only for indoor use, may use a silicone caulking material, such as needed. Protecting outdoor wiring Although some Bose® speakers are firmly connected at hardware stores. Do not use any solvents, chemicals, or cleaning solutions containing alcohol, ammonia, or...

The Bose® Lifestyle® amplifier - Owner's guide
Page 19
...end to the speaker on the wrong speakers. • Check the speaker cable connections to be sure the cable connected to Bose. Maintaining Your Lifestyle® Stereo Amplifier Problem What to do One speaker still does not play • Disconnect the wires from that speaker. Disconnect... owners guide. tion, consult your Lifestyle® stereo amplifier" on page 14. Please fill out the information section of the amplifier. Zone 2 does not • If you are using an RC-20 or RC-5 remote control, make sure the remote control switch settings are connected + to...
...end to the speaker on the wrong speakers. • Check the speaker cable connections to be sure the cable connected to Bose. Maintaining Your Lifestyle® Stereo Amplifier Problem What to do One speaker still does not play • Disconnect the wires from that speaker. Disconnect... owners guide. tion, consult your Lifestyle® stereo amplifier" on page 14. Please fill out the information section of the amplifier. Zone 2 does not • If you are using an RC-20 or RC-5 remote control, make sure the remote control switch settings are connected + to...

Owner's guide
Page 3
... Types of discs you can play 5 Check for region number compatibility 5 Glossary 5 Controls and Indicators 7 The remote control 7 Media center controls and indicators 10 Media center display window 11 General System Operation 12 Turning your system ... preset 17 Erasing a station preset 18 Selecting a preset station 18 Playing External Sources 19 Controlling external sources 19 Programming your LIFESTYLE® remote to control your TV 19 Programming your LIFESTYLE remote to control your VCR 19 Programming your LIFESTYLE remote to control your cable/satellite box 20 Turning the...
... Types of discs you can play 5 Check for region number compatibility 5 Glossary 5 Controls and Indicators 7 The remote control 7 Media center controls and indicators 10 Media center display window 11 General System Operation 12 Turning your system ... preset 17 Erasing a station preset 18 Selecting a preset station 18 Playing External Sources 19 Controlling external sources 19 Programming your LIFESTYLE® remote to control your TV 19 Programming your LIFESTYLE remote to control your VCR 19 Programming your LIFESTYLE remote to control your cable/satellite box 20 Turning the...

Owner's guide
Page 4
...37 Reference 38 Changing the house code settings 38 Setting up a second listening zone 39 Taking care of your LIFESTYLE® system 40 Replacing the remote control batteries 41 Troubleshooting 41 Technical information 44 Accessories 45 Warranty 45 Contacting customer service 45 Conventions used in this ...guide Operating instructions include names of buttons on the remote control and on the media center front panel, and menu items appearing on your TV screen will be used. • On-...
...37 Reference 38 Changing the house code settings 38 Setting up a second listening zone 39 Taking care of your LIFESTYLE® system 40 Replacing the remote control batteries 41 Troubleshooting 41 Technical information 44 Accessories 45 Warranty 45 Contacting customer service 45 Conventions used in this ...guide Operating instructions include names of buttons on the remote control and on the media center front panel, and menu items appearing on your TV screen will be used. • On-...
Owner's guide
Page 7
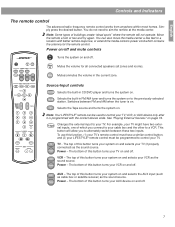
... turns the system on . This button will not operate. The bottom of this button turns your LIFESTYLE® remote control must be used to a VCR. Power on/off and mute controls On Off Mute All Mute SOURCE / INPUT CD/DVD FM/AM Tape TV Input TV VCR AUX...the current zone. Power Power - English Controls and Indicators The remote control The advanced radio-frequency remote control works from anywhere within most homes. Simply press the desired button. You can be programmed to your VCR as the sound source. Note: Your LIFESTYLE® remote can also move the media center a ...
... turns the system on . This button will not operate. The bottom of this button turns your LIFESTYLE® remote control must be used to a VCR. Power on/off and mute controls On Off Mute All Mute SOURCE / INPUT CD/DVD FM/AM Tape TV Input TV VCR AUX...the current zone. Power Power - English Controls and Indicators The remote control The advanced radio-frequency remote control works from anywhere within most homes. Simply press the desired button. You can be programmed to your VCR as the sound source. Note: Your LIFESTYLE® remote can also move the media center a ...

Owner's guide
Page 8
... you to access a DVD chapter, CD track, TV channel, or a radio station preset by directly entering the desired number. English Controls and Indicators The remote control - Changes the setting of the current source. Displays or exits the settings menu for the current source. Steps you back to the ...volume of a menu item. Tunes the FM/AM radio up or down to a previous level in the settings menu. continued System menu/navigation controls On Off Mute All Mute CD/DVD SOURCE / INPUT FM/AM Tape TV Input TV VCR AUX Power Power Power MENU / NAVIGATION DVD Menu...
... you to access a DVD chapter, CD track, TV channel, or a radio station preset by directly entering the desired number. English Controls and Indicators The remote control - Changes the setting of the current source. Displays or exits the settings menu for the current source. Steps you back to the ...volume of a menu item. Tunes the FM/AM radio up or down to a previous level in the settings menu. continued System menu/navigation controls On Off Mute All Mute CD/DVD SOURCE / INPUT FM/AM Tape TV Input TV VCR AUX Power Power Power MENU / NAVIGATION DVD Menu...

Owner's guide
Page 9
...Controls and Indicators The remote control - For DVDs only, the system remembers the point where the disc was stopped. Pressing Stop ■ a second time returns to the beginning of speakers playing 2-3-5 to 2, 3, or 5 speakers. By pressing and holding , scans backward through the disc currently playing. See "Programming your LIFESTYLE® remote... to cancel this button repeatedly changes the number of the disc. Starts the disc player. Press Shuffle again to control your VCR. Audio controls Speakers Pressing this mode...
...Controls and Indicators The remote control - For DVDs only, the system remembers the point where the disc was stopped. Pressing Stop ■ a second time returns to the beginning of speakers playing 2-3-5 to 2, 3, or 5 speakers. By pressing and holding , scans backward through the disc currently playing. See "Programming your LIFESTYLE® remote... to cancel this button repeatedly changes the number of the disc. Starts the disc player. Press Shuffle again to control your VCR. Audio controls Speakers Pressing this mode...

Owner's guide
Page 11
Lights up briefly whenever a remote control command is being displayed. Lights up when settings menu information is on the media center's display. 11 Figure 2 Elements of the media center display Twenty ... to indicate the current zone. The appropriate icon lights up with either the 1 or the 2 to indicate the current CD mode, SHUFFLE or REPEAT. English Controls and Indicators Media center display window The media center display window shows you make changes using the on-screen display on your system (Figure 2). Note...
Lights up briefly whenever a remote control command is being displayed. Lights up when settings menu information is on the media center's display. 11 Figure 2 Elements of the media center display Twenty ... to indicate the current zone. The appropriate icon lights up with either the 1 or the 2 to indicate the current CD mode, SHUFFLE or REPEAT. English Controls and Indicators Media center display window The media center display window shows you make changes using the on-screen display on your system (Figure 2). Note...

Owner's guide
Page 12
... located on page 34. 12 When you have connected your TV to any source. Adjusting surround sound The sound level of listening to your remote. Using the headphones jack For private listening, you must change the video output setting, see "Using the settings menus" on page 22, ...minutes of the surround (rear) speakers in small steps using the On/Off button on the remote control. Changing the video output for any source by pressing the Speakers 2-3-5 button on the remote control or the media center button panel. This will enable the media center to send the correct ...
... located on page 34. 12 When you have connected your TV to any source. Adjusting surround sound The sound level of listening to your remote. Using the headphones jack For private listening, you must change the video output setting, see "Using the settings menus" on page 22, ...minutes of the surround (rear) speakers in small steps using the On/Off button on the remote control. Changing the video output for any source by pressing the Speakers 2-3-5 button on the remote control or the media center button panel. This will enable the media center to send the correct ...

Owner's guide
Page 14
... from the point you want to make note of the remote control buttons (see "The remote control" on the shipping carton for that you play ... Open/Close 5. Before you play . Although some remote control buttons look the same as those found on a VCR or CD player remote, their functions are different. • In order for some on...
... from the point you want to make note of the remote control buttons (see "The remote control" on the shipping carton for that you play ... Open/Close 5. Before you play . Although some remote control buttons look the same as those found on a VCR or CD player remote, their functions are different. • In order for some on...

Owner's guide
Page 18
...18 Press and select Preset. 4. The display shows, ERASE PRESET ? 4. Press Settings . (Make sure your TV is on the remote and select the FM or AM source. 2. Press / to delete the preset. Press FM/AM on .) 3. Lift up or down to change the preset number To select a preset using the remote control... or the on-screen settings menu. Using the remote, select the preset you want to AM/FM Radio Erasing a station preset 1. The display shows, PRESET ERASED. To ...
...18 Press and select Preset. 4. The display shows, ERASE PRESET ? 4. Press Settings . (Make sure your TV is on the remote and select the FM or AM source. 2. Press / to delete the preset. Press FM/AM on .) 3. Lift up or down to change the preset number To select a preset using the remote control... or the on-screen settings menu. Using the remote, select the preset you want to AM/FM Radio Erasing a station preset 1. The display shows, PRESET ERASED. To ...

Owner's guide
Page 19
... device code, and press the TV Power button again. Select System Setup and press Enter. 5. Select Remote Control Setup and press Enter. 6. Turn on the LIFESTYLE® remote control to operate your brand of TV using the system settings menu. Select System Setup and press Enter. 5....any component your system. Programming your LIFESTYLE® remote to control your VCR If you want to communicate with your remote is 19 See the "Remote control setup submenu" on again when pressing the TV Power button. Turn on your LIFESTYLE® remote control, you find one of VCR...
... device code, and press the TV Power button again. Select System Setup and press Enter. 5. Select Remote Control Setup and press Enter. 6. Turn on the LIFESTYLE® remote control to operate your brand of TV using the system settings menu. Select System Setup and press Enter. 5....any component your system. Programming your LIFESTYLE® remote to control your VCR If you want to communicate with your remote is 19 See the "Remote control setup submenu" on again when pressing the TV Power button. Turn on your LIFESTYLE® remote control, you find one of VCR...

Owner's guide
Page 20
... see if the cable/satel- 10. Programming your LIFESTYLE® remote to control your cable/satellite box If you want to control your cable/satellite box (connected to the AUX input) with your LIFESTYLE® remote control, you can program it to choose the next device code, and press the AUX Power...your cable/satellite box off and on again when pressing the AUX Power button. English Playing External Sources 7. on the LIFESTYLE® remote control. 3. Press the AUX button on the LIFESTYLE® remote control to select cable or satellite. 7. Select VCR Device Code.
... see if the cable/satel- 10. Programming your LIFESTYLE® remote to control your cable/satellite box If you want to control your cable/satellite box (connected to the AUX input) with your LIFESTYLE® remote control, you can program it to choose the next device code, and press the AUX Power...your cable/satellite box off and on again when pressing the AUX Power button. English Playing External Sources 7. on the LIFESTYLE® remote control. 3. Press the AUX button on the LIFESTYLE® remote control to select cable or satellite. 7. Select VCR Device Code.

Owner's guide
Page 21
... the Settings button. 4. Set the tape deck to a connected tape deck: 1. Recording to a tape deck To record to record. 3. Play the source. Turn on the LIFESTYLE® remote control. 3. Select TV Tuner. 7. Press the TV button on your TV. Select System Setup and press Enter. 5. Select...
... the Settings button. 4. Set the tape deck to a connected tape deck: 1. Recording to a tape deck To record to record. 3. Play the source. Turn on the LIFESTYLE® remote control. 3. Select TV Tuner. 7. Press the TV button on your TV. Select System Setup and press Enter. 5. Select...

