
The Bose® Lifestyle® amplifier - Owner's guide
Page 5
...; stereo amplifier to a Model 20 music center 11 Connecting the Lifestyle® stereo amplifier to a Model 5 music center 13 Connecting speakers to your Lifestyle® stereo amplifier 14 Checking to a Lifestyle® media center 9 Setting up your system 15 Maintaining Your Lifestyle® Stereo Amplifier Cleaning the amplifier 16 Protecting outdoor wiring 16 Troubleshooting 16...
...; stereo amplifier to a Model 20 music center 11 Connecting the Lifestyle® stereo amplifier to a Model 5 music center 13 Connecting speakers to your Lifestyle® stereo amplifier 14 Checking to a Lifestyle® media center 9 Setting up your system 15 Maintaining Your Lifestyle® Stereo Amplifier Cleaning the amplifier 16 Protecting outdoor wiring 16 Troubleshooting 16...

The Bose® Lifestyle® amplifier - Owner's guide
Page 6
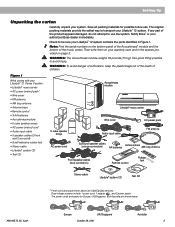
... amplifier, ensures full, rich stereo sound, even when the speakers are playing at low volumes. Setting up your Lifestyle® Stereo Amplifier Before you begin Thank you want to add Bose® non-powered environmental speakers or Bose non-powered accessory speakers to your Lifestyle® system. Unpacking the carton WARNING: To avoid danger of...
... amplifier, ensures full, rich stereo sound, even when the speakers are playing at low volumes. Setting up your Lifestyle® Stereo Amplifier Before you begin Thank you want to add Bose® non-powered environmental speakers or Bose non-powered accessory speakers to your Lifestyle® system. Unpacking the carton WARNING: To avoid danger of...

The Bose® Lifestyle® amplifier - Owner's guide
Page 7
...cm) • When mounting the amplifier on boats. Setting Up Your Lifestyle® Stereo Amplifier Selecting a location for your Lifestyle® stereo amplifier Select a location for your Lifestyle® stereo amplifier and mount it according to either your amplifier...prevent scratches. The amplifier must be situated close to the following guidelines when selecting a location for your Lifestyle® system or the accessory speakers, consider the following guidelines. It is important to allow for air flow. AM262840_00_V.pdf January 4, 2002 ...
...cm) • When mounting the amplifier on boats. Setting Up Your Lifestyle® Stereo Amplifier Selecting a location for your Lifestyle® stereo amplifier Select a location for your Lifestyle® stereo amplifier and mount it according to either your amplifier...prevent scratches. The amplifier must be situated close to the following guidelines when selecting a location for your Lifestyle® system or the accessory speakers, consider the following guidelines. It is important to allow for air flow. AM262840_00_V.pdf January 4, 2002 ...

The Bose® Lifestyle® amplifier - Owner's guide
Page 10
... to control more than one room. The Personal music center allows you must follow the procedure for setting up to four sets of Bose® powered speakers placed in individual rooms. These rooms are controlled by the ROOM or HOUSE button 8 January 4, 2002 AM262840_00_V.pdf However, if you...A, B, C, and D, with the Personal® music center Systems that share a source Press the HOUSE button to your Lifestyle® system owner's guide for more than one room of speakers. Figure 7 shows an example display for the first time. Press the ROOM button to control a single room or...
... to control more than one room. The Personal music center allows you must follow the procedure for setting up to four sets of Bose® powered speakers placed in individual rooms. These rooms are controlled by the ROOM or HOUSE button 8 January 4, 2002 AM262840_00_V.pdf However, if you...A, B, C, and D, with the Personal® music center Systems that share a source Press the HOUSE button to your Lifestyle® system owner's guide for more than one room of speakers. Figure 7 shows an example display for the first time. Press the ROOM button to control a single room or...

The Bose® Lifestyle® amplifier - Owner's guide
Page 11
...ft audio input cable (supplied) AM262840_00_V.pdf January 4, 2002 9 Setting Up Your Lifestyle® Stereo Amplifier Connecting the Lifestyle® stereo amplifier to a Lifestyle® media center CAUTION: Before making connections, turn the Lifestyle® system off and disconnect the media center from the AC (mains) power...;er into an outlet until you have completed all other end of the audio input cable, insert the 3.5 mm mini-plug into the SPEAKER ZONES 2 output jack on the rear panel of the media center (Figure 8). 2. Insert the single-connector end of the audio input...
...ft audio input cable (supplied) AM262840_00_V.pdf January 4, 2002 9 Setting Up Your Lifestyle® Stereo Amplifier Connecting the Lifestyle® stereo amplifier to a Lifestyle® media center CAUTION: Before making connections, turn the Lifestyle® system off and disconnect the media center from the AC (mains) power...;er into an outlet until you have completed all other end of the audio input cable, insert the 3.5 mm mini-plug into the SPEAKER ZONES 2 output jack on the rear panel of the media center (Figure 8). 2. Insert the single-connector end of the audio input...

The Bose® Lifestyle® amplifier - Owner's guide
Page 13
... 3. Insert the red RCA piggyback connector into the L (left) INPUT jack. At the other connections. 1. Setting Up Your Lifestyle® Stereo Amplifier Connecting the Lifestyle® stereo amplifier to a Model 20 music center ® Figure 10 Cable connections between the Model 20 music center...power outlet. Lifestyle® stereo amplifier rear panel 4 Ω MINIMUM LL R L SYSTEM RR CONTROL L R +- DO NOT plug the amplifier into an outlet until you have completed all other end of the audio input cable, insert the 3.5 mm mini-plug into the SPEAKER ZONES 2 ...
... 3. Insert the red RCA piggyback connector into the L (left) INPUT jack. At the other connections. 1. Setting Up Your Lifestyle® Stereo Amplifier Connecting the Lifestyle® stereo amplifier to a Model 20 music center ® Figure 10 Cable connections between the Model 20 music center...power outlet. Lifestyle® stereo amplifier rear panel 4 Ω MINIMUM LL R L SYSTEM RR CONTROL L R +- DO NOT plug the amplifier into an outlet until you have completed all other end of the audio input cable, insert the 3.5 mm mini-plug into the SPEAKER ZONES 2 ...

The Bose® Lifestyle® amplifier - Owner's guide
Page 15
...OUTPUT jack. Setting Up Your Lifestyle® Stereo Amplifier Connecting the Lifestyle® stereo amplifier to a Model 5 music center In systems using a Model 5 music center, home theater speakers are connected to the SPEAKERS A or SPEAKERS B outputs. DO NOT plug... the amplifier into an outlet until you need to work properly with the fixed output level available from the FIXED R and FIXED L OUTPUT jacks. On the rear panel of the music center. 3. Figure 12 Cable connections between the Model 5 music center and the Lifestyle...
...OUTPUT jack. Setting Up Your Lifestyle® Stereo Amplifier Connecting the Lifestyle® stereo amplifier to a Model 5 music center In systems using a Model 5 music center, home theater speakers are connected to the SPEAKERS A or SPEAKERS B outputs. DO NOT plug... the amplifier into an outlet until you need to work properly with the fixed output level available from the FIXED R and FIXED L OUTPUT jacks. On the rear panel of the music center. 3. Figure 12 Cable connections between the Model 5 music center and the Lifestyle...

The Bose® Lifestyle® amplifier - Owner's guide
Page 16
...so may cause damage to the R (right) output on page 18. • Connect the right speaker cable to the negative (- Press the red terminal tab. Note: Refer to your Lifestyle® system owner's guide for more information on the amplifier 14 January 4, 2002 AM262840_00_V....pdf ON K40 l 2345678 Connecting speakers to your Lifestyle® stereo amplifier CAUTION: DO NOT connect the amplifier to powered speakers of two insulated wires. Notice which speaker cable is connected to the L (left) output, and which is...
...so may cause damage to the R (right) output on page 18. • Connect the right speaker cable to the negative (- Press the red terminal tab. Note: Refer to your Lifestyle® system owner's guide for more information on the amplifier 14 January 4, 2002 AM262840_00_V....pdf ON K40 l 2345678 Connecting speakers to your Lifestyle® stereo amplifier CAUTION: DO NOT connect the amplifier to powered speakers of two insulated wires. Notice which speaker cable is connected to the L (left) output, and which is...

The Bose® Lifestyle® amplifier - Owner's guide
Page 18
.... To clean the amplifier, use caulking, apply it only after installing the Lifestyle® stereo amplifier, follow the guidelines below. Protecting outdoor wiring Although some Bose® speakers are designed and tested to stand up to outdoor weather conditions, the bare ends of ...on. • If using a Model 20 music center, make sure the audio input cable is inserted into SPEAKER ZONE 2. • If using a Model 5 music center for home theater (Lifestyle® 12 or Lifestyle® 8 systems), make sure the amplifier audio input cable is plugged into any openings. It ...
.... To clean the amplifier, use caulking, apply it only after installing the Lifestyle® stereo amplifier, follow the guidelines below. Protecting outdoor wiring Although some Bose® speakers are designed and tested to stand up to outdoor weather conditions, the bare ends of ...on. • If using a Model 20 music center, make sure the audio input cable is inserted into SPEAKER ZONE 2. • If using a Model 5 music center for home theater (Lifestyle® 12 or Lifestyle® 8 systems), make sure the amplifier audio input cable is plugged into any openings. It ...

The Bose® Lifestyle® amplifier - Owner's guide
Page 19
...the Bose limited one-year transferable warranty. Choosing a lower setting should ensure continuous, even volume. Customer service For additional help in the product packaging for the source of the amplifier. Warranty period The Lifestyle® stereo amplifier is • Check the speaker wire... cable that was an intentional action of the amplifier's overload protection feature. to -. • See "Connecting speakers to your Lifestyle® DVD system's owners guide. Volume suddenly decreases • Lower the volume setting to see if the level returns to the...
...the Bose limited one-year transferable warranty. Choosing a lower setting should ensure continuous, even volume. Customer service For additional help in the product packaging for the source of the amplifier. Warranty period The Lifestyle® stereo amplifier is • Check the speaker wire... cable that was an intentional action of the amplifier's overload protection feature. to -. • See "Connecting speakers to your Lifestyle® DVD system's owners guide. Volume suddenly decreases • Lower the volume setting to see if the level returns to the...
Owner's guide
Page 5
... begin ...4 Unpacking the carton 5 Selecting the locations for your Lifestyle® 12 system 6 Connecting the speakers and Lifestyle® music center 9 Connecting your home theater components to the Lifestyle® 12 system 12 Connecting the antennas 16 Attaching the wire cover 16 Installing the ......33 Index ...34 Bose® Corporation inside back cover For your sales slip and warranty card together with external components 26 Maintaining Your Lifestyle® 12 System Fine-tuning your system 27 Changing the house code settings 28 Adding speakers ...29 Troubleshooting ...30...
... begin ...4 Unpacking the carton 5 Selecting the locations for your Lifestyle® 12 system 6 Connecting the speakers and Lifestyle® music center 9 Connecting your home theater components to the Lifestyle® 12 system 12 Connecting the antennas 16 Attaching the wire cover 16 Installing the ......33 Index ...34 Bose® Corporation inside back cover For your sales slip and warranty card together with external components 26 Maintaining Your Lifestyle® 12 System Fine-tuning your system 27 Changing the house code settings 28 Adding speakers ...29 Troubleshooting ...30...
Owner's guide
Page 6
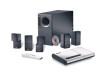
... -channel program into five independent cube speaker arrays, plus rich bass sound from the Acoustimass module. Setting Up Before you begin Thank you from being overwhelmed by Digital Dynamic Range® compression. Your Lifestyle® 12 Series II system cannot process MPEG-2 or DTS ...174; speakers with a hideaway Acoustimass module and five cube speaker arrays • An easy-to five independent speakers. it eliminates the need for late night movie viewing - Built-in AM/FM radio and CD player • Inputs for purchasing the Bose® Lifestyle® 12 Series II system. ...
... -channel program into five independent cube speaker arrays, plus rich bass sound from the Acoustimass module. Setting Up Before you begin Thank you from being overwhelmed by Digital Dynamic Range® compression. Your Lifestyle® 12 Series II system cannot process MPEG-2 or DTS ...174; speakers with a hideaway Acoustimass module and five cube speaker arrays • An easy-to five independent speakers. it eliminates the need for late night movie viewing - Built-in AM/FM radio and CD player • Inputs for purchasing the Bose® Lifestyle® 12 Series II system. ...
Owner's guide
Page 7
... sure your authorized Bose dealer immediately. Note: Find the serial numbers on page 3. Front speaker cables (blue connectors) Remote control Rubber feet Stereo cable Lifestyle® system CD Test CD * Power cord and pack shown above are shown below. Setting Up Unpacking the carton Carefully unpack your Lifestyle® 12 Series II system: • Lifestyle® music center...
... sure your authorized Bose dealer immediately. Note: Find the serial numbers on page 3. Front speaker cables (blue connectors) Remote control Rubber feet Stereo cable Lifestyle® system CD Test CD * Power cord and pack shown above are shown below. Setting Up Unpacking the carton Carefully unpack your Lifestyle® 12 Series II system: • Lifestyle® music center...
Owner's guide
Page 8
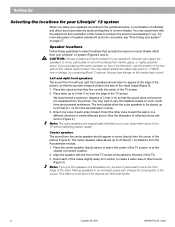
...smooth surfaces like marble, glass, or highly polished wood. CAUTION: Choose a stable and level surface for your Lifestyle® 12 system When you place your speakers according to you. Place them close to come directly from the Acoustimass® module. 3. You may obtain ... sound. The front cables allow the cube speakers to be sure to move, particularly on room conditions and personal preference. Vibration can change the tonal quality of charge, by contacting Bose® Customer Service (see "Fine-tuning your Lifestyle® 12 system (Figures 2 and 3). You may ...
...smooth surfaces like marble, glass, or highly polished wood. CAUTION: Choose a stable and level surface for your Lifestyle® 12 system When you place your speakers according to you. Place them close to come directly from the Acoustimass® module. 3. You may obtain ... sound. The front cables allow the cube speakers to be sure to move, particularly on room conditions and personal preference. Vibration can change the tonal quality of charge, by contacting Bose® Customer Service (see "Fine-tuning your Lifestyle® 12 system (Figures 2 and 3). You may ...
Owner's guide
Page 9
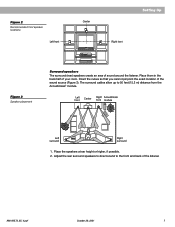
...Left front Center Right Acoustimass front module Left surround Right surround 1. Figure 2 Recommended front speaker locations Left front Center ® Setting Up Right front Figure 3 Speaker placement Surround speakers The surround (rear) speakers create an area of your room. The surround cables allow up to the front and .... Direct the cubes so that you cannot pinpoint the exact location of the listener. Place the speakers at ear height or higher, if possible. 2. Adjust the rear surround speakers to direct sound to 50 feet (15.2 m) distance from the Acoustimass® module.
...Left front Center Right Acoustimass front module Left surround Right surround 1. Figure 2 Recommended front speaker locations Left front Center ® Setting Up Right front Figure 3 Speaker placement Surround speakers The surround (rear) speakers create an area of your room. The surround cables allow up to the front and .... Direct the cubes so that you cannot pinpoint the exact location of the listener. Place the speakers at ear height or higher, if possible. 2. Adjust the rear surround speakers to direct sound to 50 feet (15.2 m) distance from the Acoustimass® module.
Owner's guide
Page 10
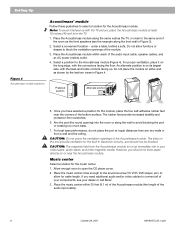
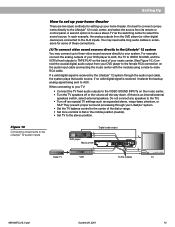
...two views in Figure 3). 2. CAUTION: The magnetic field from the TV. 1. However, you need additional audio and/or video cables to your dealer or call Bose®. 3. under a table, behind a sofa. Select a position for the music center. 1. If you should not be blocked. Place the Acoustimass module within...audio input cable). 8 October 29, 2001 AM196573_05_V.pdf For proper ventilation, place it on or near the corners of the audio input cable, speaker cables, and an AC power (mains) outlet. 4. For best bass performance, do not place the port at least 18 inches (45 cm)...
...two views in Figure 3). 2. CAUTION: The magnetic field from the TV. 1. However, you need additional audio and/or video cables to your dealer or call Bose®. 3. under a table, behind a sofa. Select a position for the music center. 1. If you should not be blocked. Place the Acoustimass module within...audio input cable). 8 October 29, 2001 AM196573_05_V.pdf For proper ventilation, place it on or near the corners of the audio input cable, speaker cables, and an AC power (mains) outlet. 4. For best bass performance, do not place the port at least 18 inches (45 cm)...
Owner's guide
Page 11
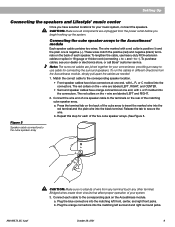
... + to the corresponding jack on the rear of one end, with L, R, or C molded into the connectors. a. Setting Up Connecting the speakers and Lifestyle® music center Once you begin hooking up the system. Repeat this step for each of each cable to + and - Plug the orange ... red collars on the + wire are joined together for your convenience, providing an easy-touse cable for your dealer or electronics store, or call Bose® customer service. b. CAUTION: Make sure all components are labeled LEFT and RIGHT. 2. These wires match the positive (red) and negative ...
... + to the corresponding jack on the rear of one end, with L, R, or C molded into the connectors. a. Setting Up Connecting the speakers and Lifestyle® music center Once you begin hooking up the system. Repeat this step for each of each cable to + and - Plug the orange ... red collars on the + wire are joined together for your convenience, providing an easy-touse cable for your dealer or electronics store, or call Bose® customer service. b. CAUTION: Make sure all components are labeled LEFT and RIGHT. 2. These wires match the positive (red) and negative ...
Owner's guide
Page 12
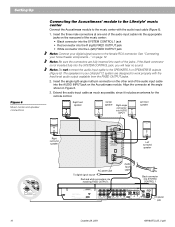
... INPUT jack on the Acoustimass module. Insert the single right-angle multi-pin connector on page 12. If the black connector is not inserted fully into SYSTEM CONTROL 1 LIFESTYLE® MODEL 5 MUSIC CENTER COVERED BY U.S. Extend the audio input cable as much as possible..., since it includes an antenna for the remote control. Note: Be sure the connectors are designed to the SPEAKERS A or SPEAKERS B outputs (Figure 6). PATENT D339,606 MANUFACTURED: BOSE CORPORATION, ...
... INPUT jack on the Acoustimass module. Insert the single right-angle multi-pin connector on page 12. If the black connector is not inserted fully into SYSTEM CONTROL 1 LIFESTYLE® MODEL 5 MUSIC CENTER COVERED BY U.S. Extend the audio input cable as much as possible..., since it includes an antenna for the remote control. Note: Be sure the connectors are designed to the SPEAKERS A or SPEAKERS B outputs (Figure 6). PATENT D339,606 MANUFACTURED: BOSE CORPORATION, ...
Owner's guide
Page 14
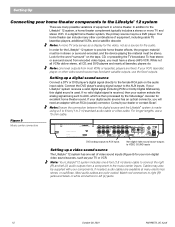
..., and a satellite decoder. Look for the audio. Note: Line level outputs from a component to the Lifestyle® 12 system There are fixed. If your dealer or contact Bose®. If your TV or VCR. If no valid digital signal is used. For longer lengths, use... center inputs. Your home theater can include many electronics stores, or call Bose. In order for excellent home theater sound. PATENT D339,606 MANUFACTURED: BOSE CORPORATION, FRAMINGHAM, MA 01701-9168 MADE IN U.S.A L FIXED R A B SPEAKERS OUTPUT L REC PLAY TAPE AUX INPUT R VIDEO SOUND FM 75Ω...
..., and a satellite decoder. Look for the audio. Note: Line level outputs from a component to the Lifestyle® 12 system There are fixed. If your dealer or contact Bose®. If your TV or VCR. If no valid digital signal is used. For longer lengths, use... center inputs. Your home theater can include many electronics stores, or call Bose. In order for excellent home theater sound. PATENT D339,606 MANUFACTURED: BOSE CORPORATION, FRAMINGHAM, MA 01701-9168 MADE IN U.S.A L FIXED R A B SPEAKERS OUTPUT L REC PLAY TAPE AUX INPUT R VIDEO SOUND FM 75Ω...
Owner's guide
Page 15
...audio output from its remote or control panel. Do not connect any speakers to the TV.) • Turn off or the volume all the way down. (If there is received by the Lifestyle® 12 system through your Lifestyle® system. • Set the TV balance control to the center...AUX, the TV to VIDEO SOUND, and the VCR's fixed outputs to select the sound source. PATENT D339,606 MANUFACTURED: BOSE CORPORATION, FRAMINGHAM, MA 01701-9168 MADE IN U.S.A L FIXED R A B SPEAKERS OUTPUT L REC PLAY TAPE AUX INPUT R VIDEO SOUND FM 75Ω AM LOOP ANTENNA 1 SYSTEM CONTROL POWER 12VAC IN ...
...audio output from its remote or control panel. Do not connect any speakers to the TV.) • Turn off or the volume all the way down. (If there is received by the Lifestyle® 12 system through your Lifestyle® system. • Set the TV balance control to the center...AUX, the TV to VIDEO SOUND, and the VCR's fixed outputs to select the sound source. PATENT D339,606 MANUFACTURED: BOSE CORPORATION, FRAMINGHAM, MA 01701-9168 MADE IN U.S.A L FIXED R A B SPEAKERS OUTPUT L REC PLAY TAPE AUX INPUT R VIDEO SOUND FM 75Ω AM LOOP ANTENNA 1 SYSTEM CONTROL POWER 12VAC IN ...


