User Manual
Page 2
Please save your system properly and enjoy its advanced features. WARNING 0#&"#1")#%23",%#)*+,#,4,)%5#)"#$6+1#"$#5"+,)'$%7# WARNING: !*%#6336$6)',#,*6//#1")#8%#%23",%&#)"#&$+33+19#"$#,3/6,*+190#61&#"8 0#,'(*#6,# =6,%,0#,*6//#1")#8%#3/6(%&#"1#)*%#6336$6)',7#>,#;+)*#614#%/%()$"1+(#3$"&'(),0#',%#(6$%#1")#)"#,3 1)"#614#36$)# ".#)*%#,4,)%57#?+ It will help you set up and operate your owner's guide for future reference. Français Español English SAFETY INFORMATION Please read this owner's guide Please take the time to follow this owner's guide carefully.
Please save your system properly and enjoy its advanced features. WARNING 0#&"#1")#%23",%#)*+,#,4,)%5#)"#$6+1#"$#5"+,)'$%7# WARNING: !*%#6336$6)',#,*6//#1")#8%#%23",%&#)"#&$+33+19#"$#,3/6,*+190#61&#"8 0#,'(*#6,# =6,%,0#,*6//#1")#8%#3/6(%&#"1#)*%#6336$6)',7#>,#;+)*#614#%/%()$"1+(#3$"&'(),0#',%#(6$%#1")#)"#,3 1)"#614#36$)# ".#)*%#,4,)%57#?+ It will help you set up and operate your owner's guide for future reference. Français Español English SAFETY INFORMATION Please read this owner's guide Please take the time to follow this owner's guide carefully.

User Manual
Page 3
... 3)&'%&'"%8#*,@#-&,+"+A To ensure reliable operation of the product and to protect it in a built-in the owner's guide. 4. 5.22.3%#22 6 5. 7 00#+#&,(%*"#+%3#&"+%.+%8.)(&,+" - system, such as directed by Bose ! H+.&"-&%&'"%0.3"+%-.+$%@+.8%;")*4%3#2 For example, do not place the product on the product and in ! English Español Français Important Safety Instructions 1 for future reference...
... 3)&'%&'"%8#*,@#-&,+"+A To ensure reliable operation of the product and to protect it in a built-in the owner's guide. 4. 5.22.3%#22 6 5. 7 00#+#&,(%*"#+%3#&"+%.+%8.)(&,+" - system, such as directed by Bose ! H+.&"-&%&'"%0.3"+%-.+$%@+.8%;")*4%3#2 For example, do not place the product on the product and in ! English Español Français Important Safety Instructions 1 for future reference...
User Manual
Page 5
... Connecting other sources 10 USING YOUR SPEAKER SYSTEM 11 Controlling the system 11 Balancing tone for the sound you keep your product online at www.bose.com/register. 5 Serial number Dealer name Dealer phone We suggest you like 12 Troubleshooting 12 REFERENCE 13 Cleaning the system 13 Contacting Customer Service 13...
... Connecting other sources 10 USING YOUR SPEAKER SYSTEM 11 Controlling the system 11 Balancing tone for the sound you keep your product online at www.bose.com/register. 5 Serial number Dealer name Dealer phone We suggest you like 12 Troubleshooting 12 REFERENCE 13 Cleaning the system 13 Contacting Customer Service 13...
User Manual
Page 6
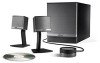
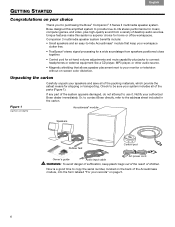
... parts (Figure 1). Check to connect! Notify your workspace ! module, into the form labeled "For your choice Thank you for purchasing the Bose®!Companion® 3 Series II multimedia speaker system. Or, to contact Bose directly, refer to use it. clutter free. • TrueSpace® stereo signal processing for a wide soundstage from speakers positioned close together...
... parts (Figure 1). Check to connect! Notify your workspace ! module, into the form labeled "For your choice Thank you for purchasing the Bose®!Companion® 3 Series II multimedia speaker system. Or, to contact Bose directly, refer to use it. clutter free. • TrueSpace® stereo signal processing for a wide soundstage from speakers positioned close together...
User Manual
Page 7
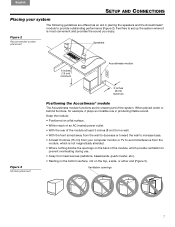
Keep the module: • Positioned on a flat surface. • Within reach of an AC (mains) power outlet. • With the rear of the module at least 3 inches (8 cm) from a wall. • With the front aimed away from the wall to decrease or toward the wall to increase bass. • At least 6 inches (15 cm) from your system The following guidelines are offered as the unseen part of the module, which provide ventilation to prevent overheating during use. • Away from heat sources (radiators, baseboards, quartz heater, etc.). • Resting on the bottom surface, not on the top, a ...
Keep the module: • Positioned on a flat surface. • Within reach of an AC (mains) power outlet. • With the rear of the module at least 3 inches (8 cm) from a wall. • With the front aimed away from the wall to decrease or toward the wall to increase bass. • At least 6 inches (15 cm) from your system The following guidelines are offered as the unseen part of the module, which provide ventilation to prevent overheating during use. • Away from heat sources (radiators, baseboards, quartz heater, etc.). • Resting on the bottom surface, not on the top, a ...
User Manual
Page 8
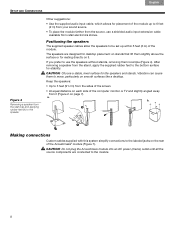
b. Français Español English SETUP AND CONNECTIONS Figure 4 Removing a speaker from the stand (a) and applying rubber feet (b) to the speaker Other suggestions: • Use the supplied audio input cable, which allows for stability. CAUTION: B*"",%#6#,)68/%0#/%=%/#,'$.6(%#."$#)*%#,3%6-%$,#61&#,)61&,7#C+8$6)+"1#(61#(6',%# )*%5#)"#5"=%0#36$)+('/6$/4#"1#,5"")*#,'$.6(%,#/+-%#6#&%,-)"37 Keep the speakers: • Up to the labeled jacks on each side of the computer monitor or TV and slightly angled away from the source, use the speakers without stands, removing them ...
b. Français Español English SETUP AND CONNECTIONS Figure 4 Removing a speaker from the stand (a) and applying rubber feet (b) to the speaker Other suggestions: • Use the supplied audio input cable, which allows for stability. CAUTION: B*"",%#6#,)68/%0#/%=%/#,'$.6(%#."$#)*%#,3%6-%$,#61&#,)61&,7#C+8$6)+"1#(61#(6',%# )*%5#)"#5"=%0#36$)+('/6$/4#"1#,5"")*#,'$.6(%,#/+-%#6#&%,-)"37 Keep the speakers: • Up to the labeled jacks on each side of the computer monitor or TV and slightly angled away from the source, use the speakers without stands, removing them ...
User Manual
Page 9
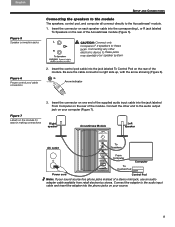
CAUTION: Connect only Companion® 3 speakers to the Acoustimass® module. 1. Insert the control pod cable into the corresponding L or R jack labeled! module. Be sure the cable connector is ...
CAUTION: Connect only Companion® 3 speakers to the Acoustimass® module. 1. Insert the control pod cable into the corresponding L or R jack labeled! module. Be sure the cable connector is ...

User Manual
Page 10
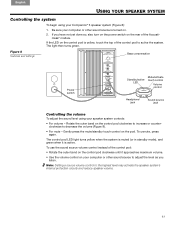
Insert the small connector end of the Acoustimass module, to indicate the system is on and is the final step before using the system. 1. Turn the power switch, located on the back of the power cord into the headphone jack on the control pod. On the control pod, the LED turns yellow to ON (|). Connecting other sources The control pod features two jacks: one for connection directly to another sound source and the other for use. See Figure 8 on page 11. • To connect headphones, insert the connector on the headphone cable into the AC INPUT jack on the module. 2. This connection ...
Insert the small connector end of the Acoustimass module, to indicate the system is on and is the final step before using the system. 1. Turn the power switch, located on the back of the power cord into the headphone jack on the control pod. On the control pod, the LED turns yellow to ON (|). Connecting other sources The control pod features two jacks: one for connection directly to another sound source and the other for use. See Figure 8 on page 11. • To connect headphones, insert the connector on the headphone cable into the AC INPUT jack on the module. 2. This connection ...
User Manual
Page 11
... switch Standby/active LED Mute/activate touch control Volume control Headphone jack Sound source jack Controlling the volume To adjust the sound level using your Companion® 3 speaker system (Figure 8): 1. To unmute, press again. To use the sound source volume control instead of the control pod: • Rotate the outer band...
... switch Standby/active LED Mute/activate touch control Volume control Headphone jack Sound source jack Controlling the volume To adjust the sound level using your Companion® 3 speaker system (Figure 8): 1. To unmute, press again. To use the sound source volume control instead of the control pod: • Rotate the outer band...
User Manual
Page 12
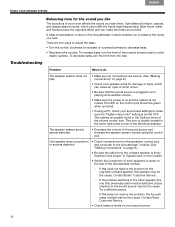
...If this does not resolve the problem, the Acoustimass module may be green when unmuted. • If using the control pod. Contact Bose Customer Service. • Check balance levels on the control pod should be the cause. playing at an audible volume. • Make...or short circuit. • Be sure that previously performed) a defective output channel on the Acoustimass® module enables you hear there. Contact Bose® Customer Service. - Upholstered furniture, carpets, and drapes absorb sound, which can muffle the treble (high frequencies). originally unheard speaker, ...
...If this does not resolve the problem, the Acoustimass module may be green when unmuted. • If using the control pod. Contact Bose Customer Service. • Check balance levels on the control pod should be the cause. playing at an audible volume. • Make...or short circuit. • Be sure that previously performed) a defective output channel on the Acoustimass® module enables you hear there. Contact Bose® Customer Service. - Upholstered furniture, carpets, and drapes absorb sound, which can muffle the treble (high frequencies). originally unheard speaker, ...
User Manual
Page 13
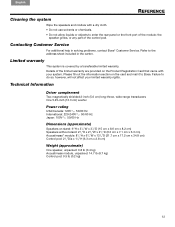
...! Speakers without stand: 21/2"H x 23/4"W x 21/2"D (6.3 cm x 7.1 cm x 6.3 cm)! Refer to the address sheet included in solving problems, contact Bose® Customer Service. Control pod: 0.5 lb (0.2 kg) 13 01&2 2 34!5 Japan: 100V 50/60 Hz Dimensions (approximate) Speakers on the card and ...mail it to Bose. Contacting Customer Service For additional help in the carton. Control pod: 21/2"Dia x 11/8"H (6.3 cm x 2.8 cm) Weight (approximate) One speaker, unpacked...
...! Speakers without stand: 21/2"H x 23/4"W x 21/2"D (6.3 cm x 7.1 cm x 6.3 cm)! Refer to the address sheet included in solving problems, contact Bose® Customer Service. Control pod: 0.5 lb (0.2 kg) 13 01&2 2 34!5 Japan: 100V 50/60 Hz Dimensions (approximate) Speakers on the card and ...mail it to Bose. Contacting Customer Service For additional help in the carton. Control pod: 21/2"Dia x 11/8"H (6.3 cm x 2.8 cm) Weight (approximate) One speaker, unpacked...
