User Manual
Page 5
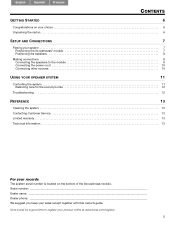
... 9 Connecting the power cord 10 Connecting other sources 10 USING YOUR SPEAKER SYSTEM 11 Controlling the system 11 Balancing tone for the sound you keep your product online at www.bose.com/register. 5 Serial number Dealer name Dealer phone We suggest you like 12 Troubleshooting 12 REFERENCE 13 Cleaning the system 13...
... 9 Connecting the power cord 10 Connecting other sources 10 USING YOUR SPEAKER SYSTEM 11 Controlling the system 11 Balancing tone for the sound you keep your product online at www.bose.com/register. 5 Serial number Dealer name Dealer phone We suggest you like 12 Troubleshooting 12 REFERENCE 13 Cleaning the system 13...
User Manual
Page 6
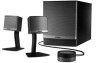
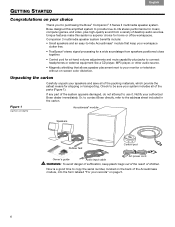
... video, plus jacks to connect! without on your choice Thank you for at-hand volume adjustments and mute capability plus high-quality sound from a variety of the Acoustimass ! Unpacking the carton Carefully unpack your system includes all of the parts (Figure 1). Companion 3... • TrueSpace® stereo signal processing for a wide soundstage from speakers positioned close together. • Control pod for purchasing the Bose®!Companion® 3 Series II multimedia speaker system. Check to -hide Acoustimass® module that allows speaker placement next to copy ...
... video, plus jacks to connect! without on your choice Thank you for at-hand volume adjustments and mute capability plus high-quality sound from a variety of the Acoustimass ! Unpacking the carton Carefully unpack your system includes all of the parts (Figure 1). Companion 3... • TrueSpace® stereo signal processing for a wide soundstage from speakers positioned close together. • Control pod for purchasing the Bose®!Companion® 3 Series II multimedia speaker system. Check to -hide Acoustimass® module that allows speaker placement next to copy ...
User Manual
Page 7
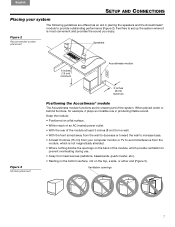
...cm) from your system The following guidelines are offered as the unseen part of the module, which is most convenient and provides the sound you enjoy. Figure 2 Recommended system placement Speakers Figure 3 Module placement 6 inches (15 cm) minimum Acoustimass module 3 inches (8 ...cm) minimum Positioning the Acoustimass® module The Acoustimass module functions as an aid in producing lifelike sound. Ventilation openings 7 01&2 2 34!5 Feel free to prevent overheating during use. • Away from the module, which provide ...
...cm) from your system The following guidelines are offered as the unseen part of the module, which is most convenient and provides the sound you enjoy. Figure 2 Recommended system placement Speakers Figure 3 Module placement 6 inches (15 cm) minimum Acoustimass module 3 inches (8 ...cm) minimum Positioning the Acoustimass® module The Acoustimass module functions as an aid in producing lifelike sound. Ventilation openings 7 01&2 2 34!5 Feel free to prevent overheating during use. • Away from the module, which provide ...
User Manual
Page 8
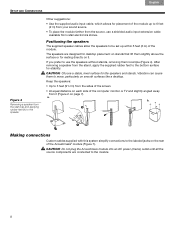
... labeled jacks on stands that lift them is simple (Figure 4). After removing a speaker from the stand, apply the supplied rubber feet to 6 feet ! (2 m) from your sound source. • To place the module farther from the source, use the speakers without stands, removing them slightly above the surface or for stability. If...
... labeled jacks on stands that lift them is simple (Figure 4). After removing a speaker from the stand, apply the supplied rubber feet to 6 feet ! (2 m) from your sound source. • To place the module farther from the source, use the speakers without stands, removing them slightly above the surface or for stability. If...

User Manual
Page 10
...ais Español English SETUP AND CONNECTIONS Connecting the power cord Plugging in and turning on the control pod. This connection mutes the sound from the sound source output jack into the headphone jack on the Acoustimass® module is the final step before using the system. 1. Insert the ... plug the cable from the speakers. 10 01&2 2 34!5 Connecting other sources The control pod features two jacks: one for connection directly to another sound source and the other for use. On the control pod, the LED turns yellow to indicate the system is ready for a headphone. • To...
...ais Español English SETUP AND CONNECTIONS Connecting the power cord Plugging in and turning on the control pod. This connection mutes the sound from the sound source output jack into the headphone jack on the Acoustimass® module is the final step before using the system. 1. Insert the ... plug the cable from the speakers. 10 01&2 2 34!5 Connecting other sources The control pod features two jacks: one for connection directly to another sound source and the other for use. On the control pod, the LED turns yellow to indicate the system is ready for a headphone. • To...
User Manual
Page 11
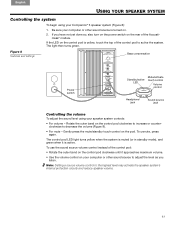
... or counterclockwise to the highest level may activate the speaker system's internal protection circuity and reduce speaker volume. 11 01&2 2 34!5 To use the sound source volume control instead of the control pod: • Rotate the outer band on the control pod clockwise until it is turned on. 2. Gently...3 speaker system (Figure 8): 1. English Español Français USING YOUR SPEAKER SYSTEM Controlling the system To begin using your computer or other sound source to adjust the level as you have not yet done so, also turn on the power switch on the rear of the Acoustimass®...
... or counterclockwise to the highest level may activate the speaker system's internal protection circuity and reduce speaker volume. 11 01&2 2 34!5 To use the sound source volume control instead of the control pod: • Rotate the outer band on the control pod clockwise until it is turned on. 2. Gently...3 speaker system (Figure 8): 1. English Español Français USING YOUR SPEAKER SYSTEM Controlling the system To begin using your computer or other sound source to adjust the level as you have not yet done so, also turn on the power switch on the rear of the Acoustimass®...
User Manual
Page 12
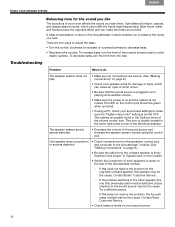
...sure the cable from the wall. originally unheard speaker, this does not resolve the problem for the ! Upholstered furniture, carpets, and drapes absorb sound, which can make sure the "Digital output only" setting is turned OFF. If the problem switches to the Acoustimass® module. (See "...Acoustimass® module enables you to decrease bass. • Reposition the module. Contact Bose Customer Service. • Check balance levels on and the system is on your room affects the sound you hear there. Français Español English USING YOUR SPEAKER SYSTEM Balancing...
...sure the cable from the wall. originally unheard speaker, this does not resolve the problem for the ! Upholstered furniture, carpets, and drapes absorb sound, which can make sure the "Digital output only" setting is turned OFF. If the problem switches to the Acoustimass® module. (See "...Acoustimass® module enables you to decrease bass. • Reposition the module. Contact Bose Customer Service. • Check balance levels on and the system is on your room affects the sound you hear there. Français Español English USING YOUR SPEAKER SYSTEM Balancing...


