User Manual
Page 2
Français Español English SAFETY INFORMATION Please read this owner's guide Please take the time to follow this owner's guide carefully. Please save your system properly and enjoy its advanced features. WARNING 0#&"#1")#%23",%#)*+,#,4,)%5#)"#$6+1#"$#5"+,)'$%7# WARNING: !*%#6336$6)',#,*6//#1")#8%#%23",%&#)"#&$+33+19#"$#,3/6,*+190#61&#"8 0#,'(*#6,# =6,%,0#,*6//#1")#8%#3/6(%&#"1#)*%#6336$6)',7#>,#;+)*#614#%/%()$"1+(#3$"&'(),0#',%#(6$%#1")#)"#,3 1)"#614#36$)# ".#)*%#,4,)%57#?+ It will help you set up and operate your owner's guide for future reference.
Français Español English SAFETY INFORMATION Please read this owner's guide Please take the time to follow this owner's guide carefully. Please save your system properly and enjoy its advanced features. WARNING 0#&"#1")#%23",%#)*+,#,4,)%5#)"#$6+1#"$#5"+,)'$%7# WARNING: !*%#6336$6)',#,*6//#1")#8%#%23",%&#)"#&$+33+19#"$#,3/6,*+190#61&#"8 0#,'(*#6,# =6,%,0#,*6//#1")#8%#3/6(%&#"1#)*%#6336$6)',7#>,#;+)*#614#%/%()$"1+(#3$"&'(),0#',%#(6$%#1")#)"#,3 1)"#614#36$)# ".#)*%#,4,)%57#?+ It will help you set up and operate your owner's guide for future reference.
User Manual
Page 3
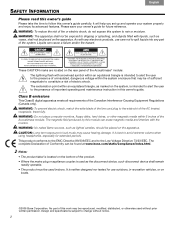
... ensure reliable operation of the product and to protect it in a built-in a wet basement, near a bathtub, washbowl, kitchen sink, laundry tub, in ! English Español Français Important Safety Instructions 1 for future reference. 3. 1""$%#22%3#+*)*4( - and as a bookcase or a cabinet that may keep air from the wall outlet before using this product from...
... ensure reliable operation of the product and to protect it in a built-in a wet basement, near a bathtub, washbowl, kitchen sink, laundry tub, in ! English Español Français Important Safety Instructions 1 for future reference. 3. 1""$%#22%3#+*)*4( - and as a bookcase or a cabinet that may keep air from the wall outlet before using this product from...
User Manual
Page 5
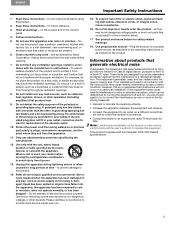
... speakers 8 Making connections 8 Connecting the speakers to register your sales receipt together with this owner's guide. Now would be a good time to the module 9 Connecting the power cord 10 Connecting other sources 10 USING YOUR SPEAKER SYSTEM 11 Controlling the system 11 Balancing tone for the sound you keep your product online at www.bose.com/register. 5 English Español Français CONTENTS GETTING STARTED...
... speakers 8 Making connections 8 Connecting the speakers to register your sales receipt together with this owner's guide. Now would be a good time to the module 9 Connecting the power cord 10 Connecting other sources 10 USING YOUR SPEAKER SYSTEM 11 Controlling the system 11 Balancing tone for the sound you keep your product online at www.bose.com/register. 5 English Español Français CONTENTS GETTING STARTED...
User Manual
Page 6
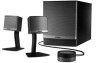
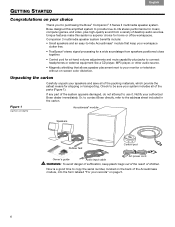
... feet Control pod AC power cord Owner's guide Audio input cable WARNING: !"#6="+&#&619%$#".#,'.."(6)+"10#-%%3#3/6,)+(#869 6 17 Now is a good time to copy the serial number, located on the back of the system appears damaged, do not attempt to connect! Or, to contact Bose directly, refer to -hide Acoustimass® module that allows speaker placement next to -life stereo performance for music, computer games, and video, plus jacks to use...
... feet Control pod AC power cord Owner's guide Audio input cable WARNING: !"#6="+&#&619%$#".#,'.."(6)+"10#-%%3#3/6,)+(#869 6 17 Now is a good time to copy the serial number, located on the back of the system appears damaged, do not attempt to connect! Or, to contact Bose directly, refer to -hide Acoustimass® module that allows speaker placement next to -life stereo performance for music, computer games, and video, plus jacks to use...
User Manual
Page 7
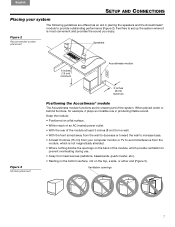
... openings 7 01&2 2 34!5 Figure 2 Recommended system placement Speakers Figure 3 Module placement 6 inches (15 cm) minimum Acoustimass module 3 inches (8 cm) minimum Positioning the Acoustimass® module The Acoustimass module functions as an aid in placing the speakers and the Acoustimass® module to set up the system where it plays an invisible role in producing lifelike sound...
... openings 7 01&2 2 34!5 Figure 2 Recommended system placement Speakers Figure 3 Module placement 6 inches (15 cm) minimum Acoustimass module 3 inches (8 cm) minimum Positioning the Acoustimass® module The Acoustimass module functions as an aid in placing the speakers and the Acoustimass® module to set up the system where it plays an invisible role in producing lifelike sound...
User Manual
Page 8
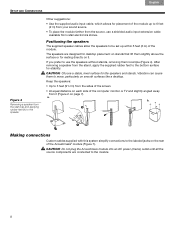
...çais Español English SETUP AND CONNECTIONS Figure 4 Removing a speaker from the stand (a) and applying rubber feet (b) to the speaker Other suggestions: • Use the supplied audio input cable, which allows for placement of the Acoustimass® module (Figure 7). Positioning the speakers The supplied speaker cables allow the speakers to be set up to 6 feet ! (2 m) from your sound source. • To place the module...
...çais Español English SETUP AND CONNECTIONS Figure 4 Removing a speaker from the stand (a) and applying rubber feet (b) to the speaker Other suggestions: • Use the supplied audio input cable, which allows for placement of the Acoustimass® module (Figure 7). Positioning the speakers The supplied speaker cables allow the speakers to be set up to 6 feet ! (2 m) from your sound source. • To place the module...
User Manual
Page 9
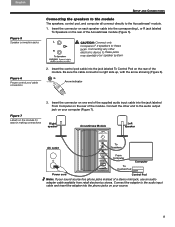
... damage your computer (Figure 7). Insert the control pod cable into the jack labeled From Computer on the rear of the! Insert the connector on one end of the supplied audio input cable into the jack labeled To Control Pod on the rear of the Acoustimass module (Figure 5). Right speaker Acoustimass Module Left speaker AC outlet To Speakers From Computer To Control Pod Computer Power cord Control Pod Note: G.#4"'$#,"'1&#,"'$(%#*6,#3*"1"#:6(-,#+1,)%6&#".#6#,)%$%"#5+1+#:6(-0#',%#61#6'&+"# 6&63)%$#(68/%#available from retail...
... damage your computer (Figure 7). Insert the control pod cable into the jack labeled From Computer on the rear of the! Insert the connector on one end of the supplied audio input cable into the jack labeled To Control Pod on the rear of the Acoustimass module (Figure 5). Right speaker Acoustimass Module Left speaker AC outlet To Speakers From Computer To Control Pod Computer Power cord Control Pod Note: G.#4"'$#,"'1&#,"'$(%#*6,#3*"1"#:6(-,#+1,)%6&#".#6#,)%$%"#5+1+#:6(-0#',%#61#6'&+"# 6&63)%$#(68/%#available from retail...

User Manual
Page 10
...; To connect headphones, insert the connector on the headphone cable into the AC INPUT jack on the module. 2. This connection mutes the sound from the sound source output jack into an AC power (mains) outlet. 3. Plug the large connector into the input jack ( ) on and is the final step before using the system. 1. Français Español English SETUP AND CONNECTIONS Connecting the power cord Plugging in and turning on the control pod.
...; To connect headphones, insert the connector on the headphone cable into the AC INPUT jack on the module. 2. This connection mutes the sound from the sound source output jack into an AC power (mains) outlet. 3. Plug the large connector into the input jack ( ) on and is the final step before using the system. 1. Français Español English SETUP AND CONNECTIONS Connecting the power cord Plugging in and turning on the control pod.
User Manual
Page 11
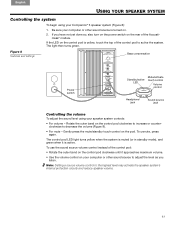
..., also turn on the power switch on the control pod clockwise to increase or counterclockwise to the highest level may activate the speaker system's internal protection circuity and reduce speaker volume. 11 01&2 2 34!5 Figure 8 Switches and settings Bass compensation Power switch Standby/active LED Mute/activate touch control Volume control Headphone jack Sound source jack Controlling the volume To adjust the sound level using your speaker system controls: • For volume - To use the sound source volume control instead of the control pod: •...
..., also turn on the power switch on the control pod clockwise to increase or counterclockwise to the highest level may activate the speaker system's internal protection circuity and reduce speaker volume. 11 01&2 2 34!5 Figure 8 Switches and settings Bass compensation Power switch Standby/active LED Mute/activate touch control Volume control Headphone jack Sound source jack Controlling the volume To adjust the sound level using your speaker system controls: • For volume - To use the sound source volume control instead of the control pod: •...
User Manual
Page 12
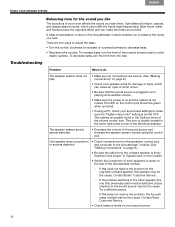
... lower right-hand corner of the sound source and increase the speaker system volume using a PC, check your sound card settings to jacks on the module. • Switch the connection of both speakers to make the treble sound shrill. originally unheard speaker, this speaker may be the cause. Contact Bose® Customer Service. - Try a different source. - If this does not resolve the problem for the ! The LED on...
... lower right-hand corner of the sound source and increase the speaker system volume using a PC, check your sound card settings to jacks on the module. • Switch the connection of both speakers to make the treble sound shrill. originally unheard speaker, this speaker may be the cause. Contact Bose® Customer Service. - Try a different source. - If this does not resolve the problem for the ! The LED on...
User Manual
Page 13
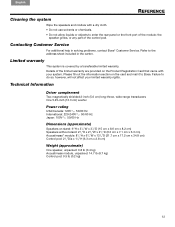
... by a transferable limited warranty. Please fill out the information section on the Product Registration Card that came with a dry cloth. • Do not use solvents or chemicals. • Do not allow liquids or objects to enter the rear panel or the front port of the control pod. One 5.25-inch (13.3 cm) woofer Power rating USA/Canada: 120V...
... by a transferable limited warranty. Please fill out the information section on the Product Registration Card that came with a dry cloth. • Do not use solvents or chemicals. • Do not allow liquids or objects to enter the rear panel or the front port of the control pod. One 5.25-inch (13.3 cm) woofer Power rating USA/Canada: 120V...


