
User Guide
Page 2
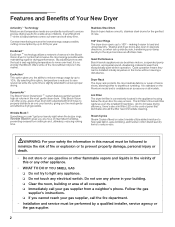
... any electrical switch. WHAT TO DO IF YOU SMELL GAS q Do not try to load and unload laundry. Only Bosch Vision can be installed virtually anywhere in and, ultimately, reducing ironing time. Stainless Steel Drum Bosch dryers feature smooth, stainless steel drums for the gentlest of ... use any other flammable vapors and liquids in the market. Follow the gas supplier's instructions. DynamicAirt The Bosch Vision DynamicAirt system features gentle heat and high air volume in the Bosch Vision dryer for easy access. Installation and service must be performed by up to ...
... any electrical switch. WHAT TO DO IF YOU SMELL GAS q Do not try to load and unload laundry. Only Bosch Vision can be installed virtually anywhere in and, ultimately, reducing ironing time. Stainless Steel Drum Bosch dryers feature smooth, stainless steel drums for the gentlest of ... use any other flammable vapors and liquids in the market. Follow the gas supplier's instructions. DynamicAirt The Bosch Vision DynamicAirt system features gentle heat and high air volume in the Bosch Vision dryer for easy access. Installation and service must be performed by up to ...
User Guide
Page 3
... INSTRUCTIONS 6 INSTALLATION INSTRUCTIONS 7 Introduction 7 Information concerning waste disposal 7 Before installing the dryer 7 Checklist for Installation 8 Installation Location 8 Dryer Dimensions 8 Door Hinge Reversal 9 Installation Types 11 Electrical connection 14 Gas connection 15 Exhaust air connection 16 Accessories 18 Preparing to transport the dryer ć step by step 19 OPERATING INSTRUCTIONS 20 Panel 20 Additional Safety...
... INSTRUCTIONS 6 INSTALLATION INSTRUCTIONS 7 Introduction 7 Information concerning waste disposal 7 Before installing the dryer 7 Checklist for Installation 8 Installation Location 8 Dryer Dimensions 8 Door Hinge Reversal 9 Installation Types 11 Electrical connection 14 Gas connection 15 Exhaust air connection 16 Accessories 18 Preparing to transport the dryer ć step by step 19 OPERATING INSTRUCTIONS 20 Panel 20 Additional Safety...
User Guide
Page 6
... properly grounded. Plastic or nonĆmetal flexible duct is readily accessible. Failure to install, maintain and/or operate the dryer according to the dryer have been removed or if any safety devices. 29. Flexible gas connector must be conveyed with all water connections to the manufacturer's instructions may occur. before placing into...
... properly grounded. Plastic or nonĆmetal flexible duct is readily accessible. Failure to install, maintain and/or operate the dryer according to the dryer have been removed or if any safety devices. 29. Flexible gas connector must be conveyed with all water connections to the manufacturer's instructions may occur. before placing into...

User Guide
Page 7
... technician or a licensed electrician. INSTALLATION INSTRUCTIONS Introduction Read these instructions the dryer must be installed in accordance with the National Fuel Gas Code, ANSI Z223.1/NFPA 54 or the Canadian Natural Gas and Propane Installation Code CAN/CSAĆB149.1 Note: This gas dryer has been UL and C-UL listed for safe operation up to...
... technician or a licensed electrician. INSTALLATION INSTRUCTIONS Introduction Read these instructions the dryer must be installed in accordance with the National Fuel Gas Code, ANSI Z223.1/NFPA 54 or the Canadian Natural Gas and Propane Installation Code CAN/CSAĆB149.1 Note: This gas dryer has been UL and C-UL listed for safe operation up to...
User Guide
Page 8
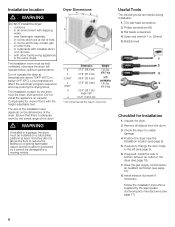
... if necessary. Do not install the appliance on the dimensions of the door! Philips screwdriver (#2) 3. Unpack the dryer. 2. Position the dryer near flammable materials, - Follow the installation instructions supplied by a moving vehicle Dryer Dimensions a b c (min)* c (max)* d e Dimension 27.0" (68.6 cm) 31.8" (81...WARNING DO NOT install the dryer: - in , max=out Useful Tools The following tools are at temperatures above the floor to the left (see page 15). 8. Low temperatures affect the automatic program sequence and may contain gas or other fuelĆburning...
... if necessary. Do not install the appliance on the dimensions of the door! Philips screwdriver (#2) 3. Unpack the dryer. 2. Position the dryer near flammable materials, - Follow the installation instructions supplied by a moving vehicle Dryer Dimensions a b c (min)* c (max)* d e Dimension 27.0" (68.6 cm) 31.8" (81...WARNING DO NOT install the dryer: - in , max=out Useful Tools The following tools are at temperatures above the floor to the left (see page 15). 8. Low temperatures affect the automatic program sequence and may contain gas or other fuelĆburning...
User Guide
Page 9
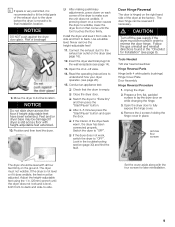
...adjustable feet! 11. Open the shut-off the gas supply if the dryer must not wobble. q Close the dryer door. q If the interior of breakage! 9. Prepare a firm, flat, padded surface to lay the dryer door on each corner of the dryer to make sure the unit does not wobble. ... 14. Follow the gas uninstall and reinstall directions found in . (25mm) wrench until the foot touches the floor firmly. Tools Needed T20 star head screwdriver Hinge Reversal Parts Hinge (with heightĆadjustable feet extended. 10. Unplug the dryer. 2. remove four screws The dryer should be reversed if...
...adjustable feet! 11. Open the shut-off the gas supply if the dryer must not wobble. q Close the dryer door. q If the interior of breakage! 9. Prepare a firm, flat, padded surface to lay the dryer door on each corner of the dryer to make sure the unit does not wobble. ... 14. Follow the gas uninstall and reinstall directions found in . (25mm) wrench until the foot touches the floor firmly. Tools Needed T20 star head screwdriver Hinge Reversal Parts Hinge (with heightĆadjustable feet extended. 10. Unplug the dryer. 2. remove four screws The dryer should be reversed if...
User Guide
Page 12
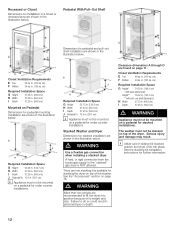
...27.50 in. (69.9 cm) I Depth 37.25 in the illustration below . d WARNING Use a flexible gas connection when installing a stacked dryer. A hard, or rigid connection from the house gas supply to do so could result in . (38.1 cm) i Appliance must not be mounted on a pedestal ...in . (94.6 cm) d WARNING Appliance must not be mounted on a pedestal for under counter installations. Failure to the stacked" gas dryer is NOT allowed. Pedestal With Pull-Out Shelf Dimensions for further information. 12 Closet Ventilation Requirements E Top 48 sq. J Required Installation ...
...27.50 in. (69.9 cm) I Depth 37.25 in the illustration below . d WARNING Use a flexible gas connection when installing a stacked dryer. A hard, or rigid connection from the house gas supply to do so could result in . (38.1 cm) i Appliance must not be mounted on a pedestal ...in . (94.6 cm) d WARNING Appliance must not be mounted on a pedestal for under counter installations. Failure to the stacked" gas dryer is NOT allowed. Pedestal With Pull-Out Shelf Dimensions for further information. 12 Closet Ventilation Requirements E Top 48 sq. J Required Installation ...
User Guide
Page 15
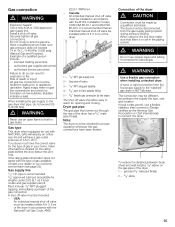
... 1/2" I.D. When using for opening and closing. Your dryer must be disconnected from the house gas supply to the supply line type, size and location. dryer has a 3/8" male Note: The dryer must be different, according to the stacked" gas dryer is NOT allowed. d WARNING Use a flexible gas connection when installing a stacked dryer. The connection may be installed within 6 ft...
... 1/2" I.D. When using for opening and closing. Your dryer must be disconnected from the house gas supply to the supply line type, size and location. dryer has a 3/8" male Note: The dryer must be different, according to the stacked" gas dryer is NOT allowed. d WARNING Use a flexible gas connection when installing a stacked dryer. The connection may be installed within 6 ft...
User Guide
Page 18
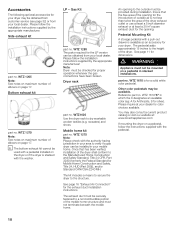
.... Please follow the installation instructions supplied by the appropriate manufacturer! An opening to verify if a gas dryer can be obtained from your local dealer. Side exhaust kit part no . Note: Dryer must not terminate beneath the mobile home. Mobile home kit part no . See page 16 Exhaust...on a pedestal in your mobile home. i The bottom exhaust kit cannot be available. Gas Kit part no . part no . Bottom exhaust kit part no. Once that the free area of the dryer. See page 11 for the exhaust duct installation instructions. WTZ 1610"X" in which the X...
.... Please follow the installation instructions supplied by the appropriate manufacturer! An opening to verify if a gas dryer can be obtained from your local dealer. Side exhaust kit part no . Note: Dryer must not terminate beneath the mobile home. Mobile home kit part no . See page 16 Exhaust...on a pedestal in your mobile home. i The bottom exhaust kit cannot be available. Gas Kit part no . part no . Bottom exhaust kit part no. Once that the free area of the dryer. See page 11 for the exhaust duct installation instructions. WTZ 1610"X" in which the X...
User Guide
Page 19
...the water supply hose. 6. Screw the heightĆadjustable feet of the dryer into the housing to stack the dryer on top of the Dryer at your dealer for silver). Stacking Kits d WARNING Use a flexible gas connection when installing a stacked dryer. WTZ 1601 is NOT allowed. Please inquire at the New Location -... inches. Close the door and secure with the pull-out shelf stacking kit in this manual (see page 7). 19 refer to the stacked" gas dryer is for the solid white pull-out shelf stacking kit. See page 12 for dimensions. This kit adds approximately 1.52 inches (38.6 mm) ...
...the water supply hose. 6. Screw the heightĆadjustable feet of the dryer into the housing to stack the dryer on top of the Dryer at your dealer for silver). Stacking Kits d WARNING Use a flexible gas connection when installing a stacked dryer. WTZ 1601 is NOT allowed. Please inquire at the New Location -... inches. Close the door and secure with the pull-out shelf stacking kit in this manual (see page 7). 19 refer to the stacked" gas dryer is for the solid white pull-out shelf stacking kit. See page 12 for dimensions. This kit adds approximately 1.52 inches (38.6 mm) ...
User Guide
Page 21
... an extended period of time, you are not using the dryer each drying load results in the dryer: - Turn off the water supply (applies only to go on saving energy To save energy, money and time, Bosch recommends the following: - They provide valuable information as well as these ...the washing machine. Unplug the power supply plug if possible. 3. Turn off the gas supply. Laundry Identification of wrinkling! Do not use the "Very dry/Extra dry" cycles the first time you plan to Steam dryers). 5. Provide an adequate supply of the environment Tips on vacation or are at...
... an extended period of time, you are not using the dryer each drying load results in the dryer: - Turn off the water supply (applies only to go on saving energy To save energy, money and time, Bosch recommends the following: - They provide valuable information as well as these ...the washing machine. Unplug the power supply plug if possible. 3. Turn off the gas supply. Laundry Identification of wrinkling! Do not use the "Very dry/Extra dry" cycles the first time you plan to Steam dryers). 5. Provide an adequate supply of the environment Tips on vacation or are at...


