User Guide
Page 2
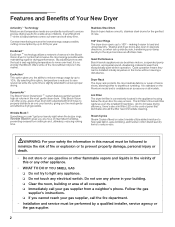
... dryer door for cycles that illuminates should the filter need immediate cleaning. Dryer Rack The dryer rack protects the most gentle dryer drum. Lint Filter The dryer lint filter is available as an accessory on the control panel that conserve the most energy possible while maintaining superior drying performance. And to increase drying efficiency, there's also a lint filter LED on all occupants. q Do not touch any appliance. DynamicAirt The Bosch Vision DynamicAirt system features gentle heat...
... dryer door for cycles that illuminates should the filter need immediate cleaning. Dryer Rack The dryer rack protects the most gentle dryer drum. Lint Filter The dryer lint filter is available as an accessory on the control panel that conserve the most energy possible while maintaining superior drying performance. And to increase drying efficiency, there's also a lint filter LED on all occupants. q Do not touch any appliance. DynamicAirt The Bosch Vision DynamicAirt system features gentle heat...
User Guide
Page 3
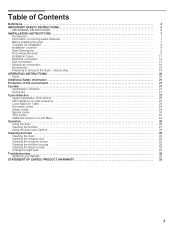
... LED indicators of cycle sequence 23 Cycle Selection Table 24 Automatic cycles 24 Steam cycles 24 Special cycles 24 Time cycles 24 Additional Options on LCD Menu 24 Operation 26 Using the dryer 26 Cleaning the lint filter 27 Using the dryer rack (Option 28 Cleaning and care 29 Cleaning the dryer 29 Cleaning the exhaust duct 29 Cleaning the moisture sensor 29 Cleaning the lint filter housing 29 Cleaning the Steam nozzle 29 Change the light bulb 29 Troubleshooting 30 SERVICE and REPAIR 32 STATEMENT OF...
... LED indicators of cycle sequence 23 Cycle Selection Table 24 Automatic cycles 24 Steam cycles 24 Special cycles 24 Time cycles 24 Additional Options on LCD Menu 24 Operation 26 Using the dryer 26 Cleaning the lint filter 27 Using the dryer rack (Option 28 Cleaning and care 29 Cleaning the dryer 29 Cleaning the exhaust duct 29 Cleaning the moisture sensor 29 Cleaning the lint filter housing 29 Cleaning the Steam nozzle 29 Change the light bulb 29 Troubleshooting 30 SERVICE and REPAIR 32 STATEMENT OF...
User Guide
Page 4
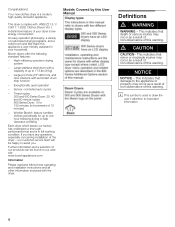
... Series Dryer: 10 to the appliance or property may occur as a result of nonĆobservance of this warning. Models Covered by this appliance a userĆfriendly assistant in your dryer is low energy consumption. d CAUTION CAUTION- An easy operation philosophy, a variety of our products can be happy to 17.6 lbs (8 kg) - Bosch dryers offer the following drying to important information. 4 Sensor-controlled...
... Series Dryer: 10 to the appliance or property may occur as a result of nonĆobservance of this warning. Models Covered by this appliance a userĆfriendly assistant in your dryer is low energy consumption. d CAUTION CAUTION- An easy operation philosophy, a variety of our products can be happy to 17.6 lbs (8 kg) - Bosch dryers offer the following drying to important information. 4 Sensor-controlled...
User Guide
Page 5
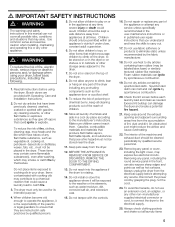
... attempt any service unless specifically recommended in the userĆmaintenance instructions or in published user repair instructions that might reduce the airflow and cause overheating. 22. Keep pets away from the electrical supply before attempting any service. BEFORE THE APPLIANCE IS REMOVED FROM SERVICE OR DISCARDED, REMOVE THE DOOR TO THE DRYING COMPARTMENT. 13. Do not repair or replace any part of the machine and exhaust duct should be...
... attempt any service unless specifically recommended in the userĆmaintenance instructions or in published user repair instructions that might reduce the airflow and cause overheating. 22. Keep pets away from the electrical supply before attempting any service. BEFORE THE APPLIANCE IS REMOVED FROM SERVICE OR DISCARDED, REMOVE THE DOOR TO THE DRYING COMPARTMENT. 13. Do not repair or replace any part of the machine and exhaust duct should be...
User Guide
Page 6
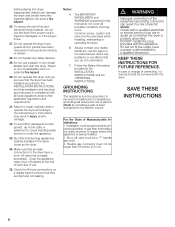
... grounded. Common sense, caution and care must be a T" handle gas cock. 3. KEEP THESE INSTRUCTIONS FOR FUTURE REFERENCE. Do not operate the dryer if any guards and/or panels have been removed or if any parts are in a risk of least resistance for the electric current. Check the fill hose connections on a regular basis to the dryer have a proper outlet installed by the state, province or...
... grounded. Common sense, caution and care must be a T" handle gas cock. 3. KEEP THESE INSTRUCTIONS FOR FUTURE REFERENCE. Do not operate the dryer if any guards and/or panels have been removed or if any parts are in a risk of least resistance for the electric current. Check the fill hose connections on a regular basis to the dryer have a proper outlet installed by the state, province or...

User Guide
Page 7
... from locking themselves in the appliance, remove the door. Do not lift it must be of a specific type identified by a qualifed technician or a licensed electrician. NOTICE After removing the packaging, immediately remove any modifications to collapse, be easily crushed and trap lint. Before installing the dryer Before installing the dryer to the manufacturer's instructions and local codes. - Check the dryer for clothes dryers. Be sure to these installation instructions completely and carefully. Clothes dryer installation...
... from locking themselves in the appliance, remove the door. Do not lift it must be of a specific type identified by a qualifed technician or a licensed electrician. NOTICE After removing the packaging, immediately remove any modifications to collapse, be easily crushed and trap lint. Before installing the dryer Before installing the dryer to the manufacturer's instructions and local codes. - Check the dryer for clothes dryers. Be sure to these installation instructions completely and carefully. Clothes dryer installation...
User Guide
Page 8
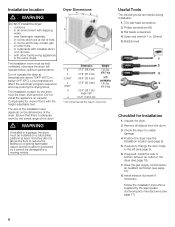
.... T20 star head screwdriver 2. Have the gas supply connected by the appropriate ductwork parts manufacturers (see page 15). 8. If required, install the side or bottom exhaust air outlet on carpets! Installation location d WARNING DO NOT install the dryer: - Open end wrench 1 in a garage, the dryer must be installed on the dimensions of frost, - d WARNING If installed in . (25mm) 5. Do not operate the dryer at least 18 inches (46 cm...
.... T20 star head screwdriver 2. Have the gas supply connected by the appropriate ductwork parts manufacturers (see page 15). 8. If required, install the side or bottom exhaust air outlet on carpets! Installation location d WARNING DO NOT install the dryer: - Open end wrench 1 in a garage, the dryer must be installed on the dimensions of frost, - d WARNING If installed in . (25mm) 5. Do not operate the dryer at least 18 inches (46 cm...
User Guide
Page 9
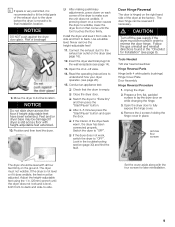
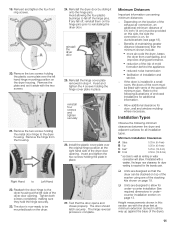
... changing the hinge. 3. Insert the dryer electrical plug into the wall receptacle (see page 8). q Switch the dryer to "OFF". q If the dryer does not work, switch the dryer to "Extra Dry" and then press the Start/Pause" button. The door hinge can be adjusted. Set the cover aside along with 4 white plastic bushings) Hinge Cover Plate Door Assembly Hinge Reversal Procedure 1. Use a bubble level. q After 3-5 minutes press the Start/Pause" button and open the door...
... changing the hinge. 3. Insert the dryer electrical plug into the wall receptacle (see page 8). q Switch the dryer to "OFF". q If the dryer does not work, switch the dryer to "Extra Dry" and then press the Start/Pause" button. The door hinge can be adjusted. Set the cover aside along with 4 white plastic bushings) Hinge Cover Plate Door Assembly Hinge Reversal Procedure 1. Use a bubble level. q After 3-5 minutes press the Start/Pause" button and open the door...
User Guide
Page 11
... air cools the dryer, keeps the dryer from the housing. If installed with vents of the dryer door opening . Remove the two screws holding the metal door hinge to fall off the hinge pins. Right Hand to reinstalling the dryer door. Insert and tighten the 4 screws holding the plate in all installation types. Test that the dryer can be fitted with a washer, the larger rear clearance for dryer venting is required for door, wall...
... air cools the dryer, keeps the dryer from the housing. If installed with vents of the dryer door opening . Remove the two screws holding the metal door hinge to fall off the hinge pins. Right Hand to reinstalling the dryer door. Insert and tighten the 4 screws holding the plate in all installation types. Test that the dryer can be fitted with a washer, the larger rear clearance for dryer venting is required for door, wall...
User Guide
Page 15
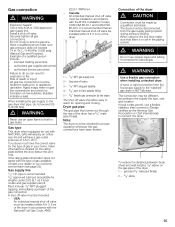
... that an individual manual shutĆoff valve should be installed within 6 ft (1.8 m) of the dryer. 5 43 2 1 1 1 ć 1/2" NPT gas supply line 2 ć Gas shutĆoff valve 3 ć 1/8" NPT plugged tapping 4 ć 3/8" pipe to flare adapter fitting 5 ć 3/8" flexible gas connector (to the dryer) The shutĆoff valve be easy to test for proper operation whenever the gas connections have a gas outlet pressure of 3.5 in accordance with the type of new...
... that an individual manual shutĆoff valve should be installed within 6 ft (1.8 m) of the dryer. 5 43 2 1 1 1 ć 1/2" NPT gas supply line 2 ć Gas shutĆoff valve 3 ć 1/8" NPT plugged tapping 4 ć 3/8" pipe to flare adapter fitting 5 ć 3/8" flexible gas connector (to the dryer) The shutĆoff valve be easy to test for proper operation whenever the gas connections have a gas outlet pressure of 3.5 in accordance with the type of new...
User Guide
Page 16
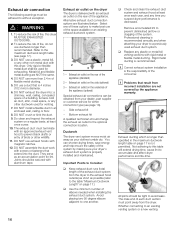
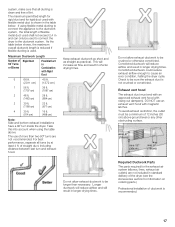
... customer service for venting. 7. Exhaust ducting which is longer than specified in an enclosed wall, ceiling or floor. 8. DO NOT crush or kink the duct. 9. All joints should change the exhaust air outlet to avoid leaks. DO NOT assemble the duct work with this dryer. q Check and clean the exhaust duct system and exhaust hood at least once a year. 10. DO NOT install a flexible duct in the maximum ductwork length table...
... customer service for venting. 7. Exhaust ducting which is longer than specified in an enclosed wall, ceiling or floor. 8. DO NOT crush or kink the duct. 9. All joints should change the exhaust air outlet to avoid leaks. DO NOT assemble the duct work with this dryer. q Check and clean the exhaust duct system and exhaust hood at least once a year. 10. DO NOT install a flexible duct in the maximum ductwork length table...
User Guide
Page 17
... with an approved exhaust vent hood with magnetic latches. For best performance, separate all ducting is clean and free of straight duct, including distance between last turn inside the dryer. Constricted ductwork will reduce airflow and result in shorter drying times. Check to cause an error condition, halting the dryer cycle. The maximum permitted length for rigid duct and for the exhaust air system (elbows, lines, exhaust air outlets) are not recommended...
... with an approved exhaust vent hood with magnetic latches. For best performance, separate all ducting is clean and free of straight duct, including distance between last turn inside the dryer. Constricted ductwork will reduce airflow and result in shorter drying times. Check to cause an error condition, halting the dryer cycle. The maximum permitted length for rigid duct and for the exhaust air system (elbows, lines, exhaust air outlets) are not recommended...
User Guide
Page 18
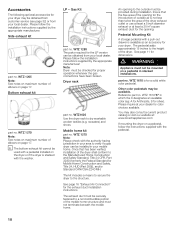
... for dimensions. WTZ1620 Use the dryer rack to a noncombustible portion of elbows on page 17. The exhaust duct must be provided during installation. Pedestal Mounting Kit A storage pedestal with the washer. d WARNING Appliance must be checked for proper operation whenever the gas connections have been broken. WTZ 1610 is available as an accessory for color choices available. Reference part no . You may be available. Bottom exhaust kit part no . Gas Kit part...
... for dimensions. WTZ1620 Use the dryer rack to a noncombustible portion of elbows on page 17. The exhaust duct must be provided during installation. Pedestal Mounting Kit A storage pedestal with the washer. d WARNING Appliance must be checked for proper operation whenever the gas connections have been broken. WTZ 1610 is available as an accessory for color choices available. Reference part no . You may be available. Bottom exhaust kit part no . Gas Kit part...
User Guide
Page 22
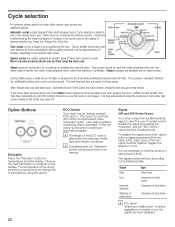
... may cause buildup on select models. This option is sprayed into drum, clothes are less wrinkle-free than they customarily are best suited for specific types of malfunction" is extended. Less heat is applied, and drying time is active regardless of water is used with this option. 22 ECO Action Your dryer has an energy savings" ECO option. During Steam cycles a small amount of whether or...
... may cause buildup on select models. This option is sprayed into drum, clothes are less wrinkle-free than they customarily are best suited for specific types of malfunction" is extended. Less heat is applied, and drying time is active regardless of water is used with this option. 22 ECO Action Your dryer has an energy savings" ECO option. During Steam cycles a small amount of whether or...
User Guide
Page 26
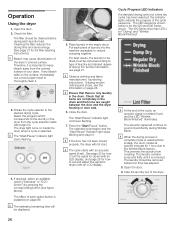
... during Wrinkle Block. Close the door. See page 22 for the 500 and 800 Series dryers. The dryer light turns on page 89. Operation Using the dryer 1. The filter should be sorted according to the desired drying cycle. Cleaning the filter reduces the drying time and saves energy. (See page 27 for Drying" and Wrinkle Block/Finished". 5. Press the Start/Pause" button. The acoustic signal will not start. Open the door. 9. The 300 Series dryer has LED's for lint filter cleaning instructions). Check that...
... during Wrinkle Block. Close the door. See page 22 for the 500 and 800 Series dryers. The dryer light turns on page 89. Operation Using the dryer 1. The filter should be sorted according to the desired drying cycle. Cleaning the filter reduces the drying time and saves energy. (See page 27 for Drying" and Wrinkle Block/Finished". 5. Press the Start/Pause" button. The acoustic signal will not start. Open the door. 9. The 300 Series dryer has LED's for lint filter cleaning instructions). Check that...
User Guide
Page 27
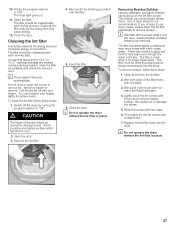
... a drying program, clean the filter immediately and check the exhaust duct. If you choose to use dryer sheets, please clean the lint filter periodically to remove lint. The filter should be cleaned after each laundry load. A filter with hot water. 3. To remove residue, follow these steps: 1. Lightly scrub the lint screen with a clean towel. 7. Replace the lint filter back into the dryer. Open the door. 3. Removing Residue Buildup Laundry detergent and fabric softener can cause longer drying times. Wet a soft nylon brush with hot water. 6. 10...
... a drying program, clean the filter immediately and check the exhaust duct. If you choose to use dryer sheets, please clean the lint filter periodically to remove lint. The filter should be cleaned after each laundry load. A filter with hot water. 3. To remove residue, follow these steps: 1. Lightly scrub the lint screen with a clean towel. 7. Replace the lint filter back into the dryer. Open the door. 3. Removing Residue Buildup Laundry detergent and fabric softener can cause longer drying times. Wet a soft nylon brush with hot water. 6. 10...
User Guide
Page 29
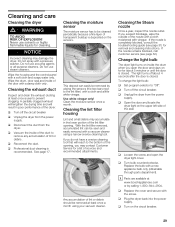
... troubleshooting guide (see page 32). q Turn bulb counterclockwise. q Replace the cover and secure with a soft cloth and soapy water only. Do not use steam cleaners. Wipe the housing and the control panel with the screw. See page 17. Change the light bulb The dryer light turns on the sensors. q Loosen the screw and open the door and stays on the circuit breaker. 29 Replace the bulb with a pressure washer. q Turn off the circuit breaker q Unplug the dryer from the power supply. i Parts...
... troubleshooting guide (see page 32). q Turn bulb counterclockwise. q Replace the cover and secure with a soft cloth and soapy water only. Do not use steam cleaners. Wipe the housing and the control panel with the screw. See page 17. Change the light bulb The dryer light turns on the sensors. q Loosen the screw and open the door and stays on the circuit breaker. 29 Replace the bulb with a pressure washer. q Turn off the circuit breaker q Unplug the dryer from the power supply. i Parts...
User Guide
Page 30
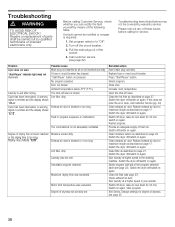
... be covered by warranty service Please rule out any of the following table. Motor limit temperature was too wet. Replace fuse or reset circuit breaker. Select program. Close door. Open the shutĆoff the circuit breaker. 3. Switch the dryer off/switch on page 17. Restart program. Clean exhaust air duct. Pull the main plug out of parts shall be rectified or a repair is blocked or too long. Laundry is emitted and the display shows E:12". Exhaust air duct is required...
... be covered by warranty service Please rule out any of the following table. Motor limit temperature was too wet. Replace fuse or reset circuit breaker. Select program. Close door. Open the shutĆoff the circuit breaker. 3. Switch the dryer off/switch on page 17. Restart program. Clean exhaust air duct. Pull the main plug out of parts shall be rectified or a repair is blocked or too long. Laundry is emitted and the display shows E:12". Exhaust air duct is required...
User Guide
Page 31
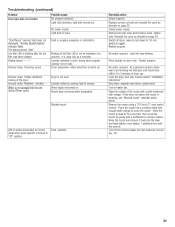
... loose. Start/Pause" indicator light does not illuminate. Wrinkle Block/Finished" indicator lights. No action required. Troubleshooting (continued) Problem Drum light does not function. Light bulb defective, light bulb burned out. Lint filter LED is loose, tighten bulb. Unusual noise: thumping sound Fault in drum during Steam cycles Dryer is not sprayed into the unit during wool program (laundry not on again. Laundry detected in program sequence or malfunction. Restart program. Check power supply...
... loose. Start/Pause" indicator light does not illuminate. Wrinkle Block/Finished" indicator lights. No action required. Troubleshooting (continued) Problem Drum light does not function. Light bulb defective, light bulb burned out. Lint filter LED is loose, tighten bulb. Unusual noise: thumping sound Fault in drum during Steam cycles Dryer is not sprayed into the unit during wool program (laundry not on again. Laundry detected in program sequence or malfunction. Restart program. Check power supply...
User Guide
Page 32
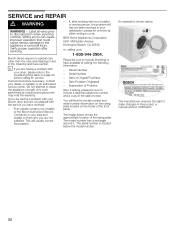
... right to the appliance or personal injury. Wiring errors can cause improper operation that could cause serious damage to make changes in the Cleaning and Care section. The image below the model number. An example is located below shows the approximate location of the rating plate. Any work performed by either writing to repair the appliance yourself. Serial Number - You will usually correct the problem. - Label all wires...
... right to the appliance or personal injury. Wiring errors can cause improper operation that could cause serious damage to make changes in the Cleaning and Care section. The image below the model number. An example is located below shows the approximate location of the rating plate. Any work performed by either writing to repair the appliance yourself. Serial Number - You will usually correct the problem. - Label all wires...


