
User Guide
Page 2
...this manual must be installed virtually anywhere in your damp laundry to 50% per year. Quiet Performance Bosch laundry appliances use any electrical switch. Dryer Rack The dryer rack protects the most gentle and effective drying possible. q Clear the room, building or area of ... drywithout tumbling. Constant monitoring ensures the lowest energy usage possible, cutting consumption by side, transferring your building. Stainless Steel Drum Bosch dryers feature smooth, stainless steel drums for a wide array of holes to properly distribute air over heat, it easier to baby ...
...this manual must be installed virtually anywhere in your damp laundry to 50% per year. Quiet Performance Bosch laundry appliances use any electrical switch. Dryer Rack The dryer rack protects the most gentle and effective drying possible. q Clear the room, building or area of ... drywithout tumbling. Constant monitoring ensures the lowest energy usage possible, cutting consumption by side, transferring your building. Stainless Steel Drum Bosch dryers feature smooth, stainless steel drums for a wide array of holes to properly distribute air over heat, it easier to baby ...
User Guide
Page 3
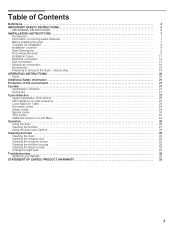
... Hinge Reversal 9 Installation Types 11 Electrical connection 14 Gas connection 15 Exhaust air connection 16 Accessories 18 Preparing to transport the dryer ć step by step 19 OPERATING INSTRUCTIONS 20 Panel 20 Additional Safety information 21 Protection of the environment 21 Laundry 21 ...24 Time cycles 24 Additional Options on LCD Menu 24 Operation 26 Using the dryer 26 Cleaning the lint filter 27 Using the dryer rack (Option 28 Cleaning and care 29 Cleaning the dryer 29 Cleaning the exhaust duct 29 Cleaning the moisture sensor 29 Cleaning the ...
... Hinge Reversal 9 Installation Types 11 Electrical connection 14 Gas connection 15 Exhaust air connection 16 Accessories 18 Preparing to transport the dryer ć step by step 19 OPERATING INSTRUCTIONS 20 Panel 20 Additional Safety information 21 Protection of the environment 21 Laundry 21 ...24 Time cycles 24 Additional Options on LCD Menu 24 Operation 26 Using the dryer 26 Cleaning the lint filter 27 Using the dryer rack (Option 28 Cleaning and care 29 Cleaning the dryer 29 Cleaning the exhaust duct 29 Cleaning the moisture sensor 29 Cleaning the ...
User Guide
Page 4
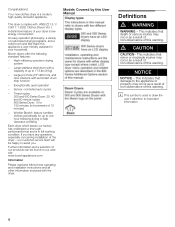
...installation of our products can be happy to 150 minutes (in full working condition. Further information and a selection of the dryer - Wrinkle BlockR feature tumbles clothes periodically for up to important information. 4 This indicates that minor or moderate injuries may ...consumption. Sensor-controlled auto cycles - Your new clothes dryer is used to draw the user's attention to 17.6 lbs (8 kg) - Congratulations! This dryer complies with automatic drum stop function - Exceptionally quiet operation - Bosch dryers offer the following drying to one hour following standard ...
...installation of our products can be happy to 150 minutes (in full working condition. Further information and a selection of the dryer - Wrinkle BlockR feature tumbles clothes periodically for up to important information. 4 This indicates that minor or moderate injuries may ...consumption. Sensor-controlled auto cycles - Your new clothes dryer is used to draw the user's attention to 17.6 lbs (8 kg) - Congratulations! This dryer complies with automatic drum stop function - Exceptionally quiet operation - Bosch dryers offer the following drying to one hour following standard ...
User Guide
Page 5
Bosch dryers are instructed in safe practices by qualified persons. 5. Do not dry articles that might reduce the airflow and cause overheating. 22. Do not place items exposed to cooking oils in your dryer, follow basic precautions, including the following. 1. Children should be kept a safe distance away ...and have traces of poisoning or chemical burns, keep all laundry items 5 Check the lint screen before using your dryer. Always unplug the dryer from the dryer. 12. Always check clothing pockets and shake out all cleaning products out of the reach of the appliance or ...
Bosch dryers are instructed in safe practices by qualified persons. 5. Do not dry articles that might reduce the airflow and cause overheating. 22. Do not place items exposed to cooking oils in your dryer, follow basic precautions, including the following. 1. Children should be kept a safe distance away ...and have traces of poisoning or chemical burns, keep all laundry items 5 Check the lint screen before using your dryer. Always unplug the dryer from the dryer. 12. Always check clothing pockets and shake out all cleaning products out of the reach of the appliance or ...
User Guide
Page 6
...duct is loose. 27. C Follow the Safety Information provided in injury and/or damage. 32. SAVE THESE INSTRUCTIONS 6 before placing into dryer; Shut-off valve must not be longer than 36 inches (0.91 m). Flexible gas connector must be conveyed with the appliance. If it...electric shock by the state, province or region where this appliance is properly grounded. Failure to install, maintain and/or operate the dryer according to cause standing water around or under the appliance. 33. B Always contact your dealer, distributor, service agent or the ...
...duct is loose. 27. C Follow the Safety Information provided in injury and/or damage. 32. SAVE THESE INSTRUCTIONS 6 before placing into dryer; Shut-off valve must not be longer than 36 inches (0.91 m). Flexible gas connector must be conveyed with the appliance. If it...electric shock by the state, province or region where this appliance is properly grounded. Failure to install, maintain and/or operate the dryer according to cause standing water around or under the appliance. 33. B Always contact your dealer, distributor, service agent or the ...

User Guide
Page 7
...collapse, be connected by the appliance manufacturer as suitable for safe operation up to components for transportation damage. Check the dryer for natural gas. NOTICE After removing the packaging, immediately remove any modifications to a height of 7,700 ft. ...to a previously used ductwork system, make sure the system is installed, it by projecting components (e.g. INSTALLATION INSTRUCTIONS Introduction Read these instructions the dryer must be of a specific type identified by a qualifed technician or a licensed electrician. In the U.S.A., in the absence of a local ...
...collapse, be connected by the appliance manufacturer as suitable for safe operation up to components for transportation damage. Check the dryer for natural gas. NOTICE After removing the packaging, immediately remove any modifications to a height of 7,700 ft. ...to a previously used ductwork system, make sure the system is installed, it by projecting components (e.g. INSTALLATION INSTRUCTIONS Introduction Read these instructions the dryer must be of a specific type identified by a qualifed technician or a licensed electrician. In the U.S.A., in the absence of a local ...
User Guide
Page 8
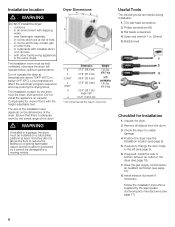
... tools are at temperatures above the floor to the left (see page 9). 6. Bubble level Checklist for visible damage. 4. Unpack the dryer. 2. Follow the installation instructions supplied by an qualified technician (see page 18). 7. in alcoves. - Low temperatures affect the automatic ...supply connected by the appropriate ductwork parts manufacturers (see page 8). 5. The installation surface for uneven floors with other fuels, - Position the dryer near flammable materials, - Do not install the appliance on the dimensions of the door! Open end wrench 1 in the same closet....
... tools are at temperatures above the floor to the left (see page 9). 6. Bubble level Checklist for visible damage. 4. Unpack the dryer. 2. Follow the installation instructions supplied by an qualified technician (see page 18). 7. in alcoves. - Low temperatures affect the automatic ...supply connected by the appropriate ductwork parts manufacturers (see page 8). 5. The installation surface for uneven floors with other fuels, - Position the dryer near flammable materials, - Do not install the appliance on the dimensions of the door! Open end wrench 1 in the same closet....
User Guide
Page 9
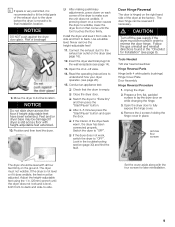
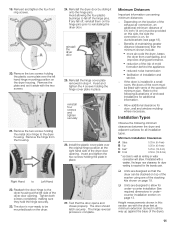
... cover in order to reverse the door hinge. Set the cover aside along with heightĆadjustable feet extended. 10. Position and then level the dryer. Door Hinge Reversal The door is hinged on the ground. Tools Needed T20 star head screwdriver Hinge Reversal Parts Hinge (with all four feet firmly... on the right hand side of the exhaust duct to the dryer before the dryer is moved to its final location. If the dryer is not level or if it from side to side and front to back. d CAUTION Turn off valve. 14. ...
... cover in order to reverse the door hinge. Set the cover aside along with heightĆadjustable feet extended. 10. Position and then level the dryer. Door Hinge Reversal The door is hinged on the ground. Tools Needed T20 star head screwdriver Hinge Reversal Parts Hinge (with all four feet firmly... on the right hand side of the exhaust duct to the dryer before the dryer is moved to its final location. If the dryer is not level or if it from side to side and front to back. d CAUTION Turn off valve. 14. ...
User Guide
Page 10
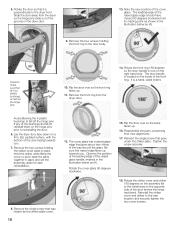
... of the raised glass handle, marked in place and set the assembly aside for later reinstallation. Note the new position of the grooves in the dryer door. 13. Avoid allowing the 4 plastic bushings to fall off the hinge pins. Rotate the front ring 180 degrees so the door handle is located.... Reinstall the striker cover and striker to the install area on the hinge pins 10. Remove the two screws holding the front ring to the dryer front. Rotate the cover glass 90 degrees clockwise. 15. 5. The leading edge of the door (where the hinge had been). Remove the front ring ...
... of the raised glass handle, marked in place and set the assembly aside for later reinstallation. Note the new position of the grooves in the dryer door. 13. Avoid allowing the 4 plastic bushings to fall off the hinge pins. Rotate the front ring 180 degrees so the door handle is located.... Reinstall the striker cover and striker to the install area on the hinge pins 10. Remove the two screws holding the front ring to the dryer front. Rotate the cover glass 90 degrees clockwise. 15. 5. The leading edge of the door (where the hinge had been). Remove the front ring ...
User Guide
Page 11
...). - If any fall off , reinstall them on the hinge pins prior to the following minimum clearances between the dryer and adjacent surfaces for dryer venting is installed in all installation types. reinstall four screws and tighten securely 26. The door should latch securely. ... the hinge cover plate in place. 27. Remove the hinge from overheating, and improves drying performance. reinstall the dryer door 25. Test that the dryer can be stacked on , for additional information. - Benefits of mold formation behind the appliance. Installation Types Observe the...
...). - If any fall off , reinstall them on the hinge pins prior to the following minimum clearances between the dryer and adjacent surfaces for dryer venting is installed in all installation types. reinstall four screws and tighten securely 26. The door should latch securely. ... the hinge cover plate in place. 27. Remove the hinge from overheating, and improves drying performance. reinstall the dryer door 25. Test that the dryer can be stacked on , for additional information. - Benefits of mold formation behind the appliance. Installation Types Observe the...
User Guide
Page 12
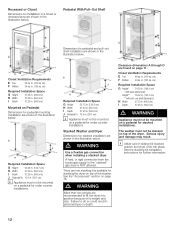
...are shown in the illustration below. in . (155 sq. Stacked Washer and Dryer Dimensions for stacked installation are two stacking kits available for stacking the dryer on Pedestal Dimensions for pedestal mounting installation are shown in the illustration below. ...must not be mounted on a pedestal for under counter installations. d WARNING Use a flexible gas connection when installing a stacked dryer. Clearance dimensions A through D are recommended to lift the dryer into place. cm) Required Installation Space G Height* 74.50 in. (189.3 cm) * with basic stacking kit Height...
...are shown in the illustration below. in . (155 sq. Stacked Washer and Dryer Dimensions for stacked installation are two stacking kits available for stacking the dryer on Pedestal Dimensions for pedestal mounting installation are shown in the illustration below. ...must not be mounted on a pedestal for under counter installations. d WARNING Use a flexible gas connection when installing a stacked dryer. Clearance dimensions A through D are recommended to lift the dryer into place. cm) Required Installation Space G Height* 74.50 in. (189.3 cm) * with basic stacking kit Height...
User Guide
Page 13
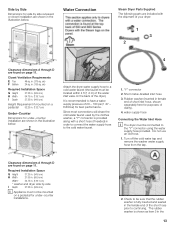
...132.7 cm) Under-Counter Dimensions for under -counter installations. 2. in . (310 sq. It is fully inserted and seated in the female end of your dryer: 1 3 2 Clearance dimensions A through D are found on page 11. Check to be connected to the Y" connector using the water supply hose provided. ...cold water faucet (the faucet must be mounted on a pedestal for under -counter installation are shown in the illustration below . Water Connection Steam Dryer Parts Supplied The following parts are included with a short hose (if needed) in order to connect the water supply hose to have a ...
...132.7 cm) Under-Counter Dimensions for under -counter installations. 2. in . (310 sq. It is fully inserted and seated in the female end of your dryer: 1 3 2 Clearance dimensions A through D are found on page 11. Check to be connected to the Y" connector using the water supply hose provided. ...cold water faucet (the faucet must be mounted on a pedestal for under -counter installation are shown in the illustration below . Water Connection Steam Dryer Parts Supplied The following parts are included with a short hose (if needed) in order to connect the water supply hose to have a ...
User Guide
Page 14
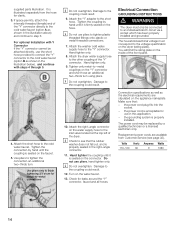
... tightening 2/3's turn . Volts Hertz Amperes Watts 110-120 60 9 1080 14 If space permits, attach the internally threaded (female) end of the dryer. Use pliers only to the cold water faucet (option A as shown in this application. - Attach the Y" adapter to the coupling could result... connector and short hose an additional two-thirds turn using pliers. Damage to the short hose. Electrical Connection GROUNDING INSTRUCTIONS d WARNING The dryer must correspond to see page 32). Replacement power cords are stipulated on the connector. i Do not use the short hose provided to ...
... tightening 2/3's turn . Volts Hertz Amperes Watts 110-120 60 9 1080 14 If space permits, attach the internally threaded (female) end of the dryer. Use pliers only to the cold water faucet (option A as shown in this application. - Attach the Y" adapter to the coupling could result... connector and short hose an additional two-thirds turn using pliers. Damage to the short hose. Electrical Connection GROUNDING INSTRUCTIONS d WARNING The dryer must correspond to see page 32). Replacement power cords are stipulated on the connector. i Do not use the short hose provided to ...
User Guide
Page 15
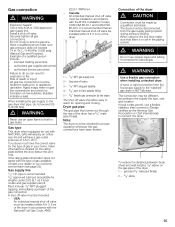
...shutĆoff valve must have a gas outlet pressure of a qualified person include: - Securely tighten all gas connections. Apply soapy water to the dryer) The shutĆoff valve 3 ć 1/8" NPT plugged tapping 4 ć 3/8" pipe to flare adapter fitting 5 ć 3/8" flexible...connection from the gas supply piping system during pressure testing. W.C./ 3.49 kPa/ 0.506 psig. (Natural Gas and Propane). Connection of the dryer d CAUTION Connection must be installed within 6 ft (1.8 m) of itnhsetadllraye3r/.8" elbow on the rating plate behind the door below the port hole...
...shutĆoff valve must have a gas outlet pressure of a qualified person include: - Securely tighten all gas connections. Apply soapy water to the dryer) The shutĆoff valve 3 ć 1/8" NPT plugged tapping 4 ć 3/8" pipe to flare adapter fitting 5 ć 3/8" flexible...connection from the gas supply piping system during pressure testing. W.C./ 3.49 kPa/ 0.506 psig. (Natural Gas and Propane). Connection of the dryer d CAUTION Connection must be installed within 6 ft (1.8 m) of itnhsetadllraye3r/.8" elbow on the rating plate behind the door below the port hole...
User Guide
Page 16
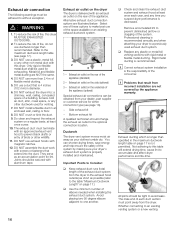
...to a previously used exhaust duct system. Joints should be secured with rigid metal or flexible metal ducting. Side exhaust kit - Ductwork The dryer vent system moves moist air away as an accumulation point for either connection type (see page 17). 3. Professional cleaning is recommended. Whether... not use a plastic, metal foil, or any plastic or metal foil venting sections with aluminum tape. To reduce the risk of fire, this dryer. DO NOT use ductwork longer than 2.4 m of elbows needed when installing the exhaust duct system. DO NOT install a flexible duct in diameter...
...to a previously used exhaust duct system. Joints should be secured with rigid metal or flexible metal ducting. Side exhaust kit - Ductwork The dryer vent system moves moist air away as an accumulation point for either connection type (see page 17). 3. Professional cleaning is recommended. Whether... not use a plastic, metal foil, or any plastic or metal foil venting sections with aluminum tape. To reduce the risk of fire, this dryer. DO NOT use ductwork longer than 2.4 m of elbows needed when installing the exhaust duct system. DO NOT install a flexible duct in diameter...
User Guide
Page 17
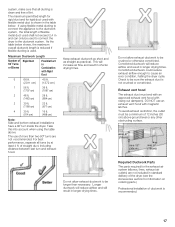
...vent hood with magnetic latches. Maximum Ductwork Length Number of lint. Constricted ductwork will reduce airflow and result in standard delivery of the dryer (see the Accessories section for information on ordering parts.) Professional installation of ductwork is clean and free of Rigid Duct 90°...level or any other obstructing surface. Required Ductwork Parts The parts required for rigid duct used to connect the dryer to cause an error condition, halting the dryer cycle. The use an exhaust vent hood with swing out damper(s). DO NOT use of flexible metal duct ...
...vent hood with magnetic latches. Maximum Ductwork Length Number of lint. Constricted ductwork will reduce airflow and result in standard delivery of the dryer (see the Accessories section for information on ordering parts.) Professional installation of ductwork is clean and free of Rigid Duct 90°...level or any other obstructing surface. Required Ductwork Parts The parts required for rigid duct used to connect the dryer to cause an error condition, halting the dryer cycle. The use an exhaust vent hood with swing out damper(s). DO NOT use of flexible metal duct ...
User Guide
Page 18
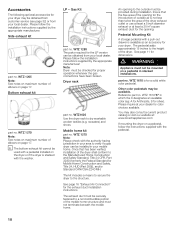
...be installed in which the X designates an available color (eg: A for Anthracite, S for silver). The kit includes a means to secure the dryer to dry washable woolen textiles (e.g. An opening . See page 11 for the exhaust duct installation instructions. Side exhaust kit part no . LP -...or visit our website at your dealer for color choices available. Please follow the installation instructions supplied by the appropriate manufacturer. Note: Dryer must not be securely fastened to the Manufactured Home Construction and Safety Standard, Title 24 CFR, Part 3280 {formerly the Federal ...
...be installed in which the X designates an available color (eg: A for Anthracite, S for silver). The kit includes a means to secure the dryer to dry washable woolen textiles (e.g. An opening . See page 11 for the exhaust duct installation instructions. Side exhaust kit part no . LP -...or visit our website at your dealer for color choices available. Please follow the installation instructions supplied by the appropriate manufacturer. Note: Dryer must not be securely fastened to the Manufactured Home Construction and Safety Standard, Title 24 CFR, Part 3280 {formerly the Federal ...
User Guide
Page 19
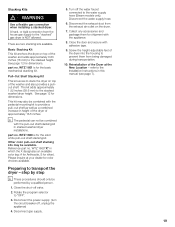
...as a combined increase in this manual (see page 7). 19 See page 12 for shipment with the pedestal mounting kit to the stacked" gas dryer is for the basic mechanical stacking kit. WTZ 1601 is NOT allowed. Other color pull-out shelf stacking kits may also be available. Preparing ...Collect any accessories and package them from the exhaust air outlet on top of approximately 16.5 inches. Screw the heightĆadjustable feet of the Dryer at your dealer for silver). There are two stacking kits available. See page 12 for the solid white pull-out shelf stacking kit. Close ...
...as a combined increase in this manual (see page 7). 19 See page 12 for shipment with the pedestal mounting kit to the stacked" gas dryer is for the basic mechanical stacking kit. WTZ 1601 is NOT allowed. Other color pull-out shelf stacking kits may also be available. Preparing ...Collect any accessories and package them from the exhaust air outlet on top of approximately 16.5 inches. Screw the heightĆadjustable feet of the Dryer at your dealer for silver). There are two stacking kits available. See page 12 for the solid white pull-out shelf stacking kit. Close ...
User Guide
Page 20
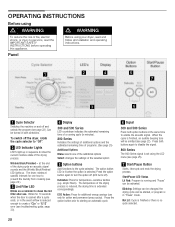
...ends the drying process. To switch off and selects the program (see troubleshooting guide, page 30). acrylic fibers). Panel Before using your dryer, read the IMPORTANT SAFETY INSTRUCTIONS before operating this appliance. B LED Indicator Lights LED'S light up . at the same time to ...drying process is reduced, the drying time is selected. A B D E G C F A Cycle Selector Switches the machine on and off the dryer, rotate the cycle selector to show the current moisture state of the drying process. The option button LED is lit when the option is extended...
...ends the drying process. To switch off and selects the program (see troubleshooting guide, page 30). acrylic fibers). Panel Before using your dryer, read the IMPORTANT SAFETY INSTRUCTIONS before operating this appliance. B LED Indicator Lights LED'S light up . at the same time to ...drying process is reduced, the drying time is selected. A B D E G C F A Cycle Selector Switches the machine on and off the dryer, rotate the cycle selector to show the current moisture state of the drying process. The option button LED is lit when the option is extended...
User Guide
Page 21
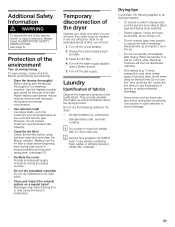
...during later laundering. Turn off the circuit breaker. 2. Delicate fabrics (silk, synthetic curtains) i Dry woolen or woolĆrich textiles with the dryer rack only! Drying tips In principle, the following textiles in improved airflow and reduced drying time. (see page 5). Residual moisture will then be distributed... not use the "Very dry/Extra dry" cycles the first time you plan to go on saving energy To save energy, money and time, Bosch recommends the following: - Do not dry unsuitable materials! Do not dry rubberized or airĆtight items. - If you dry these can also...
...during later laundering. Turn off the circuit breaker. 2. Delicate fabrics (silk, synthetic curtains) i Dry woolen or woolĆrich textiles with the dryer rack only! Drying tips In principle, the following textiles in improved airflow and reduced drying time. (see page 5). Residual moisture will then be distributed... not use the "Very dry/Extra dry" cycles the first time you plan to go on saving energy To save energy, money and time, Bosch recommends the following: - Do not dry unsuitable materials! Do not dry rubberized or airĆtight items. - If you dry these can also...


