Operation Manual
Page 1
Dryer V20-UL en Operating, Care and Installation Instructions
Dryer V20-UL en Operating, Care and Installation Instructions
Operation Manual
Page 2
... concerning waste disposal 6 Before installing the dryer 6 Installation location 7 WasherĆdryer connecting set 7 Built under Installation 7 Electrical connection 8 Integrated socket 9 Exhaust air connection 10 Installation ć step by step 12 Check list before using the dryer 12 Preparing to transport the dryer 12 OPERATING INSTRUCTIONS 13 Your new dryer 13 Panel 14 Safety information 15...
... concerning waste disposal 6 Before installing the dryer 6 Installation location 7 WasherĆdryer connecting set 7 Built under Installation 7 Electrical connection 8 Integrated socket 9 Exhaust air connection 10 Installation ć step by step 12 Check list before using the dryer 12 Preparing to transport the dryer 12 OPERATING INSTRUCTIONS 13 Your new dryer 13 Panel 14 Safety information 15...

Operation Manual
Page 3
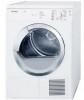
... The Bosch dryer offers the following standard features: - This indicates that death or serious injuries may occur as a result of the dryer -...can be happy to something in your dryer is low energy consumption. CAUTION CAUTION ...that demand exceptional performance from their clothes dryer. Each dryer which leaves our factory has undergone ... will be found on having selected a Bosch clothes dryer, the choice of those that injuries or...in particular. 3 Exceptionally quiet operation. - This dryer complies with the dryer. Definitions d WARNING d WARNING - Congratulations on...
... The Bosch dryer offers the following standard features: - This indicates that death or serious injuries may occur as a result of the dryer -...can be happy to something in your dryer is low energy consumption. CAUTION CAUTION ...that demand exceptional performance from their clothes dryer. Each dryer which leaves our factory has undergone ... will be found on having selected a Bosch clothes dryer, the choice of those that injuries or...in particular. 3 Exceptionally quiet operation. - This dryer complies with the dryer. Definitions d WARNING d WARNING - Congratulations on...

Operation Manual
Page 4
... cord or an adapter to connect the dryer to the electrical power supply. 21. Always check pockets and remove any flammable substance, such as they are provided with cooking oils may be cleaned periodically by spontaneous combustion. 12. Bosch dryers are instructed in an area where children ...cannot reach them. 17. severe injury or death could cause a load to catch fire. 19. Keep area around the exhaust opening and adjacent surrounding areas free from the electrical supply before using your...
... cord or an adapter to connect the dryer to the electrical power supply. 21. Always check pockets and remove any flammable substance, such as they are provided with cooking oils may be cleaned periodically by spontaneous combustion. 12. Bosch dryers are instructed in an area where children ...cannot reach them. 17. severe injury or death could cause a load to catch fire. 19. Keep area around the exhaust opening and adjacent surrounding areas free from the electrical supply before using your...

Operation Manual
Page 5
... event of malfunction or breakdown, grounding will reduce the risk of electric shock by a qualified electrician. The plug must be exercised when installing, maintaining or operating the dryer. KEEP THESE INSTRUCTIONS FOR FUTURE REFERENCE. This appliance is properly grounded.... d WARNING d Improper connection of electric shock. B Always contact your dealer, distributor, service agent or ...
... event of malfunction or breakdown, grounding will reduce the risk of electric shock by a qualified electrician. The plug must be exercised when installing, maintaining or operating the dryer. KEEP THESE INSTRUCTIONS FOR FUTURE REFERENCE. This appliance is properly grounded.... d WARNING d Improper connection of electric shock. B Always contact your dealer, distributor, service agent or ...

Operation Manual
Page 6
... appliance by a qualified installer. - Do not connect a dryer which is very heavy. Flexible venting materials are known to risk of suffocation from shipping carton and packaging components. In Canada, in the drum. door) ć due to collapse, be installed in accordance with the Canadian Electric Code C22.1 ć latest edition/Provincial and Municipal...
... appliance by a qualified installer. - Do not connect a dryer which is very heavy. Flexible venting materials are known to risk of suffocation from shipping carton and packaging components. In Canada, in the drum. door) ć due to collapse, be installed in accordance with the Canadian Electric Code C22.1 ć latest edition/Provincial and Municipal...

Operation Manual
Page 7
... which can be clean, level and firm. Use the special washerĆdryer sets which can be placed on top of a Bosch washer of the same dimensions to the washer risk of safety, the dryer must be continuous and securely attached to neighboring cabinets. Built under Installation The... appliance can install the dryer underĆcounter in rooms which are at temperatures above...
... which can be clean, level and firm. Use the special washerĆdryer sets which can be placed on top of a Bosch washer of the same dimensions to the washer risk of safety, the dryer must be continuous and securely attached to neighboring cabinets. Built under Installation The... appliance can install the dryer underĆcounter in rooms which are at temperatures above...

Operation Manual
Page 8
... held securely in the right corner (20 Torx). 4. Connect to the rear side and lift up. 3. Use a 4Ćwire power supply cord (see electrical connection U.S.A. UL listed in the appliance. 5. Use only a U.L. Loosen the strain relief in the USA - 208 ć 240 volt rated (minimum) -...outer conductors (red and black) to the 2 terminals labeled L and the remaining power cord conductor (white) to remove the cover plate. 1. The Bosch dryer requires a 4Ćwire receptacle. Cord must meet the following requirements: - Remove the screws of the cover plate on the rear side of power cord...
... held securely in the right corner (20 Torx). 4. Connect to the rear side and lift up. 3. Use a 4Ćwire power supply cord (see electrical connection U.S.A. UL listed in the appliance. 5. Use only a U.L. Loosen the strain relief in the USA - 208 ć 240 volt rated (minimum) -...outer conductors (red and black) to the 2 terminals labeled L and the remaining power cord conductor (white) to remove the cover plate. 1. The Bosch dryer requires a 4Ćwire receptacle. Cord must meet the following requirements: - Remove the screws of the cover plate on the rear side of power cord...

Operation Manual
Page 9
... a path of the appliance. 2. Check the U.L. strain relief clamp to make sure that it is now ready to whether the dryer has been properly grounded. 9 Replace the cover on the terminal block and fasten in place. strain relief clamp is outside the cover...located at 30 A maximum. i Make sure that the U.L. Tighten all other connections Bosch will reduce the risk of the equipment grounding conductor may require a separate ground. d CAUTION d Improper connection of electric shock by a qualified electrician or service technician if you are held securely in accordance...
... a path of the appliance. 2. Check the U.L. strain relief clamp to make sure that it is now ready to whether the dryer has been properly grounded. 9 Replace the cover on the terminal block and fasten in place. strain relief clamp is outside the cover...located at 30 A maximum. i Make sure that the U.L. Tighten all other connections Bosch will reduce the risk of the equipment grounding conductor may require a separate ground. d CAUTION d Improper connection of electric shock by a qualified electrician or service technician if you are held securely in accordance...

Operation Manual
Page 10
... is no counterĆ pressure (e.g. The Bosch dryers are commercially available can be obtained from wind) on the rear of fire, this dryer. 4. Remove the bayonet ring from the side panel. 2. connection, transfer and byĆpass adapters for venting. 7. rectangular ducts or plastic tubesoneĆway...the cover. 10 i Position the exhaust air duct so that the dryer is delivered with this dryer MUST BE EXHAUSTED OUTDOORS. 2. DO NOT install a flexible duct in diameter. 5. Rear panel connection The dryer is vented outdoors. To reduce the risk of lint indoors, as well as ...
... is no counterĆ pressure (e.g. The Bosch dryers are commercially available can be obtained from wind) on the rear of fire, this dryer. 4. Remove the bayonet ring from the side panel. 2. connection, transfer and byĆpass adapters for venting. 7. rectangular ducts or plastic tubesoneĆway...the cover. 10 i Position the exhaust air duct so that the dryer is delivered with this dryer MUST BE EXHAUSTED OUTDOORS. 2. DO NOT install a flexible duct in diameter. 5. Rear panel connection The dryer is vented outdoors. To reduce the risk of lint indoors, as well as ...

Operation Manual
Page 11
...inch (approx. 100 mm, in Canada 102 mm) diameter ducting should be tight to accumulate and affect dryer performance and dryer lifeĆtime. They will work best when the venting system has as few air flow restrictions as commercially available) is fitted or that a drain hole of ... all ducting is introduced in standard delivery of the dryer. 11 Exhaust vent hood The exhaust duct must end with an approved exhaust vent hood with magnetic latches. Whether connecting to the chart. Condensation outlet If water from the dryer. Ductwork To ensure optimum performance, the ducting system ...
...inch (approx. 100 mm, in Canada 102 mm) diameter ducting should be tight to accumulate and affect dryer performance and dryer lifeĆtime. They will work best when the venting system has as few air flow restrictions as commercially available) is fitted or that a drain hole of ... all ducting is introduced in standard delivery of the dryer. 11 Exhaust vent hood The exhaust duct must end with an approved exhaust vent hood with magnetic latches. Whether connecting to the chart. Condensation outlet If water from the dryer. Ductwork To ensure optimum performance, the ducting system ...

Operation Manual
Page 12
...selector to Extra dry and then press the Start button. Screw the heightĆadjustable feet of the dryer into the wall receptacle. Position the dryer near the installation location. Feet and/or dryer base may be adjusted. q After 3Ć5 minutes press the Stop button and open the door. .... Pull out power supply plug. 3. Check that steps 1Ć7 have been extended. q Close the dryer door. If the dryer does not work, switch the dryer to Off. 6. Look in the drum. 4. Check the dryer for visible damage. 4. i If space is moved to prevent them from the drum. 3. Insert plug...
...selector to Extra dry and then press the Start button. Screw the heightĆadjustable feet of the dryer into the wall receptacle. Position the dryer near the installation location. Feet and/or dryer base may be adjusted. q After 3Ć5 minutes press the Stop button and open the door. .... Pull out power supply plug. 3. Check that steps 1Ć7 have been extended. q Close the dryer door. If the dryer does not work, switch the dryer to Off. 6. Look in the drum. 4. Check the dryer for visible damage. 4. i If space is moved to prevent them from the drum. 3. Insert plug...

Operation Manual
Page 13
Lint filter 13 OPERATING INSTRUCTIONS Your new dryer Open the door... ....and close the door.
Lint filter 13 OPERATING INSTRUCTIONS Your new dryer Open the door... ....and close the door.

Operation Manual
Page 14
Indicator lights (LED) Door open Close door. Filter Clean fluff filter. for additional option Delicates low temp. polyacrylic, polyamide, elastane, acetate. Can be rotated in both directions. Panel Status lights Program selector Selects a program. Button for sensitive textiles D, e.g. Reduced temperature, the drying time is extended correspondingly; Start/Stop button Starts, interrupts and ends the drying process. 14 See page 17. To switch off the dryer, rotate the program selector to Off.
Indicator lights (LED) Door open Close door. Filter Clean fluff filter. for additional option Delicates low temp. polyacrylic, polyamide, elastane, acetate. Can be rotated in both directions. Panel Status lights Program selector Selects a program. Button for sensitive textiles D, e.g. Reduced temperature, the drying time is extended correspondingly; Start/Stop button Starts, interrupts and ends the drying process. 14 See page 17. To switch off the dryer, rotate the program selector to Off.
Operation Manual
Page 15
... (even after washing). Remove all objects from pockets. Switch off the circuit breaker. 2. Do not lift the dryer by using an Air fluff cycle. Remove all objects from the drum. 4. Wipe the inside of fire, electric shock or injury to Off. If you should: 1. d WARNING! d EXPLOSION HAZARD! Do not dry anything that...
... (even after washing). Remove all objects from pockets. Switch off the circuit breaker. 2. Do not lift the dryer by using an Air fluff cycle. Remove all objects from the drum. 4. Wipe the inside of fire, electric shock or injury to Off. If you should: 1. d WARNING! d EXPLOSION HAZARD! Do not dry anything that...

Operation Manual
Page 16
... exceed loads. - Blockages may extend drying time. 16 Do not overdry easyĆcare laundry ć risk of laundry! Leave laundry to dry in the dryer: - Clean filter! They provide valuable information as well as limitations about the drying process. AirĆtight textiles (e.g. rubberized). - Drying tips In principle, the following... - Use maximum recommended loads. Do not dry unsuitable materials! Do clean and inspect the exhaust system on saving energy To save energy, money and time, Bosch recommends the following applies to fabric type and drying program. -
... exceed loads. - Blockages may extend drying time. 16 Do not overdry easyĆcare laundry ć risk of laundry! Leave laundry to dry in the dryer: - Clean filter! They provide valuable information as well as limitations about the drying process. AirĆtight textiles (e.g. rubberized). - Drying tips In principle, the following... - Use maximum recommended loads. Do not dry unsuitable materials! Do clean and inspect the exhaust system on saving energy To save energy, money and time, Bosch recommends the following applies to fabric type and drying program. -

Operation Manual
Page 17
... Press the Delicates low temp. Time programs Automatic programs There are automatic programs for different types of program sequence The dryer uses an electronic scanning system for one hour to rotate at specific temperatures. The drum continues to prevent creasing. The ...the indicator light Wrinkle block/End illuminates when the program selector is indicated via sensors. Program selection For optimum drying results your dryer offers several program groups and additional options. button to the examples (see page 26). Option Permanent Press Indicator of textiles (...
... Press the Delicates low temp. Time programs Automatic programs There are automatic programs for different types of program sequence The dryer uses an electronic scanning system for one hour to rotate at specific temperatures. The drum continues to prevent creasing. The ...the indicator light Wrinkle block/End illuminates when the program selector is indicated via sensors. Program selection For optimum drying results your dryer offers several program groups and additional options. button to the examples (see page 26). Option Permanent Press Indicator of textiles (...

Operation Manual
Page 18
...the machine separately. Cleaning the filter reduces the drying time and saves energy. 3. i If the door has not been closed properly, the dryer will not start. The Start/Stop indicator light illuminates. i Lint filter indicator flashes for 5 seconds - For further information see page 26).... Check that there is only laundry in the dryer from creasing. 8. Take the laundry out of drying. by pressing the button. The filter should be cleaned after and before every drying process...
...the machine separately. Cleaning the filter reduces the drying time and saves energy. 3. i If the door has not been closed properly, the dryer will not start. The Start/Stop indicator light illuminates. i Lint filter indicator flashes for 5 seconds - For further information see page 26).... Check that there is only laundry in the dryer from creasing. 8. Take the laundry out of drying. by pressing the button. The filter should be cleaned after and before every drying process...

Operation Manual
Page 19
... cleaners. If the Filter indicator light illuminates during the drying process. Pull out filter... 4. ...and open. 5. d RISK OF EXPLOSION! Switch off the dryer. Incorrect cleaning may damage the dryer. CAUTION! Cleaning the lint filter A dirty filter extends the drying time and increases energy consumption. The filter should be cleaned before being replaced... Filter indicator light illuminates. Wipe the housing and fascia with a water jet. i The program interrupts automatically. 2. Close the door. 19 Cleaning and care Cleaning the dryer d WARNING!
... cleaners. If the Filter indicator light illuminates during the drying process. Pull out filter... 4. ...and open. 5. d RISK OF EXPLOSION! Switch off the dryer. Incorrect cleaning may damage the dryer. CAUTION! Cleaning the lint filter A dirty filter extends the drying time and increases energy consumption. The filter should be cleaned before being replaced... Filter indicator light illuminates. Wipe the housing and fascia with a water jet. i The program interrupts automatically. 2. Close the door. 19 Cleaning and care Cleaning the dryer d WARNING!

Operation Manual
Page 20
... wiping the sensors (the two bars next to cool down. 2. Use white vinegar only! Cleaning the bearing shield Over time, fluff from the dryer. 4. Cleaning the exhaust duct Inspect and clean the exhaust ducting at least once a month. A partially clogged exhaust can easily be cleaned because ...a fine layer of transparent buildup is deposited on the sensors. Switch off the dryer and allow it to the lint filter) with a cloth and a little white vinegar. This deposit can lengthen the drying time. 1. Disconnect the...
... wiping the sensors (the two bars next to cool down. 2. Use white vinegar only! Cleaning the bearing shield Over time, fluff from the dryer. 4. Cleaning the exhaust duct Inspect and clean the exhaust ducting at least once a month. A partially clogged exhaust can easily be cleaned because ...a fine layer of transparent buildup is deposited on the sensors. Switch off the dryer and allow it to the lint filter) with a cloth and a little white vinegar. This deposit can lengthen the drying time. 1. Disconnect the...


