
Pedestal Installation Instructions
Page 3
For dryers go directly to the washer drum. The transportation bolts must now be removed during transit. Figure 3 q Insert the bolt assemblies. Helpful Hint: Rolled up towels ... collar is removed from the wall so it against the drum with your washer (see Figure 3). Figure 4 q Make sure the tab on a new washer or dryer, proceed to the left of the unit. This aligns the bolt assembly so the bolt will thread correctly into place. q When installing the first bolt...
For dryers go directly to the washer drum. The transportation bolts must now be removed during transit. Figure 3 q Insert the bolt assemblies. Helpful Hint: Rolled up towels ... collar is removed from the wall so it against the drum with your washer (see Figure 3). Figure 4 q Make sure the tab on a new washer or dryer, proceed to the left of the unit. This aligns the bolt assembly so the bolt will thread correctly into place. q When installing the first bolt...

Pedestal Installation Instructions
Page 5
... down toward the base of 10 ftĆlb (14 N-m) to HAND TIGHTEN all four bolts with the appliance and pedestal housings. Figure 11 5. For dryers go directly to washers. Using the 6 mm Allen (Hex) wrench, install the socket head cap screws and flat washers (see Figure 10). Holding the spacer...
... down toward the base of 10 ftĆlb (14 N-m) to HAND TIGHTEN all four bolts with the appliance and pedestal housings. Figure 11 5. For dryers go directly to washers. Using the 6 mm Allen (Hex) wrench, install the socket head cap screws and flat washers (see Figure 10). Holding the spacer...

Pedestal Installation Instructions
Page 8
...OneĆYear Warranty on which vary from the date of purchase, when this pedestal is installed with the listed washer or dryer and operated according to other than those listed in the Installation Instructions, the warranty is null and void. Purchase Date Appliance Model... Number Appliance Serial Number 8 Warranty Restriction If the Pedestal is subject to the instructions provided in the washer or dryer Operating, Care and Installation Instructions", supplier will repair or replace any other rights which the pedestal is installed. This warranty applies ...
...OneĆYear Warranty on which vary from the date of purchase, when this pedestal is installed with the listed washer or dryer and operated according to other than those listed in the Installation Instructions, the warranty is null and void. Purchase Date Appliance Model... Number Appliance Serial Number 8 Warranty Restriction If the Pedestal is subject to the instructions provided in the washer or dryer Operating, Care and Installation Instructions", supplier will repair or replace any other rights which the pedestal is installed. This warranty applies ...
Operating, Care, Installation (all languages)
Page 2
...dryer 10 Preparing to transport the dryer ć step by step 10 OPERATING INSTRUCTIONS 11 Your new dryer 11 Panel 12 Summary of instructions 13 Safety information 14 Before switching on the dryer 14 Using the dryer 14 Protecting the dryer... 14 Protection of the environment 14 Before using the dryer for the first time 14 Temporary disconnection of the dryer ... table 16 Operation 17 Using the dryer 17 Using the dryer rack (Option 18 Cleaning and care 19 Cleaning the dryer 19 Cleaning the lint filter 19 ...
...dryer 10 Preparing to transport the dryer ć step by step 10 OPERATING INSTRUCTIONS 11 Your new dryer 11 Panel 12 Summary of instructions 13 Safety information 14 Before switching on the dryer 14 Using the dryer 14 Protecting the dryer... 14 Protection of the environment 14 Before using the dryer for the first time 14 Temporary disconnection of the dryer ... table 16 Operation 17 Using the dryer 17 Using the dryer rack (Option 18 Cleaning and care 19 Cleaning the dryer 19 Cleaning the lint filter 19 ...
Operating, Care, Installation (all languages)
Page 3
... minimize the risk of fire or explosion or to prevent property damage, personal injury or death. - Timed cycles from their clothes dryer. d CAUTION CAUTION - This indicates that damage may occur as a result of nonĆobservance of this warning. q ...instructions. Sensor controlled auto cycles - Exceptionally quiet operation - Congratulations on having selected a Bosch clothes dryer, the choice of those that demand exceptional performance from 20 to 60 minutes Each dryer which leaves our factory has undergone a thorough performance test and is in full working ...
... minimize the risk of fire or explosion or to prevent property damage, personal injury or death. - Timed cycles from their clothes dryer. d CAUTION CAUTION - This indicates that damage may occur as a result of nonĆobservance of this warning. q ...instructions. Sensor controlled auto cycles - Exceptionally quiet operation - Congratulations on having selected a Bosch clothes dryer, the choice of those that demand exceptional performance from 20 to 60 minutes Each dryer which leaves our factory has undergone a thorough performance test and is in full working ...
Operating, Care, Installation (all languages)
Page 4
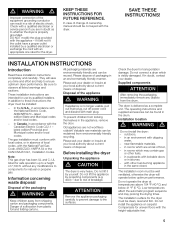
...29. GROUNDING INSTRUCTIONS This appliance must not be exercised when installing, maintaining or operating the dryer. C Follow also the Safety Information in this appliance where it will reduce the risk of fire, clothes, cleaning rags, mop heads and the like materials. Installation must be longer than 36... inches. 4 Do not operate this dryer. Common sense, caution and care must be placed in the front can...
...29. GROUNDING INSTRUCTIONS This appliance must not be exercised when installing, maintaining or operating the dryer. C Follow also the Safety Information in this appliance where it will reduce the risk of fire, clothes, cleaning rags, mop heads and the like materials. Installation must be longer than 36... inches. 4 Do not operate this dryer. Common sense, caution and care must be placed in the front can...
Operating, Care, Installation (all languages)
Page 5
... in alcoves. - Danger of the packaging d WARNING d Keep children away from shipping carton and packaging components. Do not connect a dryer which are not worthless rubbish! The operating instructions and supplied accessories can be reclaimed from plastic foil and folding cartons. in an environment with... and cautions. In case of change of ownership, manual should be conveyed with dripping water, - In addition to whether the dryer is visibly damaged. Information concerning waste disposal All packaging materials are intended for safe operation up to risk of local codes, with...
... in alcoves. - Danger of the packaging d WARNING d Keep children away from shipping carton and packaging components. Do not connect a dryer which are not worthless rubbish! The operating instructions and supplied accessories can be reclaimed from plastic foil and folding cartons. in an environment with... and cautions. In case of change of ownership, manual should be conveyed with dripping water, - In addition to whether the dryer is visibly damaged. Information concerning waste disposal All packaging materials are intended for safe operation up to risk of local codes, with...
Operating, Care, Installation (all languages)
Page 6
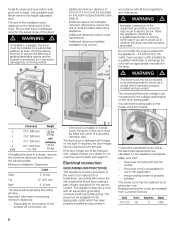
...the appliance. - Do not modify the plug provided with c 37.2" (945 mm) packaging d 19.7" (500 mm)/ 143 lbs angle 170-180° (64 kg) If installing the dryer in this side for pipes/brackets (see page 21). You will reduce the risk of the front panel. ...has been properly installed and grounded. This appliance features a cord with all local regulations and ordinances. Replacement power cords are to whether the dryer has been properly grounded. the power cord is installed in electric shock. Use a bubble level. accordance with an equipmentĆgrounding conductor ...
...the appliance. - Do not modify the plug provided with c 37.2" (945 mm) packaging d 19.7" (500 mm)/ 143 lbs angle 170-180° (64 kg) If installing the dryer in this side for pipes/brackets (see page 21). You will reduce the risk of the front panel. ...has been properly installed and grounded. This appliance features a cord with all local regulations and ordinances. Replacement power cords are to whether the dryer has been properly grounded. the power cord is installed in electric shock. Use a bubble level. accordance with an equipmentĆgrounding conductor ...
Operating, Care, Installation (all languages)
Page 7
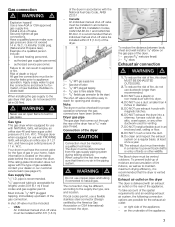
... supply line. All gas line connections must be disconnected from the gas supply piping system during testing pressure. Bubbles in the piping system. Note: The dryer must be easy to prevent back drafts or entry of new bubbles. Gas connection d WARNING d Explosion hazard! W.C./ 3.49 kPa/ 0.506 psig. (Natural ... acceptable for leaks prior to maintain maximum drying efficiency, it is no air in Ć dicate leak! The Bosch dryer must be different, according to the supply line type, size and location. Install a shutĆoff valve must be installed in accordance with ...
... supply line. All gas line connections must be disconnected from the gas supply piping system during testing pressure. Bubbles in the piping system. Note: The dryer must be easy to prevent back drafts or entry of new bubbles. Gas connection d WARNING d Explosion hazard! W.C./ 3.49 kPa/ 0.506 psig. (Natural ... acceptable for leaks prior to maintain maximum drying efficiency, it is no air in Ć dicate leak! The Bosch dryer must be different, according to the supply line type, size and location. Install a shutĆoff valve must be installed in accordance with ...
Operating, Care, Installation (all languages)
Page 8
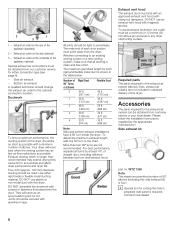
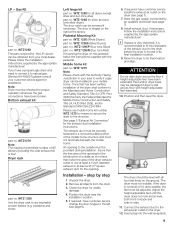
...flexible metal duct is shown in prepared side panel is longer than two 90° turns are not included in standard delivery of the dryer. Required parts The parts required for the exhaust air system (elbows, lines, exhaust air outlets) are not recommended. Exhaust ducting which ...the chart. For best performance, separate all ducting is four! WTZ 1265 Note: The maximum permitted number of 90° elbows (including this dryer. Bottom air exhaust A qualified technician should be a minimum of 12 inches (30 cm) above ground level or any other obstructing surface. Ductwork...
...flexible metal duct is shown in prepared side panel is longer than two 90° turns are not included in standard delivery of the dryer. Required parts The parts required for the exhaust air system (elbows, lines, exhaust air outlets) are not recommended. Exhaust ducting which ...the chart. For best performance, separate all ducting is four! WTZ 1265 Note: The maximum permitted number of 90° elbows (including this dryer. Bottom air exhaust A qualified technician should be a minimum of 12 inches (30 cm) above ground level or any other obstructing surface. Ductwork...
Operating, Care, Installation (all languages)
Page 9
...both frontĆtoĆback and sideĆto dry washable woolen textiles (e.g. WTZ1280 The parts required for silver and duo tone silver dryers The door catch can be installed in your area to a noncombustible portion of outside must not terminate beneath the mobile home. Bottom exhaust kit... if necessary. i If space is very restricted, it does wobble, the feet must be obtained from the drum. 3. ATTENTION Do not slide dryer across floor with all four feet firmly on the pedestal follow the installation instructions supplied by step 1. Gas Kit part no . If you have ...
...both frontĆtoĆback and sideĆto dry washable woolen textiles (e.g. WTZ1280 The parts required for silver and duo tone silver dryers The door catch can be installed in your area to a noncombustible portion of outside must not terminate beneath the mobile home. Bottom exhaust kit... if necessary. i If space is very restricted, it does wobble, the feet must be obtained from the drum. 3. ATTENTION Do not slide dryer across floor with all four feet firmly on the pedestal follow the installation instructions supplied by step 1. Gas Kit part no . If you have ...
Operating, Care, Installation (all languages)
Page 10
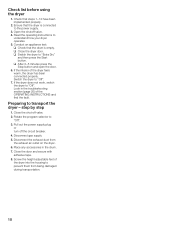
...4. Conduct an appliance test: q Check that steps 1-12 have been implemented properly. 2. q Close the dryer door. Rotate the program selector to understand how your dryer operates. 5. Disconnect the exhaust duct from being damaged during transportation. 10 Screw the heightĆadjustable feet ...in the troubleshooting section (page 20) of the dryer feels warm, the dryer has been connected properly. Ensure that the dryer is empty. Close the door and secure with adhesive tape. 8. q Switch the dryer to Off". Switch the dryer to transport the dryer ć step by step 1. Preparing to ...
...4. Conduct an appliance test: q Check that steps 1-12 have been implemented properly. 2. q Close the dryer door. Rotate the program selector to understand how your dryer operates. 5. Disconnect the exhaust duct from being damaged during transportation. 10 Screw the heightĆadjustable feet ...in the troubleshooting section (page 20) of the dryer feels warm, the dryer has been connected properly. Ensure that the dryer is empty. Close the door and secure with adhesive tape. 8. q Switch the dryer to Off". Switch the dryer to transport the dryer ć step by step 1. Preparing to ...
Operating, Care, Installation (all languages)
Page 11
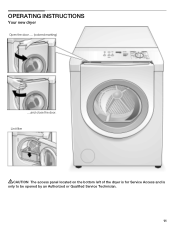
OPERATING INSTRUCTIONS Your new dryer Open the door .... (colored marking) ....and close the door. Lint filter dCAUTION The access panel located on the bottom left of the dryer is for Service Access and is only to be opened by an Authorized or Qualified Service Technician. 11
OPERATING INSTRUCTIONS Your new dryer Open the door .... (colored marking) ....and close the door. Lint filter dCAUTION The access panel located on the bottom left of the dryer is for Service Access and is only to be opened by an Authorized or Qualified Service Technician. 11
Operating, Care, Installation (all languages)
Page 12
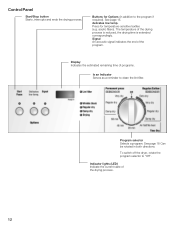
delicates low temp. acrylic fibers). See page 15. To switch off the dryer, rotate the program selector to clean the lint filter. Display Indicates the estimated remaining time of the program. Program selector Selects a program. Indicator lights (LED) ...
delicates low temp. acrylic fibers). See page 15. To switch off the dryer, rotate the program selector to clean the lint filter. Display Indicates the estimated remaining time of the program. Program selector Selects a program. Indicator lights (LED) ...
Operating, Care, Installation (all languages)
Page 13
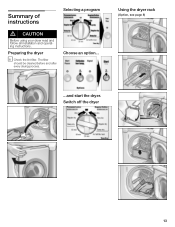
Choose an option... Summary of instructions Selecting a program d CAUTION Before using your dryer read and follow all installation and operatĆ ing instructions. Preparing the dryer i Check the lint filter. Switch off the dryer 13 Using the dryer rack (Option, see page 8) ...and start the dryer. The filter should be cleaned before and after every drying process.
Choose an option... Summary of instructions Selecting a program d CAUTION Before using your dryer read and follow all installation and operatĆ ing instructions. Preparing the dryer i Check the lint filter. Switch off the dryer 13 Using the dryer rack (Option, see page 8) ...and start the dryer. The filter should be cleaned before and after every drying process.
Operating, Care, Installation (all languages)
Page 14
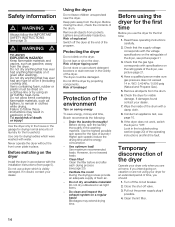
... and time, Bosch recommends the following: - Do not use solvent detergent boosters or stain remover in accordance with specifications on the rating plate of oil on the dryer. Keep pets away from page 5). Do not store or use a dryer which were washed with a damp cloth. 8. Use... optimum load! Read these instructions may extend drying time. If the dryer does not work, switch the dryer to remain in the washing machine. Temporary disconnection of the dryer Operate your dryer for drying textiles which is...
... and time, Bosch recommends the following: - Do not use solvent detergent boosters or stain remover in accordance with specifications on the rating plate of oil on the dryer. Keep pets away from page 5). Do not store or use a dryer which were washed with a damp cloth. 8. Use... optimum load! Read these instructions may extend drying time. If the dryer does not work, switch the dryer to remain in the washing machine. Temporary disconnection of the dryer Operate your dryer for drying textiles which is...

Operating, Care, Installation (all languages)
Page 15
...Cotton ECOSENSOR Permanent Press ECOSENSOR The program sequence of automatic programs is pressed. i Dry woolen or wool-rich textiles with dryer rack only! button for one hour to prevent creasing. Drying ends automatically as soon as limitations about the drying process....program Air fluff/No heat" to fabric type and drying program. - Fasten loose belts, apron strings, etc.. - Knitted textiles (e.g. Signal Your dryer outputs different signals, if the "Signal" button is controlled via indicator lights (Drying, Damp dry, Regular dry, Wrinkle block). A moisture sensor ...
...Cotton ECOSENSOR Permanent Press ECOSENSOR The program sequence of automatic programs is pressed. i Dry woolen or wool-rich textiles with dryer rack only! button for one hour to prevent creasing. Drying ends automatically as soon as limitations about the drying process....program Air fluff/No heat" to fabric type and drying program. - Fasten loose belts, apron strings, etc.. - Knitted textiles (e.g. Signal Your dryer outputs different signals, if the "Signal" button is controlled via indicator lights (Drying, Damp dry, Regular dry, Wrinkle block). A moisture sensor ...
Operating, Care, Installation (all languages)
Page 17
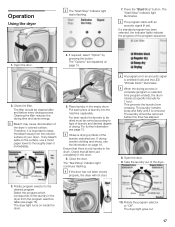
... bleach spills on inside the drum. 10. The dryer light goes out. 17 i The program starts with an acoustic signal (if set ) and the LED Wrinkle block" illuminates. i Bleach may cause discoloration of drying. If drying woolen clothing and shoes, see the information on page 15. ...2. The "Options" are completely in the drum. Cleaning the filter reduces the drying time and saves energy. Operation Using the dryer i The "Start/Stop" indicator light starts flashing. ...
... bleach spills on inside the drum. 10. The dryer light goes out. 17 i The program starts with an acoustic signal (if set ) and the LED Wrinkle block" illuminates. i Bleach may cause discoloration of drying. If drying woolen clothing and shoes, see the information on page 15. ...2. The "Options" are completely in the drum. Cleaning the filter reduces the drying time and saves energy. Operation Using the dryer i The "Start/Stop" indicator light starts flashing. ...
Operating, Care, Installation (all languages)
Page 18
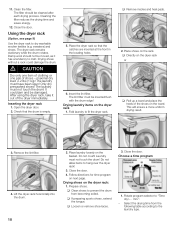
... items to Time dry/.... Close the door. Using the dryer rack (Option, see page 9) Use the dryer rack to fit the dryer rack. d CAUTION Dry only one item of clothing or one pair of the dryer immediately. The laundry must not touch the drum! Inserting the dryer rack 1. Laundry must have been spun! Drying shoes on...
... items to Time dry/.... Close the door. Using the dryer rack (Option, see page 9) Use the dryer rack to fit the dryer rack. d CAUTION Dry only one item of clothing or one pair of the dryer immediately. The laundry must not touch the drum! Inserting the dryer rack 1. Laundry must have been spun! Drying shoes on...
Operating, Care, Installation (all languages)
Page 19
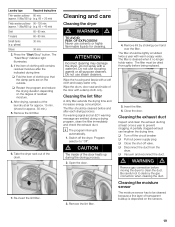
...Skirt 60-90 min. Shoes 30 min. 2. Press the Start/Stop" button. The Start/Stop" indicator light illuminates. 3. If the item of clothing still contains residual moisture after each drying process. q Restart the program and reduce the drying duration depending on the outside. Remove the lint filter. 6....OF EXPLOSION! Never use solvents or highly flammable liquids for approx. 30 min.). 5. ATTENTION Incorrect cleaning may damage the dryer. Do not spray with a soft cloth and soapy water only. Do not use scouring agents or allĆpurpose cleaners. Wipe the drum, door seal ...
...Skirt 60-90 min. Shoes 30 min. 2. Press the Start/Stop" button. The Start/Stop" indicator light illuminates. 3. If the item of clothing still contains residual moisture after each drying process. q Restart the program and reduce the drying duration depending on the outside. Remove the lint filter. 6....OF EXPLOSION! Never use solvents or highly flammable liquids for approx. 30 min.). 5. ATTENTION Incorrect cleaning may damage the dryer. Do not spray with a soft cloth and soapy water only. Do not use scouring agents or allĆpurpose cleaners. Wipe the drum, door seal ...


