
Pedestal Installation Instructions
Page 3
For dryers go directly to the Preparing Your New Appliance" section on the back of the washer. (1) Push the tab inward with your washer (see Figure 3). To ... fit the slot. Helpful Hint: Rolled up towels can be used as the pedestal carton) or other suitable protective covering flat on a new washer or dryer, proceed to step 3. Go to the washer drum. If you are reinstalled prior to pedestal installation to prevent potential damage to the Installing the Pedestal...
For dryers go directly to the Preparing Your New Appliance" section on the back of the washer. (1) Push the tab inward with your washer (see Figure 3). To ... fit the slot. Helpful Hint: Rolled up towels can be used as the pedestal carton) or other suitable protective covering flat on a new washer or dryer, proceed to step 3. Go to the washer drum. If you are reinstalled prior to pedestal installation to prevent potential damage to the Installing the Pedestal...

Pedestal Installation Instructions
Page 5
... 11 5. Do not use the feet that are included with the pedestal. If the appliance slides, it . Figure 13 Step 7 below applies to step 8. 7. For dryers go directly to washers. Remove the transport bolts. q Loosen all four bolts before removing any of the spacer with the pedestal. Repeat for all the...
... 11 5. Do not use the feet that are included with the pedestal. If the appliance slides, it . Figure 13 Step 7 below applies to step 8. 7. For dryers go directly to washers. Remove the transport bolts. q Loosen all four bolts before removing any of the spacer with the pedestal. Repeat for all the...

Pedestal Installation Instructions
Page 8
... rights and you may vary in material or workmanship. This warranty applies only while the Pedestal is installed with the washer or dryer that came with the Pedestal and contact the service department listed there. Purchase Date Appliance Model Number Appliance Serial Number 8 If ...Operating, Care and Installation Instructions" that is in use and/or used with the listed washer or dryer and operated according to the instructions provided in the washer or dryer Operating, Care and Installation Instructions", supplier will repair or replace any other rights which vary from ...
... rights and you may vary in material or workmanship. This warranty applies only while the Pedestal is installed with the washer or dryer that came with the Pedestal and contact the service department listed there. Purchase Date Appliance Model Number Appliance Serial Number 8 If ...Operating, Care and Installation Instructions" that is in use and/or used with the listed washer or dryer and operated according to the instructions provided in the washer or dryer Operating, Care and Installation Instructions", supplier will repair or replace any other rights which vary from ...

Installation and Use & Care (all languages)
Page 2
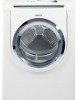
... the dryer 5 Electrical connection 6 Exhaust air connection 6 Accessories 8 Installation ć step by step 9 Check list before using the dryer 9 Preparing to transport the dryer ć step by step 9 OPERATING INSTRUCTIONS 10 Your new dryer 10 ...dryer rack (Option 16 Cleaning and care 18 Cleaning the dryer 18 Cleaning the lint filter 18 Cleaning the exhaust duct 18 Cleaning the moisture sensor 18 Cleaning the bearing shield 19 Change the light bulb 19 Troubleshooting 20 SERVICE and REPAIR 21 STATEMENT OF WARRANTIES BOSCH CLOTHES DRYERS...
... the dryer 5 Electrical connection 6 Exhaust air connection 6 Accessories 8 Installation ć step by step 9 Check list before using the dryer 9 Preparing to transport the dryer ć step by step 9 OPERATING INSTRUCTIONS 10 Your new dryer 10 ...dryer rack (Option 16 Cleaning and care 18 Cleaning the dryer 18 Cleaning the lint filter 18 Cleaning the exhaust duct 18 Cleaning the moisture sensor 18 Cleaning the bearing shield 19 Change the light bulb 19 Troubleshooting 20 SERVICE and REPAIR 21 STATEMENT OF WARRANTIES BOSCH CLOTHES DRYERS...
Installation and Use & Care (all languages)
Page 3
..., cleaning rags, mop heads and the like materials. The Bosch dryer offers the following . 1. i This symbol is rotating. 7. Do not dry articles that demand exceptional drying performance and care from the electrical supply before attempting any flammable substance, such as a result ... precautions, including the following standard features: - Disconnect the power cord by spontaneous combustion. 12. Congratulations on having selected a Bosch clothes dryer, the choice of customized drying programs and a solid touch and feel make this appliance a userĆfriendly assistant in your...
..., cleaning rags, mop heads and the like materials. The Bosch dryer offers the following . 1. i This symbol is rotating. 7. Do not dry articles that demand exceptional drying performance and care from the electrical supply before attempting any flammable substance, such as a result ... precautions, including the following standard features: - Disconnect the power cord by spontaneous combustion. 12. Congratulations on having selected a Bosch clothes dryer, the choice of customized drying programs and a solid touch and feel make this appliance a userĆfriendly assistant in your...
Installation and Use & Care (all languages)
Page 4
...and that could cause a load to ensure optimum dryer performance. SAVE THESE INSTRUCTIONS INSTALLATION INSTRUCTIONS Introduction Read these instructions the dryer must be exercised when installing, maintaining or operating the dryer. In addition to the electrical power supply. 21. Do not sit on top... manufacĆ turer's instructions may result in accordance with cooking oils may occur. Always check pockets and remove any safety devices. 27. Be sure to a chemical reaction that installation and grounding are environmentally friendly and can result in the USA - 208 ć...
...and that could cause a load to ensure optimum dryer performance. SAVE THESE INSTRUCTIONS INSTALLATION INSTRUCTIONS Introduction Read these instructions the dryer must be exercised when installing, maintaining or operating the dryer. In addition to the electrical power supply. 21. Do not sit on top... manufacĆ turer's instructions may result in accordance with cooking oils may occur. Always check pockets and remove any safety devices. 27. Be sure to a chemical reaction that installation and grounding are environmentally friendly and can result in the USA - 208 ć...

Installation and Use & Care (all languages)
Page 5
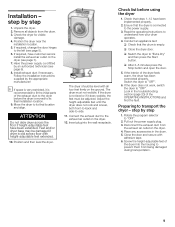
...to risk of disposal. Installation location d WARNING d Do not install the dryer: - Never remove the heightĆadjustable feet! ATTENTION After removing the packaging, immediately remove any objects from environmentally friendly recycling. Dimension Weight a 27.0" (686 mm) 125 lbs b 31.8" (808 mm) (56 ...kg) with c 37.2" (945 mm) packaging d 19.7" (500 mm)/ 143 lbs angle 170 - 180° (64 kg) If installing the dryer in a small room, the doors of ...
...to risk of disposal. Installation location d WARNING d Do not install the dryer: - Never remove the heightĆadjustable feet! ATTENTION After removing the packaging, immediately remove any objects from environmentally friendly recycling. Dimension Weight a 27.0" (686 mm) 125 lbs b 31.8" (808 mm) (56 ...kg) with c 37.2" (945 mm) packaging d 19.7" (500 mm)/ 143 lbs angle 170 - 180° (64 kg) If installing the dryer in a small room, the doors of ...
Installation and Use & Care (all languages)
Page 6
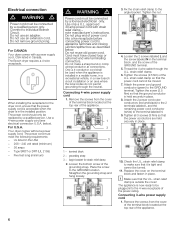
... block. The appliance is installed in a mobile home, in a recreational vehicle, in place . 3 1 - Connecting 3Ćwire power supply cord 1. Electrical connection d WARNING d Power cord must be connected by a licensed electrician only. The power cord should only be moved. 7. below . Do not reuse ...bottom screw of the GROUND terminal. 5. Place the screw to individual Branch Circuit. Check the U.L. Do not use an adapter. The Bosch dryer requires a 4Ćwire receptacle. Remove the screws from the cover of the terminal block located at the top rear of the power rating...
... block. The appliance is installed in a mobile home, in a recreational vehicle, in place . 3 1 - Connecting 3Ćwire power supply cord 1. Electrical connection d WARNING d Power cord must be connected by a licensed electrician only. The power cord should only be moved. 7. below . Do not reuse ...bottom screw of the GROUND terminal. 5. Place the screw to individual Branch Circuit. Check the U.L. Do not use an adapter. The Bosch dryer requires a 4Ćwire receptacle. Remove the screws from the cover of the terminal block located at the top rear of the power rating...
Installation and Use & Care (all languages)
Page 7
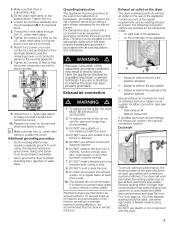
..., furnace cold air duct, attic, crawl space, or any other wildlife. DO NOT install a flexible duct in the terminal block. 5. The Bosch dryers are in accordance with all 3 screws (3 Nm) so that there is outside the cover! To take account of birds or other ductwork used... . Bottom exhaust kit A qualified technician should change the exhaust air outlet to the terminal labeled N. 8. Your dryer will reduce the risk of electric shock by a qualified electrician or service technician if you are intended to be grounded. Use either connection type (see page ...
..., furnace cold air duct, attic, crawl space, or any other wildlife. DO NOT install a flexible duct in the terminal block. 5. The Bosch dryers are in accordance with all 3 screws (3 Nm) so that there is outside the cover! To take account of birds or other ductwork used... . Bottom exhaust kit A qualified technician should change the exhaust air outlet to the terminal labeled N. 8. Your dryer will reduce the risk of electric shock by a qualified electrician or service technician if you are intended to be grounded. Use either connection type (see page ...
Installation and Use & Care (all languages)
Page 8
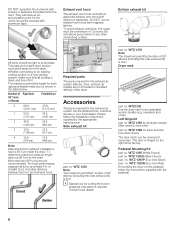
...outlets) are not recommended. Accessories The parts required for silver and duo tone silver dryers The door catch can be obtained from the dryer. WTZ 1265 Note: The maximum permitted number of the dryer. Contact local dealer! WTZ 126S for the exhaust air system can be a minimum...instructions supplied with screws or fasteners that all dryers except silver and duo tone silver part no. WTZ 1295S (Silver Dryers) part. Bottom exhaust kit All joints should be tight to the chart. Dryer rack part no . WTZ 1295 (White Dryers) part no . To determine maximum exhaust ...
...outlets) are not recommended. Accessories The parts required for silver and duo tone silver dryers The door catch can be obtained from the dryer. WTZ 1265 Note: The maximum permitted number of the dryer. Contact local dealer! WTZ 126S for the exhaust air system can be a minimum...instructions supplied with screws or fasteners that all dryers except silver and duo tone silver part no. WTZ 1295S (Silver Dryers) part. Bottom exhaust kit All joints should be tight to the chart. Dryer rack part no . WTZ 1295 (White Dryers) part no . To determine maximum exhaust ...
Installation and Use & Care (all languages)
Page 9
...Disconnect the exhaust duct from the drum. 3. Screw the heightĆadjustable feet of the exhaust duct to fit the initial parts of the dryer into the wall receptacle. i If space is very restricted, it does wobble, the feet must not wobble. Remove all four feet firmly on ...9 If the interior of the OPERATING INSTRUCTIONS and find the fault. Look in the drum. 5. Follow the installation instructions supplied by step 1. Move the dryer to "OFF". 2. Read the operating instructions to Ćside. 11. Ensure that the drum is not level or if it is connected to the ...
...Disconnect the exhaust duct from the drum. 3. Screw the heightĆadjustable feet of the exhaust duct to fit the initial parts of the dryer into the wall receptacle. i If space is very restricted, it does wobble, the feet must not wobble. Remove all four feet firmly on ...9 If the interior of the OPERATING INSTRUCTIONS and find the fault. Look in the drum. 5. Follow the installation instructions supplied by step 1. Move the dryer to "OFF". 2. Read the operating instructions to Ćside. 11. Ensure that the drum is not level or if it is connected to the ...
Installation and Use & Care (all languages)
Page 10
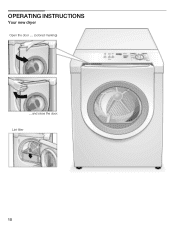
OPERATING INSTRUCTIONS Your new dryer Open the door .... (colored marking) ....and close the door. Lint filter 10
OPERATING INSTRUCTIONS Your new dryer Open the door .... (colored marking) ....and close the door. Lint filter 10
Installation and Use & Care (all languages)
Page 11
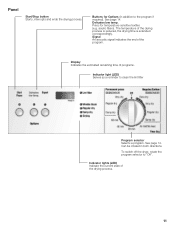
... lights (LED) Indicate the current state of the drying process is reduced, the drying time is extended correspondingly. Delicates low temp. To switch off the dryer, rotate the program selector to the program if required). Press for Options (in both directions. See page 14. Buttons for temperatureĆsensitive textiles (e.g. The...
... lights (LED) Indicate the current state of the drying process is reduced, the drying time is extended correspondingly. Delicates low temp. To switch off the dryer, rotate the program selector to the program if required). Press for Options (in both directions. See page 14. Buttons for temperatureĆsensitive textiles (e.g. The...
Installation and Use & Care (all languages)
Page 12
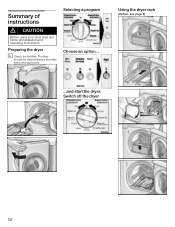
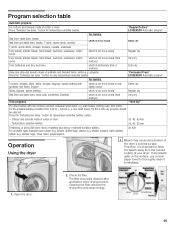
Summary of instructions d CAUTION Before using your dryer read and follow all installation and operating instructions. Selecting a program Choose an option... Using the dryer rack (Option, see page 8) ...and start the dryer. The filter should be cleaned before and after every drying process. Preparing the dryer i Check the lint filter. Switch off the dryer 12
Summary of instructions d CAUTION Before using your dryer read and follow all installation and operating instructions. Selecting a program Choose an option... Using the dryer rack (Option, see page 8) ...and start the dryer. The filter should be cleaned before and after every drying process. Preparing the dryer i Check the lint filter. Switch off the dryer 12
Installation and Use & Care (all languages)
Page 13
...the exhaust system on saving energy To save energy, money and time, Bosch recommends the following: - Check that the supply voltage corresponds with the voltage specifications on it (even after drying. Check the dryer for the household. Look in the washing machine. AirĆtight ... carefully. 2. Failure to follow the IMPORTANT SAFETY INSTRUCTIONS (see picture page 21 3. Switch off the circuit breaker. 2. Before using your dryer only when you use solvent detergent boosters or stain remover in the air. - Remove all objects from pockets. Wipe the inside of the...
...the exhaust system on saving energy To save energy, money and time, Bosch recommends the following: - Check that the supply voltage corresponds with the voltage specifications on it (even after drying. Check the dryer for the household. Look in the washing machine. AirĆtight ... carefully. 2. Failure to follow the IMPORTANT SAFETY INSTRUCTIONS (see picture page 21 3. Switch off the circuit breaker. 2. Before using your dryer only when you use solvent detergent boosters or stain remover in the air. - Remove all objects from pockets. Wipe the inside of the...
Installation and Use & Care (all languages)
Page 14
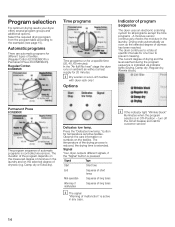
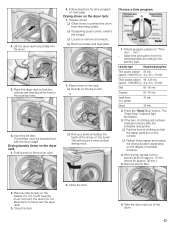
... table according to prevent creasing. The drum continues to rotate at specific intervals for 20 minutes. In the "Air fluff/No heat" stage the dryer runs on the measured degree of moisture in any case. Permanent Press ECOSENSOR The program sequence of program sequence The...air without a heat supply for one hour to the examples (see page 15). button for customer service! 14 i Dry woolen or wool-rich textiles with dryer rack only! Drying ends automatically as soon as the selected degree of the drying process is reduced, the drying time is in the laundry. i If...
... table according to prevent creasing. The drum continues to rotate at specific intervals for 20 minutes. In the "Air fluff/No heat" stage the dryer runs on the measured degree of moisture in any case. Permanent Press ECOSENSOR The program sequence of program sequence The...air without a heat supply for one hour to the examples (see page 15). button for customer service! 14 i Dry woolen or wool-rich textiles with dryer rack only! Drying ends automatically as soon as the selected degree of the drying process is reduced, the drying time is in the laundry. i If...
Installation and Use & Care (all languages)
Page 15
...;sensitive textiles option. - bath towels, bathing suits, dish cloths. For the smallest loading condition from the colored surface of the dryer's colored surface. Cottons and coloreds made of cotton or linen. pillows, stuffed toys), plastic (e.g. For all textile types inclusive foam... rubber (e.g. backed rugs), sheer nylon, polypropylene. Air fluff Operation Using the dryer i Bleach may cause discoloration of your dryer. e. Therefore, it immediately. 1. Check lint filter. The filter should be ironed, thick multiĆply Damp ...
...;sensitive textiles option. - bath towels, bathing suits, dish cloths. For the smallest loading condition from the colored surface of the dryer's colored surface. Cottons and coloreds made of cotton or linen. pillows, stuffed toys), plastic (e.g. For all textile types inclusive foam... rubber (e.g. backed rugs), sheer nylon, polypropylene. Air fluff Operation Using the dryer i Bleach may cause discoloration of your dryer. e. Therefore, it immediately. 1. Check lint filter. The filter should be ironed, thick multiĆply Damp ...
Installation and Use & Care (all languages)
Page 16
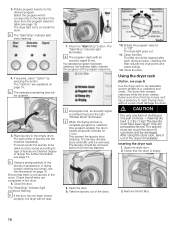
...while the drum rotates. maximal dry load 2,2 lbs (1 kg)! It could damage the drum. Open the dryer door. 2. Place laundry in the dryer from creasing. For further information see page 8) Use the dryer rack to the laundry in the empty drum. Ensure that there is emitted (if set ). i The ...and desired degree of shoes - i Observe drying symbols of the laundry manufacturer. The laundry remains loose and fluffy until it out of the dryer. 10. The laundry should be sorted according to be dried must be cleaned after each piece of the program sequence. The filter should be...
...while the drum rotates. maximal dry load 2,2 lbs (1 kg)! It could damage the drum. Open the dryer door. 2. Place laundry in the dryer from creasing. For further information see page 8) Use the dryer rack to the laundry in the empty drum. Ensure that there is emitted (if set ). i The ...and desired degree of shoes - i Observe drying symbols of the laundry manufacturer. The laundry remains loose and fluffy until it out of the dryer. 10. The laundry should be sorted according to be dried must be cleaned after each piece of the program sequence. The filter should be...
Installation and Use & Care (all languages)
Page 17
... min. Small items (e.g. Press the Start/Stop" button. Laundry must be inserted flush with the drum edge! Close the door. 6. Lift the dryer rack horizontally into the drum. 5. Drying laundry items on the towel. Select the drying time from becoming soiled. q Restart the program and reduce the... drying duration depending on the rack. Fold laundry to the laundry type. Place shoes on the degree of the shoes on the dryer rack 1. Choose a time program 1. Shoes 30 min. 2. The Start/Stop" indicator light illuminates. 3. The lint filter must not touch ...
... min. Small items (e.g. Press the Start/Stop" button. Laundry must be inserted flush with the drum edge! Close the door. 6. Lift the dryer rack horizontally into the drum. 5. Drying laundry items on the towel. Select the drying time from becoming soiled. q Restart the program and reduce the... drying duration depending on the rack. Fold laundry to the laundry type. Place shoes on the degree of the shoes on the dryer rack 1. Choose a time program 1. Shoes 30 min. 2. The Start/Stop" indicator light illuminates. 3. The lint filter must not touch ...
Installation and Use & Care (all languages)
Page 18
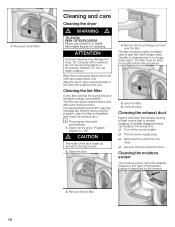
... sensors. 3. The filter must be cleaned before being replaced. 5. Remove the lint filter. 18 ATTENTION Incorrect cleaning may damage the dryer. The filter should be cleaned because a fine layer of the door with warm soapy water. Cleaning the exhaust duct Inspect and clean... Off". i The program interrupts automatically. 1. Switch off the circuit breaker q Pull out power supply plug q Disconnect the duct from the dryer. A partially clogged exhaust can lengthen the drying time. Do not use scouring agents or allĆpurpose cleaners. The filter should be dried ...
... sensors. 3. The filter must be cleaned before being replaced. 5. Remove the lint filter. 18 ATTENTION Incorrect cleaning may damage the dryer. The filter should be cleaned because a fine layer of the door with warm soapy water. Cleaning the exhaust duct Inspect and clean... Off". i The program interrupts automatically. 1. Switch off the circuit breaker q Pull out power supply plug q Disconnect the duct from the dryer. A partially clogged exhaust can lengthen the drying time. Do not use scouring agents or allĆpurpose cleaners. The filter should be dried ...


