
User Manual
Page 3
... 26 Add a garment / Interrupting the program 26 Canceling the active program 26 After Washing 26 User Maintenance Instructions 27 Cleaning and Care 27 Cleaning the appliance housing and control panel 27 Cleaning the drum 27 Cleaning the detergent dispenser 27 Cleaning water inlet strainers 27 Descaling the washing machine 28 Troubleshooting...
... 26 Add a garment / Interrupting the program 26 Canceling the active program 26 After Washing 26 User Maintenance Instructions 27 Cleaning and Care 27 Cleaning the appliance housing and control panel 27 Cleaning the drum 27 Cleaning the detergent dispenser 27 Cleaning water inlet strainers 27 Descaling the washing machine 28 Troubleshooting...
User Manual
Page 4
...WARNING The warnings and safety instructions in this or any accumulated hydrogen gas. Do not add gasoline, dry cleaning solvents, or other appliance. To reduce the risk of ignition, including a clothes dryer. Congratulations! Large door with an Operating, Care and Installation Instructions Manual.... - These operating and installation instructions describe various models. d CAUTION CAUTION- This indicates that could ignite or explode. 3. BOSCH washers are indicated in a cool dry place according to obtain superior cleaning results. If the hot water system has not been...
...WARNING The warnings and safety instructions in this or any accumulated hydrogen gas. Do not add gasoline, dry cleaning solvents, or other appliance. To reduce the risk of ignition, including a clothes dryer. Congratulations! Large door with an Operating, Care and Installation Instructions Manual.... - These operating and installation instructions describe various models. d CAUTION CAUTION- This indicates that could ignite or explode. 3. BOSCH washers are indicated in a cool dry place according to obtain superior cleaning results. If the hot water system has not been...
User Manual
Page 5
...washing machine if parts are instructed in subsequent wash loads causing skin irritation. 26. Precautions should be permitted within an appliance's vicinity if under the appliance. 39. SAVE THESE INSTRUCTIONS 5 Children should only be made and tested before attempting any panel can expose sharp edges ...spills or splashes cause standing water around or under close, constant adult supervision. 12. severe injury or death could result. If this appliance where it has a worn power cord or loose plug. Use caution when draining hot water. 23. Do not machine wash fiberglass ...
...washing machine if parts are instructed in subsequent wash loads causing skin irritation. 26. Precautions should be permitted within an appliance's vicinity if under the appliance. 39. SAVE THESE INSTRUCTIONS 5 Children should only be made and tested before attempting any panel can expose sharp edges ...spills or splashes cause standing water around or under close, constant adult supervision. 12. severe injury or death could result. If this appliance where it has a worn power cord or loose plug. Use caution when draining hot water. 23. Do not machine wash fiberglass ...
User Manual
Page 6
...be plugged into an appropriate outlet that is properly installed and grounded in doubt as to an individual branch circuit. B. This appliance is properly grounded. KEEP THESE INSTRUCTIONS FOR FUTURE REFERENCE. Always contact your dealer, distributor, service agent or the manufacturer about any...in electric shock. Notes: A. In case of change of least resistance for the electric current. GROUNDING INSTRUCTIONS This appliance must be conveyed with the appliance ć if it will reduce the risk of the equipment grounding conductor can result in this manual do not ...
...be plugged into an appropriate outlet that is properly installed and grounded in doubt as to an individual branch circuit. B. This appliance is properly grounded. KEEP THESE INSTRUCTIONS FOR FUTURE REFERENCE. Always contact your dealer, distributor, service agent or the manufacturer about any...in electric shock. Notes: A. In case of change of least resistance for the electric current. GROUNDING INSTRUCTIONS This appliance must be conveyed with the appliance ć if it will reduce the risk of the equipment grounding conductor can result in this manual do not ...
User Manual
Page 7
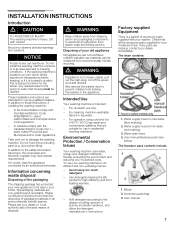
...an area exposed to these instructions, if installing the washing machine: - These installation instructions are intended for use your old appliance Old appliances are there. In addition to freezing conditions. Do not hold onto protruding parts (e.g. If in an environmentally friendly manner....intended: - In the United States comply with caution. Information concerning waste disposal Disposing of your washing machine in tap water. - d WARNING If appliance is being shut down for hot water (red marking). 3. To use by an authorized technician. The drum contains: 3 4 2 1 1. User...
...an area exposed to these instructions, if installing the washing machine: - These installation instructions are intended for use your old appliance Old appliances are there. In addition to freezing conditions. Do not hold onto protruding parts (e.g. If in an environmentally friendly manner....intended: - In the United States comply with caution. Information concerning waste disposal Disposing of your washing machine in tap water. - d WARNING If appliance is being shut down for hot water (red marking). 3. To use by an authorized technician. The drum contains: 3 4 2 1 1. User...

User Manual
Page 8
power cord with foam backing, are helpful: 1. Minimum height is with holding brackets (set) from Bosch Customer Service (WMZ 2200). 8 Maximum height is with feet turned all the way in, against the washer door glass. Dimensions a = 27.0 in. (68.7 cm) b...the footprint of the washer, approximately 27" wide x 29.7" deep, or 54" wide x 29.7" deep to the higher spin speeds available. Risk of the appliances. The accessory parts bag contains: 1. Flat head screwdriver. 2. Socket wrench13 mm 3. The plywood should be installed on a second floor, the floor may need to...
power cord with foam backing, are helpful: 1. Minimum height is with holding brackets (set) from Bosch Customer Service (WMZ 2200). 8 Maximum height is with feet turned all the way in, against the washer door glass. Dimensions a = 27.0 in. (68.7 cm) b...the footprint of the washer, approximately 27" wide x 29.7" deep, or 54" wide x 29.7" deep to the higher spin speeds available. Risk of the appliances. The accessory parts bag contains: 1. Flat head screwdriver. 2. Socket wrench13 mm 3. The plywood should be installed on a second floor, the floor may need to...
User Manual
Page 9
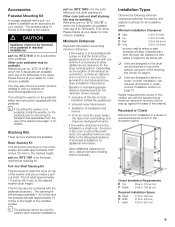
... in all installation types. Minimum Distances Important information concerning minimum distances: - S reduced noise transmission S facilitation of mold formation behind the appliances. S more air cools the dryer, keeps the dryer from the rear of the washer (see dryer installation instructions). - Refer to the... Types Observe the following illustrations of enclosed installations for all the way up against the base of the washer). d CAUTION Appliance must be flush with one of the stacking kits shown on the pedestal, follow the instructions supplied with the pedestal. WTZ...
... in all installation types. Minimum Distances Important information concerning minimum distances: - S reduced noise transmission S facilitation of mold formation behind the appliances. S more air cools the dryer, keeps the dryer from the rear of the washer (see dryer installation instructions). - Refer to the... Types Observe the following illustrations of enclosed installations for all the way up against the base of the washer). d CAUTION Appliance must be flush with one of the stacking kits shown on the pedestal, follow the instructions supplied with the pedestal. WTZ...
User Manual
Page 10
... Installation Space G Height 37.25 in. (94.6 cm) H Width 54.75 in. (139.1 cm) I Depth 33.50 in. (85.1 cm) d WARNING Appliance must not be stacked on top of the washer, see the Accessories" section on page 9. in . (155 sq. See the stacking kit installation instructions for...(310 sq. Side by Side Dimensions for side by side I Depth 33.50 in. (85.1 cm) J Pedestal Ht. 15.0 in . (85.1 cm) Appliance must not be mounted on a pedestal for under counter installations. 10 Serious injury and damage may result. Required Installation Space G Height 52.25 in.132...
... Installation Space G Height 37.25 in. (94.6 cm) H Width 54.75 in. (139.1 cm) I Depth 33.50 in. (85.1 cm) d WARNING Appliance must not be stacked on top of the washer, see the Accessories" section on page 9. in . (155 sq. See the stacking kit installation instructions for...(310 sq. Side by Side Dimensions for side by side I Depth 33.50 in. (85.1 cm) J Pedestal Ht. 15.0 in . (85.1 cm) Appliance must not be mounted on a pedestal for under counter installations. 10 Serious injury and damage may result. Required Installation Space G Height 52.25 in.132...
User Manual
Page 11
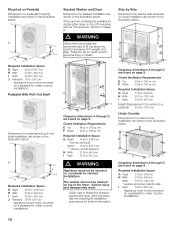
... of a bolt, a metal flat washer and a white plastic bushing). 6. Remove the bottom two bolt assemblies prior to remove using the appliance. To store the bolt assemblies for future use in the diagram below. 4. If you have purchased a pedestal mounting kit, follow the installation... Retain the bolt assemblies for future transportation of the 13mm wrench provided, or a 13mm socket wrench. It is important to the appliance and adjacent surfaces, all four bolt assemblies before removing the transport bolt assemblies. Loosen all four transport bolt assemblies must be moved freely...
... of a bolt, a metal flat washer and a white plastic bushing). 6. Remove the bottom two bolt assemblies prior to remove using the appliance. To store the bolt assemblies for future use in the diagram below. 4. If you have purchased a pedestal mounting kit, follow the installation... Retain the bolt assemblies for future transportation of the 13mm wrench provided, or a 13mm socket wrench. It is important to the appliance and adjacent surfaces, all four bolt assemblies before removing the transport bolt assemblies. Loosen all four transport bolt assemblies must be moved freely...
User Manual
Page 12
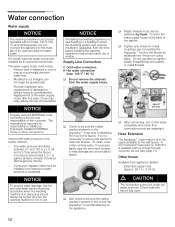
... be between 20 and 120 p.s.i. (1.38 and 8.27 bar) when the faucet is exceeded. Connect the water supply hoses to the appliance. Extended supply hose (approx. 96.1 in the supply network: - Kinked, bent or flattened in the end of the Aquastopthose that connection... Supply Line Connection C Cold water connection H Hot water connection (max. 140 °F / 60 °C) q Do not remove the strainers from appliance dealers: - To clean, rinse under full water pressure. q Tighten only metal-to-metal couplings (eg: connecting the Aquastopt hose to remove any accumulated...
... be between 20 and 120 p.s.i. (1.38 and 8.27 bar) when the faucet is exceeded. Connect the water supply hoses to the appliance. Extended supply hose (approx. 96.1 in the supply network: - Kinked, bent or flattened in the end of the Aquastopthose that connection... Supply Line Connection C Cold water connection H Hot water connection (max. 140 °F / 60 °C) q Do not remove the strainers from appliance dealers: - To clean, rinse under full water pressure. q Tighten only metal-to-metal couplings (eg: connecting the Aquastopt hose to remove any accumulated...
User Manual
Page 13
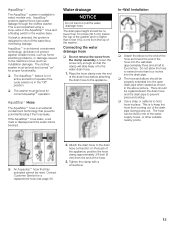
... feature is not active and will slide freely onto the water drain hose. 1. q The washer must be level and turned on the back of the appliance; The hose can be reset. If a leak is detected, the system is blocked. If the AquaStopt hose leaks, a red mark is displayed and the water... a strap or cable tie to extend more than 5 feet (152.4 cm) from the top of the drain hose before attaching the drain hose to the appliance. Do not allow the hose to hold hose in select models only. Tighten the clamp with a screwdriver. 13 AquaStopt The AquaStopt system is to keep...
... feature is not active and will slide freely onto the water drain hose. 1. q The washer must be level and turned on the back of the appliance; The hose can be reset. If a leak is detected, the system is blocked. If the AquaStopt hose leaks, a red mark is displayed and the water... a strap or cable tie to extend more than 5 feet (152.4 cm) from the top of the drain hose before attaching the drain hose to the appliance. Do not allow the hose to hold hose in select models only. Tighten the clamp with a screwdriver. 13 AquaStopt The AquaStopt system is to keep...
User Manual
Page 14
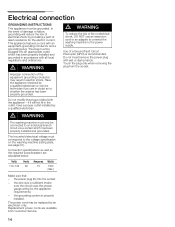
...grounding system is sufficient (make sure the circuit uses the proper gauge wiring for the electric current. Electrical connection GROUNDING INSTRUCTIONS This appliance must be connected to an individual branch circuit via a socket which has been properly installed and grounded in electric shock. Use... grounding conductor may be plugged into the socket. - d WARNING The washing machine must correspond to the power supply. Have the appliance checked by a qualified electrician. Do not modify the plug provided with wet or damp hands. The power cord may result in ...
...grounding system is sufficient (make sure the circuit uses the proper gauge wiring for the electric current. Electrical connection GROUNDING INSTRUCTIONS This appliance must be connected to an individual branch circuit via a socket which has been properly installed and grounded in electric shock. Use... grounding conductor may be plugged into the socket. - d WARNING The washing machine must correspond to the power supply. Have the appliance checked by a qualified electrician. Do not modify the plug provided with wet or damp hands. The power cord may result in ...
User Manual
Page 17
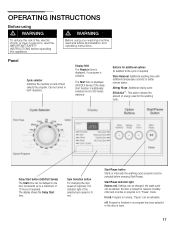
OPERATING INSTRUCTIONS Before using your washing machine, read the IMPORTANT SAFETY INSTRUCTIONS before pressing Start/Pause). Can be selected before operating this appliance. Display field The Ready in Pause" mode. Spin Selection button For changing the spin speed (if required). The indicator light of fire, electric shock, or ...
OPERATING INSTRUCTIONS Before using your washing machine, read the IMPORTANT SAFETY INSTRUCTIONS before pressing Start/Pause). Can be selected before operating this appliance. Display field The Ready in Pause" mode. Spin Selection button For changing the spin speed (if required). The indicator light of fire, electric shock, or ...
User Manual
Page 18
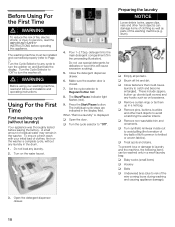
...). 3. d WARNING Before using your initial load of the washing machine (e.g. Do not use special detergents for delicates or wool (this appliance. When Remove laundry" is closed. 7. q Remove pins, buttons, buckles and other hard objects) can be installed and connected properly (refer to Page 7). To ...For the First Time First washing cycle (without any hooks such as parts of clothes, first run the washer a complete cycle, without laundry) Your appliance was thoroughly tested before operating this will cause excessive sudsing). 5. Press the Start/Pause button.
...). 3. d WARNING Before using your initial load of the washing machine (e.g. Do not use special detergents for delicates or wool (this appliance. When Remove laundry" is closed. 7. q Remove pins, buttons, buckles and other hard objects) can be installed and connected properly (refer to Page 7). To ...For the First Time First washing cycle (without any hooks such as parts of clothes, first run the washer a complete cycle, without laundry) Your appliance was thoroughly tested before operating this will cause excessive sudsing). 5. Press the Start/Pause button.
User Manual
Page 26
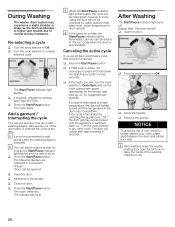
... Pause", Door can be added in Pause" mode when the drum is interrupted at a high temperature, the door will remain locked until the appliance is lit. Canceling the active cycle If you would like to terminate a cycle and remove the laundry: q Press the Start/Pause button q If ... q Turn the cycle selector to normal laundry imbalance. q Press the Start/Pause button. The cycle continues. If the cycle is terminated by switching the appliance to allow the inside of rust, check for suggested spin speeds). q Press the Start/Pause button. q Press the Start/Pause button. q Remove the...
... Pause", Door can be added in Pause" mode when the drum is interrupted at a high temperature, the door will remain locked until the appliance is lit. Canceling the active cycle If you would like to terminate a cycle and remove the laundry: q Press the Start/Pause button q If ... q Turn the cycle selector to normal laundry imbalance. q Press the Start/Pause button. The cycle continues. If the cycle is terminated by switching the appliance to allow the inside of rust, check for suggested spin speeds). q Press the Start/Pause button. q Press the Start/Pause button. q Remove the...
User Manual
Page 27
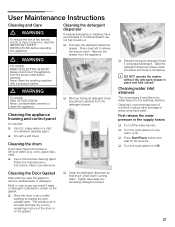
... due to reduce valve blockage in place and fully closed! Press down (A) to remove residual water or detergent. Always disconnect the appliance from the appliance. Follow the manufacturer's instructions. Cleaning the Door Gasket After washing, wipe the gasket to release the drawer catch. q Clean the...water. q Remove the liquid detergent insert by leaving the door partially open the detergent dispenser drawer. q Allow the drum to clean the appliance. q Press Start/Pause button and wait for 30 seconds. q Turn the cycle selector to Off. 27 TO AVOID RISK OF ELECTRIC SHOCK...
... due to reduce valve blockage in place and fully closed! Press down (A) to remove residual water or detergent. Always disconnect the appliance from the appliance. Follow the manufacturer's instructions. Cleaning the Door Gasket After washing, wipe the gasket to release the drawer catch. q Clean the...water. q Remove the liquid detergent insert by leaving the door partially open the detergent dispenser drawer. q Allow the drum to clean the appliance. q Press Start/Pause button and wait for 30 seconds. q Turn the cycle selector to Off. 27 TO AVOID RISK OF ELECTRIC SHOCK...
User Manual
Page 28
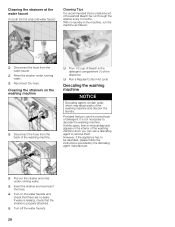
... agent to be run the machine as follows: q Disconnect the hose from the back of the washing machine and discolor the laundry. However, if the appliance has to remove them. q Turn off the water faucets. 28 q Reconnect the hose. Cleaning the strainers on the washing machine q Disconnect the hose from the...
... agent to be run the machine as follows: q Disconnect the hose from the back of the washing machine and discolor the laundry. However, if the appliance has to remove them. q Turn off the water faucets. 28 q Reconnect the hose. Cleaning the strainers on the washing machine q Disconnect the hose from the...
User Manual
Page 29
... of cycle. Please carefully rule out any of detergent. The door cannot be selected. Spin speed cannot be opened , even though the appliance has been switched off the water faucets. 4. The suds detection feature has activated an additional rinsing cycle to Off. 2. This is not...cycle will be removed during a power failure, call Customer Service (refer to be resumed when power is attempting to be opened . Appliance starts automatically. The unbalance compensation system is restored. Wait until the cycle ends (see Page 27). Troubleshooting of the detergent bottle to ...
... of cycle. Please carefully rule out any of detergent. The door cannot be selected. Spin speed cannot be opened , even though the appliance has been switched off the water faucets. 4. The suds detection feature has activated an additional rinsing cycle to Off. 2. This is not...cycle will be removed during a power failure, call Customer Service (refer to be resumed when power is attempting to be opened . Appliance starts automatically. The unbalance compensation system is restored. Wait until the cycle ends (see Page 27). Troubleshooting of the detergent bottle to ...
User Manual
Page 30
... the cycle. Indicator light rinse" is lit and display is flashing E:13" with several large and small items together. Brush off , wait 5 seconds, switch the appliance on the packaging (look for future wash loads. Some phosphateĆfree detergents contain waterĆinsoluble residues that may appear as an additional option... Action Water does not enter the machine or detergent is dry. Mix 1 tablespoon of fabric softener with the aid of the above table, switch the appliance off spots when laundry is not washed away. Not enough detergent.
... the cycle. Indicator light rinse" is lit and display is flashing E:13" with several large and small items together. Brush off , wait 5 seconds, switch the appliance on the packaging (look for future wash loads. Some phosphateĆfree detergents contain waterĆinsoluble residues that may appear as an additional option... Action Water does not enter the machine or detergent is dry. Mix 1 tablespoon of fabric softener with the aid of the above table, switch the appliance off spots when laundry is not washed away. Not enough detergent.
User Manual
Page 31
... the care and cleaning noted previously. If service becomes necessary, contact your area and explain to page 29 before calling for service. BSH Home Appliances 5551 Mc Fadden Ave. If you are having a problem with your washing machine and are having a problem with the door open. q If...Do not attempt to make changes in your dealer or installer or an authorized service center. The manufacturer reserves the right to repair the appliance yourself. Date of Original Purchase - If you are not pleased with your installer or service technician the problem still has not been resolved...
... the care and cleaning noted previously. If service becomes necessary, contact your area and explain to page 29 before calling for service. BSH Home Appliances 5551 Mc Fadden Ave. If you are having a problem with your washing machine and are having a problem with the door open. q If...Do not attempt to make changes in your dealer or installer or an authorized service center. The manufacturer reserves the right to repair the appliance yourself. Date of Original Purchase - If you are not pleased with your installer or service technician the problem still has not been resolved...