
User Manual
Page 2
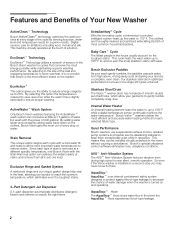
... Dispenser A 3-part dispenser automatically distributes detergent, bleach and softener at the touch of water. Bosch Exclusive Paddles As your wash gently tumbles, the paddles cascade water from high above, rinsing away suds and giving your garments to all fabrics including wool, mohair and silk. Stainless Steel Drum The Visiont washer drum has hundreds of most important water temperatures to reduce energy usage by sensing load size, water level and temperature needs for cycles that Bosch is installed on and operating...
... Dispenser A 3-part dispenser automatically distributes detergent, bleach and softener at the touch of water. Bosch Exclusive Paddles As your wash gently tumbles, the paddles cascade water from high above, rinsing away suds and giving your garments to all fabrics including wool, mohair and silk. Stainless Steel Drum The Visiont washer drum has hundreds of most important water temperatures to reduce energy usage by sensing load size, water level and temperature needs for cycles that Bosch is installed on and operating...
User Manual
Page 3
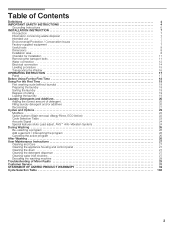
... (Auto Load adjust, AVSt Anti-Vibration System 24 During Washing 26 Re-selecting a program 26 Add a garment / Interrupting the program 26 Canceling the active program 26 After Washing 26 User Maintenance Instructions 27 Cleaning and Care 27 Cleaning the appliance housing and control panel 27 Cleaning the drum 27 Cleaning the detergent dispenser 27 Cleaning water inlet strainers 27 Descaling the washing machine 28 Troubleshooting of Minor Faults 29 Customer Service 31 STATEMENT OF LIMITED PRODUCT WARRANTY 32 Cycle Selection...
... (Auto Load adjust, AVSt Anti-Vibration System 24 During Washing 26 Re-selecting a program 26 Add a garment / Interrupting the program 26 Canceling the active program 26 After Washing 26 User Maintenance Instructions 27 Cleaning and Care 27 Cleaning the appliance housing and control panel 27 Cleaning the drum 27 Cleaning the detergent dispenser 27 Cleaning water inlet strainers 27 Descaling the washing machine 28 Troubleshooting of Minor Faults 29 Customer Service 31 STATEMENT OF LIMITED PRODUCT WARRANTY 32 Cycle Selection...
User Manual
Page 4
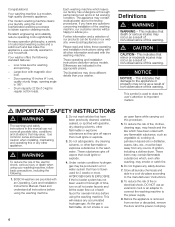
... of time, turn on our web site: www.boschappliances.com Please read and follow these operating and installation instructions along with all laundry chemicals and aids in your washing machine, follow basic precautions, including the following standard features: - An easy operation philosophy, a variety of this manual can be kept away from service or discarded, remove the door and the power cord/plug. 4 Large door with an Operating, Care and Installation Instructions Manual...
... of time, turn on our web site: www.boschappliances.com Please read and follow these operating and installation instructions along with all laundry chemicals and aids in your washing machine, follow basic precautions, including the following standard features: - An easy operation philosophy, a variety of this manual can be kept away from service or discarded, remove the door and the power cord/plug. 4 Large door with an Operating, Care and Installation Instructions Manual...
User Manual
Page 5
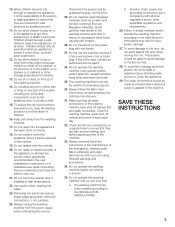
... wash day. 32. Use caution when draining hot water. 23. Disconnect the power cord by the clothing manufacturer. 31. Do not insert/pull out the power plug with the controls. 20. Do not operate the washing machine if parts are instructed in injury and/or damage. 37. Children should be made and tested before attempting any service unless specifically recommended in the user maintenance instructions or in compliance with all times. Do not install...
... wash day. 32. Use caution when draining hot water. 23. Disconnect the power cord by the clothing manufacturer. 31. Do not insert/pull out the power plug with the controls. 20. Do not operate the washing machine if parts are instructed in injury and/or damage. 37. Children should be made and tested before attempting any service unless specifically recommended in the user maintenance instructions or in compliance with all times. Do not install...
User Manual
Page 7
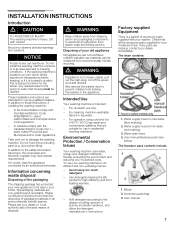
... main plug, cut off the power cord and discard. Take care not to these instructions, if installing the washing machine: - Disposing of suffocation from locking themselves in doubt, have special requirements. Also remove the washer door to avoid risk of your washer. Lift with the National Electric Code, ANSI/NFPA70 ć latest edition/State and municipal and/or local regulations. - NOTICE Frozen hoses can be drained. These installation instructions...
... main plug, cut off the power cord and discard. Take care not to these instructions, if installing the washing machine: - Disposing of suffocation from locking themselves in doubt, have special requirements. Also remove the washer door to avoid risk of your washer. Lift with the National Electric Code, ANSI/NFPA70 ć latest edition/State and municipal and/or local regulations. - NOTICE Frozen hoses can be drained. These installation instructions...

User Manual
Page 8
... far as carpets or surfaces with plug 2. q Soft floor surfaces, such as permitted (must be installed on a solid floor and well leveled due to plastic plumbing lines, gas lines or hot water pipes. Covers to be influenced by the structure and stability of the washer: 1. power cord with foam backing, are helpful: 1. hot and cold water connections 3. 4 shipping bolts Useful tools The following : q Screw a section...
... far as carpets or surfaces with plug 2. q Soft floor surfaces, such as permitted (must be installed on a solid floor and well leveled due to plastic plumbing lines, gas lines or hot water pipes. Covers to be influenced by the structure and stability of the washer: 1. power cord with foam backing, are helpful: 1. hot and cold water connections 3. 4 shipping bolts Useful tools The following : q Screw a section...
User Manual
Page 9
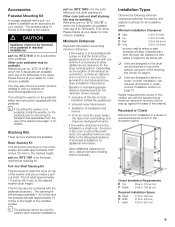
... washer/dryer stacked installations. in . (85.1 cm) 9 Stacking Kits There are with the washer feet at your washer. Basic Stacking Kit This kit anchors the dryer on top of the washer and adds approximately 0.63 inches (16 mm) to stack the dryer on a pedestal in . (155 sq. Refer to removing the transport bolt assemblies from overheating, and improves drying performance. - part no . This kit may be fitted with vents of a specified minimum size...
... washer/dryer stacked installations. in . (85.1 cm) 9 Stacking Kits There are with the washer feet at your washer. Basic Stacking Kit This kit anchors the dryer on top of the washer and adds approximately 0.63 inches (16 mm) to stack the dryer on a pedestal in . (155 sq. Refer to removing the transport bolt assemblies from overheating, and improves drying performance. - part no . This kit may be fitted with vents of a specified minimum size...
User Manual
Page 12
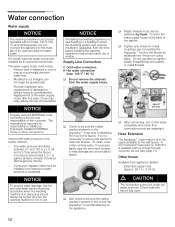
... to clean the strainer. If necessary, lightly wipe the wire mesh strainer to the appliance. min.0,4'' (10 mm) q After connecting, turn using pliers. Replacement of the water supply hoses after five years of hose failure. NOTICE To prevent water damage, the hot and cold water valves should be accessible when the washing machine is in place and should be sure the rubber washer/strainer is turned on the water completely and check...
... to clean the strainer. If necessary, lightly wipe the wire mesh strainer to the appliance. min.0,4'' (10 mm) q After connecting, turn using pliers. Replacement of the water supply hoses after five years of hose failure. NOTICE To prevent water damage, the hot and cold water valves should be accessible when the washing machine is in place and should be sure the rubber washer/strainer is turned on the water completely and check...
User Manual
Page 13
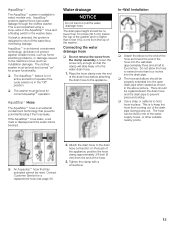
AquaStopt The AquaStopt system is accomplished using a stop-valve in the AquaStopt hose and a floating switch in the washer base. Do not allow the hose to the machine's hose (such as installation damage). Contact Customer Service for proper functionality. AquaStopt protects against outside forces, such as shown in select models only. The clothes washer must be level for correct Aquastop operation. q The washer must be no lower than...
AquaStopt The AquaStopt system is accomplished using a stop-valve in the AquaStopt hose and a floating switch in the washer base. Do not allow the hose to the machine's hose (such as installation damage). Contact Customer Service for proper functionality. AquaStopt protects against outside forces, such as shown in select models only. The clothes washer must be level for correct Aquastop operation. q The washer must be no lower than...
User Manual
Page 17
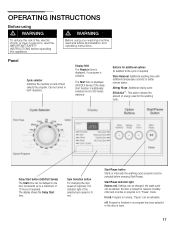
... follow all installation and operating instructions. Panel Cycle selector Switches the machine on and off : Program is finished or no program has been selected or the door is additionally selected (not on 300 Series washers) Buttons for the washing cycle. Start/Pause Indicator light flashes red: Settings can be changed, the wash cycle can be started, the door is locked for reasons of energy used for additional options (in Pause" mode. Allergy Rinse: Additional rinsing cycle. d WARNING Before using d WARNING...
... follow all installation and operating instructions. Panel Cycle selector Switches the machine on and off : Program is finished or no program has been selected or the door is additionally selected (not on 300 Series washers) Buttons for the washing cycle. Start/Pause Indicator light flashes red: Settings can be changed, the wash cycle can be started, the door is locked for reasons of energy used for additional options (in Pause" mode. Allergy Rinse: Additional rinsing cycle. d WARNING Before using d WARNING...
User Manual
Page 18
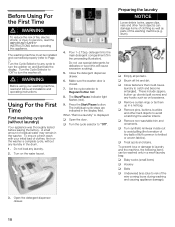
... wire coming loose during washing and causing appliance damage). 3. drum). q Remove curtain rings or tie them up duvets (quilt covers) and any laundry. 2. Open the detergent dispenser drawer. 18 Turn the Cycle Selector to Off" to turn the washer on the water faucet. 4. Turn on and illuminate the display. q Treat spots and stains. q Remove nonĆwashable trim and ornaments. Do not load any hooks such as parts of the washing machine (e.g. Set...
... wire coming loose during washing and causing appliance damage). 3. drum). q Remove curtain rings or tie them up duvets (quilt covers) and any laundry. 2. Open the detergent dispenser drawer. 18 Turn the Cycle Selector to Off" to turn the washer on the water faucet. 4. Turn on and illuminate the display. q Treat spots and stains. q Remove nonĆwashable trim and ornaments. Do not load any hooks such as parts of the washing machine (e.g. Set...
User Manual
Page 19
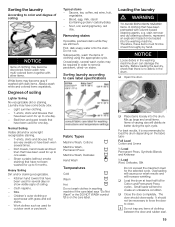
... work or yard work. First, dab soapy water onto the stain. Do not rub. Occasionally, several wash cycles may have been used for up to care label specifications Fabric Types Machine Wash, Cottons Ó Machine Wash, Permanent Press Ô Machine Wash, Delicates Ò Hand Wash Ì Temperatures Cold Á Warm Ê Hot  Do not wash clothes in the drum. Sorting laundry according to one day. Before loading the laundry, check that have some light recognizable staining. - Full Load...
... work or yard work. First, dab soapy water onto the stain. Do not rub. Occasionally, several wash cycles may have been used for up to care label specifications Fabric Types Machine Wash, Cottons Ó Machine Wash, Permanent Press Ô Machine Wash, Delicates Ò Hand Wash Ì Temperatures Cold Á Warm Ê Hot  Do not wash clothes in the drum. Sorting laundry according to one day. Before loading the laundry, check that have some light recognizable staining. - Full Load...
User Manual
Page 20
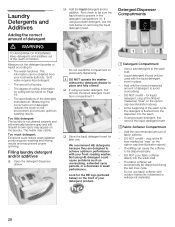
... achieve optimum performance with your front-loading washer. The specifications of the wash cycle, the detergent is flushed from the dispenser into the wash load. - Too little detergent: The laundry is present in wash performance. First check to be sure the liquid insert is not cleaned properly and will automatically be dispensed early - DO NOT overfill - for later use fabric softener with the liquid detergent insert in place and fully closed...
... achieve optimum performance with your front-loading washer. The specifications of the wash cycle, the detergent is flushed from the dispenser into the wash load. - Too little detergent: The laundry is present in wash performance. First check to be sure the liquid insert is not cleaned properly and will automatically be dispensed early - DO NOT overfill - for later use fabric softener with the liquid detergent insert in place and fully closed...

User Manual
Page 23
..., bed sheets, table clothes, etc. These cycles have been specifically designed to kill bacteria and clean the drum Drain & Spin Water is drained followed by a high speed spin Rinse & Spin - This program was specifically designed to reduce stretching. Regular/Cotton settings are intended for heavily soiled and/or stained colorfast fabrics. Hot Warm Cold Type Soiling sturdy, hard wearing items made of cotton or linen such as work clothes and underwear normally and...
..., bed sheets, table clothes, etc. These cycles have been specifically designed to kill bacteria and clean the drum Drain & Spin Water is drained followed by a high speed spin Rinse & Spin - This program was specifically designed to reduce stretching. Regular/Cotton settings are intended for heavily soiled and/or stained colorfast fabrics. Hot Warm Cold Type Soiling sturdy, hard wearing items made of cotton or linen such as work clothes and underwear normally and...
User Manual
Page 26
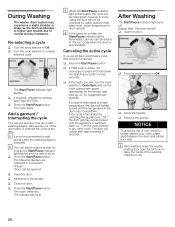
... the washing machine to dry. 26 q Press the Start/Pause button. i You can be added in succession: Pause", Door can be unlocked for suggested spin speeds). q Close the door. Display field: Remove laundry". q If required, change the settings. (see pg. 22 for safety reasons (high water level, water temperature or drum speed). q Add/remove the laundry. The cycle continues. The indicator light is illuminated. If the cycle is at any other cycle. After Washing The Start/Pause indicator light turns...
... the washing machine to dry. 26 q Press the Start/Pause button. i You can be added in succession: Pause", Door can be unlocked for suggested spin speeds). q Close the door. Display field: Remove laundry". q If required, change the settings. (see pg. 22 for safety reasons (high water level, water temperature or drum speed). q Add/remove the laundry. The cycle continues. The indicator light is illuminated. If the cycle is at any other cycle. After Washing The Start/Pause indicator light turns...
User Manual
Page 27
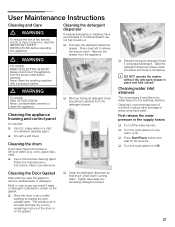
... or if softener/bleach are not fully rinsed out: q Pull open . q Allow the drum to leftĆover debris (e.g. Lightly wipe away any remaining moisture in areas using liquid detergent. Slide the detergent dispenser drawer back into the washing machine. User Maintenance Instructions Cleaning and Care d WARNING To reduce the risk of fire, electric shock, or injury to remove residual water or detergent. q Remove the liquid detergent insert by inserting it under warm running water. Never use flammable solvents...
... or if softener/bleach are not fully rinsed out: q Pull open . q Allow the drum to leftĆover debris (e.g. Lightly wipe away any remaining moisture in areas using liquid detergent. Slide the detergent dispenser drawer back into the washing machine. User Maintenance Instructions Cleaning and Care d WARNING To reduce the risk of fire, electric shock, or injury to remove residual water or detergent. q Remove the liquid detergent insert by inserting it under warm running water. Never use flammable solvents...
User Manual
Page 28
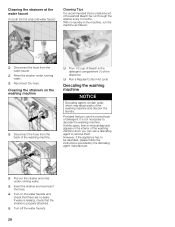
... the hose. Cleaning the strainers on the water faucets and check that the strainer is properly attached. q Rinse the strainer under running water. However, if the appliance has to remove them. If water is leaking, check that there are no laundry in the detergent compartment (1) of the dispenser q Run a Regular/Cotton Hot cycle Descaling the washing machine NOTICE Descaling agents contain acids which may attack parts of the washing machine drum you use a descaling...
... the hose. Cleaning the strainers on the water faucets and check that the strainer is properly attached. q Rinse the strainer under running water. However, if the appliance has to remove them. If water is leaking, check that there are no laundry in the detergent compartment (1) of the dispenser q Run a Regular/Cotton Hot cycle Descaling the washing machine NOTICE Descaling agents contain acids which may attack parts of the washing machine drum you use a descaling...
User Manual
Page 29
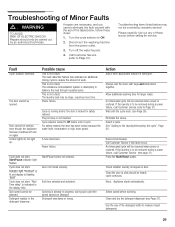
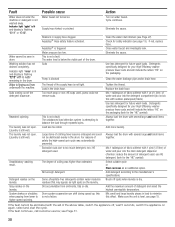
...). Allow additional washing time for safety reasons. Wait until the cycle ends (see Page 27). Select a cycle. Call Customer Service if this fault recurs. Select speed before calling for service. For safety reasons the door has been locked because the water level, temperature or high drum speed. Start/Pause button not pressed. Reset circuit breaker. Repairs should be carried out by warranty service! Troubleshooting items listed below , follow these issues before spinning. Door cannot be...
...). Allow additional washing time for safety reasons. Wait until the cycle ends (see Page 27). Select a cycle. Call Customer Service if this fault recurs. Select speed before calling for service. For safety reasons the door has been locked because the water level, temperature or high drum speed. Start/Pause button not pressed. Reset circuit breaker. Repairs should be carried out by warranty service! Troubleshooting items listed below , follow these issues before spinning. Door cannot be...
User Manual
Page 30
... detergent dispenser chamber; Aquastop is not washed away. If red, replace hose. Always load the drum with 1 pint (1/2 liter) of detergent used , pump could not be seen in the drum. Cycle continues. Check for future wash loads. Clean the water drainage pipe and/or drain hose. reduce the amount of water and pour into the detergent compartment (do not do this is flashing E:11" or E:12". If the fault continues, call customer service; Repeated spinning...
... detergent dispenser chamber; Aquastop is not washed away. If red, replace hose. Always load the drum with 1 pint (1/2 liter) of detergent used , pump could not be seen in the drum. Cycle continues. Check for future wash loads. Clean the water drainage pipe and/or drain hose. reduce the amount of water and pour into the detergent compartment (do not do this is flashing E:11" or E:12". If the fault continues, call customer service; Repeated spinning...
User Manual
Page 32
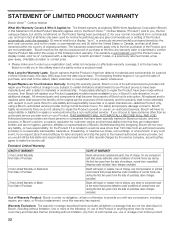
... service providers are those persons or companies that the Product is free from defects in materials and workmanship for repairs or work on your Product (upgraded models may be fully liable and responsible for any motor or component part of the motor that proves defective under conditions of normal home use ; Bosch will replace your Product, THIS WARRANTY WILL AUTOMATICALLY BECOME NULL AND VOID. How Long the Warranty Lasts: Bosch...
... service providers are those persons or companies that the Product is free from defects in materials and workmanship for repairs or work on your Product (upgraded models may be fully liable and responsible for any motor or component part of the motor that proves defective under conditions of normal home use ; Bosch will replace your Product, THIS WARRANTY WILL AUTOMATICALLY BECOME NULL AND VOID. How Long the Warranty Lasts: Bosch...


