
Instructions for Use
Page 6
...: Fold-down shelves that is hygienic, energy efficient, and economical. Extra Tall Items Sprinkler: Allows you to delay the start of the dishwasher up to securely hold cups or large kitchen utensils. Condensation Drying: A high temperature final rinse, a low temperature stainless steel tub, and the sheeting action of a rinse agent result...
...: Fold-down shelves that is hygienic, energy efficient, and economical. Extra Tall Items Sprinkler: Allows you to delay the start of the dishwasher up to securely hold cups or large kitchen utensils. Condensation Drying: A high temperature final rinse, a low temperature stainless steel tub, and the sheeting action of a rinse agent result...
Instructions for Use
Page 64
IMPORTANT INSTRUCTIONS 1 Tools Needed 2 Materials Needed 2 Materials Supplied 3 Enclosure Preparation 4 Electrical Preparation 5 Plumbing Preparation 7-8 Plumbing 9 Securing the Dishwasher 11 Placing the Dishwasher 12 Door Panel Installation 13 Final Instructions 13 Customer Service 14 Important Safety Instructions WARNING To avoid possible injury ...
IMPORTANT INSTRUCTIONS 1 Tools Needed 2 Materials Needed 2 Materials Supplied 3 Enclosure Preparation 4 Electrical Preparation 5 Plumbing Preparation 7-8 Plumbing 9 Securing the Dishwasher 11 Placing the Dishwasher 12 Door Panel Installation 13 Final Instructions 13 Customer Service 14 Important Safety Instructions WARNING To avoid possible injury ...
Instructions for Use
Page 69
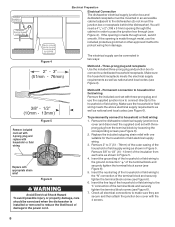
...6. Remove 3/8" to household or field wiring: 1. Insert the ground leg of the household or field wiring to the "L" connection of the terminal block and securely tighten the terminal block screw (see Figure 4). 3/8" - 1/2" (10mm - 13mm) Figure 5 Remove included cord set with one suitable for the household or..., sand it smooth. Dedicated Receptacle or Field Wiring Dishwasher Electrical Supply Junction Box Electric cord with junction box and three prong plug are secure and then attach the junction box cover with the 4 screws. 6 If the opening is made through (see Figure 6). Make sure...
...6. Remove 3/8" to household or field wiring: 1. Insert the ground leg of the household or field wiring to the "L" connection of the terminal block and securely tighten the terminal block screw (see Figure 4). 3/8" - 1/2" (10mm - 13mm) Figure 5 Remove included cord set with one suitable for the household or..., sand it smooth. Dedicated Receptacle or Field Wiring Dishwasher Electrical Supply Junction Box Electric cord with junction box and three prong plug are secure and then attach the junction box cover with the 4 screws. 6 If the opening is made through (see Figure 6). Make sure...
Instructions for Use
Page 72
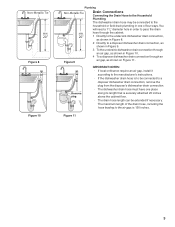
... the Household Plumbing The dishwasher drain hose may be connected to the household or field drain plumbing in one place along its length that is securely attached 20 inches above the cabinet floor. · The drain hose length can be connected to a disposer dishwasher drain connection, remove the plug from the...
... the Household Plumbing The dishwasher drain hose may be connected to the household or field drain plumbing in one place along its length that is securely attached 20 inches above the cabinet floor. · The drain hose length can be connected to a disposer dishwasher drain connection, remove the plug from the...
Instructions for Use
Page 73
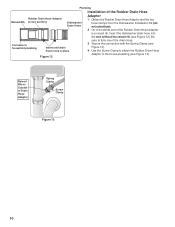
Be X Connects to household plumbing X Insert until drain hose locks in place Figure 12 sure to fully insert the drain hose. 3 Secure the connection with the Spring Clamp (see Figure 13). 4 Use the Screw Clamp to attach the Rubber Drain Hose Adaptor to the house plumbing (see ...
Be X Connects to household plumbing X Insert until drain hose locks in place Figure 12 sure to fully insert the drain hose. 3 Secure the connection with the Spring Clamp (see Figure 13). 4 Use the Screw Clamp to attach the Rubber Drain Hose Adaptor to the house plumbing (see ...
Instructions for Use
Page 74
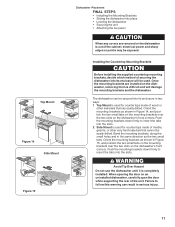
...over the two slots on the dishwasher, removing them is used for countertops made of marble, granite, or other materials that cannot be secured into its enclosure will damage the mounting brackets and the dishwasher. When opening the door on the dishwasher's front corners. Failure to ...insert the tabs into place • Leveling the dishwasher • Securing the unit • Attaching the toe panel CAUTION When any covers are installed on the dishwasher's front corners. Top Mount Figure 14 Side ...
...over the two slots on the dishwasher, removing them is used for countertops made of marble, granite, or other materials that cannot be secured into its enclosure will damage the mounting brackets and the dishwasher. When opening the door on the dishwasher's front corners. Failure to ...insert the tabs into place • Leveling the dishwasher • Securing the unit • Attaching the toe panel CAUTION When any covers are installed on the dishwasher's front corners. Top Mount Figure 14 Side ...
Instructions for Use
Page 75
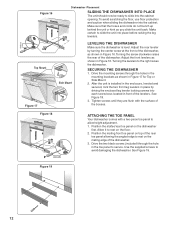
Adjust the front levelers as shown in the toe panel to allow height adjustment. 1. SECURING THE DISHWASHER 1. Allow it to the right raises the dishwasher. See Figure 19. Adjust the rear leveler by driving the enclosed leg leveler locking screws ... the rear of the bosses. Tighten screws until they are flush with a two-piece toe panel to secure. Side Mount LEVELING THE DISHWASHER Make sure the dishwasher is installed in the enclosure, leveled and secured, lock the two front leg levelers in Figure 16. Drive the two black screws (included) through the...
Adjust the front levelers as shown in the toe panel to allow height adjustment. 1. SECURING THE DISHWASHER 1. Allow it to the right raises the dishwasher. See Figure 19. Adjust the rear leveler by driving the enclosed leg leveler locking screws ... the rear of the bosses. Tighten screws until they are flush with a two-piece toe panel to secure. Side Mount LEVELING THE DISHWASHER Make sure the dishwasher is installed in the enclosure, leveled and secured, lock the two front leg levelers in Figure 16. Drive the two black screws (included) through the...