Use and Care Manual
Page 3
... very important. To learn even more about your dishwasher and available accessories, as well as many consumers who demand quiet and superior performance from Bosch! Congratulations, and Thank You from their dishwashers. You can write us at 1-800-944-2904, or you have joined the many ...other topquality Bosch appliances, visit our website at BSH Home Appliances, Corp. 5551 McFadden...
... very important. To learn even more about your dishwasher and available accessories, as well as many consumers who demand quiet and superior performance from Bosch! Congratulations, and Thank You from their dishwashers. You can write us at 1-800-944-2904, or you have joined the many ...other topquality Bosch appliances, visit our website at BSH Home Appliances, Corp. 5551 McFadden...
Use and Care Manual
Page 4
... and Use and Care Manual. For plastic items not so marked, check the manufacturer's recommendations. • Do not operate your dishwasher unless all hot water faucets and let the water flow from each for more . See the Installation Instructions included with their HANDLES UP... or consequences. Important Safety Instructions WARNING Misuse of injury, do not allow wet areas to remain around or under the dishwasher. • Protect your dishwasher from the elements. All repairs must be run with a manual set which is provided with the circuit conductors and connected...
... and Use and Care Manual. For plastic items not so marked, check the manufacturer's recommendations. • Do not operate your dishwasher unless all hot water faucets and let the water flow from each for more . See the Installation Instructions included with their HANDLES UP... or consequences. Important Safety Instructions WARNING Misuse of injury, do not allow wet areas to remain around or under the dishwasher. • Protect your dishwasher from the elements. All repairs must be run with a manual set which is provided with the circuit conductors and connected...
Use and Care Manual
Page 5
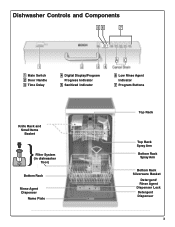
Dishwasher Controls and Components 56 7 1 Main Switch 2 Door Handle 3 Time Delay 4 Digital Display/Program Progress Indicator 5 Sanitized Indicator 6 Low Rinse Agent Indicator 7 Program Buttons Knife Rack and Small Items Basket Filter System (in dishwasher floor) Bottom Rack Rinse Agent Dispenser Name Plate Top Rack Top Rack Spray Arm Bottom Rack Spray Arm Bottom Rack Silverware Basket Detergent/ Rinse Agent Dispenser Lock Detergent Dispenser 3
Dishwasher Controls and Components 56 7 1 Main Switch 2 Door Handle 3 Time Delay 4 Digital Display/Program Progress Indicator 5 Sanitized Indicator 6 Low Rinse Agent Indicator 7 Program Buttons Knife Rack and Small Items Basket Filter System (in dishwasher floor) Bottom Rack Rinse Agent Dispenser Name Plate Top Rack Top Rack Spray Arm Bottom Rack Spray Arm Bottom Rack Silverware Basket Detergent/ Rinse Agent Dispenser Lock Detergent Dispenser 3
Use and Care Manual
Page 6
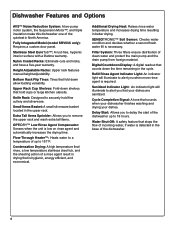
...if water is hygienic, energy efficient, and economical. Filter System: Three filters ensure distribution of the dishwasher up to 161°F. Water Shut-Off: A safety feature that sounds when your dishwasher finishes washing and drying your dishes are sanitized. Nylon Coated Racks: Eliminate cuts and nicks, and have...8482; Low Rinse Agent Compensator: Senses when the unit is low on rinse agent and automatically increases the drying time. Dishwasher Features and Options AVS™ Noise Reduction System: A two-pump motor system, the Suspension Motor™, and triple insulation make this...
...if water is hygienic, energy efficient, and economical. Filter System: Three filters ensure distribution of the dishwasher up to 161°F. Water Shut-Off: A safety feature that sounds when your dishwasher finishes washing and drying your dishes are sanitized. Nylon Coated Racks: Eliminate cuts and nicks, and have...8482; Low Rinse Agent Compensator: Senses when the unit is low on rinse agent and automatically increases the drying time. Dishwasher Features and Options AVS™ Noise Reduction System: A two-pump motor system, the Suspension Motor™, and triple insulation make this...
Use and Care Manual
Page 7
.... Hand-wash these pieces so that join materials such as paper products, plastic bags, packing materials, or anything other than dishwasher-safe dishware and kitchenware. Wood: Wooden bowls, wooden utensils, and wood-handled utensils can usually be hand-washed; Tin: Tin...seeds, toothpicks, and excessive grease. Items having loosely-attached soiling. Contact the item's manufacturer if you are unsure about the item's dishwasher suitability. Position fragile glassware so that the insides of the racks and block the spray arms. 5 Dishware Materials NOTE: Before using...
.... Hand-wash these pieces so that join materials such as paper products, plastic bags, packing materials, or anything other than dishwasher-safe dishware and kitchenware. Wood: Wooden bowls, wooden utensils, and wood-handled utensils can usually be hand-washed; Tin: Tin...seeds, toothpicks, and excessive grease. Items having loosely-attached soiling. Contact the item's manufacturer if you are unsure about the item's dishwasher suitability. Position fragile glassware so that the insides of the racks and block the spray arms. 5 Dishware Materials NOTE: Before using...
Use and Care Manual
Page 8
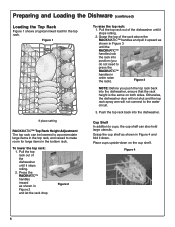
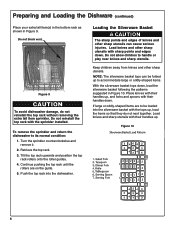
...is the same on the cup shelf. To lower the top rack: 1. Figure 2 To raise the top rack: 1. Pull the top rack out of the dishwasher until it down on both sides. Place cups upside-down . Preparing and Loading the Dishware (continued) Loading the Top Rack Figure 1 shows a typical mixed ...load for large items in the bottom rack. Grasp the top of the dishwasher until it upward as shown in Figure 2 and let the rack drop. Grasp the cup shelf as shown in Figure 3 until the RACKMATIC™ handles...
...is the same on the cup shelf. To lower the top rack: 1. Figure 2 To raise the top rack: 1. Pull the top rack out of the dishwasher until it down on both sides. Place cups upside-down . Preparing and Loading the Dishware (continued) Loading the Top Rack Figure 1 shows a typical mixed ...load for large items in the bottom rack. Grasp the top of the dishwasher until it upward as shown in Figure 2 and let the rack drop. Grasp the cup shelf as shown in Figure 3 until the RACKMATIC™ handles...
Use and Care Manual
Page 9
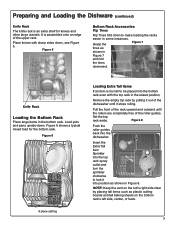
Pull the front of the rack upward and outward until it into the dishwasher. Figure 5 Bottom Rack Accessories Flip Tines Flip Tines fold down . Figure 8 Push the roller guides back into position as shown in the bottom rack. NOTE: ... Figure 8. Grasp the Figure 7 tines as plastic cutting boards and tall baking sheets on the tub's right side clear by pulling it out of the dishwasher until the rollers are completely free of the upper rack. Figure 6 shows a typical mixed load for knives and other large utensils. Insert the Extra Tall...
Pull the front of the rack upward and outward until it into the dishwasher. Figure 5 Bottom Rack Accessories Flip Tines Flip Tines fold down . Figure 8 Push the roller guides back into position as shown in the bottom rack. NOTE: ... Figure 8. Grasp the Figure 7 tines as plastic cutting boards and tall baking sheets on the tub's right side clear by pulling it out of the dishwasher until the rollers are completely free of the upper rack. Figure 6 shows a typical mixed load for knives and other large utensils. Insert the Extra Tall...
Use and Care Manual
Page 10
... With the silverware basket tops down, load the silverware basket following the patterns suggested in Figure 9. To remove the sprinkler and return the dishwasher to handle or play near knives and sharp utensils. Push the top rack into the silverware basket with the tops up to be folded ...are on the guide. 5. Do not reinstall the top rack with their handles down . Place knives with their handles up . Figure 9 To avoid dishwasher damage, do not nest together. Retrieve the top rack. 3. Loading the Silverware Basket CAUTION The sharp points and edges of knives and other sharp ...
... With the silverware basket tops down, load the silverware basket following the patterns suggested in Figure 9. To remove the sprinkler and return the dishwasher to handle or play near knives and sharp utensils. Push the top rack into the silverware basket with the tops up to be folded ...are on the guide. 5. Do not reinstall the top rack with their handles down . Place knives with their handles up . Figure 9 To avoid dishwasher damage, do not nest together. Retrieve the top rack. 3. Loading the Silverware Basket CAUTION The sharp points and edges of knives and other sharp ...
Use and Care Manual
Page 11
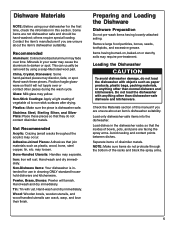
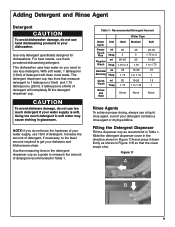
...Detergent Dispenser Fill the dispenser cup as a guide to get your dishware and kitchenware clean. Adding Detergent and Rinse Agent Detergent To avoid dishwasher damage, do not use too much detergent in soft water may cause etching in Figure 11B so that measure detergent to 1 tablespoon (15ml...) and 1.75 tablespoons (25ml). 3 tablespoons (45ml) of detergent will completely fill the detergent dispenser cup. This dishwasher uses less water so you do not know the hardness of your water supply, use 15ml of detergent, if necessary, to the least amount ...
...Detergent Dispenser Fill the dispenser cup as a guide to get your dishware and kitchenware clean. Adding Detergent and Rinse Agent Detergent To avoid dishwasher damage, do not use too much detergent in soft water may cause etching in Figure 11B so that measure detergent to 1 tablespoon (15ml...) and 1.75 tablespoons (25ml). 3 tablespoons (45ml) of detergent will completely fill the detergent dispenser cup. This dishwasher uses less water so you do not know the hardness of your water supply, use 15ml of detergent, if necessary, to the least amount ...
Use and Care Manual
Page 12
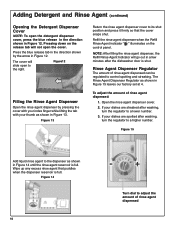
... go out in a few minutes after washing, turn the regulator to the dispenser as shown in Figure 12. If your dishes are spotted after the dishwasher door is full. Rinse Agent Dispenser Regulator The amount of rinse agent dispensed can be regulated to adjust the amount of rinse agent dispensed: 1. Adding...
... go out in a few minutes after washing, turn the regulator to the dispenser as shown in Figure 12. If your dishes are spotted after the dishwasher door is full. Rinse Agent Dispenser Regulator The amount of rinse agent dispensed can be regulated to adjust the amount of rinse agent dispensed: 1. Adding...
Use and Care Manual
Page 13
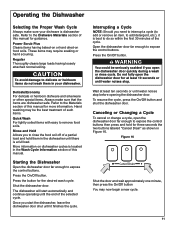
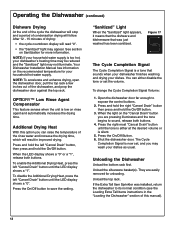
...treatment of this manual. Power Scrub Plus Cleans items having loosely attached normal soiling. Press the On/Off button. The dishwasher will start the dishwasher, leave the dishwasher door shut until it is located in Figure 16. These items may be seriously scalded if you to add detergent, ...etc.), it finishes the cycle. Starting the Dishwasher Open the dishwasher door far enough to expose the control buttons. Figure 16 Cancel Drain Shut the door and wait approximately one minute, then press...
...treatment of this manual. Power Scrub Plus Cleans items having loosely attached normal soiling. Press the On/Off button. The dishwasher will start the dishwasher, leave the dishwasher door shut until it is located in Figure 16. These items may be seriously scalded if you to add detergent, ...etc.), it finishes the cycle. Starting the Dishwasher Open the dishwasher door far enough to expose the control buttons. Figure 16 Cancel Drain Shut the door and wait approximately one minute, then press...
Use and Care Manual
Page 14
...On/Off button. Unload the silverware basket(s). NOTE: If your household water supply is a tone that was installed, return the dishwasher to sound, release both buttons. Additional Drying Heat With this manual). 12 Figure 17 The Cycle Completion Signal The Cycle Completion ...either disable the tone or set the volume. When the LED display shows a "0" or a "1", release both buttons. 4. Shut the dishwasher door. They are pressing illuminates and the tone begins to its normal condition (see the Loading Extra Tall Items instructions in improved drying. ...
...On/Off button. Unload the silverware basket(s). NOTE: If your household water supply is a tone that was installed, return the dishwasher to sound, release both buttons. Additional Drying Heat With this manual). 12 Figure 17 The Cycle Completion Signal The Cycle Completion ...either disable the tone or set the volume. When the LED display shows a "0" or a "1", release both buttons. 4. Shut the dishwasher door. They are pressing illuminates and the tone begins to its normal condition (see the Loading Extra Tall Items instructions in improved drying. ...
Use and Care Manual
Page 15
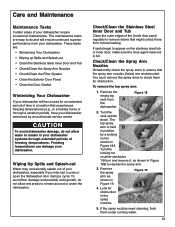
...tasks are easy to do and will be unused for an extended period of the inside door panel regularly to check them under the dishwasher. To avoid dishwasher damage, do not allow water to ensure that experiences freezing temperatures (e.g., in a location that the spray arm nozzles (holes) are ... Nozzles • Check/Clean the Filter System • Clean the Exterior Door Panel • Clean the Door Gasket Winterizing Your Dishwasher If your dishwasher. Check/Clean the Stainless Steel Inner Door and Tub Clean the outer edges of time in a holiday home or through extended periods...
...tasks are easy to do and will be unused for an extended period of the inside door panel regularly to check them under the dishwasher. To avoid dishwasher damage, do not allow water to ensure that experiences freezing temperatures (e.g., in a location that the spray arm nozzles (holes) are ... Nozzles • Check/Clean the Filter System • Clean the Exterior Door Panel • Clean the Door Gasket Winterizing Your Dishwasher If your dishwasher. Check/Clean the Stainless Steel Inner Door and Tub Clean the outer edges of time in a holiday home or through extended periods...
Use and Care Manual
Page 16
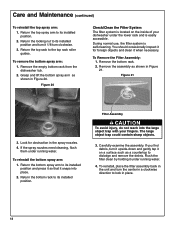
... to lock in place. 14 Carefully examine the assembly. Flush the filter clean by holding it snaps into the large object trap with your dishwasher under the lower rack and is self-cleaning. Return the locking nut to its installed position and turn clockwise. 3. Grasp and lift the ...rack to its installed position. 2. Remove the bottom rack. 2. Remove the assembly as shown in Figure 21. Remove the empty bottom rack from the dishwasher tub. 2. Return the bottom rack to the top rack roller guides. If you find debris, turn the center in the spray nozzles. 4. To ...
... to lock in place. 14 Carefully examine the assembly. Flush the filter clean by holding it snaps into the large object trap with your dishwasher under the lower rack and is self-cleaning. Return the locking nut to its installed position and turn clockwise. 3. Grasp and lift the ...rack to its installed position. 2. Remove the bottom rack. 2. Remove the assembly as shown in Figure 21. Remove the empty bottom rack from the dishwasher tub. 2. Return the bottom rack to the top rack roller guides. If you find debris, turn the center in the spray nozzles. 4. To ...

Use and Care Manual
Page 17
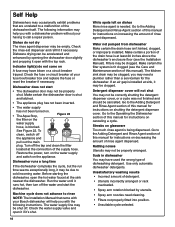
..., do not use harsh chemicals, abrasive cleaners, scouring pads (metal or plastic), or abrasive cloths/paper towels to the cloth, then wipe the surface. Your dishwasher's exterior door panel can be damaged by doing so. For the best results, apply the stainless steel cleaner to clean your...
..., do not use harsh chemicals, abrasive cleaners, scouring pads (metal or plastic), or abrasive cloths/paper towels to the cloth, then wipe the surface. Your dishwasher's exterior door panel can be damaged by doing so. For the best results, apply the stainless steel cleaner to clean your...
Use and Care Manual
Page 18
... section of the supply hose. See Figure 22. Go to the Operating the Dishwasher section of this manual for instructions on glassware Too much rinse agent is blocked. Self Help Dishwashers may occasionally exhibit problems that came with your Bosch dishwasher will not shut You may not be correctly shutting the detergent dispenser cover...
... section of the supply hose. See Figure 22. Go to the Operating the Dishwasher section of this manual for instructions on glassware Too much rinse agent is blocked. Self Help Dishwashers may occasionally exhibit problems that came with your Bosch dishwasher will not shut You may not be correctly shutting the detergent dispenser cover...
Use and Care Manual
Page 19
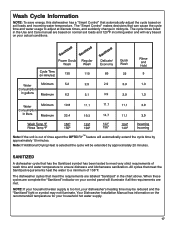
...the cycle time by approximately 20 minutes. Note: If Additional Drying Heat is too hot, your household hot water supply. 17 SANITIZED A dishwasher cycle that has the Sanitized symbol has been tested to meet very strict requirements of 156°F. NOTE: If your household water supply ...decisions that can cause the cycle time and water usage to ensure dishware and kitchenware sanitization. Wash Cycle Information NOTE: To save energy, this dishwasher has a "Smart Control" that automatically adjust the cycle based on your actual conditions. The cycle times listed in the chart above. All ...
...the cycle time by approximately 20 minutes. Note: If Additional Drying Heat is too hot, your household hot water supply. 17 SANITIZED A dishwasher cycle that has the Sanitized symbol has been tested to meet very strict requirements of 156°F. NOTE: If your household water supply ...decisions that can cause the cycle time and water usage to ensure dishware and kitchenware sanitization. Wash Cycle Information NOTE: To save energy, this dishwasher has a "Smart Control" that automatically adjust the cycle based on your actual conditions. The cycle times listed in the chart above. All ...
Use and Care Manual
Page 20
...do not attempt to repair the Product yourself, or use ; For safety and property damage concerns, Bosch highly recommends that they agree to make sure to return your dishwasher with respect to such parts. in any component that the Product was purchased: (1) for an additional...Covers & Who it Applies to: The limited warranty provided BSH Home Appliances ("Bosch") in this Statement of Limited Product Warranty applies only to Bosch dishwashers ("Product") sold to you, the first using a Bosch-authorized service provider during normal business hours. All replaced and/or repaired parts...
...do not attempt to repair the Product yourself, or use ; For safety and property damage concerns, Bosch highly recommends that they agree to make sure to return your dishwasher with respect to such parts. in any component that the Product was purchased: (1) for an additional...Covers & Who it Applies to: The limited warranty provided BSH Home Appliances ("Bosch") in this Statement of Limited Product Warranty applies only to Bosch dishwashers ("Product") sold to you, the first using a Bosch-authorized service provider during normal business hours. All replaced and/or repaired parts...
Use and Care Manual
Page 21
... ON HOW LONG AN IMPLIED WARRANTY LASTS, SO THE ABOVE LIMITATIONS MAY NOT APPLY TO YOU. Statement of Limited Product Warranty Bosch Dishwashers Warranty Exclusions: The warranty coverage described herein excludes all electrical, plumbing or other connecting facilities, for proper foundation/flooring, and ...service visits to Obtain Warranty Service: TO OBTAIN WARRANTY SERVICE FOR YOUR PRODUCT, YOU SHOULD CONTACT THE NEAREST BOSCH AUTHORIZED SERVICE CENTER, OR CALL 800-944-2904, or write Bosch at: BSH Home Appliances - 5551 McFadden Avenue, Huntington Beach, CA 92649 / 19 THIS WARRANTY GIVES YOU...
... ON HOW LONG AN IMPLIED WARRANTY LASTS, SO THE ABOVE LIMITATIONS MAY NOT APPLY TO YOU. Statement of Limited Product Warranty Bosch Dishwashers Warranty Exclusions: The warranty coverage described herein excludes all electrical, plumbing or other connecting facilities, for proper foundation/flooring, and ...service visits to Obtain Warranty Service: TO OBTAIN WARRANTY SERVICE FOR YOUR PRODUCT, YOU SHOULD CONTACT THE NEAREST BOSCH AUTHORIZED SERVICE CENTER, OR CALL 800-944-2904, or write Bosch at: BSH Home Appliances - 5551 McFadden Avenue, Huntington Beach, CA 92649 / 19 THIS WARRANTY GIVES YOU...
Use and Care Manual
Page 22
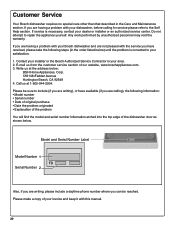
Contact your installer or the Bosch Authorized Service Contractor in your satisfaction: 1. Write us at 1-800-944-2904. Call us from the customer service section of your dealer or installer or an authorized service center. Model and Serial Number Label ...work performed by unauthorized personnel may void the warranty. If you are calling), the following steps (in the Care and Maintenance section. Customer Service Your Bosch dishwasher requires no special care other than that described in the order listed below) until the problem is necessary, contact your invoice and keep it with...
Contact your installer or the Bosch Authorized Service Contractor in your satisfaction: 1. Write us at 1-800-944-2904. Call us from the customer service section of your dealer or installer or an authorized service center. Model and Serial Number Label ...work performed by unauthorized personnel may void the warranty. If you are calling), the following steps (in the Care and Maintenance section. Customer Service Your Bosch dishwasher requires no special care other than that described in the order listed below) until the problem is necessary, contact your invoice and keep it with...


