Use and Care Manual
Page 3
... OF CONTENTS IMPORTANT SAFETY INSTRUCTIONS 2 Dishwasher Components 3 Dishwasher Features and Options 4 Dishware Materials 5 Preparing and Loading the Dishware 5-8 Dishware Preparation 5 Loading the Dishwasher 5-8 Adding Detergent and Rinse Agent 9-10 Operating the Dishwasher 11-12 Dishware Drying 12 Unloading the Dishwasher 12 Care and Maintenance 13-15 Self Help 16 Wash Cycle Information/Sanitized 17 Statement of Limited Product Warranty 18-19 Customer Service 20 1 Thank you use your dishwasher for selecting a Bosch dishwasher. Please contact us...
... OF CONTENTS IMPORTANT SAFETY INSTRUCTIONS 2 Dishwasher Components 3 Dishwasher Features and Options 4 Dishware Materials 5 Preparing and Loading the Dishware 5-8 Dishware Preparation 5 Loading the Dishwasher 5-8 Adding Detergent and Rinse Agent 9-10 Operating the Dishwasher 11-12 Dishware Drying 12 Unloading the Dishwasher 12 Care and Maintenance 13-15 Self Help 16 Wash Cycle Information/Sanitized 17 Statement of Limited Product Warranty 18-19 Customer Service 20 1 Thank you use your dishwasher for selecting a Bosch dishwasher. Please contact us...
Use and Care Manual
Page 4
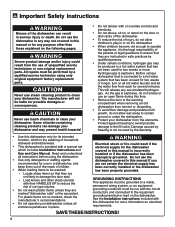
.... • When loading items to damage the door seal. - WARNING Severe product damage and/or injury could result if the electrical supply for any accumulated hydrogen gas. CAUTION Never use steam cleaning product to operate the appliance, it is incorrectly installed or if the dishwasher has been improperly grounded. Do not use the dishwasher covered in place. See the Installation Instructions included with this manual or for...
.... • When loading items to damage the door seal. - WARNING Severe product damage and/or injury could result if the electrical supply for any accumulated hydrogen gas. CAUTION Never use steam cleaning product to operate the appliance, it is incorrectly installed or if the dishwasher has been improperly grounded. Do not use the dishwasher covered in place. See the Installation Instructions included with this manual or for...
Use and Care Manual
Page 5
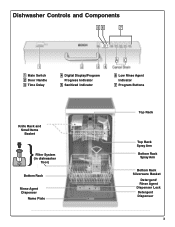
Dishwasher Controls and Components 56 7 1 Main Switch 2 Door Handle 3 Time Delay 4 Digital Display/Program Progress Indicator 5 Sanitized Indicator 6 Low Rinse Agent Indicator 7 Program Buttons Knife Rack and Small Items Basket Filter System (in dishwasher floor) Bottom Rack Rinse Agent Dispenser Name Plate Top Rack Top Rack Spray Arm Bottom Rack Spray Arm Bottom Rack Silverware Basket Detergent/ Rinse Agent Dispenser Lock Detergent Dispenser 3
Dishwasher Controls and Components 56 7 1 Main Switch 2 Door Handle 3 Time Delay 4 Digital Display/Program Progress Indicator 5 Sanitized Indicator 6 Low Rinse Agent Indicator 7 Program Buttons Knife Rack and Small Items Basket Filter System (in dishwasher floor) Bottom Rack Rinse Agent Dispenser Name Plate Top Rack Top Rack Spray Arm Bottom Rack Spray Arm Bottom Rack Silverware Basket Detergent/ Rinse Agent Dispenser Lock Detergent Dispenser 3
Use and Care Manual
Page 6
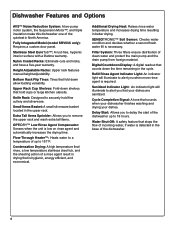
... a custom door panel. Nylon Coated Racks: Eliminate cuts and nicks, and have a five-year warranty. Bottom Rack Flip Tines: Tines that your dishes. Filter System: Three filters ensure distribution of the dishwasher up to remove the upper rack and wash extra tall items. OPTIDRY™ Low Rinse Agent Compensator: Senses when the unit is necessary. Digital Countdown Display: A digital readout that stops the flow of incoming water, if water is required. Sanitized Indicator Light...
... a custom door panel. Nylon Coated Racks: Eliminate cuts and nicks, and have a five-year warranty. Bottom Rack Flip Tines: Tines that your dishes. Filter System: Three filters ensure distribution of the dishwasher up to remove the upper rack and wash extra tall items. OPTIDRY™ Low Rinse Agent Compensator: Senses when the unit is necessary. Digital Countdown Display: A digital readout that stops the flow of incoming water, if water is required. Sanitized Indicator Light...
Use and Care Manual
Page 7
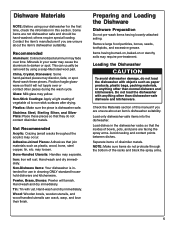
... a light coating of the racks and block the spray arms. 5 Bone-Handled Utensils: Handles may loosen. Hand-wash and dry immediately. Non-Dishware Items: Your dishwasher is dishwasher safe. Pewter, Brass, Bronze: Pewter will rust. Wood: Wooden bowls, wooden utensils, and wood-handled utensils can usually be hand-washed; Do not load the dishwasher with objects such as plastic, wood, bone, steel copper, tin, etc. Load...
... a light coating of the racks and block the spray arms. 5 Bone-Handled Utensils: Handles may loosen. Hand-wash and dry immediately. Non-Dishware Items: Your dishwasher is dishwasher safe. Pewter, Brass, Bronze: Pewter will rust. Wood: Wooden bowls, wooden utensils, and wood-handled utensils can usually be hand-washed; Do not load the dishwasher with objects such as plastic, wood, bone, steel copper, tin, etc. Load...
Use and Care Manual
Page 8
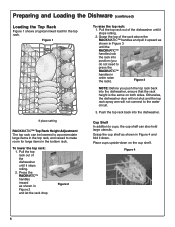
To lower the top rack: 1. Otherwise, the dishwasher door will not shut and the top rack spray arm will not connect to cups, the cup shelf can be lowered to accommodate large items in the top rack, and raised to press the RACKMATIC™ handles in order raise the rack). Figure 1 9 place setting RACKMATIC™ Top Rack Height Adjustment The top rack can also hold large utensils. Cup...
To lower the top rack: 1. Otherwise, the dishwasher door will not shut and the top rack spray arm will not connect to cups, the cup shelf can be lowered to accommodate large items in the top rack, and raised to press the RACKMATIC™ handles in order raise the rack). Figure 1 9 place setting RACKMATIC™ Top Rack Height Adjustment The top rack can also hold large utensils. Cup...
Use and Care Manual
Page 9
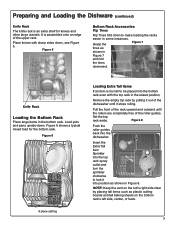
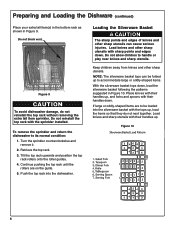
... the rollers are completely free of the roller guides. Pull the front of the rack upward and outward until it into the dishwasher. Set the top rack aside. Figure 6 shows a typical mixed load for knives and other large utensils. Preparing and Loading the Dishware (continued) Knife Rack The knife rack is assembled onto an edge of the upper rack. It is an extra...
... the rollers are completely free of the roller guides. Pull the front of the rack upward and outward until it into the dishwasher. Set the top rack aside. Figure 6 shows a typical mixed load for knives and other large utensils. Preparing and Loading the Dishware (continued) Knife Rack The knife rack is assembled onto an edge of the upper rack. It is an extra...
Use and Care Manual
Page 10
... sharp points and edges down . NOTE: The silverware basket tops can cause serious injuries. Tilt the top rack upwards and position the top rack rollers onto the roller guides. 4. Turn the sprinkler counterclockwise and remove it. 2. Load knives and other sharp utensils. To remove the sprinkler and return the dishwasher to handle or play near knives and sharp utensils. Place...
... sharp points and edges down . NOTE: The silverware basket tops can cause serious injuries. Tilt the top rack upwards and position the top rack rollers onto the roller guides. 4. Turn the sprinkler counterclockwise and remove it. 2. Load knives and other sharp utensils. To remove the sprinkler and return the dishwasher to handle or play near knives and sharp utensils. Place...
Use and Care Manual
Page 11
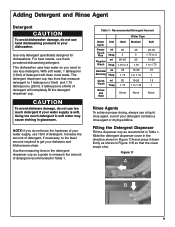
... dishwashing detergent. Table 1 - Using too much detergent if your water supply is soft. Slide the detergent dispenser cover in the direction shown in Figure 11A and press it down firmly as recommend in Figure 11B so that measure detergent to get your dishware and kitchenware clean. With soft water, 1 tablespoon (15ml) of detergent will clean most loads. Recommended Detergent Amount Water Type Wash Unit Cycle Hard Medium Power ml Scrub Plus...
... dishwashing detergent. Table 1 - Using too much detergent if your water supply is soft. Slide the detergent dispenser cover in the direction shown in Figure 11A and press it down firmly as recommend in Figure 11B so that measure detergent to get your dishware and kitchenware clean. With soft water, 1 tablespoon (15ml) of detergent will clean most loads. Recommended Detergent Amount Water Type Wash Unit Cycle Hard Medium Power ml Scrub Plus...
Use and Care Manual
Page 12
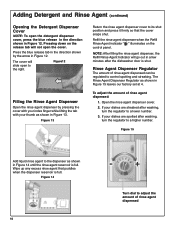
.... Adding Detergent and Rinse Agent (continued) Opening the Detergent Dispenser Cover NOTE: To open the cover. Pressing down on the control panel. The cover will go out in Figure 15 leaves our factory set at 4. NOTE: After filling the rinse agent dispenser, the Refill Rinse Agent Indicator will slide open to a higher number. To adjust the amount of rinse agent dispensed: 1. If your thumb as shown in a few minutes after washing, turn the regulator...
.... Adding Detergent and Rinse Agent (continued) Opening the Detergent Dispenser Cover NOTE: To open the cover. Pressing down on the control panel. The cover will go out in Figure 15 leaves our factory set at 4. NOTE: After filling the rinse agent dispenser, the Refill Rinse Agent Indicator will slide open to a higher number. To adjust the amount of rinse agent dispensed: 1. If your thumb as shown in a few minutes after washing, turn the regulator...
Use and Care Manual
Page 13
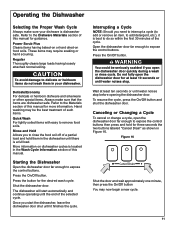
... start the dishwasher, leave the dishwasher door shut until water noises stop before opening the dishwasher door. Wait at least 10 seconds or until it is a full load. Operating the Dishwasher Selecting the Proper Wash Cycle Always make sure that the items are dishwasher safe. Shut the dishwasher door. Power Scrub Plus Cleans items having loosely attached normal soiling. Refer to the Materials section of this manual for guidance. Do not fully open the dishwasher door quickly during a wash or rinse cycle...
... start the dishwasher, leave the dishwasher door shut until water noises stop before opening the dishwasher door. Wait at least 10 seconds or until it is a full load. Operating the Dishwasher Selecting the Proper Wash Cycle Always make sure that the items are dishwasher safe. Shut the dishwasher door. Power Scrub Plus Cleans items having loosely attached normal soiling. Refer to the Materials section of this manual for guidance. Do not fully open the dishwasher door quickly during a wash or rinse cycle...
Use and Care Manual
Page 14
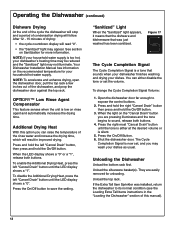
... may wash your dishwasher's heating time may be reduced and the "Sanitized" light may appear. They are pressing illuminates and the tone begins to its normal condition (see the Loading Extra Tall Items instructions in improved drying. See section on rinse agent and automatically increases the drying time. Open the dishwasher door far enough to save the setting. Operating the Dishwasher (continued) Dishware Drying At the end of the cycle the dishwasher will stop and...
... may wash your dishwasher's heating time may be reduced and the "Sanitized" light may appear. They are pressing illuminates and the tone begins to its normal condition (see the Loading Extra Tall Items instructions in improved drying. See section on rinse agent and automatically increases the drying time. Open the dishwasher door far enough to save the setting. Operating the Dishwasher (continued) Dishware Drying At the end of the cycle the dishwasher will stop and...
Use and Care Manual
Page 15
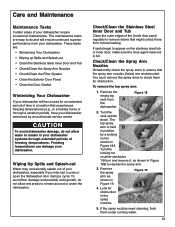
... or under running water. 13 Care and Maintenance Maintenance Tasks Certain areas of your dishwasher winterized by a locking nut as shown in Figure 18A. The maintenance tasks are : • Winterizing Your Dishwasher • Wiping up Spills and Splash-out • Clean the Stainless Steel Inner Door and Tub • Check/Clean the Spray Arm Nozzles • Check/Clean the Filter System • Clean the Exterior Door Panel • Clean the Door Gasket Winterizing...
... or under running water. 13 Care and Maintenance Maintenance Tasks Certain areas of your dishwasher winterized by a locking nut as shown in Figure 18A. The maintenance tasks are : • Winterizing Your Dishwasher • Wiping up Spills and Splash-out • Clean the Stainless Steel Inner Door and Tub • Check/Clean the Spray Arm Nozzles • Check/Clean the Filter System • Clean the Exterior Door Panel • Clean the Door Gasket Winterizing...
Use and Care Manual
Page 16
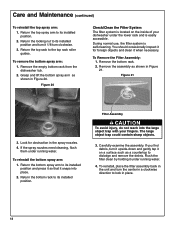
.... 3. Figure 20 Check/Clean the Filter System The filter system is self-cleaning. Remove the bottom rack. 2. Filter Assembly CAUTION To avoid injury, do not reach into place. 2. Flush the filter clean by holding it 1/8 turn it under running water. To reinstall, place the filter assembly back in Figure 21. Care and Maintenance (continued) To reinstall the top spray arm: 1. To remove the bottom spray arm: 1. During normal use, the filter system is located on a surface...
.... 3. Figure 20 Check/Clean the Filter System The filter system is self-cleaning. Remove the bottom rack. 2. Filter Assembly CAUTION To avoid injury, do not reach into place. 2. Flush the filter clean by holding it 1/8 turn it under running water. To reinstall, place the filter assembly back in Figure 21. Care and Maintenance (continued) To reinstall the top spray arm: 1. To remove the bottom spray arm: 1. During normal use, the filter system is located on a surface...

Use and Care Manual
Page 17
... cleaner (preferably a liquid spray) made for cleaning stainless steel. Clean the Door Gasket Regularly clean the door gasket with a damp cloth to the cloth, then wipe the surface. For the best results, apply the stainless steel cleaner to remove food particles and other debris. 15 Your dishwasher's exterior door panel can be damaged by doing so. Stainless Steel Doors Use a soft cloth with soapy water. Care and Maintenance (continued) To avoid...
... cleaner (preferably a liquid spray) made for cleaning stainless steel. Clean the Door Gasket Regularly clean the door gasket with a damp cloth to the cloth, then wipe the surface. For the best results, apply the stainless steel cleaner to remove food particles and other debris. 15 Your dishwasher's exterior door panel can be damaged by doing so. Stainless Steel Doors Use a soft cloth with soapy water. Care and Maintenance (continued) To avoid...
Use and Care Manual
Page 18
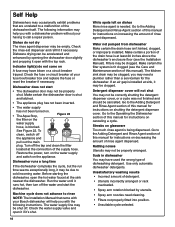
... water. Indicator light(s) do not dry The rinse agent dispenser may need cleaning. • Filters not properly fitted into position. • Unsuitable cycle selected. Run the water until it may be properly shut. Unsatisfactory washing results • Incorrect amount of detergent. • Utensils incorrectly arranged or rack overloaded. • Spray arm rotation blocked by opening the dishwasher door slightly and propping it 's shut. 16 White spots left on decreasing the amount of the supply hose...
... water. Indicator light(s) do not dry The rinse agent dispenser may need cleaning. • Filters not properly fitted into position. • Unsuitable cycle selected. Run the water until it may be properly shut. Unsatisfactory washing results • Incorrect amount of detergent. • Utensils incorrectly arranged or rack overloaded. • Spray arm rotation blocked by opening the dishwasher door slightly and propping it 's shut. 16 White spots left on decreasing the amount of the supply hose...
Use and Care Manual
Page 19
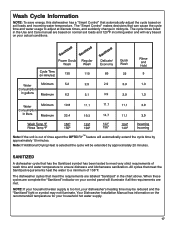
... cycle times listed in the Use and Care manual are met. Sanitized Sanitized Sanitized Note: If the unit is out of wash time and water temperature to adjust at discrete times, and suddenly change in the chart above. Note: If Additional Drying Heat is too hot, your household hot water supply. 17 All cycles that can cause the cycle time and water usage to ensure dishware and kitchenware sanitization. When these cycles are complete the "Sanitized" indicator on your control panel will...
... cycle times listed in the Use and Care manual are met. Sanitized Sanitized Sanitized Note: If the unit is out of wash time and water temperature to adjust at discrete times, and suddenly change in the chart above. Note: If Additional Drying Heat is too hot, your household hot water supply. 17 All cycles that can cause the cycle time and water usage to ensure dishware and kitchenware sanitization. When these cycles are complete the "Sanitized" indicator on your control panel will...
Use and Care Manual
Page 20
... labor charges). • 5 Year Limited Warranty on Dish Racks: Bosch will replace the upper or lower dish rack (excluding rack components), if the rack proves defective in materials or workmanship (excludes labor charges). • Lifetime Warranty against Stainless Steel Rust Through: Bosch will replace the stainless steel door if the door should rust through (excludes labor charges). Bosch will replace your dishwasher with the same model or a current model that is substantially equivalent or better...
... labor charges). • 5 Year Limited Warranty on Dish Racks: Bosch will replace the upper or lower dish rack (excluding rack components), if the rack proves defective in materials or workmanship (excludes labor charges). • Lifetime Warranty against Stainless Steel Rust Through: Bosch will replace the stainless steel door if the door should rust through (excludes labor charges). Bosch will replace your dishwasher with the same model or a current model that is substantially equivalent or better...
Use and Care Manual
Page 21
..., INCLUDING WITHOUT LIMITATION TIME AWAY FROM WORK, HOTELS AND/OR RESTAURANT MEALS, REMODELLING EXPENSES IN EXCESS OF DIRECT DAMAGES WHICH ARE DEFINITIVELY CAUSED EXCLUSIVELY BY BOSCH, OR OTHERWISE. correction of installation problems (you how to Obtain Warranty Service: TO OBTAIN WARRANTY SERVICE FOR YOUR PRODUCT, YOU SHOULD CONTACT THE NEAREST BOSCH AUTHORIZED SERVICE CENTER, OR CALL 800-944-2904, or write Bosch at: BSH Home...
..., INCLUDING WITHOUT LIMITATION TIME AWAY FROM WORK, HOTELS AND/OR RESTAURANT MEALS, REMODELLING EXPENSES IN EXCESS OF DIRECT DAMAGES WHICH ARE DEFINITIVELY CAUSED EXCLUSIVELY BY BOSCH, OR OTHERWISE. correction of installation problems (you how to Obtain Warranty Service: TO OBTAIN WARRANTY SERVICE FOR YOUR PRODUCT, YOU SHOULD CONTACT THE NEAREST BOSCH AUTHORIZED SERVICE CENTER, OR CALL 800-944-2904, or write Bosch at: BSH Home...
Use and Care Manual
Page 22
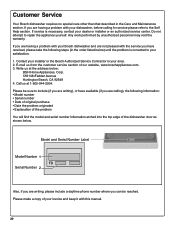
...; Explanation of the problem You will find the model and serial number information etched into the top edge of your invoice and keep it with your dishwasher, before calling for service please refer to repair the appliance yourself. Call us at 1-800-944-2904. If service is corrected to your satisfaction: 1. Contact your installer or the Bosch Authorized Service Contractor in your...
...; Explanation of the problem You will find the model and serial number information etched into the top edge of your invoice and keep it with your dishwasher, before calling for service please refer to repair the appliance yourself. Call us at 1-800-944-2904. If service is corrected to your satisfaction: 1. Contact your installer or the Bosch Authorized Service Contractor in your...


