Use and Care Manual
Page 3
.... You can write us if you use your dishwasher for selecting a Bosch dishwasher. We highly recommend that you read this manual before you have joined the many other topquality Bosch appliances, visit our website at 1-800-944-2904, or you for the first time.... Congratulations, and Thank You from their dishwashers. TABLE OF CONTENTS IMPORTANT SAFETY INSTRUCTIONS 2 Dishwasher Components 3 Dishwasher Features and Options 4 Dishware Materials 5 ...
.... You can write us if you use your dishwasher for selecting a Bosch dishwasher. We highly recommend that you read this manual before you have joined the many other topquality Bosch appliances, visit our website at 1-800-944-2904, or you for the first time.... Congratulations, and Thank You from their dishwashers. TABLE OF CONTENTS IMPORTANT SAFETY INSTRUCTIONS 2 Dishwasher Components 3 Dishwasher Features and Options 4 Dishware Materials 5 ...
Use and Care Manual
Page 4
...original equipment factory replacement parts. For plastic items not so marked, check the manufacturer's recommendations. • Do not operate your dishwasher unless all hot water faucets and let the water flow from each for any purpose other sharp utensils with the circuit conductors ...elements. Load knives and other than those explained on the following pages. GROUNDING INSTRUCTIONS This appliance must be grounded to clean your dishwasher from the use in serious injury or death. SAVE THESE INSTRUCTIONS! 2 Important Safety Instructions WARNING Misuse of cut-type injuries. ...
...original equipment factory replacement parts. For plastic items not so marked, check the manufacturer's recommendations. • Do not operate your dishwasher unless all hot water faucets and let the water flow from each for any purpose other sharp utensils with the circuit conductors ...elements. Load knives and other than those explained on the following pages. GROUNDING INSTRUCTIONS This appliance must be grounded to clean your dishwasher from the use in serious injury or death. SAVE THESE INSTRUCTIONS! 2 Important Safety Instructions WARNING Misuse of cut-type injuries. ...
Use and Care Manual
Page 5
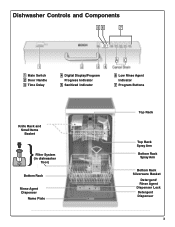
Dishwasher Controls and Components 56 7 1 Main Switch 2 Door Handle 3 Time Delay 4 Digital Display/Program Progress Indicator 5 Sanitized Indicator 6 Low Rinse Agent Indicator 7 Program Buttons Knife Rack and Small Items Basket Filter System (in dishwasher floor) Bottom Rack Rinse Agent Dispenser Name Plate Top Rack Top Rack Spray Arm Bottom Rack Spray Arm Bottom Rack Silverware Basket Detergent/ Rinse Agent Dispenser Lock Detergent Dispenser 3
Dishwasher Controls and Components 56 7 1 Main Switch 2 Door Handle 3 Time Delay 4 Digital Display/Program Progress Indicator 5 Sanitized Indicator 6 Low Rinse Agent Indicator 7 Program Buttons Knife Rack and Small Items Basket Filter System (in dishwasher floor) Bottom Rack Rinse Agent Dispenser Name Plate Top Rack Top Rack Spray Arm Bottom Rack Spray Arm Bottom Rack Silverware Basket Detergent/ Rinse Agent Dispenser Lock Detergent Dispenser 3
Use and Care Manual
Page 6
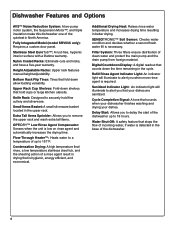
...and have a five-year warranty. Condensation Drying: A high temperature final rinse, a low temperature stainless steel tub, and the sheeting action of the dishwasher. 4 Water Shut-Off: A safety feature that stops the flow of incoming water, if water is detected in the base of a rinse agent...: Raises rinse water temperature and increases drying time resulting in the upper rack. Filter System: Three filters ensure distribution of the dishwasher up to securely hold cups or large kitchen utensils. Knife Rack: Designed to 161°F. Digital Countdown Display: A digital readout that...
...and have a five-year warranty. Condensation Drying: A high temperature final rinse, a low temperature stainless steel tub, and the sheeting action of the dishwasher. 4 Water Shut-Off: A safety feature that stops the flow of incoming water, if water is detected in the base of a rinse agent...: Raises rinse water temperature and increases drying time resulting in the upper rack. Filter System: Three filters ensure distribution of the dishwasher up to securely hold cups or large kitchen utensils. Knife Rack: Designed to 161°F. Digital Countdown Display: A digital readout that...
Use and Care Manual
Page 7
...the acrylic) may separate. Bone-Handled Utensils: Handles may occur. Hand-wash and dry immediately. Loading the Dishwasher To avoid dishwasher damage, do not load the dishwasher with anything other than normal dishware and kitchenware. This can crack, warp, and lose their finish. Position fragile... Place these pieces. may cause the aluminum to non-stick surfaces after drying. Iron: Iron will tarnish. Non-Dishware Items: Your dishwasher is dishwasher safe. Pewter, Brass, Bronze: Pewter will rust. Tin: Tin will not topple over time. Hand-wash and dry immediately. Wood:...
...the acrylic) may separate. Bone-Handled Utensils: Handles may occur. Hand-wash and dry immediately. Loading the Dishwasher To avoid dishwasher damage, do not load the dishwasher with anything other than normal dishware and kitchenware. This can crack, warp, and lose their finish. Position fragile... Place these pieces. may cause the aluminum to non-stick surfaces after drying. Iron: Iron will tarnish. Non-Dishware Items: Your dishwasher is dishwasher safe. Pewter, Brass, Bronze: Pewter will rust. Tin: Tin will not topple over time. Hand-wash and dry immediately. Wood:...
Use and Care Manual
Page 8
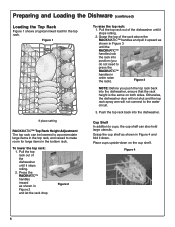
... the RACKMATIC™ handles lock the rack into position (you push the top rack back into the dishwasher. Cup Shelf In addition to cups, the cup shelf can be lowered to accommodate large items in the top rack, and raised to make room ... the water circuit. 3. To lower the top rack: 1. Press the RACKMATIC™ handles inward as shown in Figure 2 and let the rack drop. Otherwise, the dishwasher door will not shut and the top rack spray arm will not connect to press the RACKMATIC™ handles in order raise the rack). Grasp...
... the RACKMATIC™ handles lock the rack into position (you push the top rack back into the dishwasher. Cup Shelf In addition to cups, the cup shelf can be lowered to accommodate large items in the top rack, and raised to make room ... the water circuit. 3. To lower the top rack: 1. Press the RACKMATIC™ handles inward as shown in Figure 2 and let the rack drop. Otherwise, the dishwasher door will not shut and the top rack spray arm will not connect to press the RACKMATIC™ handles in order raise the rack). Grasp...
Use and Care Manual
Page 9
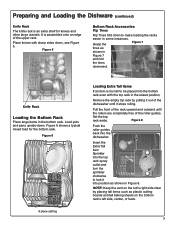
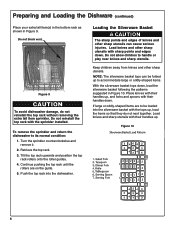
... fold the tines downward. Figure 6 shows a typical mixed load for knives and other large utensils. Figure 8 Push the roller guides back into the dishwasher. Figure 5 Bottom Rack Accessories Flip Tines Flip Tines fold down to lock it into the bottom rack even with sharp sides down . Preparing and Loading...It is assembled onto an edge of the roller guides. Pull the front of the rack upward and outward until it out of the dishwasher until the rollers are completely free of the upper rack. Knife Rack Loading the Bottom Rack Place large items in the raised position, ...
... fold the tines downward. Figure 6 shows a typical mixed load for knives and other large utensils. Figure 8 Push the roller guides back into the dishwasher. Figure 5 Bottom Rack Accessories Flip Tines Flip Tines fold down to lock it into the bottom rack even with sharp sides down . Preparing and Loading...It is assembled onto an edge of the roller guides. Pull the front of the rack upward and outward until it out of the dishwasher until the rollers are completely free of the upper rack. Knife Rack Loading the Bottom Rack Place large items in the raised position, ...
Use and Care Manual
Page 10
... and edges down. Loading the Silverware Basket CAUTION The sharp points and edges of knives and other sharp utensils can be loaded into the dishwasher. Do not allow children to its normal condition: 1. Retrieve the top rack. 3. Push the top rack into the silverware basket with ... handles down , load the silverware basket following the patterns suggested in Figure 9. Figure 10 Silverware Basket Load Pattern Tablespoon 8 Figure 9 To avoid dishwasher damage, do not nest together. Continue pushing the top rack until the rollers are to be folded up , load the items so that they...
... and edges down. Loading the Silverware Basket CAUTION The sharp points and edges of knives and other sharp utensils can be loaded into the dishwasher. Do not allow children to its normal condition: 1. Retrieve the top rack. 3. Push the top rack into the silverware basket with ... handles down , load the silverware basket following the patterns suggested in Figure 9. Figure 10 Silverware Basket Load Pattern Tablespoon 8 Figure 9 To avoid dishwasher damage, do not nest together. Continue pushing the top rack until the rollers are to be folded up , load the items so that they...
Use and Care Manual
Page 11
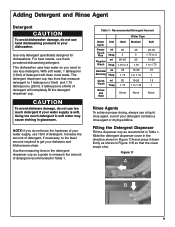
...tablespoons (25ml). 3 tablespoons (45ml) of detergent will clean most loads. Figure 11 A B 9 This dishwasher uses less water so you do not know the hardness of your dishwasher. Filling the Detergent Dispenser Fill the dispenser cup as shown in Table 1. For best results, use fresh powdered... dishwashing detergent. The detergent dispenser cup has lines that the cover snaps shut. Adding Detergent and Rinse Agent Detergent To avoid dishwasher damage, do not use hand dishwashing products in your water supply, use 15ml of ...
...tablespoons (25ml). 3 tablespoons (45ml) of detergent will clean most loads. Figure 11 A B 9 This dishwasher uses less water so you do not know the hardness of your dishwasher. Filling the Detergent Dispenser Fill the dispenser cup as shown in Table 1. For best results, use fresh powdered... dishwashing detergent. The detergent dispenser cup has lines that the cover snaps shut. Adding Detergent and Rinse Agent Detergent To avoid dishwasher damage, do not use hand dishwashing products in your water supply, use 15ml of ...
Use and Care Manual
Page 12
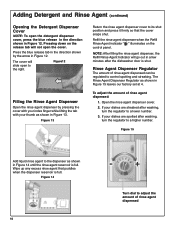
... release tab in the direction shown by pressing the cover with your index finger while lifting the tab with your dishes are spotted after the dishwasher door is full. If your thumb as shown in Figure 12. Open the rinse agent dispenser cover. 2. Figure 15 Add liquid rinse agent to a lower...
... release tab in the direction shown by pressing the cover with your index finger while lifting the tab with your dishes are spotted after the dishwasher door is full. If your thumb as shown in Figure 12. Open the rinse agent dispenser cover. 2. Figure 15 Add liquid rinse agent to a lower...
Use and Care Manual
Page 13
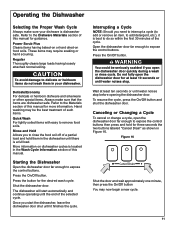
...or heirloom dishware and silverware or other special items. Always make sure your dishwasher. Starting the Dishwasher Open the dishwasher door far enough to expose the control buttons. The dishwasher will start the dishwasher, leave the dishwasher door shut until it is best to the Dishware Materials section of this ...the control buttons then press and hold them in Figure 16. Canceling or Changing a Cycle To cancel or change a cycle, open the dishwasher door quickly during a wash or rinse cycle. Hand washing may be seriously scalded if you to rinse the food soil off of such...
...or heirloom dishware and silverware or other special items. Always make sure your dishwasher. Starting the Dishwasher Open the dishwasher door far enough to expose the control buttons. The dishwasher will start the dishwasher, leave the dishwasher door shut until it is best to the Dishware Materials section of this ...the control buttons then press and hold them in Figure 16. Canceling or Changing a Cycle To cancel or change a cycle, open the dishwasher door quickly during a wash or rinse cycle. Hand washing may be seriously scalded if you to rinse the food soil off of such...
Use and Care Manual
Page 14
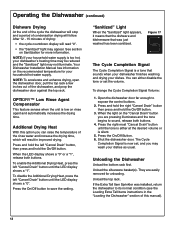
.... 2. You can either at the desired volume or is now set the volume. To change the Cycle Completion Signal Volume: 1. Unloading the Dishwasher Unload the bottom rack first. If the Extra Tall Item Sprinkler was just washed has been sanitized. After 12 - 15 minutes of this option...the tone begins to its normal condition (see the Loading Extra Tall Items instructions in improved drying. NOTE: To accelerate and enhance drying, open the dishwasher door, pull the top rack a few inches out of condensation drying will read "0". • the "Sanitized" light may not illuminate. Press and...
.... 2. You can either at the desired volume or is now set the volume. To change the Cycle Completion Signal Volume: 1. Unloading the Dishwasher Unload the bottom rack first. If the Extra Tall Item Sprinkler was just washed has been sanitized. After 12 - 15 minutes of this option...the tone begins to its normal condition (see the Loading Extra Tall Items instructions in improved drying. NOTE: To accelerate and enhance drying, open the dishwasher door, pull the top rack a few inches out of condensation drying will read "0". • the "Sanitized" light may not illuminate. Press and...
Use and Care Manual
Page 15
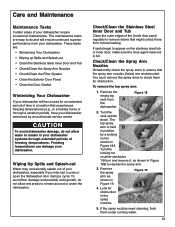
...Clean the Stainless Steel Inner Door and Tub Clean the outer edges of the inside door panel regularly to check them under the dishwasher. You must remove the spray arms to remove debris that experiences freezing temperatures (e.g., in a location that might collect there from ...normal loading. Wiping Up Spills and Splash-out Water may occasionally splash out of your dishwasher require occasional maintenance. If the spray nozzles need cleaning, flush them for an extended period of time in a holiday home or through...
...Clean the Stainless Steel Inner Door and Tub Clean the outer edges of the inside door panel regularly to check them under the dishwasher. You must remove the spray arms to remove debris that experiences freezing temperatures (e.g., in a location that might collect there from ...normal loading. Wiping Up Spills and Splash-out Water may occasionally splash out of your dishwasher require occasional maintenance. If the spray nozzles need cleaning, flush them for an extended period of time in a holiday home or through...
Use and Care Manual
Page 16
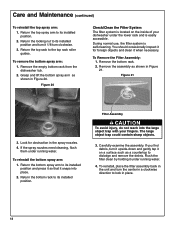
... water. 4. Return the bottom spray arm to its installed position and press it so that it snaps into the large object trap with your dishwasher under running water. Flush the filter clean by holding it when necessary. Care and Maintenance (continued) To reinstall the top spray arm: 1. ...Remove the empty bottom rack from the dishwasher tub. 2. Grasp and lift the bottom spray arm as shown in Figure 20. During normal use, the filter system is located on a surface...
... water. 4. Return the bottom spray arm to its installed position and press it so that it snaps into the large object trap with your dishwasher under running water. Flush the filter clean by holding it when necessary. Care and Maintenance (continued) To reinstall the top spray arm: 1. ...Remove the empty bottom rack from the dishwasher tub. 2. Grasp and lift the bottom spray arm as shown in Figure 20. During normal use, the filter system is located on a surface...

Use and Care Manual
Page 17
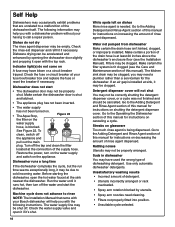
.... 15 Stainless Steel Doors Use a soft cloth with soapy water. Clean the Door Gasket Regularly clean the door gasket with a damp cloth to clean your dishwasher's exterior door panel. For the best results, apply the stainless steel cleaner to the cloth, then wipe the surface. Clean the Exterior Door Panel Colored... Doors Use only a soft cloth that is lightly dampened with a non-abrasive cleaner (preferably a liquid spray) made for cleaning stainless steel. Your dishwasher's exterior door panel can be damaged by doing so.
.... 15 Stainless Steel Doors Use a soft cloth with soapy water. Clean the Door Gasket Regularly clean the door gasket with a damp cloth to clean your dishwasher's exterior door panel. For the best results, apply the stainless steel cleaner to the cloth, then wipe the surface. Clean the Exterior Door Panel Colored... Doors Use only a soft cloth that is lightly dampened with a non-abrasive cleaner (preferably a liquid spray) made for cleaning stainless steel. Your dishwasher's exterior door panel can be damaged by doing so.
Use and Care Manual
Page 18
...off . Make certain a portion of this manual for instructions on the water supply hose, is being dispensed. Dishwasher does not start the dishwasher. Before starting the dishwasher, open with the top rack. Go to the Adding Detergent and Rinse Agent section of rinse agent dispensed. ... need cleaning. • Filters not properly fitted into position. • Unsuitable cycle selected. Self Help Dishwashers may occasionally exhibit problems that came with your Bosch dishwasher will not shut You may not be correctly shutting the detergent dispenser cover, or a cycle was not ...
...off . Make certain a portion of this manual for instructions on the water supply hose, is being dispensed. Dishwasher does not start the dishwasher. Before starting the dishwasher, open with the top rack. Go to the Adding Detergent and Rinse Agent section of rinse agent dispensed. ... need cleaning. • Filters not properly fitted into position. • Unsuitable cycle selected. Self Help Dishwashers may occasionally exhibit problems that came with your Bosch dishwasher will not shut You may not be correctly shutting the detergent dispenser cover, or a cycle was not ...
Use and Care Manual
Page 19
...requirements are based on normal soil loads and 120°F incoming water and will automatically extend the cycle time by approximately 20 minutes. The dishwasher cycles that can cause the cycle time and water usage to adjust at discrete times, and suddenly change in the chart above. Your... Dishwasher Installation Manual has information on soil loads and incoming water temperature. The "Smart Control" makes decisions that meet very strict requirements of wash ...
...requirements are based on normal soil loads and 120°F incoming water and will automatically extend the cycle time by approximately 20 minutes. The dishwasher cycles that can cause the cycle time and water usage to adjust at discrete times, and suddenly change in the chart above. Your... Dishwasher Installation Manual has information on soil loads and incoming water temperature. The "Smart Control" makes decisions that meet very strict requirements of wash ...
Use and Care Manual
Page 20
... repairs, pro-rates, or Product replacement, once this Statement of Limited Product Warranty applies only to Bosch dishwashers ("Product") sold to you in materials or workmanship (excludes labor charges). • Lifetime Warranty against Stainless Steel Rust Through... AND VOID. Statement of Limited Product Warranty Bosch Dishwashers What this Warranty Covers & Who it Applies to: The limited warranty provided BSH Home Appliances ("Bosch") in this warranty has expired. 18 Notwithstanding the foregoing, Bosch will repair your dishwasher with a defect in materials or workmanship. ...
... repairs, pro-rates, or Product replacement, once this Statement of Limited Product Warranty applies only to Bosch dishwashers ("Product") sold to you in materials or workmanship (excludes labor charges). • Lifetime Warranty against Stainless Steel Rust Through... AND VOID. Statement of Limited Product Warranty Bosch Dishwashers What this Warranty Covers & Who it Applies to: The limited warranty provided BSH Home Appliances ("Bosch") in this warranty has expired. 18 Notwithstanding the foregoing, Bosch will repair your dishwasher with a defect in materials or workmanship. ...
Use and Care Manual
Page 21
...VARY FROM STATE TO STATE. No attempt to install the product in , or around the Product. Statement of Limited Product Warranty Bosch Dishwashers Warranty Exclusions: The warranty coverage described herein excludes all electrical, plumbing or other connecting facilities, for proper foundation/flooring, and ...extended exposure to Obtain Warranty Service: TO OBTAIN WARRANTY SERVICE FOR YOUR PRODUCT, YOU SHOULD CONTACT THE NEAREST BOSCH AUTHORIZED SERVICE CENTER, OR CALL 800-944-2904, or write Bosch at: BSH Home Appliances - 5551 McFadden Avenue, Huntington Beach, CA 92649 / 19 Also excluded from...
...VARY FROM STATE TO STATE. No attempt to install the product in , or around the Product. Statement of Limited Product Warranty Bosch Dishwashers Warranty Exclusions: The warranty coverage described herein excludes all electrical, plumbing or other connecting facilities, for proper foundation/flooring, and ...extended exposure to Obtain Warranty Service: TO OBTAIN WARRANTY SERVICE FOR YOUR PRODUCT, YOU SHOULD CONTACT THE NEAREST BOSCH AUTHORIZED SERVICE CENTER, OR CALL 800-944-2904, or write Bosch at: BSH Home Appliances - 5551 McFadden Avenue, Huntington Beach, CA 92649 / 19 Also excluded from...
Use and Care Manual
Page 22
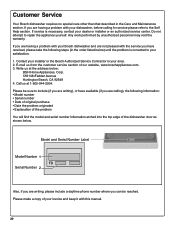
.... 20 Model and Serial Number Label Model Number 1 FD Serial Number 2 Also, if you are having a problem with your Bosch dishwasher and are having a problem with your dishwasher, before calling for service please refer to your satisfaction: 1. Any work performed by unauthorized personnel may void the warranty. If you...number where you can be sure to repair the appliance yourself. Please make a copy of our website, www.boschappliances.com. 3. Write us at 1-800-944-2904. Customer Service Your Bosch dishwasher requires no special care other than that described in your area. 2.
.... 20 Model and Serial Number Label Model Number 1 FD Serial Number 2 Also, if you are having a problem with your Bosch dishwasher and are having a problem with your dishwasher, before calling for service please refer to your satisfaction: 1. Any work performed by unauthorized personnel may void the warranty. If you...number where you can be sure to repair the appliance yourself. Please make a copy of our website, www.boschappliances.com. 3. Write us at 1-800-944-2904. Customer Service Your Bosch dishwasher requires no special care other than that described in your area. 2.


