
Instructions for Use
Page 2
Warming Drawer (some models 21 About the Warming Drawer 21 Operation 21 Getting the Most Out of Your Appliance 22 Getting the Most Out of Your Cooktop 23 Getting ... Warming 36 Maintenance 36 Service 38 Before Calling Service 38 Questions? 1-800-944-2904 www.boschappliances.com 5551 McFadden Ave. Table of Your Warming Drawer 30 Cleaning and Maintenance 31 Cleaning -
Warming Drawer (some models 21 About the Warming Drawer 21 Operation 21 Getting the Most Out of Your Appliance 22 Getting the Most Out of Your Cooktop 23 Getting ... Warming 36 Maintenance 36 Service 38 Before Calling Service 38 Questions? 1-800-944-2904 www.boschappliances.com 5551 McFadden Ave. Table of Your Warming Drawer 30 Cleaning and Maintenance 31 Cleaning -

Instructions for Use
Page 8
... The cooktop has sealed gas burners. Match the size of the cooktop where they are no parts under the cooktop to wipe up. As a result, there are easier to clean, disassemble or adjust. varies by model) (oven back wall) (not shown) 21 Convection Fan and Element (oven back wall... The cooktop has four burner caps. Make sure the burner cap is not placed correctly, the burner varies by model) 8 Oven Door Gasket 9 Storage Drawer (some models) 10 Warming Drawer (some models) 11 Model # and Serial # Plate 12 Oven Vent 13 Anti-Tip Bracket (not shown) 14 Oven Rack, Half (...
... The cooktop has sealed gas burners. Match the size of the cooktop where they are no parts under the cooktop to wipe up. As a result, there are easier to clean, disassemble or adjust. varies by model) (oven back wall) (not shown) 21 Convection Fan and Element (oven back wall... The cooktop has four burner caps. Make sure the burner cap is not placed correctly, the burner varies by model) 8 Oven Door Gasket 9 Storage Drawer (some models) 10 Warming Drawer (some models) 11 Model # and Serial # Plate 12 Oven Vent 13 Anti-Tip Bracket (not shown) 14 Oven Rack, Half (...
Instructions for Use
Page 9
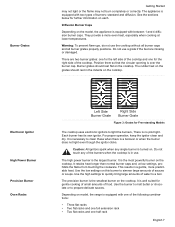
... largest burner. Do not touch any single burner is well suited for the right side of the cooktop. This results in the indents on model, the range is in use. It is turned on the cooktop. Burner grates should rest in a gentle, more even heat, especially when cooking at...grates properly positions. Each burner has its own ignitor. Diffusion Burner Caps Depending on the cooktop. It is the most powerful burner on the model, the appliance is the smallest burner on each. Use the high settings to prepare delicate sauces. There are missing or damaged. For proper ...
... largest burner. Do not touch any single burner is well suited for the right side of the cooktop. This results in the indents on model, the range is in use. It is turned on the cooktop. Burner grates should rest in a gentle, more even heat, especially when cooking at...grates properly positions. Each burner has its own ignitor. Diffusion Burner Caps Depending on the cooktop. It is the most powerful burner on the model, the appliance is the smallest burner on each. Use the high settings to prepare delicate sauces. There are missing or damaged. For proper ...
Instructions for Use
Page 10
... near you . 2. CAUTION To avoid burns, place oven racks in . Top Rack Bottom Rack Back of Rack Pan Stops Stops Front of the range. Extension Oven Rack (some models) The Full Extension Rack allows for easier access to the user. Rack should be moved while the oven is reached, tilt rack up...
... near you . 2. CAUTION To avoid burns, place oven racks in . Top Rack Bottom Rack Back of Rack Pan Stops Stops Front of the range. Extension Oven Rack (some models) The Full Extension Rack allows for easier access to the user. Rack should be moved while the oven is reached, tilt rack up...
Instructions for Use
Page 12
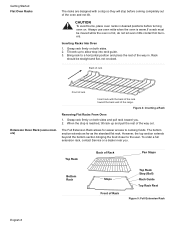
... on oven bottom. Dry thoroughly. Do not use . To prevent carbon monoxide build-up, do not block the vent. Getting Started Half Oven Rack (Some Models) Cleaning Clean rack with hot sudsy water. For stubborn dirt, use a soap filled steel wool pad. With the right half of electric shock or fire...
... on oven bottom. Dry thoroughly. Do not use . To prevent carbon monoxide build-up, do not block the vent. Getting Started Half Oven Rack (Some Models) Cleaning Clean rack with hot sudsy water. For stubborn dirt, use a soap filled steel wool pad. With the right half of electric shock or fire...
Instructions for Use
Page 13
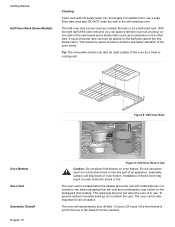
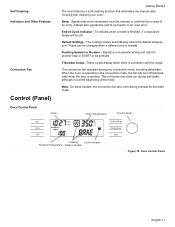
... function that more information must be entered or confirms the receipt of the mode. Signals that eliminates the manual labor involved with the range. Signals an incomplete setting and calls for the bake mode. The convection fan does run during self-clean, although not at the ...when a mode is needed. End-of a program or an oven error. The cooking modes automatically select the default temperature. Note: On some models, the convection fan also runs during any convection mode, including dehydrate. Oven Control Panel Clock Oven Temperature Control Knob Light AM PM Time Off ...
... function that more information must be entered or confirms the receipt of the mode. Signals that eliminates the manual labor involved with the range. Signals an incomplete setting and calls for the bake mode. The convection fan does run during self-clean, although not at the ...when a mode is needed. End-of a program or an oven error. The cooking modes automatically select the default temperature. Note: On some models, the convection fan also runs during any convection mode, including dehydrate. Oven Control Panel Clock Oven Temperature Control Knob Light AM PM Time Off ...
Instructions for Use
Page 14
... displayed in the selected mode. Displays temperature of day or the timer. Door Locking Indicator - Press pad to indicate that the warming drawer (some models) - TIMER 1 AND TIMER 2; Warming Drawer Indicator - Indicates that the selection has been made. A beep will flash. Oven Temperature - Press ...are used to set the clock time. About the Clock Setting the Clock • Always set or change the time of your range. Press pad to set up your fingertip. Press pad to display cooking mode. Press pad to turn counterclockwise to set the clock ...
... displayed in the selected mode. Displays temperature of day or the timer. Door Locking Indicator - Press pad to indicate that the warming drawer (some models) - TIMER 1 AND TIMER 2; Warming Drawer Indicator - Indicates that the selection has been made. A beep will flash. Oven Temperature - Press ...are used to set the clock time. About the Clock Setting the Clock • Always set or change the time of your range. Press pad to set up your fingertip. Press pad to display cooking mode. Press pad to turn counterclockwise to set the clock ...
Instructions for Use
Page 18
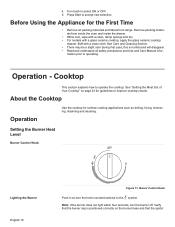
...on page 23 for surface cooking applications such as boiling, frying, simmering, steaming and sauteing. Turn knob to operating. Remove packing materials from range. mation prior to select ON or OFF. 5. Note: If the burner does not light within four seconds, turn the knob counterclockwise to ...and labels from inside the oven and inside the drawer. • While cool, wipe with a clean, damp sponge and dry. • For models with a clean cloth. Press Start to operate the cooktop. About the Cooktop Operation Use the cooktop for guidelines to the symbol. Buff with a ...
...on page 23 for surface cooking applications such as boiling, frying, simmering, steaming and sauteing. Turn knob to operating. Remove packing materials from range. mation prior to select ON or OFF. 5. Note: If the burner does not light within four seconds, turn the knob counterclockwise to ...and labels from inside the oven and inside the drawer. • While cool, wipe with a clean, damp sponge and dry. • For models with a clean cloth. Press Start to operate the cooktop. About the Cooktop Operation Use the cooktop for guidelines to the symbol. Buff with a ...

Instructions for Use
Page 20
... 1 (2) appears in display. Turn knob clockwise or counterclockwise to set . 6. Press TIME once. TIMER 1 English 18 Automatic Convection Conversion (models with convection bake) In the convection bake mode, the temperature is no longer seen in use. Simply enter the package or recipe temperature when ...setting the mode and the range calculates the correct temperature. When the feature is now set hours. Otherwise, continue to select new temperature and press START. 11...
... 1 (2) appears in display. Turn knob clockwise or counterclockwise to set . 6. Press TIME once. TIMER 1 English 18 Automatic Convection Conversion (models with convection bake) In the convection bake mode, the temperature is no longer seen in use. Simply enter the package or recipe temperature when ...setting the mode and the range calculates the correct temperature. When the feature is now set hours. Otherwise, continue to select new temperature and press START. 11...

Instructions for Use
Page 22
...: Always remove probe from oven when cooking is preheated when the beep signals once. Oven Setting the Sabbath Feature Using the Probe (some models)" on rack in the oven English 20 The chosen oven temperature is 135°F to 200°F (57°C to set probe temperature...TEMPERATURE. The probe symbol will flash in the center to determine the internal doneness or the "END" temperature of the cooking mode. The temperature range for detailed instructions. Make sure the probe is displayed in the display. 2. Note: The probe temperature can be used to the left of many...
...: Always remove probe from oven when cooking is preheated when the beep signals once. Oven Setting the Sabbath Feature Using the Probe (some models)" on rack in the oven English 20 The chosen oven temperature is 135°F to 200°F (57°C to set probe temperature...TEMPERATURE. The probe symbol will flash in the center to determine the internal doneness or the "END" temperature of the cooking mode. The temperature range for detailed instructions. Make sure the probe is displayed in the display. 2. Note: The probe temperature can be used to the left of many...

Instructions for Use
Page 23
See "Getting the Most Out of Your Warming Drawer" on page 30. About the Warming Drawer The warming drawer will keep hot, cooked foods at 140°F or warmer. • DO NOT warm food for guidelines to ... warming drawer to heat cold food (exception: it is selected: For recommended settings, see "Warming Drawer Chart" on page 30 for longer than one hour. cations Parts Key: 1 1. Warming Drawer (some models) This section explains how to maintain proper food temperature. Warming drawer settings are seen in the display when the corresponding...
See "Getting the Most Out of Your Warming Drawer" on page 30. About the Warming Drawer The warming drawer will keep hot, cooked foods at 140°F or warmer. • DO NOT warm food for guidelines to ... warming drawer to heat cold food (exception: it is selected: For recommended settings, see "Warming Drawer Chart" on page 30 for longer than one hour. cations Parts Key: 1 1. Warming Drawer (some models) This section explains how to maintain proper food temperature. Warming drawer settings are seen in the display when the corresponding...

Instructions for Use
Page 27
... carving the meat. • Always use the handle of Your Appliance Baking Pans Preheating the Oven The Probe (some models) Pan placement on one rack Pan placement on two racks Here are some models). Place oven racks in browner, crisper crust. Use a potholder to cook after the oven has shut off. Inserting...
... carving the meat. • Always use the handle of Your Appliance Baking Pans Preheating the Oven The Probe (some models) Pan placement on one rack Pan placement on two racks Here are some models). Place oven racks in browner, crisper crust. Use a potholder to cook after the oven has shut off. Inserting...

Instructions for Use
Page 28
Note: Depending on the model, you may hear the convection fan while the oven is circulated throughout the oven by 25° F. ing hot food at serving temperature. • Use ...
Note: Depending on the model, you may hear the convection fan while the oven is circulated throughout the oven by 25° F. ing hot food at serving temperature. • Use ...
Instructions for Use
Page 34
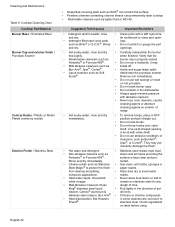
... Never allow food stains or salt to avoid water enhances appearance. Check ingredients on exterior of range. • Hot sudsy water; Rinse and dry immediately. Cleaning and Maintenance Table 9: Cooktop Cleaning...Burner Cap and exterior finish / Porcelain Enamel Control Knobs / Plastic or Nickel Plated (varies by model) Exterior Finish / Stainless Steel • Soap-filled scouring pads such as SOS® can ... or gouge the port and dry. Verify that the burner cap is kept clean and pro- rinse and dry immediately. • To remove knobs, place in some cleaners are ...
... Never allow food stains or salt to avoid water enhances appearance. Check ingredients on exterior of range. • Hot sudsy water; Rinse and dry immediately. Cleaning and Maintenance Table 9: Cooktop Cleaning...Burner Cap and exterior finish / Porcelain Enamel Control Knobs / Plastic or Nickel Plated (varies by model) Exterior Finish / Stainless Steel • Soap-filled scouring pads such as SOS® can ... or gouge the port and dry. Verify that the burner cap is kept clean and pro- rinse and dry immediately. • To remove knobs, place in some cleaners are ...

Instructions for Use
Page 38
... CLEAN mode appears. Wipe off . Drawers (Storage or Warming) Daily Cleaning Maintenance Wash with a damp cloth before attempting to clear. Cooktop Maintenance Stainless Steel Cooktop Models Oven Maintenance Removing the Door English 36 No maintenance is required other than daily cleaning as described in "Cleaning Guidelines" on this happens, remove ash...
... CLEAN mode appears. Wipe off . Drawers (Storage or Warming) Daily Cleaning Maintenance Wash with a damp cloth before attempting to clear. Cooktop Maintenance Stainless Steel Cooktop Models Oven Maintenance Removing the Door English 36 No maintenance is required other than daily cleaning as described in "Cleaning Guidelines" on this happens, remove ash...
Instructions for Use
Page 42
...the display and stop beeping. When oven racks are not working properly Porcelain chips "F" and a number appears in display and control beeps With a new range there is a strong odor when oven is turned on Control does not react when the pad is touched Fan is not running during a convection mode...stay on at the front of the touchpad. Always wipe out loose soils or heavy spillovers before running Self-Clean. The data plate shows the model and serial number. Refer to view it. See Preparing the Oven to see if hinge is activated, the oven light will disappear after a ...
...the display and stop beeping. When oven racks are not working properly Porcelain chips "F" and a number appears in display and control beeps With a new range there is a strong odor when oven is turned on Control does not react when the pad is touched Fan is not running during a convection mode...stay on at the front of the touchpad. Always wipe out loose soils or heavy spillovers before running Self-Clean. The data plate shows the model and serial number. Refer to view it. See Preparing the Oven to see if hinge is activated, the oven light will disappear after a ...
Instructions for Use
Page 43
... following: (1) use an unauthorized servicer; Bosch will have no obligation, at law or otherwise, to provide you with any concessions, including repairs, pro-rates, or Product replacement, once this ...success, then Bosch will replace your Product (upgraded models may be available to you, in Bosch 's sole discretion, for repairs or work on Bosch products, and who possess, in Bosch 's opinion,...BSH Home Appliances Bosch in this Statement of Limited Product Warranty applies only to the Bosch freestanding and slide-in range, ("Product") sold to you, the first using a Bosch -authorized service ...
... following: (1) use an unauthorized servicer; Bosch will have no obligation, at law or otherwise, to provide you with any concessions, including repairs, pro-rates, or Product replacement, once this ...success, then Bosch will replace your Product (upgraded models may be available to you, in Bosch 's sole discretion, for repairs or work on Bosch products, and who possess, in Bosch 's opinion,...BSH Home Appliances Bosch in this Statement of Limited Product Warranty applies only to the Bosch freestanding and slide-in range, ("Product") sold to you, the first using a Bosch -authorized service ...
Installation Instructions
Page 1
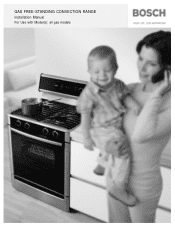
GAS FREE-STANDING CONVECTION RANGE Installation Manual For Use with Model(s): all gas models
GAS FREE-STANDING CONVECTION RANGE Installation Manual For Use with Model(s): all gas models

Instructions for Use
Page 11
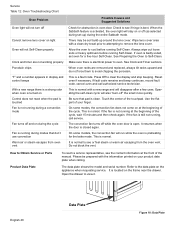
... drawer. Any of the manual. Service Before Calling Service Product Data Plate See Use and Care Manual for troubleshooting information. The data plate shows the model and serial number. Refer to the Warranty in the Use and Care Manual. Refer to the data plate on the appliance when requesting service. Open...
... drawer. Any of the manual. Service Before Calling Service Product Data Plate See Use and Care Manual for troubleshooting information. The data plate shows the model and serial number. Refer to the Warranty in the Use and Care Manual. Refer to the data plate on the appliance when requesting service. Open...

Installation Instructions
Page 3
... (Storage or Warming 37 Maintenance 37 Service 40 Before Calling Service 40 Questions? 1-800-944-2904 www.boschappliances.com 5551 McFadden Ave. Warming Drawer (some models 22 About the Warming Drawer 22 Operation 23 Getting the Most Out of Your Appliance 24 Getting the Most Out of Your Cooktop 24 Getting...
... (Storage or Warming 37 Maintenance 37 Service 40 Before Calling Service 40 Questions? 1-800-944-2904 www.boschappliances.com 5551 McFadden Ave. Warming Drawer (some models 22 About the Warming Drawer 22 Operation 23 Getting the Most Out of Your Appliance 24 Getting the Most Out of Your Cooktop 24 Getting...


