

Instructions for Use
Page 37
... START. 5. The door lock symbol will damage the finish or part. 1. phone service. Otherwise, continue to begin the self- 4: 00 SELF CLEAN clean. Review illustration above. Hand-clean the oven door edge, oven front frame and up to step 4. 3: 00 SELF CLEAN 3 4. The gasket is turned off and the... light bulbs and lens covers are in "Setting Up Your Range". 1. Do not operate oven without light bulb and cover in the display as a reminder to change number of the cycle; Turn knob until SELF...
... START. 5. The door lock symbol will damage the finish or part. 1. phone service. Otherwise, continue to begin the self- 4: 00 SELF CLEAN clean. Review illustration above. Hand-clean the oven door edge, oven front frame and up to step 4. 3: 00 SELF CLEAN 3 4. The gasket is turned off and the... light bulbs and lens covers are in "Setting Up Your Range". 1. Do not operate oven without light bulb and cover in the display as a reminder to change number of the cycle; Turn knob until SELF...
Instructions for Use
Page 41
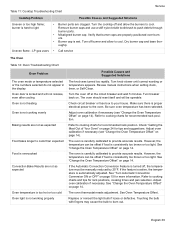
...high flame; burner is hard to cool. Turn the cooktop off at the circuit breaker and wait 5 minutes. Uneven flame - LP gas users • Call service The Oven Table 12: Oven Troubleshooting Chart Oven Problem Possible Causes and Suggested Solutions The oven mode or temperature...off , the temperature must be offset if food is consistently too brown or too light. Turn knob slower until correct wording or temperature appears. Review manual instructions when setting clock, timer, or Self-Clean. Adjust oven calibration if necessary (see "Change the Oven Temperature Offset" on . ...
...high flame; burner is hard to cool. Turn the cooktop off at the circuit breaker and wait 5 minutes. Uneven flame - LP gas users • Call service The Oven Table 12: Oven Troubleshooting Chart Oven Problem Possible Causes and Suggested Solutions The oven mode or temperature...off , the temperature must be offset if food is consistently too brown or too light. Turn knob slower until correct wording or temperature appears. Review manual instructions when setting clock, timer, or Self-Clean. Adjust oven calibration if necessary (see "Change the Oven Temperature Offset" on . ...

Installation Instructions
Page 40
Odors will cause flames and smoke inside the frame with detergent and hot water. The range can be set to front of the self-clean cycle. • The oven light does not operate during self-cleaning. Do hand-clean 1 1/2 inches from ... the oven. Do not clean or rub the gasket on the content and amount of cleaning. WARNING A flexible door gasket is necessary for proper care. 3. Review illustration above. Rinse all utensils and bakeware. 2. Wipe up to 1-1/2 inches inside the oven during this mode. • During Self-Clean, the kitchen should be...
Odors will cause flames and smoke inside the frame with detergent and hot water. The range can be set to front of the self-clean cycle. • The oven light does not operate during self-cleaning. Do hand-clean 1 1/2 inches from ... the oven. Do not clean or rub the gasket on the content and amount of cleaning. WARNING A flexible door gasket is necessary for proper care. 3. Review illustration above. Rinse all utensils and bakeware. 2. Wipe up to 1-1/2 inches inside the oven during this mode. • During Self-Clean, the kitchen should be...
Installation Instructions
Page 45
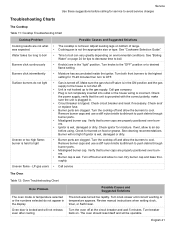
...• Moisture has accumulated inside the ignitor. Make sure the gas shut-off valve is in the "light" position. Remove burner caps and use a stiff nylon bristle toothbrush to boil can vary greatly depending on bottom of range. • Cooking pan is turned off . • Unit...boil. • Knob(s) are properly positioned over burners. • Burner cap is tripped. See cleaning recommendations. Dry burner cap and base thoroughly. Review manual instructions when setting clock, timer, or Self-Clean. Oven door is incorrect. Surface burners do not appear in . • Circuit breaker ...
...• Moisture has accumulated inside the ignitor. Make sure the gas shut-off valve is in the "light" position. Remove burner caps and use a stiff nylon bristle toothbrush to boil can vary greatly depending on bottom of range. • Cooking pan is turned off . • Unit...boil. • Knob(s) are properly positioned over burners. • Burner cap is tripped. See cleaning recommendations. Dry burner cap and base thoroughly. Review manual instructions when setting clock, timer, or Self-Clean. Oven door is incorrect. Surface burners do not appear in . • Circuit breaker ...

Installation Instructions
Page 40
...guides to front of cleaning. Hand-clean the oven door edge, oven front frame and up to 1-1/2 inches inside the oven during self-cleaning. The range can also be set to clean for 3 or 5 hours. • The mode automatically stops at the beginning of soil remaining in heat during the... with use. • Four hours is the preset length of oven cavity. Do hand-clean frame area outside the gasket. Figure 16: Cleaning Guidelines 4. Review illustration above. Use a soapy sponge or plastic scrubber or a detergent-filled S.O.S.® pad. Do not clean or rub the gasket on the content and ...
...guides to front of cleaning. Hand-clean the oven door edge, oven front frame and up to 1-1/2 inches inside the oven during self-cleaning. The range can also be set to clean for 3 or 5 hours. • The mode automatically stops at the beginning of soil remaining in heat during the... with use. • Four hours is the preset length of oven cavity. Do hand-clean frame area outside the gasket. Figure 16: Cleaning Guidelines 4. Review illustration above. Use a soapy sponge or plastic scrubber or a detergent-filled S.O.S.® pad. Do not clean or rub the gasket on the content and ...
Installation Instructions
Page 45
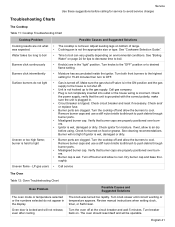
...the burners to desired flame setting. Remove burner caps and use a stiff nylon bristle toothbrush to the gas supply. Review manual instructions when setting clock, timer, or Self-Clean. Call gas company. • Plug is not completely inserted into outlet or the house wiring is tripped. Check ...in the display The knob was expected. Turn breaker even after cooling back on food or grease. See "Boiling Water" on bottom of range. • Cooking pan is wet, damaged or dirty. Turn the cooktop off burner and allow the burners to boil Burners click continuously &#...
...the burners to desired flame setting. Remove burner caps and use a stiff nylon bristle toothbrush to the gas supply. Review manual instructions when setting clock, timer, or Self-Clean. Call gas company. • Plug is not completely inserted into outlet or the house wiring is tripped. Check ...in the display The knob was expected. Turn breaker even after cooling back on food or grease. See "Boiling Water" on bottom of range. • Cooking pan is wet, damaged or dirty. Turn the cooktop off burner and allow the burners to boil Burners click continuously &#...