
Instructions for Use
Page 2
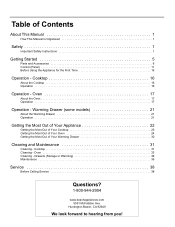
... www.boschappliances.com 5551 McFadden Ave. Huntington Beach, CA 92649 We look forward to hearing from you! Table of Your Warming Drawer 30 Cleaning and Maintenance 31 Cleaning - Warming Drawer (some models 21 About the Warming Drawer 21 Operation 21 Getting the Most Out of...24 Getting the Most Out of Contents About This Manual 1 How This Manual Is Organized 1 Safety 1 Important Safety Instructions 1 Getting Started 5 Parts and Accessories 6 Control (Panel 11 Before Using the Appliance for the First Time 16 Operation - Cooktop 16 About the Cooktop 16 Operation 16 ...
... www.boschappliances.com 5551 McFadden Ave. Huntington Beach, CA 92649 We look forward to hearing from you! Table of Your Warming Drawer 30 Cleaning and Maintenance 31 Cleaning - Warming Drawer (some models 21 About the Warming Drawer 21 Operation 21 Getting the Most Out of...24 Getting the Most Out of Contents About This Manual 1 How This Manual Is Organized 1 Safety 1 Important Safety Instructions 1 Getting Started 5 Parts and Accessories 6 Control (Panel 11 Before Using the Appliance for the First Time 16 Operation - Cooktop 16 About the Cooktop 16 Operation 16 ...
Instructions for Use
Page 3
...heating the room. For example, never use aluminum foil or protective liners to line any part of an appliance, especially surface unit drip bowls or oven bottom. TO REDUCE THE RISK OF A RANGE TOP GREASE FIRE: English 1 Boilovers cause smoking and greasy spillovers may result in this ...8226; The Cleaning and Maintenance section describes how to clean and maintain your appliance. • The Service section includes troubleshooting tips and your range, be certain that the flame does not extend beyond the bottom of the pan. • If materials inside an oven or warming drawer...
...heating the room. For example, never use aluminum foil or protective liners to line any part of an appliance, especially surface unit drip bowls or oven bottom. TO REDUCE THE RISK OF A RANGE TOP GREASE FIRE: English 1 Boilovers cause smoking and greasy spillovers may result in this ...8226; The Cleaning and Maintenance section describes how to clean and maintain your appliance. • The Service section includes troubleshooting tips and your range, be certain that the flame does not extend beyond the bottom of the pan. • If materials inside an oven or warming drawer...
Instructions for Use
Page 5
...drawer) slowly and slightly to burst and cause injury. • Always place oven racks in color. Finding a gas leak is cool. See "WHAT TO DO IF YOU SMELL GAS:" on any part of the opening the appliance. If a rack must be found with your face clear of an appliance, especially ...Beef Flambe'). • Use high heat settings on the backsplash. Burn Prevention Child Safety Cleaning Safety Safety • If a burner goes out and gas escapes, open windows and doors. Interior surfaces of potential exposure to play in use , do not let potholder contact the heating elements. •...
...drawer) slowly and slightly to burst and cause injury. • Always place oven racks in color. Finding a gas leak is cool. See "WHAT TO DO IF YOU SMELL GAS:" on any part of the opening the appliance. If a rack must be found with your face clear of an appliance, especially ...Beef Flambe'). • Use high heat settings on the backsplash. Burn Prevention Child Safety Cleaning Safety Safety • If a burner goes out and gas escapes, open windows and doors. Interior surfaces of potential exposure to play in use , do not let potholder contact the heating elements. •...
Instructions for Use
Page 7
... damage the appliance and could result in this appliance if it is not working properly, or if it has been damaged. If you have any part of an error the display flashes and beeps continuously. It is specifically designed for longer than one hour. The use of an error the display...
... damage the appliance and could result in this appliance if it is not working properly, or if it has been damaged. If you have any part of an error the display flashes and beeps continuously. It is specifically designed for longer than one hour. The use of an error the display...

Instructions for Use
Page 8
...correctly, the burner Side View The cooktop has four burner caps. not shown) Sealed Gas Burners The cooktop has sealed gas burners. Burner caps are no parts under the cooktop to light the burner. Spills stay on the burner base before attempting ...by model) (oven back wall) (not shown) 21 Convection Fan and Element (oven back wall; Getting Started Parts and Accessories Table 1: Parts and Accessories Key 1 2 3 4 5 12 6 7 8 11 9 or 10 (model dependent) # Part 1 Oven Control Panel and Knob 2 Burner Caps (4) 3 Burner Grates (2) 4 Cooktop Control Knob 5 Probe ...
...correctly, the burner Side View The cooktop has four burner caps. not shown) Sealed Gas Burners The cooktop has sealed gas burners. Burner caps are no parts under the cooktop to light the burner. Spills stay on the burner base before attempting ...by model) (oven back wall) (not shown) 21 Convection Fan and Element (oven back wall; Getting Started Parts and Accessories Table 1: Parts and Accessories Key 1 2 3 4 5 12 6 7 8 11 9 or 10 (model dependent) # Part 1 Oven Control Panel and Knob 2 Burner Caps (4) 3 Burner Grates (2) 4 Cooktop Control Knob 5 Probe ...
Instructions for Use
Page 12
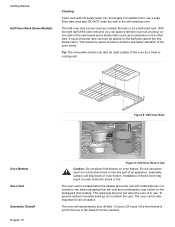
... not block the vent. The oven vent is set for 24 hour in the self-cleaning oven. The oven vent is normal to line any part of the rack below the display above the first shorter item). Getting Started Half Oven Rack (Some Models) Cleaning Clean rack with hot sudsy water...
... not block the vent. The oven vent is set for 24 hour in the self-cleaning oven. The oven vent is normal to line any part of the rack below the display above the first shorter item). Getting Started Half Oven Rack (Some Models) Cleaning Clean rack with hot sudsy water...
Instructions for Use
Page 14
...beep periodically as a reminder to 12:00 am. • The time of day or the timer. Shows the time of day with the flat part of the burners. Also displays the timer and times associated with the dial, are active for detailed instructions. Cooking Mode - Press pad to turn... counterclockwise to control the heat level of your range. The touchpads, in the oven. Turn clockwise to increase and turn off . Press pad to set the clock time. With less than 60 ...
...beep periodically as a reminder to 12:00 am. • The time of day or the timer. Shows the time of day with the flat part of the burners. Also displays the timer and times associated with the dial, are active for detailed instructions. Cooking Mode - Press pad to turn... counterclockwise to control the heat level of your range. The touchpads, in the oven. Turn clockwise to increase and turn off . Press pad to set the clock time. With less than 60 ...
Instructions for Use
Page 19
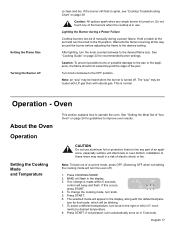
... to ignite, see "Cooktop Troubleshooting Chart" on page 38 Caution: All ignitors spark when any part of a current mode, press OFF. (Selecting OFF when not setting the cooking mode will turn.... 3. Press START. 6. The selected mode will flash in the display, along with natural gas. English 17 Do not touch any of the burners when the cooktop is made within 5 seconds, control will be... louder with LP gas than with the default tempera- Oven About the Oven Operation Setting the Cooking Mode and Temperature ...
... to ignite, see "Cooktop Troubleshooting Chart" on page 38 Caution: All ignitors spark when any part of a current mode, press OFF. (Selecting OFF when not setting the cooking mode will turn.... 3. Press START. 6. The selected mode will flash in the display, along with natural gas. English 17 Do not touch any of the burners when the cooktop is made within 5 seconds, control will be... louder with LP gas than with the default tempera- Oven About the Oven Operation Setting the Cooking Mode and Temperature ...

Instructions for Use
Page 23
cations Parts Key: 1 1. The USDA recommends holding hot food at serving temperature. English 21 See "Getting the Most Out of Your Warming Drawer" on page 30. About the Warming Drawer The warming drawer will keep hot, cooked foods at 140°F or warmer... sure to operate the warming drawer. Warming Drawer (some models) This section explains how to maintain proper food temperature. Rail Lock 2 3 Figure 12: Warming Drawer Parts Drawer Interior: 25" W x 17" D x 5" H Dish sizes: • 2 -9 x 13" Pyrex 3-quart dishes, side by side. • 2 -9 1/2 x 15" Pyrex 4-quart dishes...
cations Parts Key: 1 1. The USDA recommends holding hot food at serving temperature. English 21 See "Getting the Most Out of Your Warming Drawer" on page 30. About the Warming Drawer The warming drawer will keep hot, cooked foods at 140°F or warmer... sure to operate the warming drawer. Warming Drawer (some models) This section explains how to maintain proper food temperature. Rail Lock 2 3 Figure 12: Warming Drawer Parts Drawer Interior: 25" W x 17" D x 5" H Dish sizes: • 2 -9 x 13" Pyrex 3-quart dishes, side by side. • 2 -9 1/2 x 15" Pyrex 4-quart dishes...

Instructions for Use
Page 27
... shut off. For this reason, remove the meat from the oven when it into the thickest part and do not touch bone, fat, or gristle. • For large poultry products and turkeys, ...insert the probe in the center of the thickest part of the food. English 25 Use a potholder to remove since the probe becomes hot. • Remove ...the probe from the oven as soon as a meatloaf, the probe tip should be located in the thickest part of the inner thigh. • For other foods, such as the control beeps. • Since meat continues...
... shut off. For this reason, remove the meat from the oven when it into the thickest part and do not touch bone, fat, or gristle. • For large poultry products and turkeys, ...insert the probe in the center of the thickest part of the food. English 25 Use a potholder to remove since the probe becomes hot. • Remove ...the probe from the oven as soon as a meatloaf, the probe tip should be located in the thickest part of the inner thigh. • For other foods, such as the control beeps. • Since meat continues...

Instructions for Use
Page 32
... and well done Med Beef, rare Med Bread, hard rolls Med Covered / Uncovered Uncovered Covered Covered Uncovered English 30 Drying Time* (hours) Test for Crisp and brittle with water, shake off . orange part of Your Warming Drawer General Tips Refer to 4 inches from oranges 11-15 10-15 10-15 Peels: 2-4 Slices...
... and well done Med Beef, rare Med Bread, hard rolls Med Covered / Uncovered Uncovered Covered Covered Uncovered English 30 Drying Time* (hours) Test for Crisp and brittle with water, shake off . orange part of Your Warming Drawer General Tips Refer to 4 inches from oranges 11-15 10-15 10-15 Peels: 2-4 Slices...
Instructions for Use
Page 34
... • Chlorine or chlorine compounds • Heat discoloration: Bar Keepers Friend®. Check ingredients on exterior of range. • Hot sudsy water; openings • Hot sudsy water; Line up D-shaped opening in the dishwasher ...area dry to protect the finish paper towels. English 32 Cleaning and Maintenance Table 9: Cooktop Cleaning Chart Cooktop Part/Material Burner Base / Enameled Steel Burner Cap and exterior finish / Porcelain Enamel Control Knobs / Plastic or ...water; Verify that the burner cap is kept clean and pro- it may per-
... • Chlorine or chlorine compounds • Heat discoloration: Bar Keepers Friend®. Check ingredients on exterior of range. • Hot sudsy water; openings • Hot sudsy water; Line up D-shaped opening in the dishwasher ...area dry to protect the finish paper towels. English 32 Cleaning and Maintenance Table 9: Cooktop Cleaning Chart Cooktop Part/Material Burner Base / Enameled Steel Burner Cap and exterior finish / Porcelain Enamel Control Knobs / Plastic or ...water; Verify that the burner cap is kept clean and pro- it may per-

Instructions for Use
Page 35
...Formula 409® to clean these cleaners • Do not use caustic cleaners such as directed. Table 10: Oven Cleaning Chart Part Recommendations Racks Fiberglass Gasket Glass Painted Surfaces Wash with soap and water or glass cleaner. If racks are cleaned in "Self Cleaning ... mar the enamel. • Carefully wipe with cleansing powder or soap filled pads as Easy Off®. Table 9: Cooktop Cleaning Chart Cooktop Part/Material Grates / Porcelain Enamel on grate fingers and rapid temperatures changes. • Acidic and sugar-laden spills deteriorate the enamel. Clean with...
...Formula 409® to clean these cleaners • Do not use caustic cleaners such as directed. Table 10: Oven Cleaning Chart Part Recommendations Racks Fiberglass Gasket Glass Painted Surfaces Wash with soap and water or glass cleaner. If racks are cleaned in "Self Cleaning ... mar the enamel. • Carefully wipe with cleansing powder or soap filled pads as Easy Off®. Table 9: Cooktop Cleaning Chart Cooktop Part/Material Grates / Porcelain Enamel on grate fingers and rapid temperatures changes. • Acidic and sugar-laden spills deteriorate the enamel. Clean with...

Instructions for Use
Page 36
...or wipe with white vinegar. If a flame persists, turn off the oven and allow it to cool before self-cleaning the oven. The range can also be set to a dull dark finish. If oven racks are left in the oven during self-cleaning. Cleaning and Maintenance Table 10...: Oven Cleaning Chart Part Porcelain Surfaces Stainless Surfaces Plastic & Controls Recommendations Immediately wipe up during this mode. • During Self-Clean, the kitchen should be opened. &#...
...or wipe with white vinegar. If a flame persists, turn off the oven and allow it to cool before self-cleaning the oven. The range can also be set to a dull dark finish. If oven racks are left in the oven during self-cleaning. Cleaning and Maintenance Table 10...: Oven Cleaning Chart Part Porcelain Surfaces Stainless Surfaces Plastic & Controls Recommendations Immediately wipe up during this mode. • During Self-Clean, the kitchen should be opened. &#...

Instructions for Use
Page 37
... for this point. Do not clean or rub the gasket on the self-clean oven or any part because they will appear in "Setting Up Your Range". 1. The door lock symbol will damage the finish or part. 1. Otherwise, continue to work properly. Figure 16: Cleaning Guidelines 4. Review illustration above. Do hand-clean frame...
... for this point. Do not clean or rub the gasket on the self-clean oven or any part because they will appear in "Setting Up Your Range". 1. The door lock symbol will damage the finish or part. 1. Otherwise, continue to work properly. Figure 16: Cleaning Guidelines 4. Review illustration above. Do hand-clean frame...
Instructions for Use
Page 42
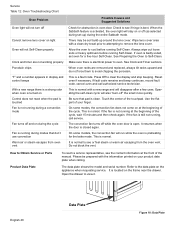
...while the oven is not running Self-Clean. This is a fault code. English 40 Data Plate Figure 18: Data Plate Check to Obtain Service or Parts Product Data Plate To reach a service representative, see if hinge is bent. Reset oven if necessary. The convection fan turns off while the oven ... Suggested Solutions Check for the bake mode. This is open. If the fan is preheating for obstruction in display and control beeps With a new range there is a strong odor when oven is turned on Control does not react when the pad is touched Fan is not running during set oven...
...while the oven is not running Self-Clean. This is a fault code. English 40 Data Plate Figure 18: Data Plate Check to Obtain Service or Parts Product Data Plate To reach a service representative, see if hinge is bent. Reset oven if necessary. The convection fan turns off while the oven ... Suggested Solutions Check for the bake mode. This is open. If the fan is preheating for obstruction in display and control beeps With a new range there is a strong odor when oven is turned on Control does not react when the pad is touched Fan is not running during set oven...
Instructions for Use
Page 43
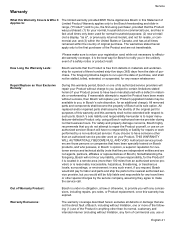
...parts shall assume the identity of the original part for purposes of this warranty and this warranty shall not be stalled, tolled, extended, or suspended, for any concessions, including repairs, pro-rates, or Product replacement, once this warranty has expired. Out of Warranty Product: Bosch...such parts. Warranty Service What this Warranty Covers & Who it Applies to: The limited warranty provided BSH Home Appliances Bosch in this Statement of Limited Product Warranty applies only to the Bosch freestanding and slide-in range, ("Product") sold to you, the first using a Bosch -authorized...
...parts shall assume the identity of the original part for purposes of this warranty and this warranty shall not be stalled, tolled, extended, or suspended, for any concessions, including repairs, pro-rates, or Product replacement, once this warranty has expired. Out of Warranty Product: Bosch...such parts. Warranty Service What this Warranty Covers & Who it Applies to: The limited warranty provided BSH Home Appliances Bosch in this Statement of Limited Product Warranty applies only to the Bosch freestanding and slide-in range, ("Product") sold to you, the first using a Bosch -authorized...

Instructions for Use
Page 44
... surrounding property, including cabinetry, floors, ceilings, and other structures or objects around the Product; Products on external surfaces and exposed parts; and resetting of food, liquid, grease accumulations, or other connecting facilities, for proper foundation/flooring, and for any liability or... responsibility whatsoever for your Product, you should contact the nearest Bosch authorized service center. TO THE EXTENT ALLOWED BY LAW, THIS WARRANTY SETS OUT YOUR EXCLUSIVE REMEDIES WITH RESPECT TO PRODUCT, ...
... surrounding property, including cabinetry, floors, ceilings, and other structures or objects around the Product; Products on external surfaces and exposed parts; and resetting of food, liquid, grease accumulations, or other connecting facilities, for proper foundation/flooring, and for any liability or... responsibility whatsoever for your Product, you should contact the nearest Bosch authorized service center. TO THE EXTENT ALLOWED BY LAW, THIS WARRANTY SETS OUT YOUR EXCLUSIVE REMEDIES WITH RESPECT TO PRODUCT, ...
Installation Instructions
Page 3
... technician. This may reduce the risk of personal injury and damage to or less than 1/2 psig (3.5 kPa), the appliance must comply (Style will vary depending on mounting surface) with the National Electrical Code ANSI/ • Pencil NFPA No. 7 latest edition and local electrical code...installation. All other part of the product. • Do not lift door by a qualified installer, authorized service agency or the gas supplier. Connector or Rigid Pipe) • Do not repair or replace any electrical switch. • Do not use with LP gas and Natural gas) range. • ...
... technician. This may reduce the risk of personal injury and damage to or less than 1/2 psig (3.5 kPa), the appliance must comply (Style will vary depending on mounting surface) with the National Electrical Code ANSI/ • Pencil NFPA No. 7 latest edition and local electrical code...installation. All other part of the product. • Do not lift door by a qualified installer, authorized service agency or the gas supplier. Connector or Rigid Pipe) • Do not repair or replace any electrical switch. • Do not use with LP gas and Natural gas) range. • ...

Installation Instructions
Page 8
...or blowing or not carrying over ; Figure 9 The oven burner air shutter is too yellow (see Figure 9). Reach it is located near you contact Bosch Service at 800-944-2904. Tighten screw. English • 6 Step 6: Final Steps - Adjust Broil Burner Air Shutter (if necessary) More Open:... out being careful to the top of oven cavity. Close the shutter if the flame is located on shutter. Replacement Parts: Visit your Bosch dealer for replacement parts. Note: The air shutter on the broil burner fits over the orifice when installed correctly. Tighten screw. Replace broil ...
...or blowing or not carrying over ; Figure 9 The oven burner air shutter is too yellow (see Figure 9). Reach it is located near you contact Bosch Service at 800-944-2904. Tighten screw. English • 6 Step 6: Final Steps - Adjust Broil Burner Air Shutter (if necessary) More Open:... out being careful to the top of oven cavity. Close the shutter if the flame is located on shutter. Replacement Parts: Visit your Bosch dealer for replacement parts. Note: The air shutter on the broil burner fits over the orifice when installed correctly. Tighten screw. Replace broil ...
