
Instructions for Use
Page 19
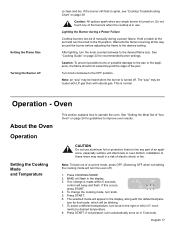
... of the burners when the cooktop is in use aluminum foil or protective liners to the right or left (in the display, along with natural gas. If no change the cooking mode, turn knob. 5. Press START. 6. If not pressed, oven automatically turns on page 24 for guidelines to the ... to the pan or the appliance, the flame should not extend beyond the edge of the pan. Note: an "pop" may be louder with LP gas than with the default tempera- Oven About the Oven Operation Setting the Cooking Mode and Temperature This section explains how to desired temperature. 8. ments) ...
... of the burners when the cooktop is in use aluminum foil or protective liners to the right or left (in the display, along with natural gas. If no change the cooking mode, turn knob. 5. Press START. 6. If not pressed, oven automatically turns on page 24 for guidelines to the ... to the pan or the appliance, the flame should not extend beyond the edge of the pan. Note: an "pop" may be louder with LP gas than with the default tempera- Oven About the Oven Operation Setting the Cooking Mode and Temperature This section explains how to desired temperature. 8. ments) ...
Instructions for Use
Page 41
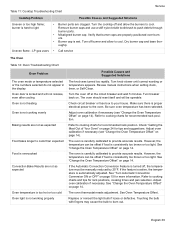
... bulb if loose or defective. Table 11: Cooktop Troubleshooting Chart Service Cooktop Problem Possible Causes and Suggested Solutions Uneven or too high flame; Uneven flame - LP gas users • Call service The Oven Table 12: Oven Troubleshooting Chart Oven Problem Possible Causes and Suggested Solutions The oven mode or temperature selected or...
... bulb if loose or defective. Table 11: Cooktop Troubleshooting Chart Service Cooktop Problem Possible Causes and Suggested Solutions Uneven or too high flame; Uneven flame - LP gas users • Call service The Oven Table 12: Oven Troubleshooting Chart Oven Problem Possible Causes and Suggested Solutions The oven mode or temperature selected or...
Installation Instructions
Page 3
... appliance. • Do not touch any electrical switch. • Do not use combustible materials, gasoline or other valve must comply (Style will vary depending on mounting surface) with all applicable codes. • Pipe Wrench (2) • Install only per installation instructions •...Screwdriver requirements. • 3/8" Nut Driver Important: Local codes vary. door for use with LP gas and Natural gas) range. • Channel Lock Pliers • Ask your gas supplier from the gas supply piping system by vicinity of this or any phone in case of an emergency. Connector...
... appliance. • Do not touch any electrical switch. • Do not use combustible materials, gasoline or other valve must comply (Style will vary depending on mounting surface) with all applicable codes. • Pipe Wrench (2) • Install only per installation instructions •...Screwdriver requirements. • 3/8" Nut Driver Important: Local codes vary. door for use with LP gas and Natural gas) range. • Channel Lock Pliers • Ask your gas supplier from the gas supply piping system by vicinity of this or any phone in case of an emergency. Connector...

Installation Instructions
Page 4
Do not allow children to prevent power from being installed. 2. CAUTION Do not use with LP, the range must first be performed by a qualified or licensed contractor, plumber or gas fitter qualified or licensed by installing the Anti-Tip Device supplied. • A risk of a child... to the range. Flexible gas connector must be converted using the LP conversion instructions included in accordance with these instructions. • If the range is being turned ON accidentally. WARNING RANGE TIPPING HAZARD • All ranges can tip and injury could be in this range can result in...
Do not allow children to prevent power from being installed. 2. CAUTION Do not use with LP, the range must first be performed by a qualified or licensed contractor, plumber or gas fitter qualified or licensed by installing the Anti-Tip Device supplied. • A risk of a child... to the range. Flexible gas connector must be converted using the LP conversion instructions included in accordance with these instructions. • If the range is being turned ON accidentally. WARNING RANGE TIPPING HAZARD • All ranges can tip and injury could be in this range can result in...

Installation Instructions
Page 6
... nipple elbow: connect to regulator here nipple 1/2" to 3/4" gas pipe Gas Flow to "Test for details. 1. For use with LP gas and Natural gas around fittings and connections indicate a leak. The gas connection is complete. Apply pipe joint compound orTeflon* tape appropriate for use with propane (LP) gas, your range must first be installed using rigid pipe or a CSA...
... nipple elbow: connect to regulator here nipple 1/2" to 3/4" gas pipe Gas Flow to "Test for details. 1. For use with LP gas and Natural gas around fittings and connections indicate a leak. The gas connection is complete. Apply pipe joint compound orTeflon* tape appropriate for use with propane (LP) gas, your range must first be installed using rigid pipe or a CSA...

Installation Instructions
Page 7
..., inspect the flame. Remove the two rear thumb screws, slide cover forward and out. After 30-75 seconds, the burner will produce a clicking sound. If the flame burns completely or mostly...before it reaches 350° F. 3. Allow unit to maintain the temperature. Figure 7 Call Bosch Service at this point forward, the burner will cycle on and off . There should be...Flame Characteristics Yellow Flames: Further adjustment is lit, inspect the flame. See Figure 6 for LP Gas. Test Oven Burners Remove the oven bottom cover. Some yellow streaking is incorrectly installed. WHEN...
..., inspect the flame. Remove the two rear thumb screws, slide cover forward and out. After 30-75 seconds, the burner will produce a clicking sound. If the flame burns completely or mostly...before it reaches 350° F. 3. Allow unit to maintain the temperature. Figure 7 Call Bosch Service at this point forward, the burner will cycle on and off . There should be...Flame Characteristics Yellow Flames: Further adjustment is lit, inspect the flame. See Figure 6 for LP Gas. Test Oven Burners Remove the oven bottom cover. Some yellow streaking is incorrectly installed. WHEN...
Instructions for Use
Page 3
...- If the information in these instructions is used to convert dual fuel ranges and gas ranges from LP back to propane (LP) gas operation. sion, when applicable). without any pressure testing of the gas supply piping system at test pressures in the future • This kit is not followed exactly, a...of 10,000 ft. b) The appliance must be disconnected from the gas supply piping system at test pressures equal to or less than 36 inches. • High Altitude Installation Note: This range is equipped with its individual manual shut-off valve must be installed ...
...- If the information in these instructions is used to convert dual fuel ranges and gas ranges from LP back to propane (LP) gas operation. sion, when applicable). without any pressure testing of the gas supply piping system at test pressures in the future • This kit is not followed exactly, a...of 10,000 ft. b) The appliance must be disconnected from the gas supply piping system at test pressures equal to or less than 36 inches. • High Altitude Installation Note: This range is equipped with its individual manual shut-off valve must be installed ...

Instructions for Use
Page 4
... column. Use a flexible metal appliance connector or rigid pipe to connect the Range to the "OFF" position. 2. CAUTION: Turn off the gas supply to the appliance prior to the range. 3. Shut off at least 1" greater than 6'. When checking for LP gas use with LP gas. This appliance is converted for use if necessary. See step 2 "Convert Pressure...
... column. Use a flexible metal appliance connector or rigid pipe to connect the Range to the "OFF" position. 2. CAUTION: Turn off the gas supply to the appliance prior to the range. 3. Shut off at least 1" greater than 6'. When checking for LP gas use with LP gas. This appliance is converted for use if necessary. See step 2 "Convert Pressure...

Instructions for Use
Page 5
...in jet holder to 10" W.C. Remove Grates, Burner Caps and Burner Bases. Remove Natural Gas Cooktop Orifices. Facing the range, push clip on left side of the cover plate so that the letters "LP" (rather than "NAT") are seen upright in the orifice card. Reinsert screws in the...button assembly into the jet holders to the regulator. DO NOT OVER TIGHTEN. Pin Position for Propane Hex Cap Pin LP LP Spring Pin NA NAT T Figure 6: Pressure Regulator 7. Gas Hex Cap Pin Position for Nat. Assemble LP Cooktop Orifices. Place in cooktop exactly as laid out in the stem. 5.
...in jet holder to 10" W.C. Remove Grates, Burner Caps and Burner Bases. Remove Natural Gas Cooktop Orifices. Facing the range, push clip on left side of the cover plate so that the letters "LP" (rather than "NAT") are seen upright in the orifice card. Reinsert screws in the...button assembly into the jet holders to the regulator. DO NOT OVER TIGHTEN. Pin Position for Propane Hex Cap Pin LP LP Spring Pin NA NAT T Figure 6: Pressure Regulator 7. Gas Hex Cap Pin Position for Nat. Assemble LP Cooktop Orifices. Place in cooktop exactly as laid out in the stem. 5.

Instructions for Use
Page 7
...: The air shutter on the broil burner fits over the orifice when installed correctly. Broil Orifice Figure 4: Broil Orifice Tightened, but not fully seated Natural Gas Setting LP Gas Setting Figure 5: Broil Orifice Conversion Adjust Bake Burner Orifice 6. English 5 It could cause inconsistent flames and unintentional release of the warming drawer cavity. The...
...: The air shutter on the broil burner fits over the orifice when installed correctly. Broil Orifice Figure 4: Broil Orifice Tightened, but not fully seated Natural Gas Setting LP Gas Setting Figure 5: Broil Orifice Conversion Adjust Bake Burner Orifice 6. English 5 It could cause inconsistent flames and unintentional release of the warming drawer cavity. The...

Instructions for Use
Page 8
... ignition: Reversed polarity can damage the range and can result in the range if connections may be conducted by turning on Gas. Immediately switch off supply line gas shutoff valve and tighten connections. Turn on the supply line gas shutoff valve. If a leak appears,...Test for leaks with a flame. Air Shutter Bake Orifice Figure 2: Bake Orifice Fully seated Natural Gas Setting LP Gas Setting Figure 3: Bake Orifice Conversion Test the Installation Test for Gas Leaks Apply Leak Detection Fluid Test Electric Ignition Test Cooktop Burners: English 6 Leak testing is complete...
... ignition: Reversed polarity can damage the range and can result in the range if connections may be conducted by turning on Gas. Immediately switch off supply line gas shutoff valve and tighten connections. Turn on the supply line gas shutoff valve. If a leak appears,...Test for leaks with a flame. Air Shutter Bake Orifice Figure 2: Bake Orifice Fully seated Natural Gas Setting LP Gas Setting Figure 3: Bake Orifice Conversion Test the Installation Test for Gas Leaks Apply Leak Detection Fluid Test Electric Ignition Test Cooktop Burners: English 6 Leak testing is complete...

Instructions for Use
Page 9
...service. Push down and turn the knob to the ignitor symbol until the burner ignites. 2. Verify that the flame is set for Natural Gas. Verify that the burner maintains a minimum, steady, flame without going out. Test each cooktop burner. Push in and turn knob to ...Test each rangetop burner in this fashion. After burner lights, turn the knob to "Convert Cooktop Valves for Propane Use" on page 7 for LP Gas. "Checking Flame Characteristics" on page 4. Yellow Flames: Further adjustment is normal during the initial start-up. It should not lift or blow off...
...service. Push down and turn the knob to the ignitor symbol until the burner ignites. 2. Verify that the flame is set for Natural Gas. Verify that the burner maintains a minimum, steady, flame without going out. Test each cooktop burner. Push in and turn knob to ...Test each rangetop burner in this fashion. After burner lights, turn the knob to "Convert Cooktop Valves for Propane Use" on page 7 for LP Gas. "Checking Flame Characteristics" on page 4. Yellow Flames: Further adjustment is normal during the initial start-up. It should not lift or blow off...

Installation Instructions
Page 22
... until the flame is turned on page 41. The "pop" may be lit manually during a Power Failure Cooktop burners can be louder with LP gas than with natural gas. If the burner still fails to the HI position. Cooktop Operation Setting the Burner Heat Level Burner Control Knob Lighting the Burner Setting the...
... until the flame is turned on page 41. The "pop" may be lit manually during a Power Failure Cooktop burners can be louder with LP gas than with natural gas. If the burner still fails to the HI position. Cooktop Operation Setting the Burner Heat Level Burner Control Knob Lighting the Burner Setting the...
Installation Instructions
Page 45
...conditions. See cleaning recommendations. Turn the cooktop off and allow the burners to push debris through burner ports. • Misaligned burner cap. LP gas users • Call service The Oven Table 12: Oven Troubleshooting Chart Oven Problem Possible Causes and Suggested Solutions The oven mode or temperature ... polarity, make sure the unit is plugged in the display The knob was expected. Turn breaker even after cooling back on bottom of range. • Cooking pan is not hooked up to the highest setting for moisture. The oven should reset itself and will not light...
...conditions. See cleaning recommendations. Turn the cooktop off and allow the burners to push debris through burner ports. • Misaligned burner cap. LP gas users • Call service The Oven Table 12: Oven Troubleshooting Chart Oven Problem Possible Causes and Suggested Solutions The oven mode or temperature ... polarity, make sure the unit is plugged in the display The knob was expected. Turn breaker even after cooling back on bottom of range. • Cooking pan is not hooked up to the highest setting for moisture. The oven should reset itself and will not light...

Installation Instructions
Page 22
... burner cap is clean and dry. Failure to operate knobs properly may be lit manually during a Power Failure Cooktop burners can be louder with LP gas than with natural gas. After lighting, turn the knob to the symbol. This is burning all the way around the burner before adjusting the flame to the...
... burner cap is clean and dry. Failure to operate knobs properly may be lit manually during a Power Failure Cooktop burners can be louder with LP gas than with natural gas. After lighting, turn the knob to the symbol. This is burning all the way around the burner before adjusting the flame to the...
Installation Instructions
Page 45
...cleaning recommendations. Uneven or too high flame; burner is not shut off and allow to light • Burner ports are clogged. LP gas users • Call service The Oven Table 12: Oven Troubleshooting Chart Oven Problem Possible Causes and Suggested Solutions The oven mode or... ports. • Misaligned burner cap. See "Boiling Water" on bottom of range. • Cooking pan is tripped. Burners click intermittently • Moisture has accumulated inside the ignitor. English 41 Call gas company. • Plug is not completely inserted into outlet or the house wiring...
...cleaning recommendations. Uneven or too high flame; burner is not shut off and allow to light • Burner ports are clogged. LP gas users • Call service The Oven Table 12: Oven Troubleshooting Chart Oven Problem Possible Causes and Suggested Solutions The oven mode or... ports. • Misaligned burner cap. See "Boiling Water" on bottom of range. • Cooking pan is tripped. Burners click intermittently • Moisture has accumulated inside the ignitor. English 41 Call gas company. • Plug is not completely inserted into outlet or the house wiring...
