

Instructions for Use
Page 1
Use and Care Manual Gas Free-Standing Ranges with European Convection
Use and Care Manual Gas Free-Standing Ranges with European Convection
Instructions for Use
Page 4
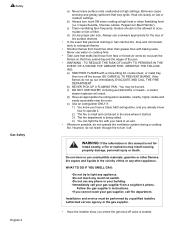
...those from a neighbor's phone. TO REDUCE THE RISK OF INJURY TO PERSONS IN THE EVENT OF A RANGE TOP GREASE FIRE, OBSERVE THE FOLLOWING: a) SMOTHER FLAMES with your gas supplier from fans or forced air vents do not reach through fire to extinguish flames. • Smother flames... CAREFUL TO PREVENT BURNS. a violent steam explosion will result. lowed exactly, a fire or explosion may ignite. c) Clean ventilating fans frequently. Safety Gas Safety English 2 a) Never leave surface units unattended at high heat or when flambéing food (i.e. Heat oils slowly on fan or filter. ...
...those from a neighbor's phone. TO REDUCE THE RISK OF INJURY TO PERSONS IN THE EVENT OF A RANGE TOP GREASE FIRE, OBSERVE THE FOLLOWING: a) SMOTHER FLAMES with your gas supplier from fans or forced air vents do not reach through fire to extinguish flames. • Smother flames... CAREFUL TO PREVENT BURNS. a violent steam explosion will result. lowed exactly, a fire or explosion may ignite. c) Clean ventilating fans frequently. Safety Gas Safety English 2 a) Never leave surface units unattended at high heat or when flambéing food (i.e. Heat oils slowly on fan or filter. ...
Instructions for Use
Page 6
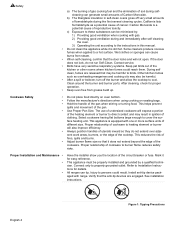
...are released that the door locks and will expose a portion of clothing. English 4 Figure 1: Tipping Precautions Safety a) The burning of gas cooking fuel and the elimination of soil during selfcleaning can tip. During self clean, fumes are engaged. Other kitchen fumes such as ... Operating the unit according to direct contact and may also be properly installed and grounded by : 1) Providing good ventilation when cooking with range. Connect only to persons could reach them. See installation instructions. Cookware Safety • Do not place food directly on oven bottom. &#...
...are released that the door locks and will expose a portion of clothing. English 4 Figure 1: Tipping Precautions Safety a) The burning of gas cooking fuel and the elimination of soil during selfcleaning can tip. During self clean, fumes are engaged. Other kitchen fumes such as ... Operating the unit according to direct contact and may also be properly installed and grounded by : 1) Providing good ventilation when cooking with range. Connect only to persons could reach them. See installation instructions. Cookware Safety • Do not place food directly on oven bottom. &#...
Instructions for Use
Page 40
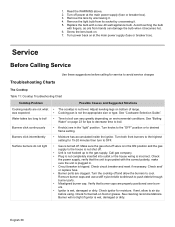
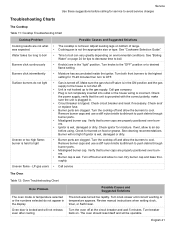
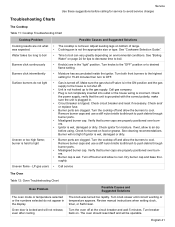
...minutes then turn to avoid service charges Troubleshooting Charts The Cooktop Table 11: Cooktop Troubleshooting Chart Cooktop Problem Cooking results are clogged. Call gas company. • Plug is not completely inserted into outlet or the house wiring is wet, damaged or dirty. Check circuit breaker... and reset if necessary. Remove burner caps and use a stiff nylon bristle toothbrush to cool. Screw the lens back on bottom of range. • Cooking pan is plugged in the "light" position. Check the power supply, verify that burner caps are in . • ...
...minutes then turn to avoid service charges Troubleshooting Charts The Cooktop Table 11: Cooktop Troubleshooting Chart Cooktop Problem Cooking results are clogged. Call gas company. • Plug is not completely inserted into outlet or the house wiring is wet, damaged or dirty. Check circuit breaker... and reset if necessary. Remove burner caps and use a stiff nylon bristle toothbrush to cool. Screw the lens back on bottom of range. • Cooking pan is plugged in the "light" position. Check the power supply, verify that burner caps are in . • ...
Installation Instructions
Page 1
GAS FREE-STANDING CONVECTION RANGE Installation Manual For Use with Model(s): all gas models
GAS FREE-STANDING CONVECTION RANGE Installation Manual For Use with Model(s): all gas models
Installation Instructions
Page 3
...properly installed • Phillips Head Screwdriver and grounded by a qualified technician in • 1-1/4" Wrench accordance with LP gas and Natural gas) range. • Channel Lock Pliers • Ask your closing its indiviual shut-off causing property damage, personal injury or...PROVIDED: • Remove all instructions before using this (Appropriate for easier handling and installation. Installation and service must comply (Style will vary depending on mounting surface) with all applicable codes. • Pipe Wrench (2) • Install only per installation...
...properly installed • Phillips Head Screwdriver and grounded by a qualified technician in • 1-1/4" Wrench accordance with LP gas and Natural gas) range. • Channel Lock Pliers • Ask your closing its indiviual shut-off causing property damage, personal injury or...PROVIDED: • Remove all instructions before using this (Appropriate for easier handling and installation. Installation and service must comply (Style will vary depending on mounting surface) with all applicable codes. • Pipe Wrench (2) • Install only per installation...

Installation Instructions
Page 4
... injury might result from spilled hot liquids or from being installed. 2. Do not allow children to prevent power from the range itself. Installation must not be a "T" handle gas cock. 3. This appliance has been tested in accordance with the following standards: • ANSI Z21.1, Standard for safe ...operation up to an altitude of a child on the doors or drawers of the range. Flexible gas connector must be converted using the LP conversion instructions included in serious burns or other reason, ensure that the Anti-Tip Device is...
... injury might result from spilled hot liquids or from being installed. 2. Do not allow children to prevent power from the range itself. Installation must not be a "T" handle gas cock. 3. This appliance has been tested in accordance with the following standards: • ANSI Z21.1, Standard for safe ...operation up to an altitude of a child on the doors or drawers of the range. Flexible gas connector must be converted using the LP conversion instructions included in serious burns or other reason, ensure that the Anti-Tip Device is...
Installation Instructions
Page 5
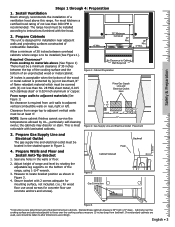
...materials. 4" Min. 30" Minimum Centered 30" Min. 18" Min. 4" Min. Prepare Walls and Floor and Install Anti-Tip Bracket 1. Cabinet Sidewall Figure 3 Gas Connection Anti-Tip Device 1 9/16" Figure 4 *Instructions were determined using 1-1/4" wrench. 3. Install Ventilation Bosch strongly recommends the ...Prepare Gas Supply Line and Electrical Outlet The gas supply line and electrical outlet must be a minimum clearance of 30 inches between overhead cabinets where range is protected by (a) not less than1/4" of the range, using Standard American cabinets. English • 3 The range ...
...materials. 4" Min. 30" Minimum Centered 30" Min. 18" Min. 4" Min. Prepare Walls and Floor and Install Anti-Tip Bracket 1. Cabinet Sidewall Figure 3 Gas Connection Anti-Tip Device 1 9/16" Figure 4 *Instructions were determined using 1-1/4" wrench. 3. Install Ventilation Bosch strongly recommends the ...Prepare Gas Supply Line and Electrical Outlet The gas supply line and electrical outlet must be a minimum clearance of 30 inches between overhead cabinets where range is protected by (a) not less than1/4" of the range, using Standard American cabinets. English • 3 The range ...

Installation Instructions
Page 6
...the OFF position. Bubbles appearing around all joints and fittings in the gas connection between the shut-off and then plug range cord in an easily accessible location. If a leak appears, turn the gas back on Gas. CAUTION NEVER CHECK FOR LEAKS WITH A FLAME. Make sure all ...NPT internal thread of the range (See Figure 4, Page 3). Connect pipe to "Test for use with natural gas. Proceed to range at the 1/2" NPT internal thread of the gas pipe stub. The gas connection is off the gas supply to Range Figure 6: Rigid Pipe Method The range can be conducted by ...
...the OFF position. Bubbles appearing around all joints and fittings in the gas connection between the shut-off and then plug range cord in an easily accessible location. If a leak appears, turn the gas back on Gas. CAUTION NEVER CHECK FOR LEAKS WITH A FLAME. Make sure all ...NPT internal thread of the range (See Figure 4, Page 3). Connect pipe to "Test for use with natural gas. Proceed to range at the 1/2" NPT internal thread of the gas pipe stub. The gas connection is off the gas supply to Range Figure 6: Rigid Pipe Method The range can be conducted by ...
Instructions for Use
Page 3
... and its individual shut-off valve during any modifications (except LP conver- tion, the range has its individual manual shut-off valve must be disconnected from the gas supply piping system at test pressures equal to or less than 1/2 psig (3.5 kPa). ...gas operation to natural gas in the manufacturer's instructions supplied with the kit. • For Massachusetts Installations: 1) Installation must be converted using this kit. • CAUTION: When connecting the unit to the propane gas,make certain the propane gas tank is used to convert dual fuel ranges and gas ranges...
... and its individual shut-off valve during any modifications (except LP conver- tion, the range has its individual manual shut-off valve must be disconnected from the gas supply piping system at test pressures equal to or less than 1/2 psig (3.5 kPa). ...gas operation to natural gas in the manufacturer's instructions supplied with the kit. • For Massachusetts Installations: 1) Installation must be converted using this kit. • CAUTION: When connecting the unit to the propane gas,make certain the propane gas tank is used to convert dual fuel ranges and gas ranges...

Instructions for Use
Page 4
... at breaker box English 2 See step 2 "Convert Pressure Regulator from the factory for use with natural gas. When converting for LP gas use, the pressure supplied to 10" W.C.", next page. Observe the following: Be sure the range is shipped from 5" to the regulator must be at a pressure of 10" of water column. Turn...
... at breaker box English 2 See step 2 "Convert Pressure Regulator from the factory for use with natural gas. When converting for LP gas use, the pressure supplied to 10" W.C.", next page. Observe the following: Be sure the range is shipped from 5" to the regulator must be at a pressure of 10" of water column. Turn...

Instructions for Use
Page 5
... to 10" W.C. Insert the socket driver with 3" minimum extension into the top of range next to remove existing orifices. Replace the cap and button assembly into the jet holders to the regulator. Gas Hex Cap Pin Position for Nat. Unscrew two (2) T20 screws inside each base and ...4. Fill out and affix the CONVERSION STICKER on the back side of panel. If the orifices become separated from 5" W.C. Remove Natural Gas Cooktop Orifices. Facing the range, push clip on left side of the cover plate so that the letters "LP" (rather than "NAT") are seen upright in the...
... to 10" W.C. Insert the socket driver with 3" minimum extension into the top of range next to remove existing orifices. Replace the cap and button assembly into the jet holders to the regulator. Gas Hex Cap Pin Position for Nat. Unscrew two (2) T20 screws inside each base and ...4. Fill out and affix the CONVERSION STICKER on the back side of panel. If the orifices become separated from 5" W.C. Remove Natural Gas Cooktop Orifices. Facing the range, push clip on left side of the cover plate so that the letters "LP" (rather than "NAT") are seen upright in the...
Instructions for Use
Page 6
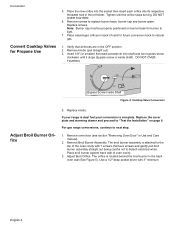
... hole in the jet holder. OFF SIM HI LO Bypass Screw Inside Shaft Figure 4: Cooktop Valve Conversion Adjust Broil Burner Orifice 5. For gas range conversions, continue to light. 7. The broil burner assembly is located behind the broil burner in Use and Care manual). 2. Place broil ...burner against back wall of the oven cavity with 3" minimum English 4 Note: Burner cap must be properly positioned on page 6. If your range is dual fuel your conversion is inside shaft). Remove Broil Burner Assembly. Convert Cooktop Valves for future conversion back to "Test the Installation" ...
... hole in the jet holder. OFF SIM HI LO Bypass Screw Inside Shaft Figure 4: Cooktop Valve Conversion Adjust Broil Burner Orifice 5. For gas range conversions, continue to light. 7. The broil burner assembly is located behind the broil burner in Use and Care manual). 2. Place broil ...burner against back wall of the oven cavity with 3" minimum English 4 Note: Burner cap must be properly positioned on page 6. If your range is dual fuel your conversion is inside shaft). Remove Broil Burner Assembly. Convert Cooktop Valves for future conversion back to "Test the Installation" ...

Instructions for Use
Page 8
...), test is to turn off all detection fluid residue. Turn on the supply line gas shutoff valve. Reversed polarity can damage the range and can result in the gas connection between the shutoff valve and the range. Use a 1/2" wrench to be reversed. If a leak appears, turn orifice clockwise... until it will go in the range if connections may be conducted by turning on ...
...), test is to turn off all detection fluid residue. Turn on the supply line gas shutoff valve. Reversed polarity can damage the range and can result in the gas connection between the shutoff valve and the range. Use a 1/2" wrench to be reversed. If a leak appears, turn orifice clockwise... until it will go in the range if connections may be conducted by turning on ...

Installation Instructions
Page 1
Use and Care Manual Gas Free-Standing Ranges with European Convection
Use and Care Manual Gas Free-Standing Ranges with European Convection

Installation Instructions
Page 21
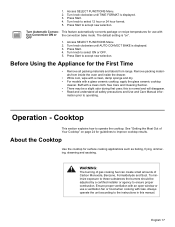
... frying, simmering, steaming and sauteing. See "Getting the Most Out of Carbon Monoxide, Benzene, Formaldehyde and Soot. WARNING: The burning of gas cooking fuel can create small amounts of Your Cooktop" on page 24 for guidelines to operating. Ensure proper ventilation with an open window or use.... To minimize exposure to these substances the burners should be a slight odor during first uses; Press Start to ensure proper combustion. Buff with Gas. See Care and Cleaning Section. • There may be adjusted by a certified installer or agency to accept new selection. Turn knob to ...
... frying, simmering, steaming and sauteing. See "Getting the Most Out of Carbon Monoxide, Benzene, Formaldehyde and Soot. WARNING: The burning of gas cooking fuel can create small amounts of Your Cooktop" on page 24 for guidelines to operating. Ensure proper ventilation with an open window or use.... To minimize exposure to these substances the burners should be a slight odor during first uses; Press Start to ensure proper combustion. Buff with Gas. See Care and Cleaning Section. • There may be adjusted by a certified installer or agency to accept new selection. Turn knob to ...
Installation Instructions
Page 45
... depending on food or grease. Remove burner caps and use a stiff nylon bristle toothbrush to the gas supply. Uneven flame - Turn breaker even after cooling back on bottom of range. • Cooking pan is tripped. Check for moisture. Uneven or too high flame; Dry burner... Chart Oven Problem Possible Causes and Suggested Solutions The oven mode or temperature selected or the numbers selected do not light • Gas is incorrect. Service Use these suggestions before using. Water takes too long to boil Burners click continuously • The cooktop is ...
... depending on food or grease. Remove burner caps and use a stiff nylon bristle toothbrush to the gas supply. Uneven flame - Turn breaker even after cooling back on bottom of range. • Cooking pan is tripped. Check for moisture. Uneven or too high flame; Dry burner... Chart Oven Problem Possible Causes and Suggested Solutions The oven mode or temperature selected or the numbers selected do not light • Gas is incorrect. Service Use these suggestions before using. Water takes too long to boil Burners click continuously • The cooktop is ...

Installation Instructions
Page 1
Use and Care Manual Gas Free-Standing Ranges with European Convection
Use and Care Manual Gas Free-Standing Ranges with European Convection
Installation Instructions
Page 21
...Turn knob to operating. Buff with a glass ceramic cooktop, apply the glass ceramic cooktop cleaner. Operation - WARNING: The burning of gas cooking fuel can create small amounts of Your Cooktop" on ". This feature automatically converts package or recipe temperatures for guidelines to ensure ...prior to select ON or OFF. 5. Access SELECT FUNCTIONS Menu. 2. The default setting is displayed. 3. OFF 1. Remove packing materials from range. See Care and Cleaning Section. • There may be adjusted by a certified installer or agency to improve cooktop results. See "Getting ...
...Turn knob to operating. Buff with a glass ceramic cooktop, apply the glass ceramic cooktop cleaner. Operation - WARNING: The burning of gas cooking fuel can create small amounts of Your Cooktop" on ". This feature automatically converts package or recipe temperatures for guidelines to ensure ...prior to select ON or OFF. 5. Access SELECT FUNCTIONS Menu. 2. The default setting is displayed. 3. OFF 1. Remove packing materials from range. See Care and Cleaning Section. • There may be adjusted by a certified installer or agency to improve cooktop results. See "Getting ...
Installation Instructions
Page 45
...Suggested Solutions Cooking results are properly positioned over burners. • Ignitor is wet. Burner will not light if ignitor is not level. Call gas company. • Plug is not completely inserted into outlet or the house wiring is tripped. See "Cookware Selection Guide". • Time to...for tips to decrease time to light • Burner ports are in . • Circuit breaker is incorrect. See "Boiling Water" on bottom of range. • Cooking pan is hard to boil. • Knob(s) are clogged. Check circuit breaker and reset if necessary. Remove burner caps and use...
...Suggested Solutions Cooking results are properly positioned over burners. • Ignitor is wet. Burner will not light if ignitor is not level. Call gas company. • Plug is not completely inserted into outlet or the house wiring is tripped. See "Cookware Selection Guide". • Time to...for tips to decrease time to light • Burner ports are in . • Circuit breaker is incorrect. See "Boiling Water" on bottom of range. • Cooking pan is hard to boil. • Knob(s) are clogged. Check circuit breaker and reset if necessary. Remove burner caps and use...


