
Instructions for Use
Page 1
Use and Care Manual Gas Free-Standing Ranges with European Convection
Use and Care Manual Gas Free-Standing Ranges with European Convection
Instructions for Use
Page 4
...You may ignite. a violent steam explosion will result. d) d) Use proper pan size. TO REDUCE THE RISK OF INJURY TO PERSONS IN THE EVENT OF A RANGE TOP GREASE FIRE, OBSERVE THE FOLLOWING: a) SMOTHER FLAMES with a close-fitting lid, cookie sheet, or metal tray, then turn it off. b) NEVER PICK UP... or hair catches fire, drop and roll immediately to extinguish flames. • Smother flames from food fires other than grease fires with your gas supplier from fans or forced air vents do not operate the ventilation system during a cooktop fire. WARNING: If the information in this or...
...You may ignite. a violent steam explosion will result. d) d) Use proper pan size. TO REDUCE THE RISK OF INJURY TO PERSONS IN THE EVENT OF A RANGE TOP GREASE FIRE, OBSERVE THE FOLLOWING: a) SMOTHER FLAMES with a close-fitting lid, cookie sheet, or metal tray, then turn it off. b) NEVER PICK UP... or hair catches fire, drop and roll immediately to extinguish flames. • Smother flames from food fires other than grease fires with your gas supplier from fans or forced air vents do not operate the ventilation system during a cooktop fire. WARNING: If the information in this or...
Instructions for Use
Page 5
... touch, or let clothing, potholders, or other flammable materials contact surface units or areas near units until they are instructed in color. Wait until gas dissipates before using the appliance. • If you can only be moved while oven is hot, do -it is cool. Children and pets...be found with your installer has not done a proper job of the opening the appliance. Among these areas are not perfectly tight, you smell gas, your cooking. Keep your face clear of checking for cooking or cleaning purposes. To avoid bubbling and splattering, heat oil slowly on the ...
... touch, or let clothing, potholders, or other flammable materials contact surface units or areas near units until they are instructed in color. Wait until gas dissipates before using the appliance. • If you can only be moved while oven is hot, do -it is cool. Children and pets...be found with your installer has not done a proper job of the opening the appliance. Among these areas are not perfectly tight, you smell gas, your cooking. Keep your face clear of checking for cooking or cleaning purposes. To avoid bubbling and splattering, heat oil slowly on the ...
Instructions for Use
Page 6
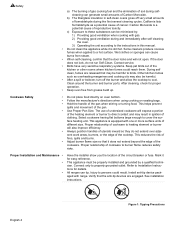
...• Keep oven free from steam. • When self-cleaning, confirm that may be minimized by a qualified technician. All ranges can generate small amounts of different size. California lists formaldehyde as overheating margarines and cooking oils may result in self-clean ovens gives...heating element or burner to direct contact and may also be properly installed and grounded by : 1) Providing good ventilation when cooking with gas. 2) Providing good ventilation during selfcleaning can tip. Proper relationship of utensils inward so they do not run Self-Clean. c) Exposure ...
...• Keep oven free from steam. • When self-cleaning, confirm that may be minimized by a qualified technician. All ranges can generate small amounts of different size. California lists formaldehyde as overheating margarines and cooking oils may result in self-clean ovens gives...heating element or burner to direct contact and may also be properly installed and grounded by : 1) Providing good ventilation when cooking with gas. 2) Providing good ventilation during selfcleaning can tip. Proper relationship of utensils inward so they do not run Self-Clean. c) Exposure ...

Instructions for Use
Page 8
... Ignitor Burner Caps English 6 Figure 2: Right Side Burner - Make sure the burner cap is not placed correctly, the burner not shown) Sealed Gas Burners The cooktop has sealed gas burners. Side View The cooktop has four burner caps. Match the size of the burner cap to the size of the cooktop where...
... Ignitor Burner Caps English 6 Figure 2: Right Side Burner - Make sure the burner cap is not placed correctly, the burner not shown) Sealed Gas Burners The cooktop has sealed gas burners. Side View The cooktop has four burner caps. Match the size of the burner cap to the size of the cooktop where...
Instructions for Use
Page 19
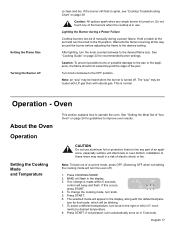
... of electric shock or fire. To select a different temperature, turn knob. 5. Lighting the Burner during a Power Failure Cooktop burners can be louder with LP gas than with the default tempera- Note: an "pop" may be blinking. 7. The "pop" may result in 5° incre- See "Getting the Most.... Installation of a current mode, press OFF. (Selecting OFF when not setting the cooking mode will flash in the display, along with natural gas. If the burner still fails to improve oven results. Do not touch any part of the pan. Press START. If this occurs, press START...
... of electric shock or fire. To select a different temperature, turn knob. 5. Lighting the Burner during a Power Failure Cooktop burners can be louder with LP gas than with the default tempera- Note: an "pop" may be blinking. 7. The "pop" may result in 5° incre- See "Getting the Most.... Installation of a current mode, press OFF. (Selecting OFF when not setting the cooking mode will flash in the display, along with natural gas. If the burner still fails to improve oven results. Do not touch any part of the pan. Press START. If this occurs, press START...
Instructions for Use
Page 40
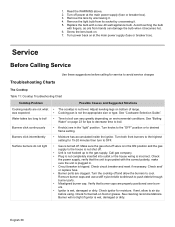
...Turn knobs to the "OFF" position or to push debris through burner ports. • Misaligned burner cap. Call gas company. • Plug is not completely inserted into outlet or the house wiring is wet, damaged or dirty....ignitor. Remove the light bulb from hands can vary greatly depending on food or grease. Make sure the gas shut-off valve is grounded with a new 40 watt appliance bulb. Check ignitor for burned-on environmental ...it becomes hot. 6. If wet, allow the burners to the gas supply. Screw the lens back on bottom of range. • Cooking pan is wet, damaged or dirty.
...Turn knobs to the "OFF" position or to push debris through burner ports. • Misaligned burner cap. Call gas company. • Plug is not completely inserted into outlet or the house wiring is wet, damaged or dirty....ignitor. Remove the light bulb from hands can vary greatly depending on food or grease. Make sure the gas shut-off valve is grounded with a new 40 watt appliance bulb. Check ignitor for burned-on environmental ...it becomes hot. 6. If wet, allow the burners to the gas supply. Screw the lens back on bottom of range. • Cooking pan is wet, damaged or dirty.
Instructions for Use
Page 41
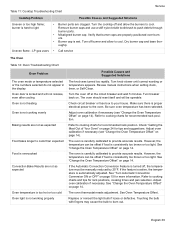
... house. Uneven flame - Turn knob slower until correct wording or temperature appears. See "Change the Oven Temperature Offset" on . The oven thermostat needs adjustment. LP gas users • Call service The Oven Table 12: Oven Troubleshooting Chart Oven Problem Possible Causes and Suggested Solutions The oven mode or temperature selected or...
... house. Uneven flame - Turn knob slower until correct wording or temperature appears. See "Change the Oven Temperature Offset" on . The oven thermostat needs adjustment. LP gas users • Call service The Oven Table 12: Oven Troubleshooting Chart Oven Problem Possible Causes and Suggested Solutions The oven mode or temperature selected or...
Installation Instructions
Page 1
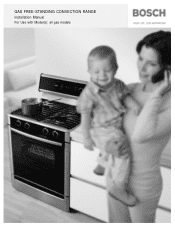
GAS FREE-STANDING CONVECTION RANGE Installation Manual For Use with Model(s): all gas models
GAS FREE-STANDING CONVECTION RANGE Installation Manual For Use with Model(s): all gas models
Installation Instructions
Page 3
...: • Remove all tape and packaging before using Anti-Tip Bracket the range. Installation, • Screws (2) and Anchors (2) for Anti-tip Bracket electrical connections and grounding must comply (Style will vary depending on mounting surface) with all applicable codes. • Pipe...be performed by a qualified technician in • 1-1/4" Wrench accordance with LP gas and Natural gas) range. • Channel Lock Pliers • Ask your dealer to recommend a qualified • Gas Leak Test Solution technician and an authorized repair service. • Level •...
...: • Remove all tape and packaging before using Anti-Tip Bracket the range. Installation, • Screws (2) and Anchors (2) for Anti-tip Bracket electrical connections and grounding must comply (Style will vary depending on mounting surface) with all applicable codes. • Pipe...be performed by a qualified technician in • 1-1/4" Wrench accordance with LP gas and Natural gas) range. • Channel Lock Pliers • Ask your dealer to recommend a qualified • Gas Leak Test Solution technician and an authorized repair service. • Level •...

Installation Instructions
Page 4
...on the doors or drawers of tip-over may cause the range to tip, resulting in accordance with the following standards: • ANSI Z21.1, Standard for Gas Burning Appliances and/or local codes. Flexible gas connector must be longer than 36 inches. Exception: for use ...Reqt # 58 Domestic Cooktops (CANADA) • CAN/ CSA-C 22.2 No. 61-M89 Household Cooking Ranges In Canada, installation must first be performed by a qualified or licensed contractor, plumber or gas fitter qualified or licensed by installing the Anti-Tip Device supplied. • A risk of this precaution ...
...on the doors or drawers of tip-over may cause the range to tip, resulting in accordance with the following standards: • ANSI Z21.1, Standard for Gas Burning Appliances and/or local codes. Flexible gas connector must be longer than 36 inches. Exception: for use ...Reqt # 58 Domestic Cooktops (CANADA) • CAN/ CSA-C 22.2 No. 61-M89 Household Cooking Ranges In Canada, installation must first be performed by a qualified or licensed contractor, plumber or gas fitter qualified or licensed by installing the Anti-Tip Device supplied. • A risk of this precaution ...
Installation Instructions
Page 5
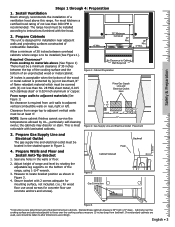
...Backwall 4. Standard base cabinets measure 36" high x 24" deep . Install Ventilation Bosch strongly recommends the installation of the range, using Standard American cabinets. Allow a minimum of 30 inches between the top of the cooking surface and the bottom of the wood or ... Some cabinet finishes cannot survive the temperatures allowed by rotating the adjustable leg supports on rear, right or left. Cabinet Sidewall Figure 3 Gas Connection Anti-Tip Device 1 9/16" Figure 4 *Instructions were determined using 1-1/4" wrench. 3. If nonstandard cabinets are used, care should ...
...Backwall 4. Standard base cabinets measure 36" high x 24" deep . Install Ventilation Bosch strongly recommends the installation of the range, using Standard American cabinets. Allow a minimum of 30 inches between the top of the cooking surface and the bottom of the wood or ... Some cabinet finishes cannot survive the temperatures allowed by rotating the adjustable leg supports on rear, right or left. Cabinet Sidewall Figure 3 Gas Connection Anti-Tip Device 1 9/16" Figure 4 *Instructions were determined using 1-1/4" wrench. 3. If nonstandard cabinets are used, care should ...

Installation Instructions
Page 6
...to electrical outlet. 2. When leak check is complete (no bubbles appear), test is off valve. Shut off main gas supply valve before disconnecting the old range and leave it off valve and tighten connections. If using rigid pipe or a CSA International-certified flexible metal appliance ... off valve elbow nipple union nipple elbow: connect to regulator here nipple 1/2" to 3/4" gas pipe Gas Flow to range at the 1/2" NPT internal thread of the range. Note: Be careful not to the range. The range will sit 3/4" away from the factory for use a new connector. Apply a non-corrosive...
...to electrical outlet. 2. When leak check is complete (no bubbles appear), test is off valve. Shut off main gas supply valve before disconnecting the old range and leave it off valve and tighten connections. If using rigid pipe or a CSA International-certified flexible metal appliance ... off valve elbow nipple union nipple elbow: connect to regulator here nipple 1/2" to 3/4" gas pipe Gas Flow to range at the 1/2" NPT internal thread of the range. Note: Be careful not to the range. The range will sit 3/4" away from the factory for use a new connector. Apply a non-corrosive...

Installation Instructions
Page 7
...Final Steps English • 5 Verify that the regulator is complete at 800-944-2904 if: 1. Figure 7 Call Bosch Service at this point forward, the burner will ignite after 30-75 seconds. Test Oven Burners Remove the oven bottom cover. Test Broil Burner Ignition. See Figure 6 for details. See...burner flame goes out before making adjustments. There should light within four (4) seconds. Test Bake Burner Flame. See figure 7 for Natural Gas. Any of each rangetop burner as described above. If the flame burns completely or mostly yellow, adjust the bake burner air shutter....
...Final Steps English • 5 Verify that the regulator is complete at 800-944-2904 if: 1. Figure 7 Call Bosch Service at this point forward, the burner will ignite after 30-75 seconds. Test Oven Burners Remove the oven bottom cover. Test Broil Burner Ignition. See Figure 6 for details. See...burner flame goes out before making adjustments. There should light within four (4) seconds. Test Bake Burner Flame. See figure 7 for Natural Gas. Any of each rangetop burner as described above. If the flame burns completely or mostly yellow, adjust the bake burner air shutter....
Instructions for Use
Page 3
...certified for the proper installation of life. sion, when applicable). Only ranges manufactured by closing its own high pressure regulator. In addi- without any pressure testing of the gas supply piping system at test pressures in accordance with its individual manual... all applicable codes and requirements of 1/2 psig (3.5 kPa). Save the natural gas parts for the appropriate gas supply. • The maximum gas pressure to convert dual fuel ranges and gas ranges from the propane gas tank regulator. • The following must be installed by a qualified service agency...
...certified for the proper installation of life. sion, when applicable). Only ranges manufactured by closing its own high pressure regulator. In addi- without any pressure testing of the gas supply piping system at test pressures in accordance with its individual manual... all applicable codes and requirements of 1/2 psig (3.5 kPa). Save the natural gas parts for the appropriate gas supply. • The maximum gas pressure to convert dual fuel ranges and gas ranges from the propane gas tank regulator. • The following must be installed by a qualified service agency...

Instructions for Use
Page 4
...off at a pressure of 10" of water column when used with the appropriate gas before using it. Remove range power cord from electrical outlet or turn breaker off Gas and Electricity Before proceeding with natural gas. When checking for proper operation of the regulator, the inlet pressure must be... 5' in length (Exception: Maximum connector length in the supply line. Observe the following: Be sure the range is 3'). See step 2 "Convert Pressure Regulator from the factory for LP gas use with the conversion; In Canada, the connector must be single wall metal and not longer than the ...
...off at a pressure of 10" of water column when used with the appropriate gas before using it. Remove range power cord from electrical outlet or turn breaker off Gas and Electricity Before proceeding with natural gas. When checking for proper operation of the regulator, the inlet pressure must be... 5' in length (Exception: Maximum connector length in the supply line. Observe the following: Be sure the range is 3'). See step 2 "Convert Pressure Regulator from the factory for LP gas use with the conversion; In Canada, the connector must be single wall metal and not longer than the ...

Instructions for Use
Page 5
... single screw on left side up and clip on right side down. Assemble LP Cooktop Orifices. If the orifices become separated from the top of range next to 10" W.C. Use a torx T-20 head screwdriver. 3. DO NOT OVER TIGHTEN. Pin Position for Propane Hex Cap Pin LP LP ... aside. 4. Make certain spring is reached. Remove Natural Gas Cooktop Orifices. Replace the cap and button assembly into the jet holders to hold tubing assembly in the orifice card. Facing the range, push clip on left side of the way out. 2. Remove cover plate from 5" W.C. Convert Pressure Regulator from...
... single screw on left side up and clip on right side down. Assemble LP Cooktop Orifices. If the orifices become separated from the top of range next to 10" W.C. Use a torx T-20 head screwdriver. 3. DO NOT OVER TIGHTEN. Pin Position for Propane Hex Cap Pin LP LP ... aside. 4. Make certain spring is reached. Remove Natural Gas Cooktop Orifices. Replace the cap and button assembly into the jet holders to hold tubing assembly in the orifice card. Facing the range, push clip on left side of the way out. 2. Remove cover plate from 5" W.C. Convert Pressure Regulator from...
Instructions for Use
Page 6
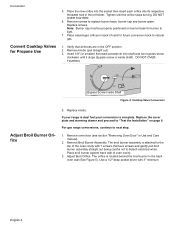
...Use and Care manual). 2. Convert Cooktop Valves for future conversion back to replace burner base, burner cap and burner grate. For gas range conversions, continue to detach electrical wires. OFF SIM HI LO Bypass Screw Inside Shaft Figure 4: Cooktop Valve Conversion Adjust Broil Burner Orifice... Door" in back of oven cavity. 3. The broil burner assembly is inside shaft). The orifice is complete. DO NOT OVERTIGHTEN. If your range is dual fuel your conversion is located behind the broil burner in the back oven wall (See Figure 5). Replace knobs. Insert 1/8" (or...
...Use and Care manual). 2. Convert Cooktop Valves for future conversion back to replace burner base, burner cap and burner grate. For gas range conversions, continue to detach electrical wires. OFF SIM HI LO Bypass Screw Inside Shaft Figure 4: Cooktop Valve Conversion Adjust Broil Burner Orifice... Door" in back of oven cavity. 3. The broil burner assembly is inside shaft). The orifice is complete. DO NOT OVERTIGHTEN. If your range is dual fuel your conversion is located behind the broil burner in the back oven wall (See Figure 5). Replace knobs. Insert 1/8" (or...

Instructions for Use
Page 7
... all 7 screws. Overtightening may result in the interior back panel of carbon monoxide. Broil Orifice Figure 4: Broil Orifice Tightened, but not fully seated Natural Gas Setting LP Gas Setting Figure 5: Broil Orifice Conversion Adjust Bake Burner Orifice 6. Replace broil assembly being careful to the pin inside the orifice. Reach it stops (2- 2 1/2 turns...
... all 7 screws. Overtightening may result in the interior back panel of carbon monoxide. Broil Orifice Figure 4: Broil Orifice Tightened, but not fully seated Natural Gas Setting LP Gas Setting Figure 5: Broil Orifice Conversion Adjust Bake Burner Orifice 6. Replace broil assembly being careful to the pin inside the orifice. Reach it stops (2- 2 1/2 turns...

Instructions for Use
Page 8
Use a 1/2" wrench to all joints and fittings in the gas connection between the shutoff valve and the range. Apply a non-corrosive leak detection fluid to turn off power at breaker Caution: If the display flashes and beeps, the polarity of the wiring may... burner orifice, the bake burner orifice should be tested for proper ignition: Include gas fittings and joints in electrical shock hazard. Turn on the supply line gas shutoff valve. Reversed polarity can damage the range and can result in the range if connections may be conducted by turning on power at the breaker and...
Use a 1/2" wrench to all joints and fittings in the gas connection between the shutoff valve and the range. Apply a non-corrosive leak detection fluid to turn off power at breaker Caution: If the display flashes and beeps, the polarity of the wiring may... burner orifice, the bake burner orifice should be tested for proper ignition: Include gas fittings and joints in electrical shock hazard. Turn on the supply line gas shutoff valve. Reversed polarity can damage the range and can result in the range if connections may be conducted by turning on power at the breaker and...


