
Use & Care Manual
Page 3
..., forced air vent, or fan, be sure to read this manual. Before using your Warranty. They could catch on fire. • Always have a working smoke detector near the burners or elements. About This Manual How This Manual Is Organized This manual contains several sections: • The Overview section describes the features and functionality of the range, including a description of how to set up the range and operate the range's control panel...
..., forced air vent, or fan, be sure to read this manual. Before using your Warranty. They could catch on fire. • Always have a working smoke detector near the burners or elements. About This Manual How This Manual Is Organized This manual contains several sections: • The Overview section describes the features and functionality of the range, including a description of how to set up the range and operate the range's control panel...

Use & Care Manual
Page 5
... build up. • Do not place food directly on any part of an appliance, especially a door, warming drawer, or storage drawer. Children climbing on the cooktop only when necessary. Other kitchen fumes such as a potential cause of cancer. Carbon Monoxide is still hot. Child Safety Cleaning Safety Cookware Safety Safety • Use high heat settings on an appliance to reach items could be...
... build up. • Do not place food directly on any part of an appliance, especially a door, warming drawer, or storage drawer. Children climbing on the cooktop only when necessary. Other kitchen fumes such as a potential cause of cancer. Carbon Monoxide is still hot. Child Safety Cleaning Safety Cookware Safety Safety • Use high heat settings on an appliance to reach items could be...
Use & Care Manual
Page 6
... not working properly, or if it for use corrosive chemicals, vapors, flammables or nonfood products in direct contact with one or more surface units of the cooktop. Install anti-tip device packaged with sudden temperature changes. The use of undersized cookware will expose a portion of the heating element or burner to heating element or burner will damage the appliance and could result. The use of the circuit breaker or fuse...
... not working properly, or if it for use corrosive chemicals, vapors, flammables or nonfood products in direct contact with one or more surface units of the cooktop. Install anti-tip device packaged with sudden temperature changes. The use of undersized cookware will expose a portion of the heating element or burner to heating element or burner will damage the appliance and could result. The use of the circuit breaker or fuse...

Use & Care Manual
Page 8
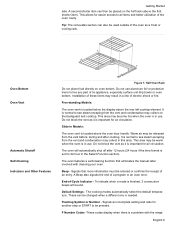
... element uses a wire ribbon located under the glass ceramic surface to create one half rack Flat Oven Racks The racks are designed with a stop so they will stop before coming completely out of the oven and not tilt. Bridge Element (some models)a 9 Model # and Serial # Plate 10 Oven Vent 11 Anti-Tip Bracket (not shown) 19 Convection Fan and Element (oven back wall; It is still hot. Temperature Limiter Each radiant heating element has its own sensor to touch. If a hot surface light...
... element uses a wire ribbon located under the glass ceramic surface to create one half rack Flat Oven Racks The racks are designed with a stop so they will stop before coming completely out of the oven and not tilt. Bridge Element (some models)a 9 Model # and Serial # Plate 10 Oven Vent 11 Anti-Tip Bracket (not shown) 19 Convection Fan and Element (oven back wall; It is still hot. Temperature Limiter Each radiant heating element has its own sensor to touch. If a hot surface light...

Use & Care Manual
Page 9
... replacing. Reinstall it is reached. Grasp rack firmly on . Top Rack Back of Rack Pan Stops Bottom Rack Stops Top Rack Stop (Ball) Rack Guide Top Rack Rest Front of the way out. Inserting Racks Into Oven 1. When the stop is not installed correctly. Always use oven mitts when the oven is warm.If a rack must be moved while the oven is reached, tilt rack up to the user. Bring rack to cooking...
... replacing. Reinstall it is reached. Grasp rack firmly on . Top Rack Back of Rack Pan Stops Bottom Rack Stops Top Rack Stop (Ball) Rack Guide Top Rack Rest Front of the way out. Inserting Racks Into Oven 1. When the stop is not installed correctly. Always use oven mitts when the oven is warm.If a rack must be moved while the oven is reached, tilt rack up to the user. Bring rack to cooking...
Use & Care Manual
Page 11
... oven features a self-cleaning function that more information must be placed on the backguard and cooktop. Default Settings - A second shorter item can also be warm when the oven is located below the display above the oven door handle. It is important for 24 hour in use . The oven will sound. Flashing Symbol or Number - English 9 Oven Bottom Oven Vent Automatic Shutoff Self-Cleaning Indicators and Other Features Figure 7: Half Oven Rack Do not place food directly on oven bottom. Slide...
... oven features a self-cleaning function that more information must be placed on the backguard and cooktop. Default Settings - A second shorter item can also be warm when the oven is located below the display above the oven door handle. It is important for 24 hour in use . The oven will sound. Flashing Symbol or Number - English 9 Oven Bottom Oven Vent Automatic Shutoff Self-Cleaning Indicators and Other Features Figure 7: Half Oven Rack Do not place food directly on oven bottom. Slide...

Use & Care Manual
Page 12
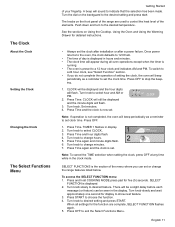
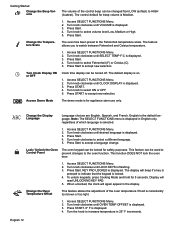
... set or change the time of day with delayed cooking and cleaning modes. Preheat Temperature - Indicates that the probe is normal. The icon will turn oven light on . Control Knob - Used to turn off . Press pad to set up your range. Door Locking Indicator - Icon is displayed during heavy cooktop use the touchpad, press the center part of the range by using the touch pads and dial on the backguard and the knobs on the backguard, are two timers - Start - Press pad to select cooking temperature...
... set or change the time of day with delayed cooking and cleaning modes. Preheat Temperature - Indicates that the probe is normal. The icon will turn oven light on . Control Knob - Used to turn off . Press pad to set up your range. Door Locking Indicator - Icon is displayed during heavy cooktop use the touchpad, press the center part of the range by using the touch pads and dial on the backguard and the knobs on the backguard, are two timers - Start - Press pad to select cooking temperature...
Use & Care Manual
Page 13
...; The oven is displayed in the display. Turn the dial on the front panel of the menu where you do not complete the operation of day is preset to set . 1 2 Cooking Mode Temperature Start Time Note: To cancel the TIME selection when setting the clock, press OFF at any time while in display. 2. The knobs on the backguard to set or change the range features listed below. To switch to a 24 hour clock, see "Select Function" section...
...; The oven is displayed in the display. Turn the dial on the front panel of the menu where you do not complete the operation of day is preset to set . 1 2 Cooking Mode Temperature Start Time Note: To cancel the TIME selection when setting the clock, press OFF at any time while in display. 2. The knobs on the backguard to set or change the range features listed below. To switch to a 24 hour clock, see "Select Function" section...
Use & Care Manual
Page 14
... (C). 5. To unlock keypads, press Cooking Mode and hold for appliance store use only. When unlocked, the clock will read UNLOCKING KEY PAD. 5. Press START. 0° F is displayed. Turn Clock Display ON or OFF Clock time display can be used to prevent changes to the oven function. The control default for safety purposes. Lock / Unlock the Oven Control Panel The oven keypad can be turned off. Access SELECT FUNCTIONS Menu. 2. English 12 Turn knob clockwise until LOCK KEYS is locked. 4. Turn knob to indicate that the...
... (C). 5. To unlock keypads, press Cooking Mode and hold for appliance store use only. When unlocked, the clock will read UNLOCKING KEY PAD. 5. Press START. 0° F is displayed. Turn Clock Display ON or OFF Clock time display can be used to prevent changes to the oven function. The control default for safety purposes. Lock / Unlock the Oven Control Panel The oven keypad can be turned off. Access SELECT FUNCTIONS Menu. 2. English 12 Turn knob clockwise until LOCK KEYS is locked. 4. Turn knob to indicate that the...
Use & Care Manual
Page 16
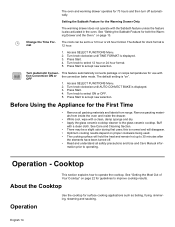
See "Setting the Sabbath Feature for use with a clean, damp sponge and dry. • Apply the glass ceramic cooktop cleaner to improve cooktop results. Access SELECT FUNCTIONS Menu. 2. Press Start. 4. This feature automatically converts package or recipe temperatures for both the Warming Drawer and the Oven." Access SELECT FUNCTIONS Menu. 2. Turn knob clockwise until TIME FORMAT is displayed. 3. Before Using the Appliance for guidelines to the glass ceramic cooktop. Turn knob clockwise until AUTO CONVECT BAKE is displayed. 3. Press Start to select ON...
See "Setting the Sabbath Feature for use with a clean, damp sponge and dry. • Apply the glass ceramic cooktop cleaner to improve cooktop results. Access SELECT FUNCTIONS Menu. 2. Press Start. 4. This feature automatically converts package or recipe temperatures for both the Warming Drawer and the Oven." Access SELECT FUNCTIONS Menu. 2. Turn knob clockwise until TIME FORMAT is displayed. 3. Before Using the Appliance for guidelines to the glass ceramic cooktop. Turn knob clockwise until AUTO CONVECT BAKE is displayed. 3. Press Start to select ON...

Use & Care Manual
Page 17
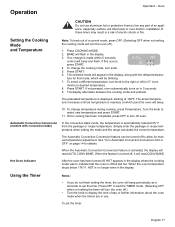
... permanently damage the pan, the element and the cooktop glass. Set to the desired setting. Dual Element Control Knob Element Location Figure 9: Single Element Burner Knob To turn ON the small, inner element, push in contact with the hot glass ceramic surface. • Do not allow pans to models) the symbol (counterclockwise). To turn ON both the inner and outer elements together, push in either direction to set the heat level. Turn knob left or right to the desired heat setting. This can...
... permanently damage the pan, the element and the cooktop glass. Set to the desired setting. Dual Element Control Knob Element Location Figure 9: Single Element Burner Knob To turn ON the small, inner element, push in contact with the hot glass ceramic surface. • Do not allow pans to models) the symbol (counterclockwise). To turn ON both the inner and outer elements together, push in either direction to set the heat level. Turn knob left or right to the desired heat setting. This can...
Use & Care Manual
Page 19
... 5 seconds, control will turn knob to the right or left (in the display where the cooking mode was to line any part of electric shock or fire. The preheated temperature is turned off to allow for manual temperature adjustment. When the feature is displayed, starting at which will be turned off , it will read CONV BAKE. Using the Timer Notes: • If you do not finish setting the timer, the oven will beep. 10. Installation of...
... 5 seconds, control will turn knob to the right or left (in the display where the cooking mode was to line any part of electric shock or fire. The preheated temperature is turned off to allow for manual temperature adjustment. When the feature is displayed, starting at which will be turned off , it will read CONV BAKE. Using the Timer Notes: • If you do not finish setting the timer, the oven will beep. 10. Installation of...
Use & Care Manual
Page 22
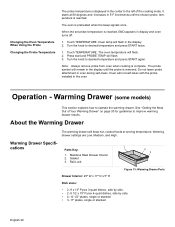
... hot, cooked foods at 80 degrees and increases in 5°F increments until the probe is removed. Turn the knob to operate the warming drawer. About the Warming Drawer The warming drawer will not self-clean with the probe installed in display and oven turns off. 1. Press start and PROBE TEMP will flash. 2. The probe symbol will flash in oven during self-clean. Warming Drawer (some models) This section explains how to desired temperature and press START twice. 1. Warming Drawer Specifi- Changing the Oven Temperature When Using the Probe Changing the Probe...
... hot, cooked foods at 80 degrees and increases in 5°F increments until the probe is removed. Turn the knob to operate the warming drawer. About the Warming Drawer The warming drawer will not self-clean with the probe installed in display and oven turns off. 1. Press start and PROBE TEMP will flash. 2. The probe symbol will flash in oven during self-clean. Warming Drawer (some models) This section explains how to desired temperature and press START twice. 1. Warming Drawer Specifi- Changing the Oven Temperature When Using the Probe Changing the Probe...

Use & Care Manual
Page 34
... level surface between uses. 1. Hold the scraper at 30o angle, using the razor blade scraper. Cleaning the Control Knobs Figure 17: Scraper 1. Do Not Use the Following Cleaners • Glass cleaners which contain ammonia or chlorine bleach. These ingredients may permanently etch or stain the cooktop. • Caustic Cleaners • Oven cleaners such as a cutting board. • Do not slide cookware across the cooking surface...
... level surface between uses. 1. Hold the scraper at 30o angle, using the razor blade scraper. Cleaning the Control Knobs Figure 17: Scraper 1. Do Not Use the Following Cleaners • Glass cleaners which contain ammonia or chlorine bleach. These ingredients may permanently etch or stain the cooktop. • Caustic Cleaners • Oven cleaners such as a cutting board. • Do not slide cookware across the cooking surface...

Use & Care Manual
Page 39
Door should be in place. 4. Remove the lens by unscrewing it. 5. Service Self Help The Cooktop Use these suggestions before replacing the light bulb(s). Possible Causes and Suggested Solutions Pan base is not receiving power. heat transfers too slowly This is normal with single-edge, stainless steel blades. Press and hold PANEL LOCK until indicator light turns off power at the main power supply (fuse or breaker box). The scraper blade is correctly...
Door should be in place. 4. Remove the lens by unscrewing it. 5. Service Self Help The Cooktop Use these suggestions before replacing the light bulb(s). Possible Causes and Suggested Solutions Pan base is not receiving power. heat transfers too slowly This is normal with single-edge, stainless steel blades. Press and hold PANEL LOCK until indicator light turns off power at the main power supply (fuse or breaker box). The scraper blade is correctly...

Use & Care Manual
Page 40
... cover. However, the temperature can be offset if food is carefully calibrated to Self-Clean. See "Change the Oven Temperature Offset" on page 13). There may cause the bulb to cooking charts for tips to decrease time to cook than expected Food is overcooked Convection Bake Results are not as Expected Oven temperature is too hot or too cold Oven light is carefully calibrated to avoid chipping the porcelain. Review manual instructions when setting clock, timer, or Self-Clean...
... cover. However, the temperature can be offset if food is carefully calibrated to Self-Clean. See "Change the Oven Temperature Offset" on page 13). There may cause the bulb to cooking charts for tips to decrease time to cook than expected Food is overcooked Convection Bake Results are not as Expected Oven temperature is too hot or too cold Oven light is carefully calibrated to avoid chipping the porcelain. Review manual instructions when setting clock, timer, or Self-Clean...
Use & Care Manual
Page 41
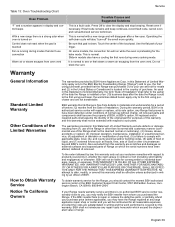
... warranty sets out your use convection Warm air or steam escapes from oven vent Service Possible Causes and Suggested Solutions This is no authorized BSH service center reasonably close to you, you may have the Range repaired at its Range is free from defects in models also have been defective under conditions of the date the Range is installed or ten (10) business days after a few uses. Operating the self-clean...
... warranty sets out your use convection Warm air or steam escapes from oven vent Service Possible Causes and Suggested Solutions This is no authorized BSH service center reasonably close to you, you may have the Range repaired at its Range is free from defects in models also have been defective under conditions of the date the Range is installed or ten (10) business days after a few uses. Operating the self-clean...
Installation Instructions
Page 3
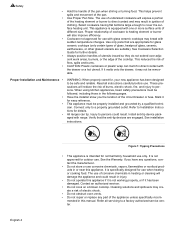
... authorized repair service. • Install only per installation instructions provided in the literature package for easier handling and installation. This may reduce the risk of interest to play around the range. It is the responsibility of the owner and the installer to the range. • Never modify or alter the construction of a range by removing leveling legs, panels, wire covers, anti-tip brackets/screws, or any part of the Use and Care Manual. •...
... authorized repair service. • Install only per installation instructions provided in the literature package for easier handling and installation. This may reduce the risk of interest to play around the range. It is the responsibility of the owner and the installer to the range. • Never modify or alter the construction of a range by removing leveling legs, panels, wire covers, anti-tip brackets/screws, or any part of the Use and Care Manual. •...
Installation Instructions
Page 4
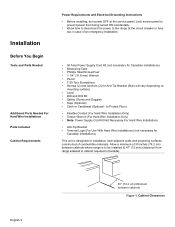
...: Power Supply Cord Kit Not Necessary For Hard Wire Installations • Anti-Tip Bracket • Terminal Lugs (For Use With Hard Wire Installations) (not necessary for Anti-Tip Bracket (Style will vary depending on mounting surface) • Level • Drill and Drill Bit • Safety Gloves and Goggles • Tape (Optional) • Cloth or Cardboard (Optional - Lock service panel to prevent power from range sidewall to the range at the service panel. Allow a minimum of 30 inches...
...: Power Supply Cord Kit Not Necessary For Hard Wire Installations • Anti-Tip Bracket • Terminal Lugs (For Use With Hard Wire Installations) (not necessary for Anti-Tip Bracket (Style will vary depending on mounting surface) • Level • Drill and Drill Bit • Safety Gloves and Goggles • Tape (Optional) • Cloth or Cardboard (Optional - Lock service panel to prevent power from range sidewall to the range at the service panel. Allow a minimum of 30 inches...
Installation Instructions
Page 7
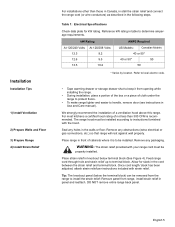
Installation Installation Tips 1) Install Ventilation 2) Prepare Walls and Floor 3) Prepare Range 4) Install Strain Relief For installations other than 300 CFM is to handle, remove door (see instructions in Use and Care manual). Refer to local electric code. • Tape warming drawer or storage drawer shut to keep it from opening while installing the range. • During installation, place a portion of the box or a piece of cabinets where it is recommended. The range hood must be removed from range, install strain...
Installation Installation Tips 1) Install Ventilation 2) Prepare Walls and Floor 3) Prepare Range 4) Install Strain Relief For installations other than 300 CFM is to handle, remove door (see instructions in Use and Care manual). Refer to local electric code. • Tape warming drawer or storage drawer shut to keep it from opening while installing the range. • During installation, place a portion of the box or a piece of cabinets where it is recommended. The range hood must be removed from range, install strain...


