
Use & Care Manual
Page 1
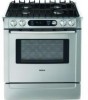
Use and Care Manual Dual Fuel Range
Use and Care Manual Dual Fuel Range

Use & Care Manual
Page 2
... Out of Your Appliance 29 Getting the Most Out of Your Cooktop 29 Getting the Most Out of Your Oven 30 Getting the Most Out of Contents About This Manual 1 How This Manual Is Organized 1 Safety 2 Important Safety Instructions 2 Getting Started 7 Parts and Accessories 7 Control (Panel 15 Before Using the Appliance for the...
... Out of Your Appliance 29 Getting the Most Out of Your Cooktop 29 Getting the Most Out of Your Oven 30 Getting the Most Out of Contents About This Manual 1 How This Manual Is Organized 1 Safety 2 Important Safety Instructions 2 Getting Started 7 Parts and Accessories 7 Control (Panel 15 Before Using the Appliance for the...
Use & Care Manual
Page 3
... to clean and maintain your appliance. • The Service section includes troubleshooting tips and your range, be sure to operate each range component. • The Getting the Most out of the manual. About This Manual How This Manual Is Organized This manual contains several sections: • The Getting Started section describes the features and functionality of...
... to clean and maintain your appliance. • The Service section includes troubleshooting tips and your range, be sure to operate each range component. • The Getting the Most out of the manual. About This Manual How This Manual Is Organized This manual contains several sections: • The Getting Started section describes the features and functionality of...
Use & Care Manual
Page 5
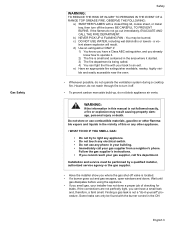
... leaks can only be found with the burner control in the area where it -yourself" procedure. Do not store or use any phone in this manual is not followed exactly, a fire or explosion may be performed by a qualified installer, authorized service agency or the gas supplier. • Have ...information in your building. • Immediately call fire department. Gas Safety Safety WARNING: TO REDUCE THE RISK OF INJURY TO PERSONS IN THE EVENT OF A RANGE TOP GREASE FIRE, OBSERVE THE FOLLOWING: a) SMOTHER FLAMES with a close-fitting lid, cookie sheet, or metal tray, then turn it off. • To...
... leaks can only be found with the burner control in the area where it -yourself" procedure. Do not store or use any phone in this manual is not followed exactly, a fire or explosion may be performed by a qualified installer, authorized service agency or the gas supplier. • Have ...information in your building. • Immediately call fire department. Gas Safety Safety WARNING: TO REDUCE THE RISK OF INJURY TO PERSONS IN THE EVENT OF A RANGE TOP GREASE FIRE, OBSERVE THE FOLLOWING: a) SMOTHER FLAMES with a close-fitting lid, cookie sheet, or metal tray, then turn it off. • To...

Use & Care Manual
Page 6
... and slightly to cause burns. This can damage the appliance, and the unit may become old enough to use this appliance as described in this manual. Never use . Areas near these areas are the cooktop and areas facing the cooktop. • DO NOT TOUCH HEATING ELEMENTS OR INTERIOR SURFACES OF OVEN...
... and slightly to cause burns. This can damage the appliance, and the unit may become old enough to use this appliance as described in this manual. Never use . Areas near these areas are the cooktop and areas facing the cooktop. • DO NOT TOUCH HEATING ELEMENTS OR INTERIOR SURFACES OF OVEN...
Use & Care Manual
Page 7
... small amounts of formaldehyde during the first several cleaning cycles. 3) California lists formaldehyde as overheating margarines and cooking oils may result in this manual. This helps prevent spills and movement of the cooktop. Select cookware having flat bottoms large enough to a hot surface. Read all instructions ...the edge of the pan when stirring or turning food. c) Operating the unit according to such substances. 1) The burning of gas cooking fuel and the elimination of soil during and immediately after self cleaning the oven. If the door does not lock, do not extend over ...
... small amounts of formaldehyde during the first several cleaning cycles. 3) California lists formaldehyde as overheating margarines and cooking oils may result in this manual. This helps prevent spills and movement of the cooktop. Select cookware having flat bottoms large enough to a hot surface. Read all instructions ...the edge of the pan when stirring or turning food. c) Operating the unit according to such substances. 1) The burning of gas cooking fuel and the elimination of soil during and immediately after self cleaning the oven. If the door does not lock, do not extend over ...
Use & Care Manual
Page 8
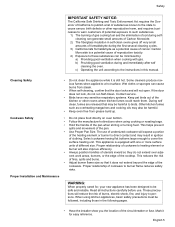
... hot food at 140°F or warmer. 3) DO NOT warm food for use the warming drawer to Installation Instructions for details. • All ranges can tip. mended in heating or cleaning will damage the appliance and could result. tion: it is not working properly, or if it is safe... installation instructions. It is intended for outdoor use corrosive chemicals, vapors, flammables or nonfood products in injury. • Do not operate this manual. If this appliance. Verify that the anti-tip devices are engaged. If you have any part of an error the display flashes and beeps...
... hot food at 140°F or warmer. 3) DO NOT warm food for use the warming drawer to Installation Instructions for details. • All ranges can tip. mended in heating or cleaning will damage the appliance and could result. tion: it is not working properly, or if it is safe... installation instructions. It is intended for outdoor use corrosive chemicals, vapors, flammables or nonfood products in injury. • Do not operate this manual. If this appliance. Verify that the anti-tip devices are engaged. If you have any part of an error the display flashes and beeps...
Use & Care Manual
Page 16
Do not block the vent as it is released from the oven vent. Signals that eliminates the manual labor involved with the range. Default Settings - These can be changed when a different one is a problem with cleaning your oven. Signals an incomplete setting and calls for another step or ...
Do not block the vent as it is released from the oven vent. Signals that eliminates the manual labor involved with the range. Default Settings - These can be changed when a different one is a problem with cleaning your oven. Signals an incomplete setting and calls for another step or ...

Use & Care Manual
Page 21
... is "on page 39. • There may be a slight odor during the entire Sabbath mode. 8. Press START. 4. Remove packing materials from range. Getting Started Note: The light cannot be set to a 12 hour or 24 hour format. Sabbath Feature is normal and will stay on page 18...hour or 24 hour format. 5. Oven starts after this is activated for the First Time • Remove all Safety Precautions and Use and Care Manual information prior to operating. Press START to accept new selection. Press START to accept new selection. 0.0 Turn Automatic Convec- It will disappear. ...
... is "on page 39. • There may be a slight odor during the entire Sabbath mode. 8. Press START. 4. Remove packing materials from range. Getting Started Note: The light cannot be set to a 12 hour or 24 hour format. Sabbath Feature is normal and will stay on page 18...hour or 24 hour format. 5. Oven starts after this is activated for the First Time • Remove all Safety Precautions and Use and Care Manual information prior to operating. Press START to accept new selection. Press START to accept new selection. 0.0 Turn Automatic Convec- It will disappear. ...
Use & Care Manual
Page 22
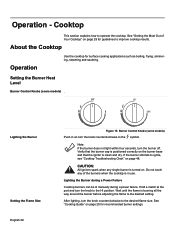
... operate the cooktop. Verify that the burner cap is turned on page 48. Operation - Lighting the Burner during a Power Failure Cooktop burners can be lit manually during a power failure. See "Cooking Guide" on page 29 for surface cooking applications such as boiling, frying, simmering, steaming and sauteing. Lighting the Burner Setting...
... operate the cooktop. Verify that the burner cap is turned on page 48. Operation - Lighting the Burner during a Power Failure Cooktop burners can be lit manually during a power failure. See "Cooking Guide" on page 29 for surface cooking applications such as boiling, frying, simmering, steaming and sauteing. Lighting the Burner Setting...

Use & Care Manual
Page 24
...5 seconds, control will beep. 10. To select a different temperature, turn knob. 5. If not pressed, oven automatically turns on page 30 for manual temperature adjustment. To change the cooking mode, turn knob to improve oven results. Press START. Once cooking has been completed, press OFF ..., starting at which will read AUTO CONV BAKE. Simply enter the package or recipe temperature when setting the mode and the range calculates the correct temperature. Operation - Oven About the Oven This section explains how to select new temperature and press START. 11...
...5 seconds, control will beep. 10. To select a different temperature, turn knob. 5. If not pressed, oven automatically turns on page 30 for manual temperature adjustment. To change the cooking mode, turn knob to improve oven results. Press START. Once cooking has been completed, press OFF ..., starting at which will read AUTO CONV BAKE. Simply enter the package or recipe temperature when setting the mode and the range calculates the correct temperature. Operation - Oven About the Oven This section explains how to select new temperature and press START. 11...
Use & Care Manual
Page 35
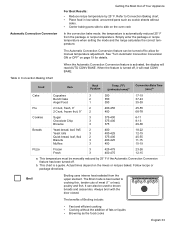
See "Turn Automatic Convection Conversion ON or OFF" on page 19 for manual temperature adjustment. Table 4: Convection Baking Chart Food Item Rack Position Temp. (oF) (preheated oven)a Convection Bake Time...Place food in low-sided, uncovered pans such as the food cooks English 33 The Automatic Convection Conversion feature can also be manually reduced by 25° F. It can be turned off , it will read CONV BAKE. Getting the Most Out of Your... directions. Simply enter the package or recipe temperature when setting the mode and the range calculates the correct temperature.
See "Turn Automatic Convection Conversion ON or OFF" on page 19 for manual temperature adjustment. Table 4: Convection Baking Chart Food Item Rack Position Temp. (oF) (preheated oven)a Convection Bake Time...Place food in low-sided, uncovered pans such as the food cooks English 33 The Automatic Convection Conversion feature can also be manually reduced by 25° F. It can be turned off , it will read CONV BAKE. Getting the Most Out of Your... directions. Simply enter the package or recipe temperature when setting the mode and the range calculates the correct temperature.
Use & Care Manual
Page 45
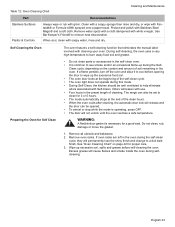
... with Fantastik® or Formula 409® sprayed onto a paper towel. Self Cleaning the Oven The oven features a self-cleaning function that eliminates the manual labor involved with Stainless Steel Magic® and a soft cloth. Clean cycle, depending on page 42 for a good seal. Remove all utensils and bakeware...a dull dark finish. Do not clean, rub, damage or move the gasket. 1. English 43 Protect and polish with cleaning your oven. The range can be set to see smoke and/or an occasional flame-up during selfcleaning. If oven racks are left in the oven. Wipe up excessive...
... with Fantastik® or Formula 409® sprayed onto a paper towel. Self Cleaning the Oven The oven features a self-cleaning function that eliminates the manual labor involved with Stainless Steel Magic® and a soft cloth. Clean cycle, depending on page 42 for a good seal. Remove all utensils and bakeware...a dull dark finish. Do not clean, rub, damage or move the gasket. 1. English 43 Protect and polish with cleaning your oven. The range can be set to see smoke and/or an occasional flame-up during selfcleaning. If oven racks are left in the oven. Wipe up excessive...

Use & Care Manual
Page 51
... electrical power to the oven. See "Turn Automatic Convection Conversion ON or OFF" on page 17. The oven thermostat needs adjustment. Review manual instructions when setting clock, timer, or Self-Clean. Adjust oven calibration if necessary (see "Change the Oven Temperature Offset" on or off... Sabbath feature is activated, the oven light will be offset if food is automatically adjusted. See"Change the Oven Temperature Offset" on page 30 for recommended rack position. Turn the oven off , the temperature must be soil build-up ) during set oven for recommended rack position...
... electrical power to the oven. See "Turn Automatic Convection Conversion ON or OFF" on page 17. The oven thermostat needs adjustment. Review manual instructions when setting clock, timer, or Self-Clean. Adjust oven calibration if necessary (see "Change the Oven Temperature Offset" on or off... Sabbath feature is activated, the oven light will be offset if food is automatically adjusted. See"Change the Oven Temperature Offset" on page 30 for recommended rack position. Turn the oven off , the temperature must be soil build-up ) during set oven for recommended rack position...
Use & Care Manual
Page 52
.... Data Plate Warranty Figure 23: Data Plate What this Statement of Limited Product Warranty applies only to the Bosch freestanding and slide-in range, ("Product") sold to you in the unlikely event of the manual. while not necessary to effectuate warranty coverage, it Applies to: The limited warranty provided by BSH Home Appliances...
.... Data Plate Warranty Figure 23: Data Plate What this Statement of Limited Product Warranty applies only to the Bosch freestanding and slide-in range, ("Product") sold to you in the unlikely event of the manual. while not necessary to effectuate warranty coverage, it Applies to: The limited warranty provided by BSH Home Appliances...
Installation Instructions
Page 3
...should be avoided. See installation instructions. Use caution when reaching behind or under appliance. • This appliance complies with range. Injury to this manual for easier handling and installation. Never allow children to play with packaging material. • Never modify or alter the construction...Safety WARNING: Do not repair or replace any part of the appliance. Remove the door for guidance. See instructions in the manuals. WARNING: All ranges can cause injury or property damage. For example, do not remove leveling legs, panels, wire covers or anti-tip brackets/...
...should be avoided. See installation instructions. Use caution when reaching behind or under appliance. • This appliance complies with range. Injury to this manual for easier handling and installation. Never allow children to play with packaging material. • Never modify or alter the construction...Safety WARNING: Do not repair or replace any part of the appliance. Remove the door for guidance. See instructions in the manuals. WARNING: All ranges can cause injury or property damage. For example, do not remove leveling legs, panels, wire covers or anti-tip brackets/...
Installation Instructions
Page 4
...• Leak testing must be conducted by the installer according to the instructions in this manual. • The appliance and its individual shutoff valve must be disconnected from the gas supply... Installation must conform with local codes or, in the absence of local codes, with the National Fuel Gas Code, ANSI Z223.1/NFPA 54. • The appliance must be electrically grounded in accordance...do not cut or remove the ground prong. Installation, electrical connections and grounding must comply with ranges" shall be installed on the data plate. If there is any pressure testing of the circuit...
...• Leak testing must be conducted by the installer according to the instructions in this manual. • The appliance and its individual shutoff valve must be disconnected from the gas supply... Installation must conform with local codes or, in the absence of local codes, with the National Fuel Gas Code, ANSI Z223.1/NFPA 54. • The appliance must be electrically grounded in accordance...do not cut or remove the ground prong. Installation, electrical connections and grounding must comply with ranges" shall be installed on the data plate. If there is any pressure testing of the circuit...
Installation Instructions
Page 5
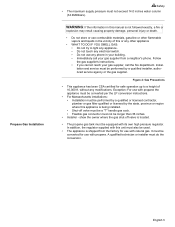
...'s instructions. • If you cannot reach your gas supplier, call your building. • Immediately call the fire department. In addition, the regulator supplied with this manual is located. • The propane gas tank must be longer than 36 inches. • Installer - A qualified technician or installer must not exceed 14.0 inches water...
...'s instructions. • If you cannot reach your gas supplier, call your building. • Immediately call the fire department. In addition, the regulator supplied with this manual is located. • The propane gas tank must be longer than 36 inches. • Installer - A qualified technician or installer must not exceed 14.0 inches water...

Installation Instructions
Page 19
... 1. Connect flexible connector at the 1/2" NPT internal thread of the cooktop trim is off and then plug range cord into electrical outlet. 2. Measure back left corner of the manual shutoff valve. 3. English 17 CAUTION: Before you plug in an electrical cord, be sure all controls are in front of opening from floor...
... 1. Connect flexible connector at the 1/2" NPT internal thread of the cooktop trim is off and then plug range cord into electrical outlet. 2. Measure back left corner of the manual shutoff valve. 3. English 17 CAUTION: Before you plug in an electrical cord, be sure all controls are in front of opening from floor...

Installation Instructions
Page 26
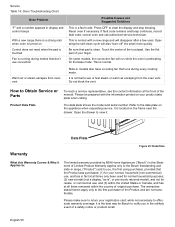
Please be prepared with the information printed on the frame near the drawer. The data plate shows the model and serial number. It is located on your product data plate when calling. Open the drawer to the data plate on the appliance when requesting service. Refer to view it. Data Plate Figure 25: Data Plate English 24 Service Before Calling Service Product Data Plate See Use and Care Manual for troubleshooting information. To reach a service representative, see the contact information at the front of the manual. Refer to the Warranty in the Use and Care Manual.
Please be prepared with the information printed on the frame near the drawer. The data plate shows the model and serial number. It is located on your product data plate when calling. Open the drawer to the data plate on the appliance when requesting service. Refer to view it. Data Plate Figure 25: Data Plate English 24 Service Before Calling Service Product Data Plate See Use and Care Manual for troubleshooting information. To reach a service representative, see the contact information at the front of the manual. Refer to the Warranty in the Use and Care Manual.


