
Use & Care Manual
Page 2
... Operation 27 Getting the Most Out of Your Appliance 29 Getting the Most Out of Your Cooktop 29 Getting the Most Out of Your Oven 30 Getting the Most Out of Contents About This Manual 1 How This Manual Is Organized 1 Safety 2 Important Safety Instructions 2 Getting Started 7 Parts and Accessories 7 Control (Panel...
... Operation 27 Getting the Most Out of Your Appliance 29 Getting the Most Out of Your Cooktop 29 Getting the Most Out of Your Oven 30 Getting the Most Out of Contents About This Manual 1 How This Manual Is Organized 1 Safety 2 Important Safety Instructions 2 Getting Started 7 Parts and Accessories 7 Control (Panel...

Use & Care Manual
Page 24
.... If not pressed, oven automatically turns on in 5° incre- Simply enter the package or recipe temperature when setting the mode and the range calculates the correct temperature. If this occurs, press START. 6: 35 PM 380 100 BAKE 4. See "Turn Automatic Convection Conversion ON or OFF" ...on page 30 for details. See "Getting the Most Out of an appliance, especially surface unit drip bowls or oven bottom. The actual temperature increases until set...
.... If not pressed, oven automatically turns on in 5° incre- Simply enter the package or recipe temperature when setting the mode and the range calculates the correct temperature. If this occurs, press START. 6: 35 PM 380 100 BAKE 4. See "Turn Automatic Convection Conversion ON or OFF" ...on page 30 for details. See "Getting the Most Out of an appliance, especially surface unit drip bowls or oven bottom. The actual temperature increases until set...
Use & Care Manual
Page 32
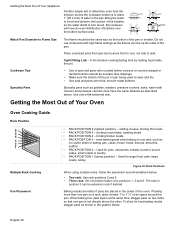
... shown in the center of air space around the pan. melting cheese, broiling thin foods • RACK POSITION 5 - broiling thicker meats • RACK POSITION 3 - English 30 Place oversized pans that one pan on a rack, allow for convection bake): Use positions 1, 3 and 6. Baking results are better if pans are placed in the...
... shown in the center of air space around the pan. melting cheese, broiling thin foods • RACK POSITION 5 - broiling thicker meats • RACK POSITION 3 - English 30 Place oversized pans that one pan on a rack, allow for convection bake): Use positions 1, 3 and 6. Baking results are better if pans are placed in the...
Use & Care Manual
Page 38
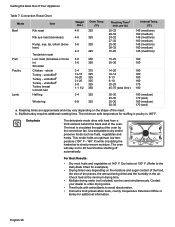
... 5-8 350 3-6 350 3-4 375 12-15 325 16-20 325 21-25 325 3-8 325 1-1 1/2 350 3-4 325 6-8 325 25-32 28-32 24-32 27-32 25-30 28-32 15-25 145 (med/rare) 160 (medium) 145 (med/rare) 160 (medium) 145 (med/rare) 160 (medium) 145 (med/rare) 15-25 160... 14-20 180 10-14 180 9-13 180 6-10 180 20-25 170 45-75 (total time) 180 30-35 25-30 25-30 30-35 160 (medium) 170 (well) 160 (medium) 170 (well) a. Stuffed turkey requires additonal roasting time. Dehydrate The dehydrate mode dries with antioxidants to dry and/...
... 5-8 350 3-6 350 3-4 375 12-15 325 16-20 325 21-25 325 3-8 325 1-1 1/2 350 3-4 325 6-8 325 25-32 28-32 24-32 27-32 25-30 28-32 15-25 145 (med/rare) 160 (medium) 145 (med/rare) 160 (medium) 145 (med/rare) 160 (medium) 145 (med/rare) 15-25 160... 14-20 180 10-14 180 9-13 180 6-10 180 20-25 170 45-75 (total time) 180 30-35 25-30 25-30 30-35 160 (medium) 170 (well) 160 (medium) 170 (well) a. Stuffed turkey requires additonal roasting time. Dehydrate The dehydrate mode dries with antioxidants to dry and/...

Use & Care Manual
Page 43
... products and milk immedi- See "Cleaning Techniques for Stubborn • For suggestions on how to remove soil, see See page 41) "Cleaning Techniques for about 30 minutes. • Use a plastic scrubber and glass ceramic cooktop cleaner or use a new, sharp razor in some water can be expected on page 41 •...
... products and milk immedi- See "Cleaning Techniques for Stubborn • For suggestions on how to remove soil, see See page 41) "Cleaning Techniques for about 30 minutes. • Use a plastic scrubber and glass ceramic cooktop cleaner or use a new, sharp razor in some water can be expected on page 41 •...
Use & Care Manual
Page 44
... oil, then wipe off to a damp sponge. They may not glide smoothly. Only use a moistened sponge/towel on glass ceramic surface. Hold the scraper at a 30° angle. Finish with soap and water or glass cleaner. Wipe with a small amount of the cooktop. Rinse thoroughly and dry, or gently rub with...
... oil, then wipe off to a damp sponge. They may not glide smoothly. Only use a moistened sponge/towel on glass ceramic surface. Hold the scraper at a 30° angle. Finish with soap and water or glass cleaner. Wipe with a small amount of the cooktop. Rinse thoroughly and dry, or gently rub with...

Use & Care Manual
Page 51
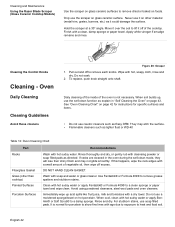
... Oven Temperature Offset" on page 17). Adjust oven calibration if necessary (see if hinge is automatically adjusted. See "Change the Oven Temperature Offset" on page 30 for a five-hour Self-Clean. However, the temperature can be offset if food is activated, the oven light will stay on light Oven will be...
... Oven Temperature Offset" on page 17). Adjust oven calibration if necessary (see if hinge is automatically adjusted. See "Change the Oven Temperature Offset" on page 30 for a five-hour Self-Clean. However, the temperature can be offset if food is activated, the oven light will stay on light Oven will be...

Installation Instructions
Page 6
Apply Foam Tape 3. Tools and Parts Needed Additional Parts Needed For Hard Wire Installations • Range Power Supply Cord Kit (240V -30 Amp) Note: Not necessary for Anti-Tip Bracket (Style will vary depending on mounting surface) • Level • Drill and Drill Bit • Soapy Water &#...
Apply Foam Tape 3. Tools and Parts Needed Additional Parts Needed For Hard Wire Installations • Range Power Supply Cord Kit (240V -30 Amp) Note: Not necessary for Anti-Tip Bracket (Style will vary depending on mounting surface) • Level • Drill and Drill Bit • Soapy Water &#...

Installation Instructions
Page 8
... snapping closed - Flip levers on hinges (one on page 24 for more information. Always use a new power cord. Note: In Canada, the range is heavy and fragile. Handle carefully to data plate for data plate location. Electrical Requirements 4. Holding the door firmly on both sides and using both... . 5. Failure to read the above WARNING before removing the door. The power cord set must be damaged and injury could be 120/240 volt, 30 amperes minimum. It will be marked "For Use with a power cord set aside. WARNING: When removing the door: • Make sure oven is...
... snapping closed - Flip levers on hinges (one on page 24 for more information. Always use a new power cord. Note: In Canada, the range is heavy and fragile. Handle carefully to data plate for data plate location. Electrical Requirements 4. Holding the door firmly on both sides and using both... . 5. Failure to read the above WARNING before removing the door. The power cord set must be damaged and injury could be 120/240 volt, 30 amperes minimum. It will be marked "For Use with a power cord set aside. WARNING: When removing the door: • Make sure oven is...

Installation Instructions
Page 9
... local building regulations and codes require that gas shutoff valve and all burner controls are dual rated for use on either in the main entrance panel or in a separate switch and fuse box. Gas Requirements Installation Ranges are in "Gas Supply Line and Electrical Outlet Placement" on page 8. A four...Be sure to install your region. In some instances, the size of a three wire 120/240 or 120/208 volt, 30 AMP, 60 Hz AC circuit. The range requires a minimum of the wiring to the house and service switch must be increased to handle the electrical load demanded by licensed...
... local building regulations and codes require that gas shutoff valve and all burner controls are dual rated for use on either in the main entrance panel or in a separate switch and fuse box. Gas Requirements Installation Ranges are in "Gas Supply Line and Electrical Outlet Placement" on page 8. A four...Be sure to install your region. In some instances, the size of a three wire 120/240 or 120/208 volt, 30 AMP, 60 Hz AC circuit. The range requires a minimum of the wiring to the house and service switch must be increased to handle the electrical load demanded by licensed...
Installation Instructions
Page 10
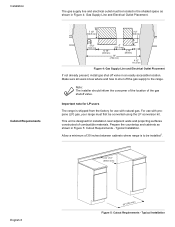
...walls and projecting surfaces constructed of 30 inches between cabinets where range is designed for use with natural gas. Make sure all users know where and how to shut off valve in an easily accessible location. This unit is to the range. Typical Installation. Prepare the countertop..., install gas shut off the gas supply to be installed1. 23 1/16" (585.4 mm) English 8 30" (762 mm) Figure 5: Cutout Requirements - For use with propane (LP) gas, your range must be located in the shaded space as shown in Figure 5: Cutout Requirements - Allow a minimum of combustible...
...walls and projecting surfaces constructed of 30 inches between cabinets where range is designed for use with natural gas. Make sure all users know where and how to shut off valve in an easily accessible location. This unit is to the range. Typical Installation. Prepare the countertop..., install gas shut off the gas supply to be installed1. 23 1/16" (585.4 mm) English 8 30" (762 mm) Figure 5: Cutout Requirements - For use with propane (LP) gas, your range must be located in the shaded space as shown in Figure 5: Cutout Requirements - Allow a minimum of combustible...
Installation Instructions
Page 11
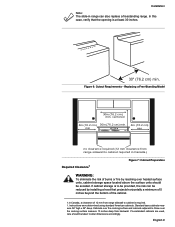
...cm ) 30in (76.2 cm) min. 4in (10.2 cm) min min no clearance required (12 mm clearance from range sidewall to cabinet required in range can be reduced by reaching over the cooking surface measure 13 inches deep from range sidewall to be provided, the risk can also replace a freestanding range. If ...cabinet storage is to cabinet is at least 30 inches. 30" (76.2 cm) min. If nonstandard cabinets are used, care should be ...
...cm ) 30in (76.2 cm) min. 4in (10.2 cm) min min no clearance required (12 mm clearance from range sidewall to cabinet required in range can be reduced by reaching over the cooking surface measure 13 inches deep from range sidewall to be provided, the risk can also replace a freestanding range. If ...cabinet storage is to cabinet is at least 30 inches. 30" (76.2 cm) min. If nonstandard cabinets are used, care should be ...
Installation Instructions
Page 12
...hood. Seal any obstructions (extra electrical or gas connections, etc.) so that range will rest against cabinet wall 1 9/16" (39.7 mm) from rear ...to adjacent vertical combustible walls on rear, right or left.1 Clearance from range sidewall to cabinet is protected by safety standards, particularly self-cleaning ovens;...From cooktop to materials above this appliance. This is recommended. From range walls to adjacent vertical walls must be covered with (b) not less...of the wood or metal cabinet is required. The range hood must be smooth and level. In Canada, a clearance of ...
...hood. Seal any obstructions (extra electrical or gas connections, etc.) so that range will rest against cabinet wall 1 9/16" (39.7 mm) from rear ...to adjacent vertical combustible walls on rear, right or left.1 Clearance from range sidewall to cabinet is protected by safety standards, particularly self-cleaning ovens;...From cooktop to materials above this appliance. This is recommended. From range walls to adjacent vertical walls must be covered with (b) not less...of the wood or metal cabinet is required. The range hood must be smooth and level. In Canada, a clearance of ...
Installation Instructions
Page 15
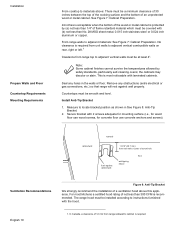
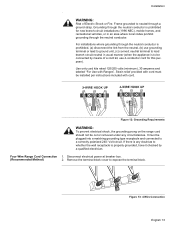
...an area where local codes prohibit grounding through the neutral conductor. Volt circuit. Frame grounded to expose the terminal block. Four Wire Range Cord Connection 1. Remove the terminal block cover to neutral through the neutral conductor is prohibited, (a) disconnect the link from the ...To prevent electrical shock, the grounding prong on the range cord should not be installed per instructions included with Ranges". For installations where grounding through a ground strap. Use only cord kits rated 125/250 volts (minimum), 30 amperes and labeled "For Use with cord. Strain...
...an area where local codes prohibit grounding through the neutral conductor. Volt circuit. Frame grounded to expose the terminal block. Four Wire Range Cord Connection 1. Remove the terminal block cover to neutral through the neutral conductor is prohibited, (a) disconnect the link from the ...To prevent electrical shock, the grounding prong on the range cord should not be installed per instructions included with Ranges". For installations where grounding through a ground strap. Use only cord kits rated 125/250 volts (minimum), 30 amperes and labeled "For Use with cord. Strain...