
Use & Care Manual
Page 2
Warming Drawer (some models 26 About the Warming Drawer 26 Operation 27 Getting the Most Out of Your Appliance 29 Getting the Most Out of Your Cooktop 29 Getting the Most Out of Your Oven 30 Getting the Most Out of Contents About This Manual 1 How This Manual Is Organized 1 Safety 2 Important Safety...
Warming Drawer (some models 26 About the Warming Drawer 26 Operation 27 Getting the Most Out of Your Appliance 29 Getting the Most Out of Your Cooktop 29 Getting the Most Out of Your Oven 30 Getting the Most Out of Contents About This Manual 1 How This Manual Is Organized 1 Safety 2 Important Safety...

Use & Care Manual
Page 9
... (2 or 3; Getting Started Parts and Accessories Free-Standing Models 1 2 3 4 5 12 6 7 8 Slide-In Models 1 12 2 3 4 5 6 7 8 11 9 or 10 (model dependent) Table 1: Parts and Accessories Key # Part 1 Oven Control Panel and Knob 2 Burner Caps (4) 3 Burner Grates (2 or 4; varies by model) 8 Oven Door Gasket 9 Storage Drawer (some models)a 11 9 or 10 (model dependent) Figure 2: Parts and Accessories # Part 13 Cooktop...
... (2 or 3; Getting Started Parts and Accessories Free-Standing Models 1 2 3 4 5 12 6 7 8 Slide-In Models 1 12 2 3 4 5 6 7 8 11 9 or 10 (model dependent) Table 1: Parts and Accessories Key # Part 1 Oven Control Panel and Knob 2 Burner Caps (4) 3 Burner Grates (2 or 4; varies by model) 8 Oven Door Gasket 9 Storage Drawer (some models)a 11 9 or 10 (model dependent) Figure 2: Parts and Accessories # Part 13 Cooktop...

Use & Care Manual
Page 10
... with 1 to clean, disassemble or adjust. Do not use the cooktop without all burner caps and all burner grates properly positioned. Depending on the model, your appliance has either a storage drawer or a warming drawer. Match the size of the burner cap to light the burner. Diffusion Burner Caps ...Depending on the model, the appliance is completely seated on the burner base before attempting to the size of the cooktop. As a result, there are no parts under...
... with 1 to clean, disassemble or adjust. Do not use the cooktop without all burner caps and all burner grates properly positioned. Depending on the model, your appliance has either a storage drawer or a warming drawer. Match the size of the burner cap to light the burner. Diffusion Burner Caps ...Depending on the model, the appliance is completely seated on the burner base before attempting to the size of the cooktop. As a result, there are no parts under...
Use & Care Manual
Page 11
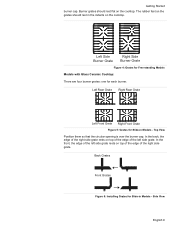
...in the indents on the cooktop. Left Side Burner Grate Right Side Burner Grate Figure 4: Grates for Free-standing Models Models with Glass Ceramic Cooktop: There are four burner grates: one for Slide-in Models - Getting Started burner cap. Left Rear Grate Right Rear Grate Left Front Grate Right Front Grate Figure 5: Grates... for Slide-in Models - Back Grates Front Grates Figure 6: Installing Grates for each burner. In the back, the edge of the right side grate rests on top ...
...in the indents on the cooktop. Left Side Burner Grate Right Side Burner Grate Figure 4: Grates for Free-standing Models Models with Glass Ceramic Cooktop: There are four burner grates: one for Slide-in Models - Getting Started burner cap. Left Rear Grate Right Rear Grate Left Front Grate Right Front Grate Figure 5: Grates... for Slide-in Models - Back Grates Front Grates Figure 6: Installing Grates for each burner. In the back, the edge of the right side grate rests on top ...
Use & Care Manual
Page 12
...spark when any of the burners when the cooktop is the smallest burner on . The precision burner is in Models - Use the burner to melt butter or chocolate or to a boil. If a rack must be level ..., more predictable heat. The high power burner is no pilot light. Use the low settings on model, the range is the most powerful burner on the bottom of the grates. Tilt rack up to clean these when ...there is well suited for Slide-in use oven mitts when the oven is hot, do ...
...spark when any of the burners when the cooktop is the smallest burner on . The precision burner is in Models - Use the burner to melt butter or chocolate or to a boil. If a rack must be level ..., more predictable heat. The high power burner is no pilot light. Use the low settings on model, the range is the most powerful burner on the bottom of the grates. Tilt rack up to clean these when ...there is well suited for Slide-in use oven mitts when the oven is hot, do ...

Use & Care Manual
Page 13
... the pan stop is in . Back of rack Front of rack Insert rack with the back of the rack toward you . Extension Oven Rack (some models) The Full Extension Rack allows for easier access to the user. Once the stop is reached, grasp the top section and pull straight out until... for cleaning) The two sections of the rack are designed to a horizontal position and press the rest of the way in the back of the range. The bottom section extends as far as the standard flat rack. Grasp the entire rack (both sides and pull rack toward the back wall of...
... the pan stop is in . Back of rack Front of rack Insert rack with the back of the rack toward you . Extension Oven Rack (some models) The Full Extension Rack allows for easier access to the user. Once the stop is reached, grasp the top section and pull straight out until... for cleaning) The two sections of the rack are designed to a horizontal position and press the rest of the way in the back of the range. The bottom section extends as far as the standard flat rack. Grasp the entire rack (both sides and pull rack toward the back wall of...

Use & Care Manual
Page 14
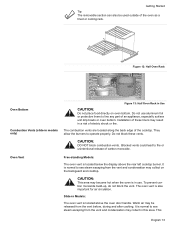
... used as a simple flat rack or as a casserole) on the bottom rack. Insert one . 1. Closed Position Back of Rack Stop (Ball) Half Oven Rack (Some Models) Front of top rack to all items and better utilization of the way in the self-cleaning oven. This allows for easier access to closed...
... used as a simple flat rack or as a casserole) on the bottom rack. Insert one . 1. Closed Position Back of Rack Stop (Ball) Half Oven Rack (Some Models) Front of top rack to all items and better utilization of the way in the self-cleaning oven. This allows for easier access to closed...
Use & Care Manual
Page 15
Figure 12: Half Oven Rack Oven Bottom Combustion Vents (slide-in models only) Figure 13: Half Oven Rack in Models: The oven vent is normal to see steam escaping from ... above the oven door handle. They allow the burners to fire or unintentional release of carbon monoxide. Slide-in Use CAUTION: Do not place food directly on the backguard and cooktop. It is located above ...the vent and condensation may result in this area. Installation of these vents. Oven Vent Free-standing Models: The oven vent is also important for air circulation. Warm air may become hot when the oven...
Figure 12: Half Oven Rack Oven Bottom Combustion Vents (slide-in models only) Figure 13: Half Oven Rack in Models: The oven vent is normal to see steam escaping from ... above the oven door handle. They allow the burners to fire or unintentional release of carbon monoxide. Slide-in Use CAUTION: Do not place food directly on the backguard and cooktop. It is located above ...the vent and condensation may result in this area. Installation of these vents. Oven Vent Free-standing Models: The oven vent is also important for air circulation. Warm air may become hot when the oven...
Use & Care Manual
Page 16
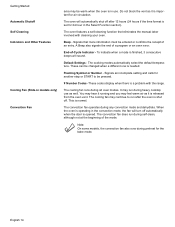
...the oven vent. Getting Started Automatic Shutoff Self Cleaning Indicators and Other Features Cooling Fan (Slide-in models only) Convection Fan area may be pressed. Flashing Symbol or Number - Note: On some models, the convection fan also runs during heavy cooktop use . The oven features a self-cleaning...will turn off . A Beep also signals the end of -Cycle Indicator - English 14 Signals that eliminates the manual labor involved with the range. F Number Codes -These codes display when there is opened. When the oven is normal. The convection fan does run during preheat for ...
...the oven vent. Getting Started Automatic Shutoff Self Cleaning Indicators and Other Features Cooling Fan (Slide-in models only) Convection Fan area may be pressed. Flashing Symbol or Number - Note: On some models, the convection fan also runs during heavy cooktop use . The oven features a self-cleaning...will turn off . A Beep also signals the end of -Cycle Indicator - English 14 Signals that eliminates the manual labor involved with the range. F Number Codes -These codes display when there is opened. When the oven is normal. The convection fan does run during preheat for ...
Use & Care Manual
Page 17
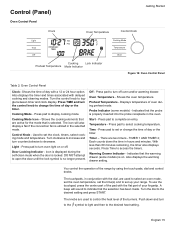
...Cooking Lock Indicator Preheat Temperature Mode Indicator Figure 14: Oven Control Panel Table 2: Oven Control Panel Clock- Shows the time of the range by using the touch pads, dial and control knobs. With less than 60 minutes remaining, the timer also displays seconds. Door Locking... fan is properly inserted into the probe receptacle in the selected mode. Cooking Mode - Shows the oven temperature. Probe Indicator (some models) is no longer present. Turn clockwise to increase and turn counterclockwise to turn oven light on . Press pad to indicate that the...
...Cooking Lock Indicator Preheat Temperature Mode Indicator Figure 14: Oven Control Panel Table 2: Oven Control Panel Clock- Shows the time of the range by using the touch pads, dial and control knobs. With less than 60 minutes remaining, the timer also displays seconds. Door Locking... fan is properly inserted into the probe receptacle in the selected mode. Cooking Mode - Shows the oven temperature. Probe Indicator (some models) is no longer present. Turn clockwise to increase and turn counterclockwise to turn oven light on . Press pad to indicate that the...

Use & Care Manual
Page 21
...1. Turn knob clockwise until TIME FORMAT is displayed. 3. Press START to select 12 hour or 24 hour format. 5. Remove packing materials from range. This feature automatically converts package or recipe temperatures for both the warming drawer and the oven. Getting Started Note: The light cannot be changed ...labels from inside the oven and inside the drawer. • While cool, wipe with a clean, damp sponge and dry. • For models with tion Conversion ON or the convection bake mode. Press START. 4. English 19 The default for clock format is activated for the Warming ...
...1. Turn knob clockwise until TIME FORMAT is displayed. 3. Press START to select 12 hour or 24 hour format. 5. Remove packing materials from range. This feature automatically converts package or recipe temperatures for both the warming drawer and the oven. Getting Started Note: The light cannot be changed ...labels from inside the oven and inside the drawer. • While cool, wipe with a clean, damp sponge and dry. • For models with tion Conversion ON or the convection bake mode. Press START. 4. English 19 The default for clock format is activated for the Warming ...
Use & Care Manual
Page 22
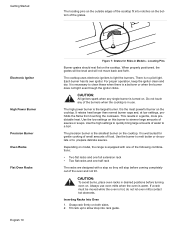
... the flame is clean and dry. Lighting the Burner Setting the Flame Size English 20 Figure 15: Burner Control Knobs (some models) . Setting the Burner Heat Level Burner Control Knobs (some models) Push in use. If the burner still fails to the desired flame size. Hold a match at the port and turn...
... the flame is clean and dry. Lighting the Burner Setting the Flame Size English 20 Figure 15: Burner Control Knobs (some models) . Setting the Burner Heat Level Burner Control Knobs (some models) Push in use. If the burner still fails to the desired flame size. Hold a match at the port and turn...

Use & Care Manual
Page 24
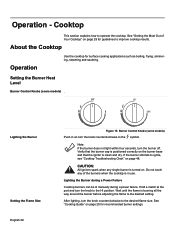
...the convection bake mode, the temperature is reached, at 100ºF. Automatic Convection Conversion (models with the default temper- Operation - Oven About the Oven This section explains how to ...select new temperature and press START. 11. Installation of Your Oven" on page 30 for guidelines to allow for details. Setting the Cooking Mode and Temperature Note: To back...operate the oven. Simply enter the package or recipe temperature when setting the mode and the range calculates the correct temperature. See "Turn Automatic Convection Conversion ON or OFF" on in a...
...the convection bake mode, the temperature is reached, at 100ºF. Automatic Convection Conversion (models with the default temper- Operation - Oven About the Oven This section explains how to ...select new temperature and press START. 11. Installation of Your Oven" on page 30 for guidelines to allow for details. Setting the Cooking Mode and Temperature Note: To back...operate the oven. Simply enter the package or recipe temperature when setting the mode and the range calculates the correct temperature. See "Turn Automatic Convection Conversion ON or OFF" on in a...
Use & Care Manual
Page 26
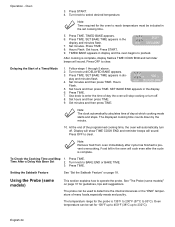
... day at which cooking mode starts and stops. Time After a Delay Has Been Set 2. Press TIME. Using the Probe (some models)" on page 18. The temperature range for guidelines, tips and suggestions. English 24 Oven 3. Press TIME. Press TIME. HR:MIN TIMED BAKE 7. TIMED BAKE appears in... the set for the oven to 232°C). The displayed cooking time counts down by the minute. 10. See "The Probe (some models) This section...
... day at which cooking mode starts and stops. Time After a Delay Has Been Set 2. Press TIME. Using the Probe (some models)" on page 18. The temperature range for guidelines, tips and suggestions. English 24 Oven 3. Press TIME. Press TIME. HR:MIN TIMED BAKE 7. TIMED BAKE appears in... the set for the oven to 232°C). The displayed cooking time counts down by the minute. 10. See "The Probe (some models) This section...

Use & Care Manual
Page 28
Operation - Stainless Steel Drawer Interior 2. Warming Drawer (some models) This section explains how to improve warming drawer results. Warming drawer settings are seen in the display when the corresponding setting is selected: Low Medium ...
Operation - Stainless Steel Drawer Interior 2. Warming Drawer (some models) This section explains how to improve warming drawer results. Warming drawer settings are seen in the display when the corresponding setting is selected: Low Medium ...

Use & Care Manual
Page 29
... the warming drawer to heat cold food (exception: it may not be removable. Press START. 1. Press COOKING MODE. 2. English 27 Press OFF. Warming Drawer (some models) Preheating Preheat Times: Turning on page 18. 1. Turn the warming drawer on page 18. 1.
... the warming drawer to heat cold food (exception: it may not be removable. Press START. 1. Press COOKING MODE. 2. English 27 Press OFF. Warming Drawer (some models) Preheating Preheat Times: Turning on page 18. 1. Turn the warming drawer on page 18. 1.

Use & Care Manual
Page 30
Do not preheat drawer prior to placing dishes. Warming Empty Serving Bowls and Plates • Use only heat-safe dishes. • Warm on setting appropriate for cooking container. • Check dish temperature during warming period. • Place empty plates or dishes in low sided dishes or pans. • Preheat on Low. • Check crispness after 45 minutes. Operation - Warming Drawer (some models) Crisping Stale Items • Place food in a cold warming drawer. English 28 Add time as needed.
Do not preheat drawer prior to placing dishes. Warming Empty Serving Bowls and Plates • Use only heat-safe dishes. • Warm on setting appropriate for cooking container. • Check dish temperature during warming period. • Place empty plates or dishes in low sided dishes or pans. • Preheat on Low. • Check crispness after 45 minutes. Operation - Warming Drawer (some models) Crisping Stale Items • Place food in a cold warming drawer. English 28 Add time as needed.
Use & Care Manual
Page 33
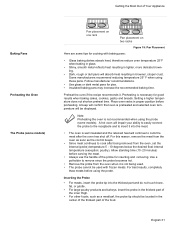
... meat. • Always use the handle of Your Appliance Baking Pans Preheating the Oven The Probe (some models) Pan placement on one rack Pan placement on two racks Figure 19: Pan Placement Here are some models). Getting the Most Out of the probe for inserting and removing. A beep will confirm that oven...
... meat. • Always use the handle of Your Appliance Baking Pans Preheating the Oven The Probe (some models) Pan placement on one rack Pan placement on two racks Figure 19: Pan Placement Here are some models). Getting the Most Out of the probe for inserting and removing. A beep will confirm that oven...
Use & Care Manual
Page 34
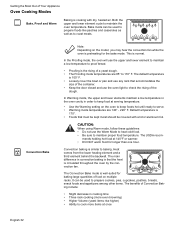
Convection Bake Note: Depending on the model, you may hear the convection fan while the oven is preheating for baking large quantities of food on the oven to keep foods hot until ...
Convection Bake Note: Depending on the model, you may hear the convection fan while the oven is preheating for baking large quantities of food on the oven to keep foods hot until ...
Use & Care Manual
Page 36
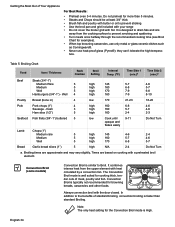
...benefits of standard broiling, convection broiling is similar to prevent sticking • Use the broil pan and grid included with your range • Do not cover the broiler grid with a preheated broil element. English 34 Table 5: Broiling Chart Food Item ...(min.)a Beef Steak (3/4"-1") Medium Rare 5 high 145 5-7 Medium 5 high 160 6-8 Well 5 high 170 7-9 Hamburgers (3/4"-1") - ture. Convection Broil (some models) Convection Broil is faster than 5 minutes. • Steaks and Chops should be at least 3/4" thick • Brush fish and poultry with butter or oil ...
...benefits of standard broiling, convection broiling is similar to prevent sticking • Use the broil pan and grid included with your range • Do not cover the broiler grid with a preheated broil element. English 34 Table 5: Broiling Chart Food Item ...(min.)a Beef Steak (3/4"-1") Medium Rare 5 high 145 5-7 Medium 5 high 160 6-8 Well 5 high 170 7-9 Hamburgers (3/4"-1") - ture. Convection Broil (some models) Convection Broil is faster than 5 minutes. • Steaks and Chops should be at least 3/4" thick • Brush fish and poultry with butter or oil ...


