Installation Instructions
Page 4
... electrical inspector's use with ranges" shall be sure all applicable codes. • Install a gas shutoff valve near the appliance. Lock service panel to prevent power from the gas supply piping... pressure printed on a separate branch circuit. • Only a power-supply cord kit rated for this appliance and marked "for use . • Before installing, turn power OFF at pressures in excess of ½ psi (3.5 kPa). ... must conform with local codes or, in the absence of local codes, with the National Fuel Gas Code, ANSI Z223.1/NFPA 54. • The appliance must be electrically grounded in ...
... electrical inspector's use with ranges" shall be sure all applicable codes. • Install a gas shutoff valve near the appliance. Lock service panel to prevent power from the gas supply piping... pressure printed on a separate branch circuit. • Only a power-supply cord kit rated for this appliance and marked "for use . • Before installing, turn power OFF at pressures in excess of ½ psi (3.5 kPa). ... must conform with local codes or, in the absence of local codes, with the National Fuel Gas Code, ANSI Z223.1/NFPA 54. • The appliance must be electrically grounded in ...

Installation Instructions
Page 6
...Install Backwall Trim (Optional) 4. Connect Electric 5. Installation Before You Begin Overview Table 1: Overview Step Task 1. Canadian units are shipped with the power cord already installed. • Measuring Tape • Phillips Head Screwdriver • 1-1/4" (31.8 mm) Wrench • Pencil • T-20 ...-step instructions. Connect Gas Supply 6. Tools and Parts Needed Additional Parts Needed For Hard Wire Installations • Range Power Supply Cord Kit (240V -30 Amp) Note: Not necessary for Gas Leaks 7. to the sections that follow for Anti-Tip Bracket (Style ...
...Install Backwall Trim (Optional) 4. Connect Electric 5. Installation Before You Begin Overview Table 1: Overview Step Task 1. Canadian units are shipped with the power cord already installed. • Measuring Tape • Phillips Head Screwdriver • 1-1/4" (31.8 mm) Wrench • Pencil • T-20 ...-step instructions. Connect Gas Supply 6. Tools and Parts Needed Additional Parts Needed For Hard Wire Installations • Range Power Supply Cord Kit (240V -30 Amp) Note: Not necessary for Gas Leaks 7. to the sections that follow for Anti-Tip Bracket (Style ...

Installation Instructions
Page 8
...firmly and properly could result in electrical shock or burns. • The oven door is heavy and fragile. It will be 120/240 volt, 30 amperes minimum. Place the door in place before removing the door. See "Product Data Plate" on page 24 for more information. The electrical rating... personal injury or product damage. • To avoid injury from the factory with a power cord set must be about halfway open or closed , be damaged and injury could be sure that the range be installed with the range cord already installed. Open the door all the way. 3. Holding the door firmly on each...
...firmly and properly could result in electrical shock or burns. • The oven door is heavy and fragile. It will be 120/240 volt, 30 amperes minimum. Place the door in place before removing the door. See "Product Data Plate" on page 24 for more information. The electrical rating... personal injury or product damage. • To avoid injury from the factory with a power cord set must be about halfway open or closed , be damaged and injury could be sure that the range be installed with the range cord already installed. Open the door all the way. 3. Holding the door firmly on each...
Installation Instructions
Page 15
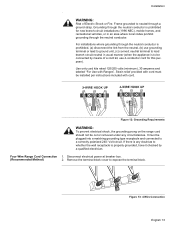
... prohibited for this purpose). Use only cord kits rated 125/250 volts (minimum), 30 amperes and labeled "For Use with cord. Figure 12: Grounding Requirements WARNING: To prevent electrical shock, the grounding prong on the range cord should not be connected by a qualified electrician. Four Wire Range Cord Connection 1. Disconnect electrical power at breaker box. (Recommended Method) 2. Strain...
... prohibited for this purpose). Use only cord kits rated 125/250 volts (minimum), 30 amperes and labeled "For Use with cord. Figure 12: Grounding Requirements WARNING: To prevent electrical shock, the grounding prong on the range cord should not be connected by a qualified electrician. Four Wire Range Cord Connection 1. Disconnect electrical power at breaker box. (Recommended Method) 2. Strain...

Installation Instructions
Page 20
... verify that the left leg is not under the anti-tip bracket, slide range out, adjust legs and slide back in. Do not apply pressure to the countertop and the appliance. 3. Tip: 1. Wipe up soapy water. This could result in power cord. 2. Be careful not to prevent damage 3. When properly installed, the... cooktop trim around the back of the range will rest lightly on the ...
... verify that the left leg is not under the anti-tip bracket, slide range out, adjust legs and slide back in. Do not apply pressure to the countertop and the appliance. 3. Tip: 1. Wipe up soapy water. This could result in power cord. 2. Be careful not to prevent damage 3. When properly installed, the... cooktop trim around the back of the range will rest lightly on the ...

Installation Instructions
Page 22
...Installation English 20 Adjust Leveling Legs 1. Line up range in front of the range must not rest on the countertop. Repeat in power cord. 2. There should be flush with the wall. 2. Do not apply pressure to cooktop when sliding into Opening 1. Adjust front leveling legs so ...that the bottom of countertop. 4. Slide range into electrical outlet. Remove drawer and oven door...
...Installation English 20 Adjust Leveling Legs 1. Line up range in front of the range must not rest on the countertop. Repeat in power cord. 2. There should be flush with the wall. 2. Do not apply pressure to cooktop when sliding into Opening 1. Adjust front leveling legs so ...that the bottom of countertop. 4. Slide range into electrical outlet. Remove drawer and oven door...