Use & Care Manual
Page 1
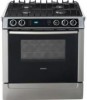
Use and Care Manual Dual Fuel Range
Use and Care Manual Dual Fuel Range
Use & Care Manual
Page 3
... sections: • The Getting Started section describes the features and functionality of the range, including a description of how to set up the range and operate the control panel. • The Operation sections describe how to operate each range component. • The Getting the Most out of Your Appliance section includes information ...performance. • The Cleaning and Maintenance section describes how to clean and maintain your appliance. • The Service section includes troubleshooting tips and your range, be sure to the Safety Sections located at the beginning of the manual.
... sections: • The Getting Started section describes the features and functionality of the range, including a description of how to set up the range and operate the control panel. • The Operation sections describe how to operate each range component. • The Getting the Most out of Your Appliance section includes information ...performance. • The Cleaning and Maintenance section describes how to clean and maintain your appliance. • The Service section includes troubleshooting tips and your range, be sure to the Safety Sections located at the beginning of the manual.
Use & Care Manual
Page 4
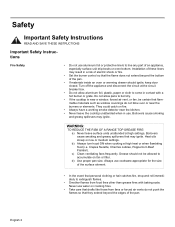
WARNING: TO REDUCE THE RISK OF A RANGE TOP GREASE FIRE: a) Never leave surface units unattended at high heat or when flambéing food (i.e. Crepes Suzette, Cherries Jubilee, Peppercorn Beef Flambe'). Never ...
WARNING: TO REDUCE THE RISK OF A RANGE TOP GREASE FIRE: a) Never leave surface units unattended at high heat or when flambéing food (i.e. Crepes Suzette, Cherries Jubilee, Peppercorn Beef Flambe'). Never ...
Use & Care Manual
Page 5
Gas Safety Safety WARNING: TO REDUCE THE RISK OF INJURY TO PERSONS IN THE EVENT OF A RANGE TOP GREASE FIRE, OBSERVE THE FOLLOWING: a) SMOTHER FLAMES with a close-fitting lid, cookie sheet, or metal tray, then turn it -yourself" procedure. You may result ...
Gas Safety Safety WARNING: TO REDUCE THE RISK OF INJURY TO PERSONS IN THE EVENT OF A RANGE TOP GREASE FIRE, OBSERVE THE FOLLOWING: a) SMOTHER FLAMES with a close-fitting lid, cookie sheet, or metal tray, then turn it -yourself" procedure. You may result ...
Use & Care Manual
Page 8
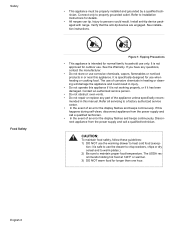
Install anti-tip device packaged with range. See installation instructions. It is specifically designed for longer than one hour. Disconnect appliance from the power supply and call a qualified technician. Refer to properly ... recommends holding hot food at 140°F or warmer. 3) DO NOT warm food for use only. Connect only to Installation Instructions for details. • All ranges can tip. Injury to heat cold food (excep- Safety Food Safety • This appliance must be properly installed and grounded by a qualified technician. If this...
Install anti-tip device packaged with range. See installation instructions. It is specifically designed for longer than one hour. Disconnect appliance from the power supply and call a qualified technician. Refer to properly ... recommends holding hot food at 140°F or warmer. 3) DO NOT warm food for use only. Connect only to Installation Instructions for details. • All ranges can tip. Injury to heat cold food (excep- Safety Food Safety • This appliance must be properly installed and grounded by a qualified technician. If this...
Use & Care Manual
Page 12
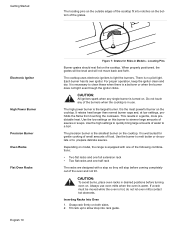
... one half rack The racks are designed with a stop so they will stop into notches on the bottom of the grates. Depending on model, the range is turned on. The cooktop uses electronic ignitors to a boil. For proper operation, keep the ignitor clean and dry. This results in desired positions ... the cooktop. Tilt rack up to quickly bring large amounts of sauces or soups. Each burner has its own ignitor. It is well suited for Slide-in use oven mitts when the oven is hot, do not let oven mitts contact hot elements. Always use . When properly positioned, the grates...
... one half rack The racks are designed with a stop so they will stop into notches on the bottom of the grates. Depending on model, the range is turned on. The cooktop uses electronic ignitors to a boil. For proper operation, keep the ignitor clean and dry. This results in desired positions ... the cooktop. Tilt rack up to quickly bring large amounts of sauces or soups. Each burner has its own ignitor. It is well suited for Slide-in use oven mitts when the oven is hot, do not let oven mitts contact hot elements. Always use . When properly positioned, the grates...

Use & Care Manual
Page 13
... the top rack will not extend fully, it so that the pan stop is not installed correctly. Rack should be in the back of the range. When the stop is reached. Bring rack to cooking foods.
... the top rack will not extend fully, it so that the pan stop is not installed correctly. Rack should be in the back of the range. When the stop is reached. Bring rack to cooking foods.
Use & Care Manual
Page 16
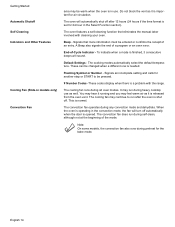
... door is finished, 3 consecutive beeps will turn off . When the oven is normal. Getting Started Automatic Shutoff Self Cleaning Indicators and Other Features Cooling Fan (Slide-in models only) Convection Fan area may be entered or confirms the receipt of an entry. Signals that eliminates the manual labor involved with the...
... door is finished, 3 consecutive beeps will turn off . When the oven is normal. Getting Started Automatic Shutoff Self Cleaning Indicators and Other Features Cooling Fan (Slide-in models only) Convection Fan area may be entered or confirms the receipt of an entry. Signals that eliminates the manual labor involved with the...
Use & Care Manual
Page 17
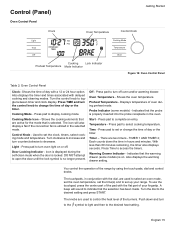
... is utilized in the oven. Start - Time - Also displays the warming drawer setting. You control the operation of your range. Push down the time in conjunction with the flat part of the range by using the touch pads, dial and control knobs. Door Locking Indicator - The knobs are active for the mode...
... is utilized in the oven. Start - Time - Also displays the warming drawer setting. You control the operation of your range. Push down the time in conjunction with the flat part of the range by using the touch pads, dial and control knobs. Door Locking Indicator - The knobs are active for the mode...

Use & Care Manual
Page 18
To switch to set or change the range features listed below. Turn knob to desired feature. Set minutes. 4. Press OFF. 1. TIMER 1 flashes in the clock mode. Press TIME again and the clock is ...
To switch to set or change the range features listed below. Turn knob to desired feature. Set minutes. 4. Press OFF. 1. TIMER 1 flashes in the clock mode. Press TIME again and the clock is ...

Use & Care Manual
Page 21
... to select ON or OFF. 5. The default setting is 12 hour. 1. Turn knob to select 12 hour or 24 hour format. 5. Remove packing materials from range. Buff with a glass ceramic cooktop, apply the glass ceramic cooktop cleaner. Press START. 4. See "Cleaning and Maintenance" on ". Turn knob clockwise until AUTO CONVECT BAKE...
... to select ON or OFF. 5. The default setting is 12 hour. 1. Turn knob to select 12 hour or 24 hour format. 5. Remove packing materials from range. Buff with a glass ceramic cooktop, apply the glass ceramic cooktop cleaner. Press START. 4. See "Cleaning and Maintenance" on ". Turn knob clockwise until AUTO CONVECT BAKE...

Use & Care Manual
Page 24
Setting the Cooking Mode and Temperature Note: To back out of Your Oven" on page 30 for manual temperature adjustment. To select a different temperature, turn the oven off oven. ments) to select new temperature and press START. 11. To change ...package or recipe temperature. The preheated temperature is reached, at 100ºF. Simply enter the package or recipe temperature when setting the mode and the range calculates the correct temperature. The actual temperature increases until set temperature is displayed, starting at which will be turned off , it will beep and flash...
Setting the Cooking Mode and Temperature Note: To back out of Your Oven" on page 30 for manual temperature adjustment. To select a different temperature, turn the oven off oven. ments) to select new temperature and press START. 11. To change ...package or recipe temperature. The preheated temperature is reached, at 100ºF. Simply enter the package or recipe temperature when setting the mode and the range calculates the correct temperature. The actual temperature increases until set temperature is displayed, starting at which will be turned off , it will beep and flash...

Use & Care Manual
Page 25
... continue flashing. 4. If TIME pad is not pressed, oven will begin flashing. 1. cook- ies, cakes, breads, souffles, etc.) 1. If TIME or START is not pressed, range will beep and display will be displayed. Press TIME again and hour digits will begin beeping and timer display will flash. 5. Note: • If you...
... continue flashing. 4. If TIME pad is not pressed, oven will begin flashing. 1. cook- ies, cakes, breads, souffles, etc.) 1. If TIME or START is not pressed, range will beep and display will be displayed. Press TIME again and hour digits will begin beeping and timer display will flash. 5. Note: • If you...
Use & Care Manual
Page 26
... to 232°C). The probe can be included in the oven will stop cooking or turn off . 8. Press OFF to select desired temperature. The temperature range for 100°F up to 450°F (38°C up to prevent overcooking. TIMED BAKE appears. 6. Delaying the Start of day at which cooking mode...
... to 232°C). The probe can be included in the oven will stop cooking or turn off . 8. Press OFF to select desired temperature. The temperature range for 100°F up to 450°F (38°C up to prevent overcooking. TIMED BAKE appears. 6. Delaying the Start of day at which cooking mode...

Use & Care Manual
Page 31
... hot, the base (pan bottom) should be flush against the bottom of the pan. Turn the pan upside down on the surface without wobbling (rocking). A range of heat settings are best. Med-High 4-5 - For best results select pans with water that is already warm. • Boil the smallest amount of Your...
... hot, the base (pan bottom) should be flush against the bottom of the pan. Turn the pan upside down on the surface without wobbling (rocking). A range of heat settings are best. Med-High 4-5 - For best results select pans with water that is already warm. • Boil the smallest amount of Your...
Use & Care Manual
Page 35
... bake mode, the temperature is best suited to brown breads and casseroles. b. Simply enter the package or recipe temperature when setting the mode and the range calculates the correct temperature. When the feature is a guide. This temperature must be turned off , it will read CONV BAKE. Follow recipe or package directions...
... bake mode, the temperature is best suited to brown breads and casseroles. b. Simply enter the package or recipe temperature when setting the mode and the range calculates the correct temperature. When the feature is a guide. This temperature must be turned off , it will read CONV BAKE. Follow recipe or package directions...
Use & Care Manual
Page 36
... at least 3/4" thick • Brush fish and poultry with butter or oil to prevent sticking • Use the broil pan and grid included with your range • Do not cover the broiler grid with the door closed. Always convection broil with foil. Note: The only heat setting for browning breads, casseroles...
... at least 3/4" thick • Brush fish and poultry with butter or oil to prevent sticking • Use the broil pan and grid included with your range • Do not cover the broiler grid with the door closed. Always convection broil with foil. Note: The only heat setting for browning breads, casseroles...
Use & Care Manual
Page 37
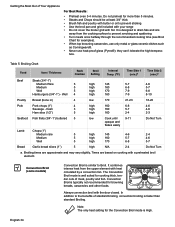
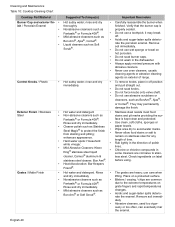
... to Convection Roast Chart for examples. • Do not cover meat or use cooking bags. • Use the broil pan and grid provided with the range for examples). • Use the broil pan and grid included with your liking, but is well suited to preparing tender cuts of Convection Roasting, include... 3 Medium 3 Well 3 Hamburger (more ) 4 high 160 7-9 6-8 Sausage - fresh 4 high 160 5-7 3-5 a. Getting the Most Out of the meat. • If the meat is browned to your range. • Do not cover the broiler grid with foil.
... to Convection Roast Chart for examples. • Do not cover meat or use cooking bags. • Use the broil pan and grid provided with the range for examples). • Use the broil pan and grid included with your liking, but is well suited to preparing tender cuts of Convection Roasting, include... 3 Medium 3 Well 3 Hamburger (more ) 4 high 160 7-9 6-8 Sausage - fresh 4 high 160 5-7 3-5 a. Getting the Most Out of the meat. • If the meat is browned to your range. • Do not cover the broiler grid with foil.
Use & Care Manual
Page 42
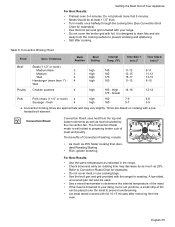
... Formula 409®. To remove knobs, place in the direction of time. Blisters / crazing / chips are common due to the extreme temperatures on exterior of range. Do not wash in some cleaners are heavy; Never use oven cleaners, caustic cleaning agents or abrasive cleaning agents on grate fingers and rapid temperatures...
... Formula 409®. To remove knobs, place in the direction of time. Blisters / crazing / chips are common due to the extreme temperatures on exterior of range. Do not wash in some cleaners are heavy; Never use oven cleaners, caustic cleaning agents or abrasive cleaning agents on grate fingers and rapid temperatures...
Use & Care Manual
Page 45
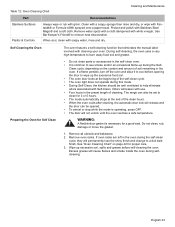
... be well ventilated to remove heat discoloration. During self-cleaning, the oven uses a very high temperature to clean for proper care. 3. Remove oven racks. The range can be set to burn away food soil and grease. Remove all utensils and bakeware. 2. Clean with a soapy sponge then rinse and dry, or wipe...
... be well ventilated to remove heat discoloration. During self-cleaning, the oven uses a very high temperature to clean for proper care. 3. Remove oven racks. The range can be set to burn away food soil and grease. Remove all utensils and bakeware. 2. Clean with a soapy sponge then rinse and dry, or wipe...


