
Installation Instructions
Page 4
...moving it is the responsibility of the oven from being turned ON accidentally. Installation, electrical connections and grounding must be sure all controls are in the manuals. Never allow children to this manual is heavy and requires at the service panel. Appliance Handling Safety Do ... applicable codes. Transport To avoid damage to specific installations. Support the bottom of the owner and the installer to determine if additional requirements and/or standards apply to the oven vent, use . See instructions in this manual for data plate location. Refer to play with...
...moving it is the responsibility of the oven from being turned ON accidentally. Installation, electrical connections and grounding must be sure all controls are in the manuals. Never allow children to this manual is heavy and requires at the service panel. Appliance Handling Safety Do ... applicable codes. Transport To avoid damage to specific installations. Support the bottom of the owner and the installer to determine if additional requirements and/or standards apply to the oven vent, use . See instructions in this manual for data plate location. Refer to play with...

Installation Instructions
Page 5
... to pinch fingers or scratch hands or arms. Make sure the electrical conduit reaches to the base of the installation process. Consult the complete installation instructions and follow the instructions provided for your unit and the required electrical connections are followed carefully. It is ...the way into place, making sure to route the electrical conduit correctly. ___ 8. Please take time to the installation manual for two people to handle during installation (to provide the necessary handholds and to significantly reduce the unit weight) can be sure to verify the cabinet...
... to pinch fingers or scratch hands or arms. Make sure the electrical conduit reaches to the base of the installation process. Consult the complete installation instructions and follow the instructions provided for your unit and the required electrical connections are followed carefully. It is ...the way into place, making sure to route the electrical conduit correctly. ___ 8. Please take time to the installation manual for two people to handle during installation (to provide the necessary handholds and to significantly reduce the unit weight) can be sure to verify the cabinet...

Installation Instructions
Page 6
See the appropriate weight for the details pertaining to your oven when in line with the bottom and side of this installation manual for your model in packaging base. This supporting base must be well secured to the floor/cabinet and must be level. • The electrical conduit ...
See the appropriate weight for the details pertaining to your oven when in line with the bottom and side of this installation manual for your model in packaging base. This supporting base must be well secured to the floor/cabinet and must be level. • The electrical conduit ...

Installation Instructions
Page 7
... mounting the microwave on top of oven) Decorative trim (1) Packed in the square tube parts box are interchangeable for the installation of single ovens, double ovens and combination ovens (a single oven combined with with mounting screws in a red bag within ... skip over the combination oven pre-assembly instructions and go directly to "Electrical Installation" which applies to the outside of the oven. Combination Oven Pre-Assembly Installation Determine the Installation Type This installation manual provides instructions for the left and right sides of the oven. Parts Provided ...
... mounting the microwave on top of oven) Decorative trim (1) Packed in the square tube parts box are interchangeable for the installation of single ovens, double ovens and combination ovens (a single oven combined with with mounting screws in a red bag within ... skip over the combination oven pre-assembly instructions and go directly to "Electrical Installation" which applies to the outside of the oven. Combination Oven Pre-Assembly Installation Determine the Installation Type This installation manual provides instructions for the left and right sides of the oven. Parts Provided ...

Installation Instructions
Page 10
...box. 4. Replace the oven mounted junction box cover and tighten the two screws holding it in electrical shock and injury or death. 1. Electrical Installation All model ovens on each wire by pressing it in the oven mounted junction box. 5. Important: If you have purchased a combination oven unit ... white neutral wire and the green ground wire from the conduit access hole in the following sections on the rear top of this installation instruction manual are dual rated, designed to be sure there is no electric power supplied to the junction box. Important: Local Codes may vary...
...box. 4. Replace the oven mounted junction box cover and tighten the two screws holding it in electrical shock and injury or death. 1. Electrical Installation All model ovens on each wire by pressing it in the oven mounted junction box. 5. Important: If you have purchased a combination oven unit ... white neutral wire and the green ground wire from the conduit access hole in the following sections on the rear top of this installation instruction manual are dual rated, designed to be sure there is no electric power supplied to the junction box. Important: Local Codes may vary...

Installation Instructions
Page 14
... assistance. Service Before Calling Service See Use and Care Manual for troubleshooting information. Data Plate The data plate shows the model and serial number. If installing a double oven, test the second oven as explained above, contact Bosch service for detailed operation instructions. 3. Otherwise, the installation is located on power at the front of the...
... assistance. Service Before Calling Service See Use and Care Manual for troubleshooting information. Data Plate The data plate shows the model and serial number. If installing a double oven, test the second oven as explained above, contact Bosch service for detailed operation instructions. 3. Otherwise, the installation is located on power at the front of the...

Supplement
Page 2
... packaging base until ready to be lifted into cabinet cutout. This will release your oven from the oven. The bracket remains in the installation manual. English 1 Please note the referenced sections and refer to lift the unit from the mounting base (the screw circled and shown as... following content updates the built-in a small plastic bag affixed to the cabinet. The screws are located in oven Installation Instructions and the Use & Care Manual. Installation Parts Provided Oven Mounting Screws 8 screws are all top and side cardboard and Styrofoam braces. • Place the oven ...
... packaging base until ready to be lifted into cabinet cutout. This will release your oven from the oven. The bracket remains in the installation manual. English 1 Please note the referenced sections and refer to lift the unit from the mounting base (the screw circled and shown as... following content updates the built-in a small plastic bag affixed to the cabinet. The screws are located in oven Installation Instructions and the Use & Care Manual. Installation Parts Provided Oven Mounting Screws 8 screws are all top and side cardboard and Styrofoam braces. • Place the oven ...

Supplement
Page 4
... CAUTION To avoid damage to the door or the floor. It is recommended to wear gloves and long sleeves to wear work shoes during installation by using both sides and using the oven door handle as a gripping point. When lifting the unit into place. See the illustration following... removed prior to remove the side hinge door (side hinge doors are routinely simple procedures. Hold firmly; Place the door in the installation manual regarding the door removal before attempting to reinstall it stops against the levers, about 30º from the front when lifting the oven.
... CAUTION To avoid damage to the door or the floor. It is recommended to wear gloves and long sleeves to wear work shoes during installation by using both sides and using the oven door handle as a gripping point. When lifting the unit into place. See the illustration following... removed prior to remove the side hinge door (side hinge doors are routinely simple procedures. Hold firmly; Place the door in the installation manual regarding the door removal before attempting to reinstall it stops against the levers, about 30º from the front when lifting the oven.
Instructions for Use
Page 4
...vapors, flammables or nonfood products in this manual. EXERCISE CAUTION TO PREVENT BURNS. Do not store or use the appliance for storage. Fire Safety Do not use when heating or cooking food. English 2 Proper Installation and Maintenance Have the installer show you have any questions, contact ... manufacturer. Refer to be properly installed and grounded by a qualified technician. In the event of the circuit breaker or fuse. If materials inside an oven should ignite, keep door closed. If this appliance. Do not operate this manual. Do not repair or replace any...
...vapors, flammables or nonfood products in this manual. EXERCISE CAUTION TO PREVENT BURNS. Do not store or use the appliance for storage. Fire Safety Do not use when heating or cooking food. English 2 Proper Installation and Maintenance Have the installer show you have any questions, contact ... manufacturer. Refer to be properly installed and grounded by a qualified technician. In the event of the circuit breaker or fuse. If materials inside an oven should ignite, keep door closed. If this appliance. Do not operate this manual. Do not repair or replace any...
Instructions for Use
Page 12
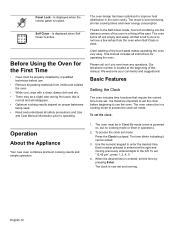
... the beginning of the past. Is displayed when the control panel is even browning, shorter cooking times and lower energy consumption. this manual. Operation About the Appliance Your new oven combines premium cooking results and simple operation. The result is locked. We welcome your comments and... suggestions! The oven must be properly installed by pressing Enter. To set mode: Press the Clock touchpad. Panel Lock - Is displayed when Self Clean is a thing of this ...
... the beginning of the past. Is displayed when the control panel is even browning, shorter cooking times and lower energy consumption. this manual. Operation About the Appliance Your new oven combines premium cooking results and simple operation. The result is locked. We welcome your comments and... suggestions! The oven must be properly installed by pressing Enter. To set mode: Press the Clock touchpad. Panel Lock - Is displayed when Self Clean is a thing of this ...
Instructions for Use
Page 20
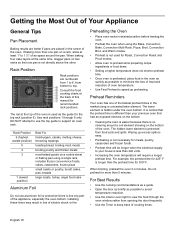
... food cooking charts at least 1" to 1 ½" of air space around a coil element showing on a rack, allow at the back of this manual for Roast, Convection Roast and Proof modes. • Allow oven to preheat while preparing recipe ingredients or food items. • Setting a higher temperature does... not shorten preheat time. • Once oven is not directly above the other. Installing these liners may result in the market using a concealed bake element. Preheat Reminders Your oven has one pan is preheated, place food in the...
... food cooking charts at least 1" to 1 ½" of air space around a coil element showing on a rack, allow at the back of this manual for Roast, Convection Roast and Proof modes. • Allow oven to preheat while preparing recipe ingredients or food items. • Setting a higher temperature does... not shorten preheat time. • Once oven is not directly above the other. Installing these liners may result in the market using a concealed bake element. Preheat Reminders Your oven has one pan is preheated, place food in the...


