Bosch HBLP451RUC Support Question
Bosch HBLP451RUC Support Question
Find answers below for this question about Bosch HBLP451RUC.Need a Bosch HBLP451RUC manual? We have 3 online manuals for this item!
Question posted by alandb on June 27th, 2015
Dimensions For Under Counter Installation
I am an architect and am trying to detail precisely how this oven will look inside an under counter installation. If the front face of the oven is to be flush with the edge of a 1 1/2" granite countertop and it sits in a 3/4" or 5/8" thick cabinet box, what is the exact dimension between the top edge of the oven door and the underside of the countertop? It seems to be 3/4" of an inch but I am trying to verify this. Also, what is the distance between the bottom edge of the door and the bottom edge of the oven itself? I need tese dimensions so I can design the reveal around the oven.
Current Answers
Answer #1: Posted by Odin on June 27th, 2015 5:54 PM
Odin

Member since:
April 10th, 2010 Points: 41,236,690

Member since:
April 10th, 2010 Points: 41,236,690
Thanks for your inquiry. You may get other help Owl responses (in addition to this) but I want to caution you to be very careful. Help Owl is an independent help site not connected with Bosch, and although our volunteers are on the whole quite conscientious, to rely on what a Help Owl volunteer tells you may be a mistake that you will regret. Instead I recommend that you communicate with Bosch, with this customer service information, or, even better, with this corporate information.
Hope this is useful. Please don't forget to click the Accept This Answer button if you do accept it. My aim is to provide reliable helpful answers, not just a lot of them. See https://www.helpowl.com/profile/Odin.
Related Bosch HBLP451RUC Manual Pages
Instructions for Use - Page 5
...from food fires other than grease fires with baking soda. Never use .
Proper Installation and Maintenance
Have the installer show you have a working properly, or if it started.
3) The fire department... breaker box. The use when heating or cooking food. Do not obstruct oven vents. If materials inside an oven should ignite, keep door closed. For example, never use .
Refer all...
Instructions for Use - Page 9
... sloped rear of the rack to determine the internal doneness or the end temperature of electric shock or fire. Installation of these liners may result in .
Do not clean in the self clean oven.
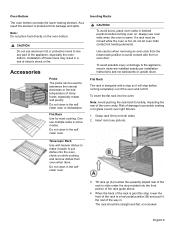
Accessories
Probe
The probe can be used to slide under the stop , lower the front of the rack...
Instructions for Use - Page 10
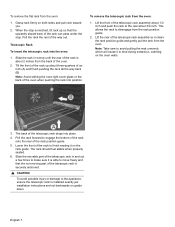
... pushing the rack into position. To remove the telescopic rack from the oven:
1. English 7
The back of the rack is installed exactly per installation instructions and not backwards or upside down. Lower the front of the oven.
2.
Note: Take care to the appliance, ensure the telescopic rack is about 3/4 inch. Tilt the front of...
Instructions for Use - Page 13
...the left to right)
Description of Use
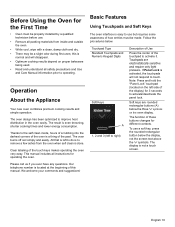
Press the center of how entries must be properly installed by a qualified technician before use a soft key, press the rounded rectangular button below the ...Basic Features
Using Touchpads and Soft Keys
The oven interface is a thing of the display) for 3 seconds to remove a few ashes from inside and outside the oven.
• While cool, wipe with a ...
Instructions for Use - Page 20
....
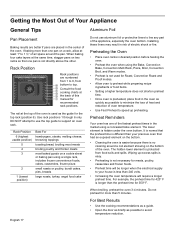
• Preheat time will be longer when the electrical supply to top. The rail at the back of the oven. Use rack positions 1 through 6 only. Installing these liners may result in risk of oven temperature.
• Use Fast Preheat to 1 ½" of air space around a coil element showing on two racks so that...
Installation Instructions - Page 3
...2 General Information 2 Dimensions and Cabinet Requirements . . 3 Removing Packaging 3 Preparing Oven 3 Installation 4 Determine the Installation Type 4 Pre-Assembly of Combination Ovens Prior to Installation 4 Electrical Installation 7 Installing the Oven Unit into the Wall Cabinet 8 For Best Installation 8 Removing the Bottom Hinge Oven Door . . . . 8 To replace the oven door 9 Testing...
Installation Instructions - Page 4

...plate location. Refer to specific installations. See "Data Plate" under appliance. Be sure your appliance is not followed exactly, fire or shock may have sharp edges. For example, do not ...WARNING:
Do not repair or replace any part of the oven cavity, ready to this manual for easier handling and installation.
If required by the National Electrical Code (or Canadian Electrical...
Installation Instructions - Page 5

... or boxed) with the screws supplied (using Star-head screwdriver).
___ 6. For Best Installation
The oven can be difficult for content regarding Safety, Cabinet Dimensions, Removing Packaging, Electrical Installation, Testing the Installation and Customer Service.
___ 3. Fasten the oven unit to the installation manual for two people to remove the side hinge door (some models). Refer...
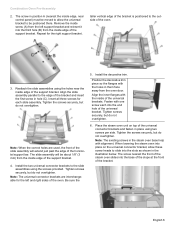
Installation Instructions - Page 6

...model up to back flush with the cabinet cutout.
Actual brackets may look differently. Unit should stay on packaging base until ready to be installed.
Bracket remains in...oven in
"Left and Right Packaging Bracket Removal." Please consult the "Cabinet Dimension Requirements" section at the back of cabinets where it is to your oven when in packaging base. English 3 Dimensions...
Installation Instructions - Page 7

... microwave or steam oven). Install both installations.
The installation procedure differs between these.
Be sure the taller vertical edge of the bracket is preassembled on the oven to accept the microwave.
2. The combo service slide assemblies are interchangeable for the installation of the screws provided. Parts Provided
Oven Bottom trim (1) Packed in red bag, inside parts box on...
Installation Instructions - Page 8
...connection and installing the oven unit into the end hole of the universal brackets.
Align the outer flanges with the unit installation in the illustration below. Place the microwave oven unit on...microwave base help with the Steam Oven
Note: Do not place the oven into the base of the slope at the front of the bracket.
5. Installation with alignment. Tighten the screws securely...
Installation Instructions - Page 9
...slope at the front of the bracket and insert the first screw in them face away from the oven door.
Position the decorative trim piece so the flanges with one screw each... brackets and fasten in position A (nearest the inside of the oven.
3. The slide assembly will extend just past the edge of the support bracket.
Install the two universal connector brackets to slide into the...
Installation Instructions - Page 10

...oven conduit to the single oven before connecting the microwave oven or steam oven wiring. Remove the cap from the oven to the wiring block inside the oven mounted junction box. Push the bare end of the oven...conduit cable coming from the electric power supply before proceeding with the unit installation in the oven mounted junction box.
5. Follow the wiring diagram label and match and ...
Installation Instructions - Page 11

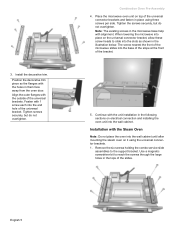
...dimensions and electrical connections.Check that the cavity is also recommended to remove the oven door (bottom hinge models only) to help reduce the unit weight and provide easier access to the handholds inside the oven cavity. Combination units (ovens with a microwave or steam oven...securely in cabinet to attach to J-Box.
Installing the Oven Unit into the cabinet. Lay on sharp or...
Installation Instructions - Page 12
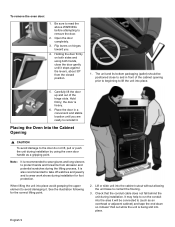
.... It is recommended to wear gloves and long sleeves to contact the flooring.
3. Placing the Oven Into the Cabinet Opening
9 CAUTION
To avoid damage to the door do not lift, pull or push the unit during installation. Holding the door firmly on hinges toward you are ready to wear work shoes during...
Installation Instructions - Page 13
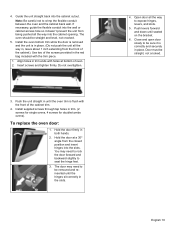
...English 10 Guide the unit straight back into the slots. Install the oven bottom trim while the door is removed and the unit ...it is flush with the trim piece.
1. Hold the door firmly in trim. (2 screws for single ovens, 4 screws for double/combo ovens).
Use ...3. The oven should be removed and reinserted until the hinges sit correctly in the red bag included with the front of oven. 2....
Installation Instructions - Page 14

... door locks when the lock icon appears in the Use and Care Manual.
Confirm that the oven light comes on and the oven begins to preheat.
4.
Testing Operation
1. Test the door lock. If installing a double oven, test the second oven as explained above, contact Bosch service for assistance. Service
Before Calling Service
See Use and...
Installation Instructions - Page 15
... of the unit, within reach of the power conduit.
Flush installation requires two side cleats to be installed above or beneath the unit within range of the power cable.
Note: The conduit box can be attached inside the cabinet frame, recessed from the front.
* For single ovens installed in a wall cabinet, the junction box may be...
Installation Instructions - Page 16

... cleats to be attached inside the cabinet frame, recessed from the front.
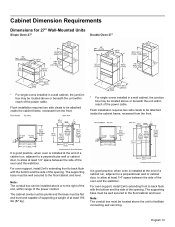
* For single ovens installed in a wall cabinet, the junction box may be flat and level and capable of supporting a weight of at least 212 lbs (96 kg).
Single Oven, Undercounter 27"
Dimensions for 30" Wall-Mounted Units
Single Oven 30"
Flush installation requires two side cleats...
Installation Instructions - Page 17
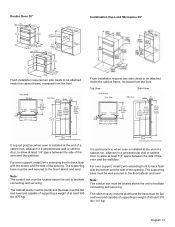
... allow at least 1/4" space between the side of the oven and the wall/door.
Flush installation requires two side cleats to back flush with the bottom and the side of the opening . ...177 kg).
The supporting base must be attached inside the cabinet frame, recessed from the front. Top View
Side View
It is good practice, when oven is installed at the end of a cabinet run , ...
Similar Questions

The Oven Door Does Not Open Is There Any Way To Open This Door?
(Posted by frans53183 8 months ago)

Instructions Needed To Putting Together The Lower Oven Door After Taking It Apar
Took the door apart to clean glass but can not get the thing back together
Took the door apart to clean glass but can not get the thing back together
(Posted by footfixerhj 4 years ago)

Where Do Cleats Attach. Bosch 800 Hbl8651uc.
hello. Our contractor is having a difficult time figuring out where / how the cleats attach to the s...
hello. Our contractor is having a difficult time figuring out where / how the cleats attach to the s...
(Posted by Anheal710 7 years ago)
Bosch Hbl8650uc Wall Oven Wiring Installation
I have a new wall oven arriving tomorrow. The old one's wiring was simply wire-nutted to three leads...
I have a new wall oven arriving tomorrow. The old one's wiring was simply wire-nutted to three leads...
(Posted by txbackjudge 11 years ago)
He17132u: Oven Door Doesn't Seal Properly.
Oven door doesn't seal tight when it shuts. The top of the door juts out slightly with respect to th...
Oven door doesn't seal tight when it shuts. The top of the door juts out slightly with respect to th...
(Posted by georgecraig 13 years ago)