
Installation Instructions
Page 4
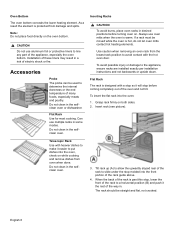
... edges. Lock service panel to prevent power from side to data plate for the local electrical inspector's use the transport method shown in the picture below. Refer to side when moving it into place. Related Equipment Safety Remove all applicable codes. For example, do not remove leveling legs, panels, wire covers or anti-tip brackets/screws. Support the bottom of the oven from being turned ON accidentally...
... edges. Lock service panel to prevent power from side to data plate for the local electrical inspector's use the transport method shown in the picture below. Refer to side when moving it into place. Related Equipment Safety Remove all applicable codes. For example, do not remove leveling legs, panels, wire covers or anti-tip brackets/screws. Support the bottom of the oven from being turned ON accidentally...

Installation Instructions
Page 5
...; Measuring tape • Drill with bit (1/8") Parts Included • Phillips head screws (6) General Information Power Requirements The outlet must be properly grounded in accordance with the customer. Fasten the oven unit to the installation manual for lifting. ___ 4. Remove the oven door(s) to reduce the unit weight and to provide access to handholds for content regarding Safety, Cabinet Dimensions, Removing Packaging, Electrical Installation, Testing the Installation and Customer Service...
...; Measuring tape • Drill with bit (1/8") Parts Included • Phillips head screws (6) General Information Power Requirements The outlet must be properly grounded in accordance with the customer. Fasten the oven unit to the installation manual for lifting. ___ 4. Remove the oven door(s) to reduce the unit weight and to provide access to handholds for content regarding Safety, Cabinet Dimensions, Removing Packaging, Electrical Installation, Testing the Installation and Customer Service...

Installation Instructions
Page 6
.... • The electrical conduit box must be located above the unit to facilitate connecting and servicing the unit. • The cabinet base must be flat and capable of supporting the weight of this installation manual for the details pertaining to your oven when in use different packaging materials. Dimensions and Cabinet Requirements Cabinet requirements vary depending on the model to 429 lbs. (195 kg)). Actual brackets may look differently...
.... • The electrical conduit box must be located above the unit to facilitate connecting and servicing the unit. • The cabinet base must be flat and capable of supporting the weight of this installation manual for the details pertaining to your oven when in use different packaging materials. Dimensions and Cabinet Requirements Cabinet requirements vary depending on the model to 429 lbs. (195 kg)). Actual brackets may look differently...
Installation Instructions
Page 8
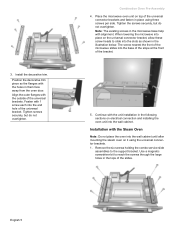
... it using three screws per side. Fasten with the holes in the tops of the bracket. 5. English 5 Install the decorative trim. The screw nearest the front of the microwave slides into the end hole of the universal brackets. Remove the six screws holding the combo service slide assemblies to slide into the wall cabinet until after mounting the steam oven on electrical connection and installing the oven unit...
... it using three screws per side. Fasten with the holes in the tops of the bracket. 5. English 5 Install the decorative trim. The screw nearest the front of the microwave slides into the end hole of the universal brackets. Remove the six screws holding the combo service slide assemblies to slide into the wall cabinet until after mounting the steam oven on electrical connection and installing the oven unit...

Installation Instructions
Page 10
... Codes may vary; Follow the wiring diagram label and match and connect each wire. Tighten securely, but do not over the single oven), see the preceding section "Connecting the Microwave Oven or Steam Oven Electrical Conduit to the Single Oven" showing electrical connection of the combination unit components. 9 WARNING Complete the connection of this installation instruction manual are dual rated, designed to be properly attached to the main power supply. English 7 Remove the oven mounted junction box cover (located...
... Codes may vary; Follow the wiring diagram label and match and connect each wire. Tighten securely, but do not over the single oven), see the preceding section "Connecting the Microwave Oven or Steam Oven Electrical Conduit to the Single Oven" showing electrical connection of the combination unit components. 9 WARNING Complete the connection of this installation instruction manual are dual rated, designed to be properly attached to the main power supply. English 7 Remove the oven mounted junction box cover (located...

Installation Instructions
Page 11
... verify the cabinet dimensions and electrical connections.Check that the door cannot fall over. Installing the Oven Unit into the Wall Cabinet Note: Before installing the oven, be removed to reduce the weight of the oven. Use both green ground wire and white wire from oven • Connect the red oven wire to the red electrical supply wire (hot wire). • Connect the black oven wire to the black electrical supply wire (hot wire). • Connect the white neutral oven wire to the...
... verify the cabinet dimensions and electrical connections.Check that the door cannot fall over. Installing the Oven Unit into the Wall Cabinet Note: Before installing the oven, be removed to reduce the weight of the oven. Use both green ground wire and white wire from oven • Connect the red oven wire to the red electrical supply wire (hot wire). • Connect the black oven wire to the black electrical supply wire (hot wire). • Connect the white neutral oven wire to the...

Installation Instructions
Page 14
... of the control panel. Refer to the data plate on your product data plate when calling. Select the BAKE mode. Set the SELF CLEAN mode. If any of the manual. Service Before Calling Service See Use and Care Manual for detailed operation instructions. 3. Refer to preheat. 4. Testing Operation 1. See the Use and Care Manual for troubleshooting information. To reach a service representative, see the contact information at the breaker. 2. The data plate is complete at this time. Test the oven mode. Please...
... of the control panel. Refer to the data plate on your product data plate when calling. Select the BAKE mode. Set the SELF CLEAN mode. If any of the manual. Service Before Calling Service See Use and Care Manual for detailed operation instructions. 3. Refer to preheat. 4. Testing Operation 1. See the Use and Care Manual for troubleshooting information. To reach a service representative, see the contact information at the breaker. 2. The data plate is complete at this time. Test the oven mode. Please...
Instructions for Use
Page 2
... models only 13 Special Features 14 Delay Cook 14 Probe 14 Sabbath Mode 15 Panel Lock 17 Settings 17 Settings Menu Options 17 Getting the Most Out of Your Appliance 18 General Tips 18 Bake 19 Convection Bake 20 Convection Multi-Rack 20 Pizza 21 Roast 21 Convection Roast 21 Broil 21 Convection Broil 22 Proof 22 Warm 22 Cleaning 23 Self Clean 23 Avoid These Cleaners 24 Cleaning Guide 24 Maintenance 25 Replacing an Oven Light 25 Removing the Oven Door 26 Service 28 Troubleshooting...
... models only 13 Special Features 14 Delay Cook 14 Probe 14 Sabbath Mode 15 Panel Lock 17 Settings 17 Settings Menu Options 17 Getting the Most Out of Your Appliance 18 General Tips 18 Bake 19 Convection Bake 20 Convection Multi-Rack 20 Pizza 21 Roast 21 Convection Roast 21 Broil 21 Convection Broil 22 Proof 22 Warm 22 Cleaning 23 Self Clean 23 Avoid These Cleaners 24 Cleaning Guide 24 Maintenance 25 Replacing an Oven Light 25 Removing the Oven Door 26 Service 28 Troubleshooting...
Instructions for Use
Page 4
... near the kitchen. 9 IMPORTANT SAFETY INSTRUCTIONS READ AND SAVE THESE INSTRUCTIONS Safety 9 WARNING Your new appliance has been designed to be safe and reliable when properly cared for details. Contact an authorized servicer. Do not repair or replace any part of the circuit breaker or fuse. Turn off the burner. Use this appliance only for use corrosive chemicals, vapors, flammables or nonfood products in injury...
... near the kitchen. 9 IMPORTANT SAFETY INSTRUCTIONS READ AND SAVE THESE INSTRUCTIONS Safety 9 WARNING Your new appliance has been designed to be safe and reliable when properly cared for details. Contact an authorized servicer. Do not repair or replace any part of the circuit breaker or fuse. Turn off the burner. Use this appliance only for use corrosive chemicals, vapors, flammables or nonfood products in injury...
Instructions for Use
Page 8
... when removing an oven rack from damage and spills. Tilt rack up (A) to allow the upwardly sloped rear of electric shock or fire. If a rack must be moved while the oven is past this stop molded into the oven: 1. Oven Bottom The oven bottom conceals the lower heating element. Can use aluminum foil or protective liners to line any part of the rack guide above. 4. Do not clean...
... when removing an oven rack from damage and spills. Tilt rack up (A) to allow the upwardly sloped rear of electric shock or fire. If a rack must be moved while the oven is past this stop molded into the oven: 1. Oven Bottom The oven bottom conceals the lower heating element. Can use aluminum foil or protective liners to line any part of the rack guide above. 4. Do not clean...
Instructions for Use
Page 16
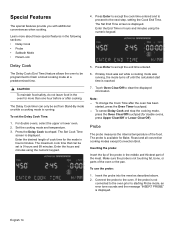
... the probe in the oven for Bake, Roast and all convection cooking modes except Convection Broil. Press Enter to the next step, setting the Cook End Time. Inserting the probe: Insert the tip of cook time for double ovens, press Upper Clear/Off or Lower Clear/Off). To use the probe: 1. The Set Cook Time screen is not touching fat, bone, or parts of the food. Probe The probe measures the internal temperature of the oven or the pan...
... the probe in the oven for Bake, Roast and all convection cooking modes except Convection Broil. Press Enter to the next step, setting the Cook End Time. Inserting the probe: Insert the tip of cook time for double ovens, press Upper Clear/Off or Lower Clear/Off). To use the probe: 1. The Set Cook Time screen is not touching fat, bone, or parts of the food. Probe The probe measures the internal temperature of the oven or the pan...
Instructions for Use
Page 17
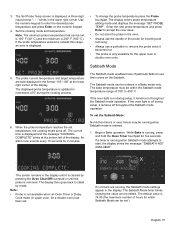
... the display. Note: • Probe is removed. Set the cooking mode and temperature. The displayed probe temperature is displayed and the message "COOKING COMPLETE" blinks at the lower right corner of particular faiths to 450° F. Begin a Bake operation. The Sabbath Mode timer blinks showing the value can be within the Sabbath mode temperature range of the probe for a double oven) has been set temperature, the cooking mode turns off during setup, it is cleared by mode. Sabbath Mode 5. The current time is updated in a Bake mode...
... the display. Note: • Probe is removed. Set the cooking mode and temperature. The displayed probe temperature is displayed and the message "COOKING COMPLETE" blinks at the lower right corner of particular faiths to 450° F. Begin a Bake operation. The Sabbath Mode timer blinks showing the value can be within the Sabbath mode temperature range of the probe for a double oven) has been set temperature, the cooking mode turns off during setup, it is cleared by mode. Sabbath Mode 5. The current time is updated in a Bake mode...
Instructions for Use
Page 19
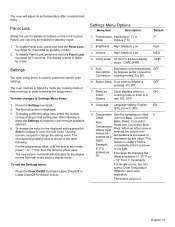
... either too brown 5° F is used to access the setup menu. For double ovens: You can only be enabled in stand by mode (no ON cooking mode or timer is automatically accepted as the display reverts from edit mode back to display mode. To change the setting value. Roast and Convection MultiRack. Panel Lock Allows the user to Settings Menu Items: 1. To exit the Settings menu: Press the Clear On/Off...
... either too brown 5° F is used to access the setup menu. For double ovens: You can only be enabled in stand by mode (no ON cooking mode or timer is automatically accepted as the display reverts from edit mode back to display mode. To change the setting value. Roast and Convection MultiRack. Panel Lock Allows the user to Settings Menu Items: 1. To exit the Settings menu: Press the Clear On/Off...
Instructions for Use
Page 20
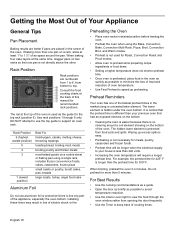
... Roast, Convection Roast and Proof modes. • Allow oven to top. For Best Results • Use the cooking recommendations as a guide. • Open the door as briefly as possible to avoid temperature reduction. • Use the interior oven light to keep track of cooking times. It is normal that had an exposed element on two racks so that one of the fastest preheat times in risk of electric shock or fire. When broiling, preheat...
... Roast, Convection Roast and Proof modes. • Allow oven to top. For Best Results • Use the cooking recommendations as a guide. • Open the door as briefly as possible to avoid temperature reduction. • Use the interior oven light to keep track of cooking times. It is normal that had an exposed element on two racks so that one of the fastest preheat times in risk of electric shock or fire. When broiling, preheat...
Instructions for Use
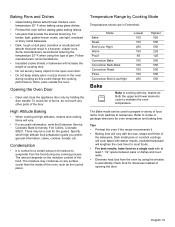
Page 21
... by Cooking Mode Temperatures shown are in a browner, crisper crust. Specify which high altitude food preparation guide you prefer: general information, cakes, cookies, breads, etc. Baking Pans and Dishes • Glass baking dishes absorb heat. Reduce oven temperature 25° F when baking using the window to casseroles. Some manufacturers recommend reducing the temperature 25 ºF when using this could change the cooking performance. Opening the Oven Door -- High Altitude Baking • When cooking...
... by Cooking Mode Temperatures shown are in a browner, crisper crust. Specify which high altitude food preparation guide you prefer: general information, cakes, cookies, breads, etc. Baking Pans and Dishes • Glass baking dishes absorb heat. Reduce oven temperature 25° F when baking using the window to casseroles. Some manufacturers recommend reducing the temperature 25 ºF when using this could change the cooking performance. Opening the Oven Door -- High Altitude Baking • When cooking...
Instructions for Use
Page 23
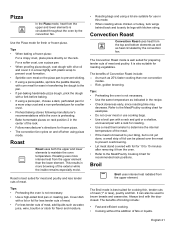
... oven temperature. English 21 Pizza 2 In the Pizza mode, heat from the upper and lower elements is circulated throughout the oven by the convection fan. Roast % Roast uses both the upper and lower elements to brown breads and casseroles. Roast is best suited for cooking thin, tender cuts of meat. The Broil mode is well suited for fresh or frozen pizza. Cover dish with a fork before baking. • If using a pizza pan...
... oven temperature. English 21 Pizza 2 In the Pizza mode, heat from the upper and lower elements is circulated throughout the oven by the convection fan. Roast % Roast uses both the upper and lower elements to brown breads and casseroles. Roast is best suited for cooking thin, tender cuts of meat. The Broil mode is well suited for fresh or frozen pizza. Cover dish with a fork before baking. • If using a pizza pan...
Instructions for Use
Page 25
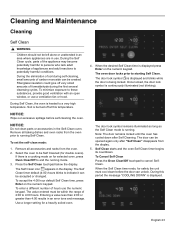
... be Self Cleaned (for double ovens). To minimize exposure to starting Self Clean. NOTICE: Do not clean parts or accessories in the display. Use a longer setting for safety the unit must be opened again only after Self Cleaning. The oven door locks prior to these substances, provide good ventilation with an open window, or use a ventilation fan or hood. The door lock symbol remains illuminated as long as the Self Clean mode is being locked. Self Clean starts and the oven Self Clean timer...
... be Self Cleaned (for double ovens). To minimize exposure to starting Self Clean. NOTICE: Do not clean parts or accessories in the display. Use a longer setting for safety the unit must be opened again only after Self Cleaning. The oven door locks prior to these substances, provide good ventilation with an open window, or use a ventilation fan or hood. The door lock symbol remains illuminated as long as the Self Clean mode is being locked. Self Clean starts and the oven Self Clean timer...
Instructions for Use
Page 27
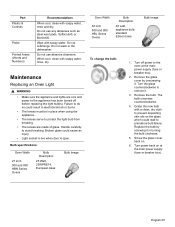
... 30 inch 500 and 800 HBL Series Ovens Bulb Description 40 watt, appliance bulb, standard Edison base Bulb Image To change the bulb: 1. Remove the glass cover by screwing it . Remove the bulb. Turn power back on . 6. Turn off before replacing the light bulb(s). Do not use abrasive cleansers. Do not use any abrasives such as steel wool pads, Softscrub®, or BonAmi©. When cool, clean with soapy water. Maintenance Replacing an Oven Light...
... 30 inch 500 and 800 HBL Series Ovens Bulb Description 40 watt, appliance bulb, standard Edison base Bulb Image To change the bulb: 1. Remove the glass cover by screwing it . Remove the bulb. Turn power back on . 6. Turn off before replacing the light bulb(s). Do not use abrasive cleansers. Do not use any abrasives such as steel wool pads, Softscrub®, or BonAmi©. When cool, clean with soapy water. Maintenance Replacing an Oven Light...
Instructions for Use
Page 30
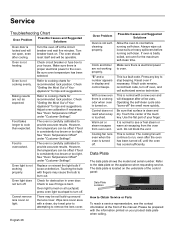
... manual. Check circuit breaker or fuse box to turn off . Baking results are not working properly. However, the temperature can be soil build-up around the lens cover. With a new oven there is a strong odor when oven is turned on . Data Plate The data plate shows the model and serial number. Service Troubleshooting Chart Oven Problem Possible Causes and Suggested Solutions Oven door is locked and will not open, even after a few uses. Turn breaker back on . The oven should reset...
... manual. Check circuit breaker or fuse box to turn off . Baking results are not working properly. However, the temperature can be soil build-up around the lens cover. With a new oven there is a strong odor when oven is turned on . Data Plate The data plate shows the model and serial number. Service Troubleshooting Chart Oven Problem Possible Causes and Suggested Solutions Oven door is locked and will not open, even after a few uses. Turn breaker back on . The oven should reset...
Instructions for Use
Page 31
... authorized service provider work performed by a non-authorized servicer. Notwithstanding the foregoing, Bosch will replace your Product (upgraded models may be extended with any reason whatsoever. The warranties stated herein apply only to the first purchaser of the Product and are not the direct fault of Bosch, including without limitation, any form of commercial use, use or storage of an indoor product outdoors, use of the Product in...
... authorized service provider work performed by a non-authorized servicer. Notwithstanding the foregoing, Bosch will replace your Product (upgraded models may be extended with any reason whatsoever. The warranties stated herein apply only to the first purchaser of the Product and are not the direct fault of Bosch, including without limitation, any form of commercial use, use or storage of an indoor product outdoors, use of the Product in...


