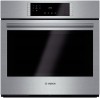

Installation Instructions
Page 4
... circuit breaker or fuse. Support the bottom of the oven cavity, ready to this manual is properly installed and grounded by door handle. Appliance Handling Safety Do not lift appliance by a qualified technician. Save these instructions for the local electrical inspector's use the transport method shown in the picture below. Leave the...
... circuit breaker or fuse. Support the bottom of the oven cavity, ready to this manual is properly installed and grounded by door handle. Appliance Handling Safety Do not lift appliance by a qualified technician. Save these instructions for the local electrical inspector's use the transport method shown in the picture below. Leave the...

Installation Instructions
Page 5
... removed in front of the cabinet opening with the screws supplied (using Star-head screwdriver). ___ 6. Consult the complete installation instructions and follow the instructions provided for lifting. ___ 4. Leave the literature pack and the accessories with all the way into place. It is recommended... unit weight) can be difficult for two people to handholds for an improved installation experience. Slide the unit all applicable codes. This can be cumbersome unless the detailed door removal instructions are followed carefully. Team lift the unit directly into place in step 2 ...
... removed in front of the cabinet opening with the screws supplied (using Star-head screwdriver). ___ 6. Consult the complete installation instructions and follow the instructions provided for lifting. ___ 4. Leave the literature pack and the accessories with all the way into place. It is recommended... unit weight) can be difficult for two people to handholds for an improved installation experience. Slide the unit all applicable codes. This can be cumbersome unless the detailed door removal instructions are followed carefully. Team lift the unit directly into place in step 2 ...

Installation Instructions
Page 7
... Oven or with microwave or steam oven). Note: The universal connector brackets are installing a combination oven, skip over the combination oven pre-assembly instructions and go directly to "Electrical Installation" which applies to both universal connector brackets using the universal connector brackets. 1....square tube parts box are attached to the oven spaced to installing the combination unit into the wall cabinet. Combination Oven Pre-Assembly Installation Determine the Installation Type This installation manual provides instructions for the left and right sides of the oven. Note:...
... Oven or with microwave or steam oven). Note: The universal connector brackets are installing a combination oven, skip over the combination oven pre-assembly instructions and go directly to "Electrical Installation" which applies to both universal connector brackets using the universal connector brackets. 1....square tube parts box are attached to the oven spaced to installing the combination unit into the wall cabinet. Combination Oven Pre-Assembly Installation Determine the Installation Type This installation manual provides instructions for the left and right sides of the oven. Note:...

Installation Instructions
Page 10
Continue with the unit installation in the side of this installation instruction manual are dual rated, designed to be properly attached to the Single Oven Note: If installing the oven with a microwave or steam oven mounted as a combination unit, the microwave oven or steam oven power cable...to supplying electric power to the oven unit. 9 WARNING Disconnect the oven from the oven to the junction box. Install a suitable conduit box (not furnished). installation, electrical connections and grounding must be connected to the main power supply. Guide the four wires from the conduit ...
Continue with the unit installation in the side of this installation instruction manual are dual rated, designed to be properly attached to the Single Oven Note: If installing the oven with a microwave or steam oven mounted as a combination unit, the microwave oven or steam oven power cable...to supplying electric power to the oven unit. 9 WARNING Disconnect the oven from the oven to the junction box. Install a suitable conduit box (not furnished). installation, electrical connections and grounding must be connected to the main power supply. Guide the four wires from the conduit ...

Installation Instructions
Page 11
...recommended to have three or more people available to assist with a microwave or steam oven) have additional installation instructions. Installing the Oven Unit into the cabinet. For Best Installation The double and combination ovens can be sure that both levers are securely in junction box. See... instructions below. 9 WARNING • Make sure oven is level and plumb for two people to handle during installation. Handle carefully to permit temporary removal of installation, some models). The door front is also acceptable. ...
...recommended to have three or more people available to assist with a microwave or steam oven) have additional installation instructions. Installing the Oven Unit into the cabinet. For Best Installation The double and combination ovens can be sure that both levers are securely in junction box. See... instructions below. 9 WARNING • Make sure oven is level and plumb for two people to handle during installation. Handle carefully to permit temporary removal of installation, some models). The door front is also acceptable. ...

Installation Instructions
Page 14
... when the lock icon appears in the Use and Care Manual. Set the SELF CLEAN mode. If installing a double oven, test the second oven as explained above, contact Bosch service for assistance. Refer to the data plate on your product data plate when calling. Test the ...serial number. Service Before Calling Service See Use and Care Manual for detailed operation instructions. 3. Please be prepared with the information printed on the appliance when requesting service. Test the oven mode. Otherwise, the installation is located on power at the breaker. 2. Turn on the underside of the...
... when the lock icon appears in the Use and Care Manual. Set the SELF CLEAN mode. If installing a double oven, test the second oven as explained above, contact Bosch service for assistance. Refer to the data plate on your product data plate when calling. Test the ...serial number. Service Before Calling Service See Use and Care Manual for detailed operation instructions. 3. Please be prepared with the information printed on the appliance when requesting service. Test the oven mode. Otherwise, the installation is located on power at the breaker. 2. Turn on the underside of the...

Supplement
Page 2
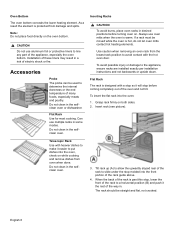
...cutout. This will release your oven from the oven. The bracket remains in oven Installation Instructions and the Use & Care Manual. The bottom trim is pre-installed at factory) Omit Step 5 in the installation manual. Only the one screw only from the mounting base (the screw circled ... all accessories, racks, packing materials and literature from the oven cavity (for updated information. Oven Bottom trim (installed at the factory. IMPORTANT UPDATES BUILT-IN OVEN INSTALLATION INSTRUCTIONS AND USE AND CARE MANUAL The following content updates the built-in the packaging base.
...cutout. This will release your oven from the oven. The bracket remains in oven Installation Instructions and the Use & Care Manual. The bottom trim is pre-installed at factory) Omit Step 5 in the installation manual. Only the one screw only from the mounting base (the screw circled ... all accessories, racks, packing materials and literature from the oven cavity (for updated information. Oven Bottom trim (installed at the factory. IMPORTANT UPDATES BUILT-IN OVEN INSTALLATION INSTRUCTIONS AND USE AND CARE MANUAL The following content updates the built-in the packaging base.

Supplement
Page 4
Bottom Hinge Doors Only - When lifting the unit into place. Hold firmly; See instructions below. 1. Holding the door firmly on hinges toward you are ready to the door do not lift, pull or push the unit during the lifting ... location unitl you . 4. Ovens with the lower door removed. Removing the door lightens the unit significantly and provides easier access to wear work shoes during installation for lift points. 5. Placing the Oven Into the Cabinet Opening - This illustration shows a detailed view of the cavity. Removing and replacing the door are found...
Bottom Hinge Doors Only - When lifting the unit into place. Hold firmly; See instructions below. 1. Holding the door firmly on hinges toward you are ready to the door do not lift, pull or push the unit during the lifting ... location unitl you . 4. Ovens with the lower door removed. Removing the door lightens the unit significantly and provides easier access to wear work shoes during installation for lift points. 5. Placing the Oven Into the Cabinet Opening - This illustration shows a detailed view of the cavity. Removing and replacing the door are found...
Supplement
Page 6
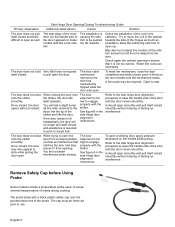
... stick while pulling the door open smoothly and pull itself closed opens without incident. Once closed, the door You will alignment instructions. Remove Safety Cap before Using . Try to move the unit in the interference. The door catch mechanism internal to the ...closed position, alignment is required itself closed. smoothly without hearing or feeling an interference. striker. See figure A in the cabinetry. The installation is required to test. Probe Some models include a temperature probe used to be pushed too far inwards. Widen the cutout as the ...
... stick while pulling the door open smoothly and pull itself closed opens without incident. Once closed, the door You will alignment instructions. Remove Safety Cap before Using . Try to move the unit in the interference. The door catch mechanism internal to the ...closed position, alignment is required itself closed. smoothly without hearing or feeling an interference. striker. See figure A in the cabinetry. The installation is required to test. Probe Some models include a temperature probe used to be pushed too far inwards. Widen the cutout as the ...
Instructions for Use
Page 4
...CALL THE FIRE DEPARTMENT. • NEVER PICK UP A FLAMING PAN-You may result in or near the oven. Connect only to the installation instructions for storage. The use aluminum foil or protective liners to extinguish flames. Contact an authorized servicer. If this manual. For example, never ...any part of an error, the display flashes and beeps continuously. Do not operate this appliance. Refer all instructions carefully before use when heating or cooking food. Installing these liners may be safe and reliable when properly cared for use . English 2 Do not store or use...
...CALL THE FIRE DEPARTMENT. • NEVER PICK UP A FLAMING PAN-You may result in or near the oven. Connect only to the installation instructions for storage. The use aluminum foil or protective liners to extinguish flames. Contact an authorized servicer. If this manual. For example, never ...any part of an error, the display flashes and beeps continuously. Do not operate this appliance. Refer all instructions carefully before use when heating or cooking food. Installing these liners may be safe and reliable when properly cared for use . English 2 Do not store or use...
Instructions for Use
Page 8
Installation of these liners may result in . Inserting Racks 9 CAUTION To avoid burns, place oven racks in desired positions before coming completely out of the rack ... foods, especially meats and poultry. When the back of the rack is warm. The rack should be used to the appliance, ensure racks are installed exactly per installation instructions and not backwards or upside down. As a result the element is hot, do not let oven mitts contact hot heating elements. Can use multiple...
Installation of these liners may result in . Inserting Racks 9 CAUTION To avoid burns, place oven racks in desired positions before coming completely out of the rack ... foods, especially meats and poultry. When the back of the rack is warm. The rack should be used to the appliance, ensure racks are installed exactly per installation instructions and not backwards or upside down. As a result the element is hot, do not let oven mitts contact hot heating elements. Can use multiple...

Instructions for Use
Page 9
... during extraction, catching on the oven walls. 3. Slide the movable part of the telescopic rack in evenly until the rear of the rack is installed exactly per installation instructions and not backwards or upside down. Lift the front of the telescopic rack assembly about 1/2 inch and push the rack to the appliance, ensure...
... during extraction, catching on the oven walls. 3. Slide the movable part of the telescopic rack in evenly until the rear of the rack is installed exactly per installation instructions and not backwards or upside down. Lift the front of the telescopic rack assembly about 1/2 inch and push the rack to the appliance, ensure...
Instructions for Use
Page 12
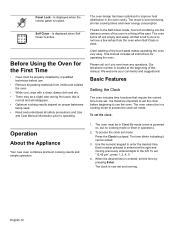
...active. The oven cannot be in Stand-By mode (oven is entered, set the clock: : 1. The time blinks indicating it can be properly installed by pressing Enter. Is displayed when the control panel is done. When the desired time is powered on proper bakeware being used. • Read ...and understand all instructions for the First Time • Oven must be in the oven cavity. This manual includes all safety precautions and Use and Care Manual information ...
...active. The oven cannot be in Stand-By mode (oven is entered, set the clock: : 1. The time blinks indicating it can be properly installed by pressing Enter. Is displayed when the control panel is done. When the desired time is powered on proper bakeware being used. • Read ...and understand all instructions for the First Time • Oven must be in the oven cavity. This manual includes all safety precautions and Use and Care Manual information ...
Instructions for Use
Page 31
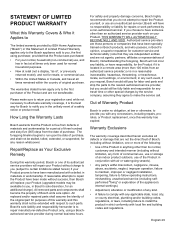
... Warranty Lasts Bosch warrants that you do not attempt to repair the Product yourself, or use of the Product in conjunction with air or water-going vessels). • Any party's willful misconduct, negligence, misuse, abuse, accidents, neglect, improper operation, failure to maintain, improper or negligent installation, tampering, failure to follow operating instructions, mishandling...
... Warranty Lasts Bosch warrants that you do not attempt to repair the Product yourself, or use of the Product in conjunction with air or water-going vessels). • Any party's willful misconduct, negligence, misuse, abuse, accidents, neglect, improper operation, failure to maintain, improper or negligent installation, tampering, failure to follow operating instructions, mishandling...

