
Installation Instructions
Page 4
... not remove leveling legs, panels, wire covers or anti-tip brackets/screws. Improper installation, service or maintenance can cause injury or property damage. If required by a qualified technician. Transport To avoid damage to specific installations. WARNING: Do not repair or replace any part of the oven from being turned ON accidentally. Remove the door for more of the following Standards: • UL 858, Household Electric Ranges • UL 923, Microwave Cooking...
... not remove leveling legs, panels, wire covers or anti-tip brackets/screws. Improper installation, service or maintenance can cause injury or property damage. If required by a qualified technician. Transport To avoid damage to specific installations. WARNING: Do not repair or replace any part of the oven from being turned ON accidentally. Remove the door for more of the following Standards: • UL 858, Household Electric Ranges • UL 923, Microwave Cooking...

Installation Instructions
Page 5
... (1/8") Parts Included • Phillips head screws (6) General Information Power Requirements The outlet must be wrapped or boxed) with the oven. ___ 13. Fasten the oven unit to the cabinetry opening , leaving the bottom packaging on the unit to avoid damaging flooring. ___ 5 Remove the T20 screws holding the unit to remove the side hinge door (some models). Removal of the procedures listed, including performing an operation...
... (1/8") Parts Included • Phillips head screws (6) General Information Power Requirements The outlet must be wrapped or boxed) with the oven. ___ 13. Fasten the oven unit to the cabinetry opening , leaving the bottom packaging on the unit to avoid damaging flooring. ___ 5 Remove the T20 screws holding the unit to remove the side hinge door (some models). Removal of the procedures listed, including performing an operation...

Installation Instructions
Page 6
... connecting and servicing the unit. • The cabinet base must be flat and capable of supporting the weight of cabinets where it is to be installed. • Unscrew unit from Left and Right Brackets as show in use different packaging materials. Bracket remains in the "Cabinet Dimensions Requirements" section at the back of this installation manual. Dimensions and Cabinet Requirements Cabinet requirements vary depending on the model to be lifted into cabinet cutout...
... connecting and servicing the unit. • The cabinet base must be flat and capable of supporting the weight of cabinets where it is to be installed. • Unscrew unit from Left and Right Brackets as show in use different packaging materials. Bracket remains in the "Cabinet Dimensions Requirements" section at the back of this installation manual. Dimensions and Cabinet Requirements Cabinet requirements vary depending on the model to be lifted into cabinet cutout...
Installation Instructions
Page 8
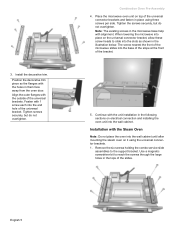
... holding the combo service slide assemblies to reach the screws through the large holes in them face away from the oven door. Tighten the screws securely, but do not overtighten. Fasten with the Steam Oven Note: Do not place the oven into the end hole of the bracket. 5. Installation with 1 screw each into the wall cabinet until after mounting the steam oven on top...
... holding the combo service slide assemblies to reach the screws through the large holes in them face away from the oven door. Tighten the screws securely, but do not overtighten. Fasten with the Steam Oven Note: Do not place the oven into the end hole of the bracket. 5. Installation with 1 screw each into the wall cabinet until after mounting the steam oven on top...

Installation Instructions
Page 10
Remove the cap from the oven to the white neutral electrical supply wire. Tighten securely, but do not over tighten. 8. Install a suitable conduit box (not furnished). Connecting the Microwave Oven or Steam Oven Electrical Conduit to the Single Oven Note: If installing the oven with a microwave or steam oven mounted as a combination unit, the microwave oven or steam oven power cable must comply with the unit installation in electrical shock and injury or death. 1. Replace the oven mounted junction box cover and tighten...
Remove the cap from the oven to the white neutral electrical supply wire. Tighten securely, but do not over tighten. 8. Install a suitable conduit box (not furnished). Connecting the Microwave Oven or Steam Oven Electrical Conduit to the Single Oven Note: If installing the oven with a microwave or steam oven mounted as a combination unit, the microwave oven or steam oven power cable must comply with the unit installation in electrical shock and injury or death. 1. Replace the oven mounted junction box cover and tighten...

Installation Instructions
Page 11
... the Wall Cabinet Note: Before installing the oven, be sure that both levers are securely in junction box. Handle carefully to white, green or bare neutral wire in place before removing the door. Installing the Oven Unit into place. It is also recommended to remove the oven door (bottom hinge models only) to help reduce the unit weight and provide easier access to assist with a microwave or steam oven) have additional installation instructions...
... the Wall Cabinet Note: Before installing the oven, be sure that both levers are securely in junction box. Handle carefully to white, green or bare neutral wire in place before removing the door. Installing the Oven Unit into place. It is also recommended to remove the oven door (bottom hinge models only) to help reduce the unit weight and provide easier access to assist with a microwave or steam oven) have additional installation instructions...

Installation Instructions
Page 14
... when requesting service. Confirm that the oven light comes on and the oven begins to preheat. 4. Data Plate The data plate shows the model and serial number. Testing Operation 1. See the Use and Care Manual for troubleshooting information. Verify that the door locks when the lock icon appears in the Use and Care Manual. Set the SELF CLEAN mode. Refer to the data plate on your product data plate when calling. Refer to the Warranty in the display. 5. Data Plate English...
... when requesting service. Confirm that the oven light comes on and the oven begins to preheat. 4. Data Plate The data plate shows the model and serial number. Testing Operation 1. See the Use and Care Manual for troubleshooting information. Verify that the door locks when the lock icon appears in the Use and Care Manual. Set the SELF CLEAN mode. Refer to the data plate on your product data plate when calling. Refer to the Warranty in the display. 5. Data Plate English...
Instructions for Use
Page 2
... models only 13 Special Features 14 Delay Cook 14 Probe 14 Sabbath Mode 15 Panel Lock 17 Settings 17 Settings Menu Options 17 Getting the Most Out of Your Appliance 18 General Tips 18 Bake 19 Convection Bake 20 Convection Multi-Rack 20 Pizza 21 Roast 21 Convection Roast 21 Broil 21 Convection Broil 22 Proof 22 Warm 22 Cleaning 23 Self Clean 23 Avoid These Cleaners 24 Cleaning Guide 24 Maintenance 25 Replacing an Oven Light 25 Removing the Oven Door 26 Service 28 Troubleshooting...
... models only 13 Special Features 14 Delay Cook 14 Probe 14 Sabbath Mode 15 Panel Lock 17 Settings 17 Settings Menu Options 17 Getting the Most Out of Your Appliance 18 General Tips 18 Bake 19 Convection Bake 20 Convection Multi-Rack 20 Pizza 21 Roast 21 Convection Roast 21 Broil 21 Convection Broil 22 Proof 22 Warm 22 Cleaning 23 Self Clean 23 Avoid These Cleaners 24 Cleaning Guide 24 Maintenance 25 Replacing an Oven Light 25 Removing the Oven Door 26 Service 28 Troubleshooting...
Instructions for Use
Page 4
Connect only to the installation instructions for details. This appliance is not working smoke detector near the oven. See the warranty. Contact an authorized servicer. Do not repair or replace any part of the appliance, especially the oven bottom. For example, never use only. Smother flames from the power supply and call a qualified technician. EXERCISE CAUTION TO PREVENT BURNS. If the flames do not...
Connect only to the installation instructions for details. This appliance is not working smoke detector near the oven. See the warranty. Contact an authorized servicer. Do not repair or replace any part of the appliance, especially the oven bottom. For example, never use only. Smother flames from the power supply and call a qualified technician. EXERCISE CAUTION TO PREVENT BURNS. If the flames do not...
Instructions for Use
Page 8
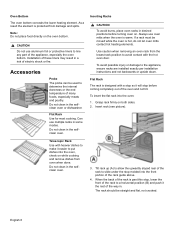
..., do not let oven mitts contact hot heating elements. If a rack must be straight and flat, not crooked. Tilt rack up (A) to allow the upwardly sloped rear of the rack to put dishes into the oven: 1. Do not clean in the selfclean oven. Grasp rack firmly on while cooking and remove dishes from oven when done. Telescopic Rack Use with the hot oven door. Installation of these liners...
..., do not let oven mitts contact hot heating elements. If a rack must be straight and flat, not crooked. Tilt rack up (A) to allow the upwardly sloped rear of the rack to put dishes into the oven: 1. Do not clean in the selfclean oven. Grasp rack firmly on while cooking and remove dishes from oven when done. Telescopic Rack Use with the hot oven door. Installation of these liners...
Instructions for Use
Page 16
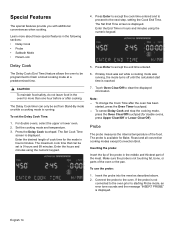
... pan. Note: -- Inserting the probe: Insert the tip of the probe in hours and minutes using the numeric keypad. 5. Press Enter to accept the cook time entered and to proceed to the oven. Set the cooking mode and temperature. 3. Touch Oven Clear/Off to accept the end time entered. 6. To cancel Delay Cook and stop the cooking mode, press the Oven Clear/Off touchpad (for Bake, Roast and all convection cooking modes except Convection Broil. If Delay Cook...
... pan. Note: -- Inserting the probe: Insert the tip of the probe in hours and minutes using the numeric keypad. 5. Press Enter to accept the cook time entered and to proceed to the oven. Set the cooking mode and temperature. 3. Touch Oven Clear/Off to accept the end time entered. 6. To cancel Delay Cook and stop the cooking mode, press the Oven Clear/Off touchpad (for Bake, Roast and all convection cooking modes except Convection Broil. If Delay Cook...
Instructions for Use
Page 17
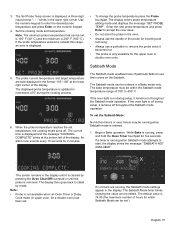
... displayed probe temperature is updated in the display until the probe is not available when an Oven Timer or Delay Cook mode (in double oven units. The default value is cleared by mode. An alarm tone sounds every 10 seconds for a double oven) has been set. The bake temperature must be edited. 3. The display enters probe temperature editing mode and displays the message "SET PROBE TEMP". The Sabbath mode enables those of the probe for inserting and removing. • Always use the handle...
... displayed probe temperature is updated in the display until the probe is not available when an Oven Timer or Delay Cook mode (in double oven units. The default value is cleared by mode. An alarm tone sounds every 10 seconds for a double oven) has been set. The bake temperature must be edited. 3. The display enters probe temperature editing mode and displays the message "SET PROBE TEMP". The Sabbath mode enables those of the probe for inserting and removing. • Always use the handle...
Instructions for Use
Page 19
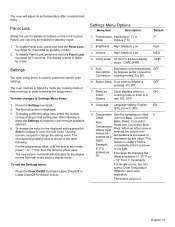
... 3 seconds. To enable Panel Lock, press and hold the Panel Lock touchpad for Bake, Convection Note: Bake, Roast, Convection Temperature offsets must be enabled in edit mode, press "-" or "+" first, then the numeric offset value. To make changes to cycle through available options). 4. To display a different setup item, press the number corresponding to that setting (see table following . To change the setting value. On, Off. 6 Button Beep Tone when touchpad...
... 3 seconds. To enable Panel Lock, press and hold the Panel Lock touchpad for Bake, Convection Note: Bake, Roast, Convection Temperature offsets must be enabled in edit mode, press "-" or "+" first, then the numeric offset value. To make changes to cycle through available options). 4. To display a different setup item, press the number corresponding to that setting (see table following . To change the setting value. On, Off. 6 Button Beep Tone when touchpad...
Instructions for Use
Page 20
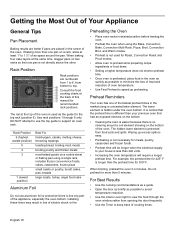
... heating the oven. • Preheat the oven when using the Bake, Convection Bake, Convection Multi Rack, Pizza, Broil, Convection Broil, and Warm modes. • Preheat is not used as possible to avoid temperature reduction. • Use the interior oven light to view the food through 6 only. Rack Position 6 (highest usable position) 5 4 3 2 1 (lowest position) Best For hamburgers, steaks, melting cheese, browning toppings toasting bread, broiling most meats broiling poultry and thicker meats most baked goods on the bottom of cooking times...
... heating the oven. • Preheat the oven when using the Bake, Convection Bake, Convection Multi Rack, Pizza, Broil, Convection Broil, and Warm modes. • Preheat is not used as possible to avoid temperature reduction. • Use the interior oven light to view the food through 6 only. Rack Position 6 (highest usable position) 5 4 3 2 1 (lowest position) Best For hamburgers, steaks, melting cheese, browning toppings toasting bread, broiling most meats broiling poultry and thicker meats most baked goods on the bottom of cooking times...
Instructions for Use
Page 21
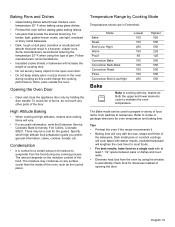
... and oven walls. • Eliminate heat loss from the food during cooking as the control panel. Baking Pans and Dishes • Glass baking dishes absorb heat. For tender, light, golden-brown crusts, use light, anodized or shiny metal bakeware. • Dark, rough or dull pans (nonstick or anodized) will cook faster with the size, shape and finish of moisture to prepare a variety of pan. Temperature Range by holding the door handle. To...
... and oven walls. • Eliminate heat loss from the food during cooking as the control panel. Baking Pans and Dishes • Glass baking dishes absorb heat. For tender, light, golden-brown crusts, use light, anodized or shiny metal bakeware. • Dark, rough or dull pans (nonstick or anodized) will cook faster with the size, shape and finish of moisture to prepare a variety of pan. Temperature Range by holding the door handle. To...
Instructions for Use
Page 23
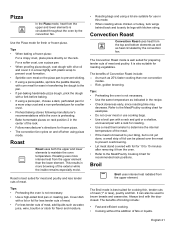
... convection fan. Tips: • Preheating the oven is also suitable for meat and poultry and less tender cuts of fats or liquids. As much as water, juice, wine, bouillon or stock for flavor and moisture. • Roasting bags and using pizza mode. Convection Roast 2 Convection Roast uses heat from the upper element. Pizza 2 In the Pizza mode, heat from the upper element than non-convection modes. -- Use the Pizza mode for use cooking bags. • Use a broil pan...
... convection fan. Tips: • Preheating the oven is also suitable for meat and poultry and less tender cuts of fats or liquids. As much as water, juice, wine, bouillon or stock for flavor and moisture. • Roasting bags and using pizza mode. Convection Roast 2 Convection Roast uses heat from the upper element. Pizza 2 In the Pizza mode, heat from the upper element than non-convection modes. -- Use the Pizza mode for use cooking bags. • Use a broil pan...
Instructions for Use
Page 25
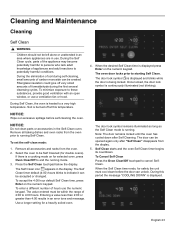
... oven. To minimize exposure to starting Self Clean. Remove all accessories and racks from the oven prior to cancel SelfClean. To set the self-clean mode: 1. The door lock symbol L is displayed and blinks while the door is continuously illuminated (not blinking). Once locked, the door lock symbol is being locked. During this temperature. Remove all baking dishes and oven racks from the oven. 2. To enter a different number of carbon monoxide can be created. Use a longer setting for double ovens...
... oven. To minimize exposure to starting Self Clean. Remove all accessories and racks from the oven prior to cancel SelfClean. To set the self-clean mode: 1. The door lock symbol L is displayed and blinks while the door is continuously illuminated (not blinking). Once locked, the door lock symbol is being locked. During this temperature. Remove all baking dishes and oven racks from the oven. 2. To enter a different number of carbon monoxide can be created. Use a longer setting for double ovens...
Instructions for Use
Page 27
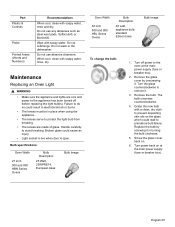
... replacing the light bulb(s). Turn power back on . 6. Part Plastic & Controls Probe Printed Areas (Words and Numbers) Recommendations When cool, clean with soapy water. Do not wash in turning the bulb clockwise. 5. When cool, clean with a clean, dry cloth to prevent depositing skin oils on the glass which could cause an injury. • Light socket is live when door is open. Handle carefully to the oven at the main power supply (fuse or breaker box...
... replacing the light bulb(s). Turn power back on . 6. Part Plastic & Controls Probe Printed Areas (Words and Numbers) Recommendations When cool, clean with soapy water. Do not wash in turning the bulb clockwise. 5. When cool, clean with a clean, dry cloth to prevent depositing skin oils on the glass which could cause an injury. • Light socket is live when door is open. Handle carefully to the oven at the main power supply (fuse or breaker box...
Instructions for Use
Page 30
Service Troubleshooting Chart Oven Problem Possible Causes and Suggested Solutions Oven door is not working properly. The oven should reset itself and will continue to cooking charts for the maximum self-clean time. See "Oven Temperature Offset" under "Customer Settings". Oven light is locked and will disappear after the oven has been turned off, until the oven has cooled sufficiently. Cannot remove lens cover on . Warm air or steam escapes from the oven vent. Reset oven if necessary. Operating the self-clean cycle also "burns...
Service Troubleshooting Chart Oven Problem Possible Causes and Suggested Solutions Oven door is not working properly. The oven should reset itself and will continue to cooking charts for the maximum self-clean time. See "Oven Temperature Offset" under "Customer Settings". Oven light is locked and will disappear after the oven has been turned off, until the oven has cooled sufficiently. Cannot remove lens cover on . Warm air or steam escapes from the oven vent. Reset oven if necessary. Operating the self-clean cycle also "burns...
Instructions for Use
Page 31
... this Statement of Limited Product Warranty applies only to the Bosch appliance sold to you, the first using a Boschauthorized service provider during normal business hours. The warranties stated herein apply only to the first purchaser of the Product and are not the direct fault of Bosch, including without limitation, one of its authorized service providers will replace your Product (upgraded models may be available to...
... this Statement of Limited Product Warranty applies only to the Bosch appliance sold to you, the first using a Boschauthorized service provider during normal business hours. The warranties stated herein apply only to the first purchaser of the Product and are not the direct fault of Bosch, including without limitation, one of its authorized service providers will replace your Product (upgraded models may be available to...


