Use and Care Manual
Page 2
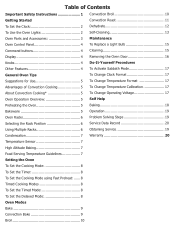
... 1 Convection Broil 10 Getting Started Convection Roast 11 To Set the Clock 2 Dehydrate 12 To Use the Oven Lights 2 Self-Cleaning 13 Oven Parts and Accessories 3 Maintenance Oven Control Panel 4 To Replace a Light Bulb 15 Command buttons 4 Cleaning 15 Display 4 Removing the Oven Door 16 Knobs 4 Do-It-Yourself Procedures Other Features 4 To Activate Sabbath Mode 17 General Oven Tips To Change Clock Format 17 Suggestions for Use 5 To Change Temperature Format 17 Advantages of Convection Cooking 5 To Change Temperature Calibration 17 About Convection Cooking...
... 1 Convection Broil 10 Getting Started Convection Roast 11 To Set the Clock 2 Dehydrate 12 To Use the Oven Lights 2 Self-Cleaning 13 Oven Parts and Accessories 3 Maintenance Oven Control Panel 4 To Replace a Light Bulb 15 Command buttons 4 Cleaning 15 Display 4 Removing the Oven Door 16 Knobs 4 Do-It-Yourself Procedures Other Features 4 To Activate Sabbath Mode 17 General Oven Tips To Change Clock Format 17 Suggestions for Use 5 To Change Temperature Format 17 Advantages of Convection Cooking 5 To Change Temperature Calibration 17 About Convection Cooking...

Use and Care Manual
Page 3
... self-cleaning generates some by-products which are released. Do not use the cavity for examination, repair or adjustment. • Do not repair or replace any vent openings. 8. Do not overcook food. If materials inside the oven should climb onto the appliance to substances which are placed inside the oven. 5. Turn oven off and disconnect the circuit at the circuit breaker box. 7. Loose fitting garments or garments with the Installation Instructions...
... self-cleaning generates some by-products which are released. Do not use the cavity for examination, repair or adjustment. • Do not repair or replace any vent openings. 8. Do not overcook food. If materials inside the oven should climb onto the appliance to substances which are placed inside the oven. 5. Turn oven off and disconnect the circuit at the circuit breaker box. 7. Loose fitting garments or garments with the Installation Instructions...
Use and Care Manual
Page 4
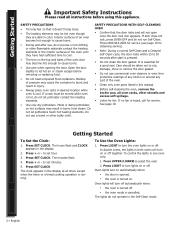
... the Self-Clean mode. 2 • English Press SET CLOCK The clock appears in burns from steam. Do not let potholders touch hot heating elements. to set hour. 3. to set minutes. 5. Self Help Care and Maintenance Operating the Oven Getting Started Important Safety Instructions Please read all times except when the timer or a timed cooking operation is running. Open the door slightly to let hot air or steam escape before using this manual. • Before self-cleaning the oven, remove the broiler pan, all oven racks, other...
... the Self-Clean mode. 2 • English Press SET CLOCK The clock appears in burns from steam. Do not let potholders touch hot heating elements. to set hour. 3. to set minutes. 5. Self Help Care and Maintenance Operating the Oven Getting Started Important Safety Instructions Please read all times except when the timer or a timed cooking operation is running. Open the door slightly to let hot air or steam escape before using this manual. • Before self-cleaning the oven, remove the broiler pan, all oven racks, other...
Use and Care Manual
Page 5
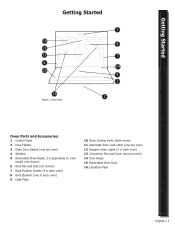
... the Oven Care and Maintenance Self Help Getting Started 10 11 13 9 15 12 Figure 1: Oven Parts 1 8 7 14 4 3 2 Oven Parts and Accessories: 1 Control Panel 2 Door Handle 3 Oven Door Gasket (one per oven) 4 Window 5 Removable Oven Racks; 2-5 depending on oven model (not shown) 6 Broil Pan and Grid (not shown) 7 Rack Position Guides (4 in each oven) 8 Broil Element (one in each oven) 9 Data Plate 10 Oven Cooling Vents (both ovens) 11 Automatic Door Lock Latch (one per oven) 12 Halogen Oven Lights (2 in each oven) 13 Convection Fan and Cover (one per oven) 14 Door Hinge 15 Removable Oven Door...
... the Oven Care and Maintenance Self Help Getting Started 10 11 13 9 15 12 Figure 1: Oven Parts 1 8 7 14 4 3 2 Oven Parts and Accessories: 1 Control Panel 2 Door Handle 3 Oven Door Gasket (one per oven) 4 Window 5 Removable Oven Racks; 2-5 depending on oven model (not shown) 6 Broil Pan and Grid (not shown) 7 Rack Position Guides (4 in each oven) 8 Broil Element (one in each oven) 9 Data Plate 10 Oven Cooling Vents (both ovens) 11 Automatic Door Lock Latch (one per oven) 12 Halogen Oven Lights (2 in each oven) 13 Convection Fan and Cover (one per oven) 14 Door Hinge 15 Removable Oven Door...
Use and Care Manual
Page 6
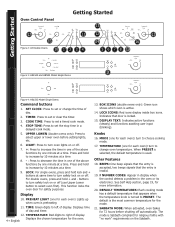
.... Self Help Care and Maintenance Operating the Oven Getting Started Oven Control Panel °F Getting Started 13 17 11 16 Figure 2: All Double Ovens 10 1 2 3 4 12 14 16 5 6 7 8 10 °F °F 17 Figure 3: HBL504 and HBN54 Model Single Ovens 9 °F Figure 4: HBL503 Model Single Ovens Command buttons 1. SET CLOCK: Press to select oven first). TIME: Green digits to right of day and timer. 12. This function locks the oven door for religious faiths with "no work" requirements...
.... Self Help Care and Maintenance Operating the Oven Getting Started Oven Control Panel °F Getting Started 13 17 11 16 Figure 2: All Double Ovens 10 1 2 3 4 12 14 16 5 6 7 8 10 °F °F 17 Figure 3: HBL504 and HBN54 Model Single Ovens 9 °F Figure 4: HBL503 Model Single Ovens Command buttons 1. SET CLOCK: Press to select oven first). TIME: Green digits to right of day and timer. 12. This function locks the oven door for religious faiths with "no work" requirements...
Use and Care Manual
Page 7
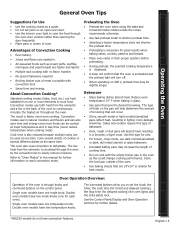
... turn off. • When operating on the control panel. The oven also uses convection to cook food. Bakeware • Glass baking dishes absorb heat. Single oven models have one mode knob. Getting Started Operating the Oven Care and Maintenance Self Help General Oven Tips Suggestions for Use • Use the cooking charts as a guide. • Do not set the clock, the timer, the cook time (for timed and delayed cooking), the stop time (for delayed cooking) the oven lights and the child safety lock. Cook several different dishes at one time. Refer to set pans...
... turn off. • When operating on the control panel. The oven also uses convection to cook food. Bakeware • Glass baking dishes absorb heat. Single oven models have one mode knob. Getting Started Operating the Oven Care and Maintenance Self Help General Oven Tips Suggestions for Use • Use the cooking charts as a guide. • Do not set the clock, the timer, the cook time (for timed and delayed cooking), the stop time (for delayed cooking) the oven lights and the child safety lock. Cook several different dishes at one time. Refer to set pans...
Use and Care Manual
Page 8
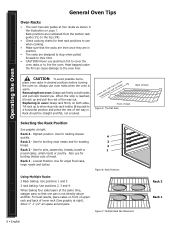
... oven liner. Use for broiling most meats and for broiling thicker cuts of lower rack (See graphic at the same time, stagger pans so that the racks are level once they are in oven: Grasp rack firmly on both sides. Self Help Care and Maintenance Operating the Oven Getting Familiar... Highest position. Lowest Position. For best results, place cakes on . Replacing in position. • The racks are numbered...
... oven liner. Use for broiling most meats and for broiling thicker cuts of lower rack (See graphic at the same time, stagger pans so that the racks are level once they are in oven: Grasp rack firmly on both sides. Self Help Care and Maintenance Operating the Oven Getting Familiar... Highest position. Lowest Position. For best results, place cakes on . Replacing in position. • The racks are numbered...
Use and Care Manual
Page 9
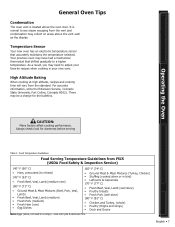
... a charge for doneness before serving Table 1: Food Temperature Guidelines Food Serving Temperature Guidelines from FSIS (USDA Food Safety & Inspection Service) 140° F (60° C) • Ham, precooked (to adjust your new oven. CAUTION: Many factors affect cooking performance. Operating the Oven Care and Maintenance Self Help General Oven Tips Condensation The oven vent is normal to see steam escaping from the standard. Always check food...
... a charge for doneness before serving Table 1: Food Temperature Guidelines Food Serving Temperature Guidelines from FSIS (USDA Food Safety & Inspection Service) 140° F (60° C) • Ham, precooked (to adjust your new oven. CAUTION: Many factors affect cooking performance. Operating the Oven Care and Maintenance Self Help General Oven Tips Condensation The oven vent is normal to see steam escaping from the standard. Always check food...
Use and Care Manual
Page 10
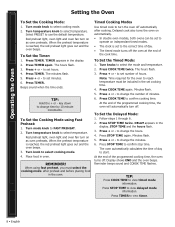
...: Time required for the oven to operate on as oven preheats. To Set the Delayed Mode: 1. STOP TIME and the hours flash. 3. Minutes flash. 5. TIP: Press COOK TIME to select cooking mode. 2. Turn mode knob to view timed mode information. Select PRESET to FAST PREHEAT. 2. Press TIMER. Turn mode knob to use the default temperature. Red preheat light, oven light and oven fan turn on independant timed modes. • The clock is reached, the red preheat light goes out and the oven beeps. 3. Place food in the display...
...: Time required for the oven to operate on as oven preheats. To Set the Delayed Mode: 1. STOP TIME and the hours flash. 3. Minutes flash. 5. TIP: Press COOK TIME to select cooking mode. 2. Turn mode knob to view timed mode information. Select PRESET to FAST PREHEAT. 2. Press TIMER. Turn mode knob to use the default temperature. Red preheat light, oven light and oven fan turn on independant timed modes. • The clock is reached, the red preheat light goes out and the oven beeps. 3. Place food in the display...

Use and Care Manual
Page 11
...fit from standard bake to maintain the oven temperature: Convection Bake Convection baking is well-suited for ... Table 2: Convection Bake Chart * The convection bake temperature is cooking with dry, heated air. Operating the Oven Care and Maintenance Self Help Oven Modes Bake Baking is 25° F less than recommended on two or more racks, use positions two, three and four. It can also be used to casseroles. The tem perature in cooking time • Three rack cooking • Higher volume...
...fit from standard bake to maintain the oven temperature: Convection Bake Convection baking is well-suited for ... Table 2: Convection Bake Chart * The convection bake temperature is cooking with dry, heated air. Operating the Oven Care and Maintenance Self Help Oven Modes Bake Baking is 25° F less than recommended on two or more racks, use positions two, three and four. It can also be used to casseroles. The tem perature in cooking time • Three rack cooking • Higher volume...
Use and Care Manual
Page 12
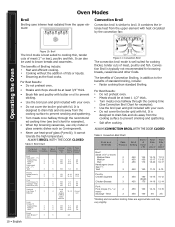
... heat circulated by the convection fan: Figure 10: Broil The broil mode is typically not recommended for examples). • Use the broil pan and grid included with your oven. • Do not cover the broiler grid with fork 5 145 5-7 4-6 5 160 6-8 5-7 5 170 8-10 7-9 5 4-6 10 • English Figure 11: Convection Broil The convection broil mode is similar to brown breads and casseroles. For Best Results: • Do not preheat oven. • Meats...
... heat circulated by the convection fan: Figure 10: Broil The broil mode is typically not recommended for examples). • Use the broil pan and grid included with your oven. • Do not cover the broiler grid with fork 5 145 5-7 4-6 5 160 6-8 5-7 5 170 8-10 7-9 5 4-6 10 • English Figure 11: Convection Broil The convection broil mode is similar to brown breads and casseroles. For Best Results: • Do not preheat oven. • Meats...

Use and Care Manual
Page 13
... the meat. Tenderloin Roast 2-3 425 Pork Loin Roast (boneless or bone-in the recipe. • Check doneness early as 25%. The minimum safe temperature for roasting. English • 11 The benefits of meat and poultry. Operating the Oven Care and Maintenance Self Help Oven Modes Convection Roast Convection roast uses heat from standard bake to your liking, but is browned to convection roast • DO NOT change recipe temperature. • Use roasting times in...
... the meat. Tenderloin Roast 2-3 425 Pork Loin Roast (boneless or bone-in the recipe. • Check doneness early as 25%. The minimum safe temperature for roasting. English • 11 The benefits of meat and poultry. Operating the Oven Care and Maintenance Self Help Oven Modes Convection Roast Convection roast uses heat from standard bake to your liking, but is browned to convection roast • DO NOT change recipe temperature. • Use roasting times in...
Use and Care Manual
Page 15
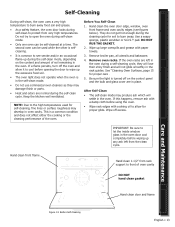
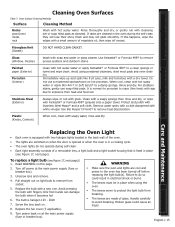
... the self-clean mode, depending on the control panel and the bulb and glass cover are left from the clean cycle. Hand clean the oven door edge, window, oven front frame and oven cavity edges (see smoke and/or an occasional flame-up the excessive food soil. • The oven light does not operate when the oven is turned off excess. Hand clean front frame Hand clean 1-1/2" from very high temperatures. Remove broiler pan...
... the self-clean mode, depending on the control panel and the bulb and glass cover are left from the clean cycle. Hand clean the oven door edge, window, oven front frame and oven cavity edges (see smoke and/or an occasional flame-up the excessive food soil. • The oven light does not operate when the oven is turned off excess. Hand clean front frame Hand clean 1-1/2" from very high temperatures. Remove broiler pan...
Use and Care Manual
Page 16
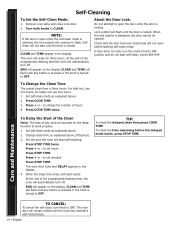
... - Set self-clean mode as explained above (if desired). 3. END will not start self-cleaning: Press STOP TIME twice. TO CANCEL: To cancel the self-clean, turn the mode knob to change the number of day must be opened. Self Help Care and Maintenance Operating the Oven Getting Familiar... phone 800-944- For light soil, use four hours. 1. To Delay the Start of the Clean Note: The time of hours. 4. Press + or - When the delay time ends, self-clean starts. The oven door...
... - Set self-clean mode as explained above (if desired). 3. END will not start self-cleaning: Press STOP TIME twice. TO CANCEL: To cancel the self-clean, turn the mode knob to change the number of day must be opened. Self Help Care and Maintenance Operating the Oven Getting Familiar... phone 800-944- For light soil, use four hours. 1. To Delay the Start of the Clean Note: The time of hours. 4. Press + or - When the delay time ends, self-clean starts. The oven door...
Use and Care Manual
Page 17
... the oven during self-clean. • Each light assembly consists of glass. If racks are cool and power to protect the light bulb from socket. 5. Avoid using the oven. • The lenses serve to the oven has been turned off power at the main power supply (fuse or breaker box). For stubborn stains, gently use a moistened sponge/towel on . 8. Plastic (Knobs, Controls) When cool, clean with grain. Broken glass could result in electrical...
... the oven during self-clean. • Each light assembly consists of glass. If racks are cool and power to protect the light bulb from socket. 5. Avoid using the oven. • The lenses serve to the oven has been turned off power at the main power supply (fuse or breaker box). For stubborn stains, gently use a moistened sponge/towel on . 8. Plastic (Knobs, Controls) When cool, clean with grain. Broken glass could result in electrical...
Use and Care Manual
Page 18
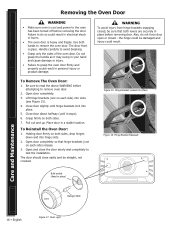
... and up. Removing the Oven Door WARNING • Make sure oven is cool and power to the oven has been turned off before attempting to remove the oven door. Handle carefully to read the above WARNING before removing the door. Use both levers are securely in electrical shock or burns. • The oven door is glass. Be sure to avoid breaking. • Grasp only the sides of the oven door. Open door completely. 3.
... and up. Removing the Oven Door WARNING • Make sure oven is cool and power to the oven has been turned off before attempting to remove the oven door. Handle carefully to read the above WARNING before removing the door. Use both levers are securely in electrical shock or burns. • The oven door is glass. Be sure to avoid breaking. • Grasp only the sides of the oven door. Open door completely. 3.
Use and Care Manual
Page 19
... shown. 2. Touch and hold SET CLOCK and TIMER until SELE dEG is shown. 2. Press SET CLOCK. 4. Press + or - to select oven (double ovens only). 5. The mode is a five minute delay in the calibration affects all beeps are present. Turn knob to set : 6. However, it can be changed . 208 V conversion must be done by a qualified technician. Turn knob to BAKE. 7. The temperature no work" requirements on or off automatically.
... shown. 2. Touch and hold SET CLOCK and TIMER until SELE dEG is shown. 2. Press SET CLOCK. 4. Press + or - to select oven (double ovens only). 5. The mode is a five minute delay in the calibration affects all beeps are present. Turn knob to set : 6. However, it can be changed . 208 V conversion must be done by a qualified technician. Turn knob to BAKE. 7. The temperature no work" requirements on or off automatically.
Use and Care Manual
Page 20
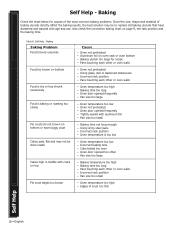
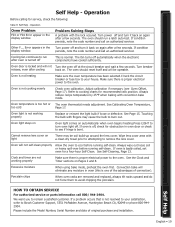
Self Help Care and Maintenance Operating the Oven Getting Familiar... Oven temperature too low - Tightly sealed with crack on bottom or have darkened and warped with age and use. Oven temperature is baking or roasting too slowly Pie crusts do not brown on top Pie crust edges too brown Cause - Pans touching each other or oven walls - Oven not preheated - Oven not preheated - Pan size too small - Using shiny steel pans - Incorrect baking time - Pan size too...
Self Help Care and Maintenance Operating the Oven Getting Familiar... Oven temperature too low - Tightly sealed with crack on bottom or have darkened and warped with age and use. Oven temperature is baking or roasting too slowly Pie crusts do not brown on top Pie crust edges too brown Cause - Pans touching each other or oven walls - Oven not preheated - Oven not preheated - Pan size too small - Using shiny steel pans - Incorrect baking time - Pan size too...
Use and Care Manual
Page 21
... parts information call 800/ 944-2904. Problem Solving Steps A problem with convention bake mode. Oven door is normal. Turn breaker release, even after oven is turned off and turn it back on automatically when oven begins heating.Press LIGHT to cool before running self-clean. Make sure there is badly soiled, set oven for obstruction in the display window. Oven is too hot or The oven thermostat needs adjustment. Oven temperature is not cooking evenly Check oven calibration. Oven light is proper electrical power...
... parts information call 800/ 944-2904. Problem Solving Steps A problem with convention bake mode. Oven door is normal. Turn breaker release, even after oven is turned off and turn it back on automatically when oven begins heating.Press LIGHT to cool before running self-clean. Make sure there is badly soiled, set oven for obstruction in the display window. Oven is too hot or The oven thermostat needs adjustment. Oven temperature is not cooking evenly Check oven calibration. Oven light is proper electrical power...
Use and Care Manual
Page 22
... PERIOD THAT THIS EXPRESS WARRANTY IS EFFECTIVE. It is opened. To obtain service see page 19. 20 • English Model number: Serial Number: Date of Bosch, at its authorized service center will not be seen when the oven door is located on the product can be liable for the Built-In Oven, you , the first using purchaser, provided that the Built-In Oven was purchased (1) for your...
... PERIOD THAT THIS EXPRESS WARRANTY IS EFFECTIVE. It is opened. To obtain service see page 19. 20 • English Model number: Serial Number: Date of Bosch, at its authorized service center will not be seen when the oven door is located on the product can be liable for the Built-In Oven, you , the first using purchaser, provided that the Built-In Oven was purchased (1) for your...


