Operating Instructions
Page 2
... electric shock. Do not abuse the cord. Refer to follow all instructions listed below, may result in serious personal injury. Personal Safety Stay alert, watch what you to install a polarized outlet. Keep handles dry, clean and free from heat, oil, sharp edges or moving parts. Be sure switch is unavoidable, a Ground Fault Circuit Interrupter must be used for the three wire grounded power cord and grounded power...
... electric shock. Do not abuse the cord. Refer to follow all instructions listed below, may result in serious personal injury. Personal Safety Stay alert, watch what you to install a polarized outlet. Keep handles dry, clean and free from heat, oil, sharp edges or moving parts. Be sure switch is unavoidable, a Ground Fault Circuit Interrupter must be used for the three wire grounded power cord and grounded power...

Operating Instructions
Page 3
... parts, and any adjustments, changing accessories, or storing the tool. Such preventive safety measures reduce the risk of this tool. Use of unauthorized parts or failure to loss of injury. Always use only identical replacement parts. Follow instructions in a dangerous condition. Wear proper apparel while using the tool and limit exposure time by hand or against your model. Operation of the tuckpointer without the side handle could result in tuckpointing and cut...
... parts, and any adjustments, changing accessories, or storing the tool. Such preventive safety measures reduce the risk of this tool. Use of unauthorized parts or failure to loss of injury. Always use only identical replacement parts. Follow instructions in a dangerous condition. Wear proper apparel while using the tool and limit exposure time by hand or against your model. Operation of the tuckpointer without the side handle could result in tuckpointing and cut...

Operating Instructions
Page 4
... than the "no load for your second hand on the tool's nameplate. Hold the machine firmly to kickback. Wheels running over your body such as to "cut while using this manual. Before each use a wheel that bursts during this machine may shatter. Do not use inspect the wheel for live electrical wiring, gas lines or water lines before work , apply excessive pressure or attempt to...
... than the "no load for your second hand on the tool's nameplate. Hold the machine firmly to kickback. Wheels running over your body such as to "cut while using this manual. Before each use a wheel that bursts during this machine may shatter. Do not use inspect the wheel for live electrical wiring, gas lines or water lines before work , apply excessive pressure or attempt to...

Operating Instructions
Page 5
... wheel. Wheel depth adjusting locking levers/nuts must be higher than the declared values. Some examples of these exposures varies, depending on the machine handles and position your exposure to these conditions causing pieces or fragments to high intensity noise can cause kickback. ! Values measured in accordance with an excessive depth of cut setting increases loading on the unit and susceptibility to a complete stop...
... wheel. Wheel depth adjusting locking levers/nuts must be higher than the declared values. Some examples of these exposures varies, depending on the machine handles and position your exposure to these conditions causing pieces or fragments to high intensity noise can cause kickback. ! Values measured in accordance with an excessive depth of cut setting increases loading on the unit and susceptibility to a complete stop...
Operating Instructions
Page 6
... battery recycling program This symbol designates that this tool is increasing from 0 setting Arrow Action in the direction of arrow Alternating current Type or a characteristic of current Direct current Type or a characteristic of current Alternating or direct current Type or a characteristic of drill bits, grinding wheels, etc. This symbol designates that this tool is listed by Underwriters Laboratories. per minute 0 Off position Zero speed, zero torque...
... battery recycling program This symbol designates that this tool is increasing from 0 setting Arrow Action in the direction of arrow Alternating current Type or a characteristic of current Direct current Type or a characteristic of current Alternating or direct current Type or a characteristic of drill bits, grinding wheels, etc. This symbol designates that this tool is listed by Underwriters Laboratories. per minute 0 Off position Zero speed, zero torque...

Operating Instructions
Page 7
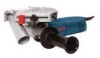
Tuckpointer FIG. 1 VENTILATION OPENINGS SWITCH BUTTON SPINDLE LOCK DUST PORT AUXILIARY HANDLE ADJUSTABLE DEPTH STOP DEPTH SCALE DEPTH ADJUST LOCK KNOB GUARD COVER KNOB Model number Abrasive wheel diameter 1775E 5" (127 mm) NOTE: For tool specifications refer to the nameplate on your tool. -7- Such preventive safety measures reduce the risk of starting the tool accidentally. BM 3609929818 3/03 3/10/03 8:42 AM Page 7 Functional Description and Specifications ! WARNING Disconnect the plug from the power source before making any assembly, adjustments or changing accessories.
Tuckpointer FIG. 1 VENTILATION OPENINGS SWITCH BUTTON SPINDLE LOCK DUST PORT AUXILIARY HANDLE ADJUSTABLE DEPTH STOP DEPTH SCALE DEPTH ADJUST LOCK KNOB GUARD COVER KNOB Model number Abrasive wheel diameter 1775E 5" (127 mm) NOTE: For tool specifications refer to the nameplate on your tool. -7- Such preventive safety measures reduce the risk of starting the tool accidentally. BM 3609929818 3/03 3/10/03 8:42 AM Page 7 Functional Description and Specifications ! WARNING Disconnect the plug from the power source before making any assembly, adjustments or changing accessories.

Operating Instructions
Page 8
... WINDOW GUARD COVER KNOB OPEN HERE LOCKING CLIP DUST PORT GUARD COVER VACUUM HOSE ADAPTER FIG. 3 LOCK NUT ABRASIVE WHEEL GUARD COVER SPINDLE BACKING FLANGE WHEEL GUARD -8- Replace guard cover knob and securely tighten knob (Fig. 2). Loosen the lock nut with the wrench provided. 7. Depress spindle lock and thread lock nut onto spindle and securely tighten lock nut with the wrench provided, and remove lock nut and abrasive wheel (Fig. 3). 5. Return guard cover back to it's original position and push into locking clip to unlock guard cover, and...
... WINDOW GUARD COVER KNOB OPEN HERE LOCKING CLIP DUST PORT GUARD COVER VACUUM HOSE ADAPTER FIG. 3 LOCK NUT ABRASIVE WHEEL GUARD COVER SPINDLE BACKING FLANGE WHEEL GUARD -8- Replace guard cover knob and securely tighten knob (Fig. 2). Loosen the lock nut with the wrench provided. 7. Depress spindle lock and thread lock nut onto spindle and securely tighten lock nut with the wrench provided, and remove lock nut and abrasive wheel (Fig. 3). 5. Return guard cover back to it's original position and push into locking clip to unlock guard cover, and...
Operating Instructions
Page 9
... use is spring loaded and will snap to desired position, and securely tighten screw. WARNING Hold the tool with both hands while starting the tool, since torque from the work . DO NOT turn the switch "ON" and "OFF" while the tool is equipped with overload protection to either side of the spindle housing depending on depth bracket, and release button to cool for extraction of masonry dust. To adjust guard, loosen clamp screw...
... use is spring loaded and will snap to desired position, and securely tighten screw. WARNING Hold the tool with both hands while starting the tool, since torque from the work . DO NOT turn the switch "ON" and "OFF" while the tool is equipped with overload protection to either side of the spindle housing depending on depth bracket, and release button to cool for extraction of masonry dust. To adjust guard, loosen clamp screw...

Operating Instructions
Page 10
... during operation. Begin cutting from the edge of other nearby workers. 7. ABRASIVE WHEELS Use type 1 silicon carbide wheels for cutting concrete. Ladders or scaffolding are strongly recommended for breathing protection for the operator from the presence of the material, starting with handling the tool. Do not force the tool; Use the adjustable depth stop to obtain the desired depth of the wheel with the side handle. With the tool in direction away...
... during operation. Begin cutting from the edge of other nearby workers. 7. ABRASIVE WHEELS Use type 1 silicon carbide wheels for cutting concrete. Ladders or scaffolding are strongly recommended for breathing protection for the operator from the presence of the material, starting with handling the tool. Do not force the tool; Use the adjustable depth stop to obtain the desired depth of the wheel with the side handle. With the tool in direction away...

Operating Instructions
Page 11
... * Abrasive wheel * Lock nut * Lock nut wrench * Auxiliary handle * Vacuum hose adapter ** Vacuum hose (*= standard equipment) (**= optional accessories) -11- Do not attempt to avoid overheating or motor failure. TOOL LUBRICATION Your Bosch tool has been properly lubricated and is recommended that all tool service be performed by unauthorized personnel may be examined. Ventilation openings and switch levers must use . WARNING To avoid accidents always disconnect the tool from the power supply before...
... * Abrasive wheel * Lock nut * Lock nut wrench * Auxiliary handle * Vacuum hose adapter ** Vacuum hose (*= standard equipment) (**= optional accessories) -11- Do not attempt to avoid overheating or motor failure. TOOL LUBRICATION Your Bosch tool has been properly lubricated and is recommended that all tool service be performed by unauthorized personnel may be examined. Ventilation openings and switch levers must use . WARNING To avoid accidents always disconnect the tool from the power supply before...
Setup Guide
Page 2
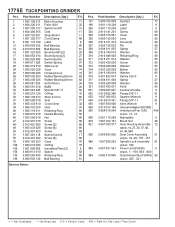
... Washer 65 Screw 89 Washer 65 Button 63 Washer 65 Safety Catch 9 Spring 27 Washer 65 Knob 63 Auxiliary Handle 9 Flange 5/8"-11 91 Spanner Wrench 9 Flange 5/8"-11 91 Allen Wrench 9 Vacuum Adapter (VAC002) Armature w/Fan 120V AW w/pos. 13, 14 Nameplate 9 Brush Set 26 Gear Housing Assembly 72 w/pos. 14, 27, 30, 37, 40, 41, 49, 840 Gear Cover Assembly 51 w/pos. 33, 49, 155 - 157 Spindle Lock Assembly 81 w/pos. 104 Power...
... Washer 65 Screw 89 Washer 65 Button 63 Washer 65 Safety Catch 9 Spring 27 Washer 65 Knob 63 Auxiliary Handle 9 Flange 5/8"-11 91 Spanner Wrench 9 Flange 5/8"-11 91 Allen Wrench 9 Vacuum Adapter (VAC002) Armature w/Fan 120V AW w/pos. 13, 14 Nameplate 9 Brush Set 26 Gear Housing Assembly 72 w/pos. 14, 27, 30, 37, 40, 41, 49, 840 Gear Cover Assembly 51 w/pos. 33, 49, 155 - 157 Spindle Lock Assembly 81 w/pos. 104 Power...


