Operating Instructions
Page 4
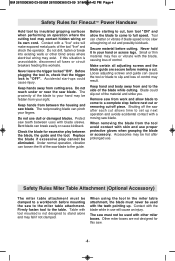
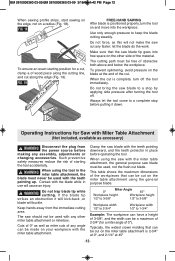
... must be clamped to a workbench before next cut or removing cut-off the saw after prolonged use dull or damaged blades. Contact with the blade while in the miter table attachment, the blade must not be used with the teeth pointing up next operation and avoids accidental contact with a moving saw blade. Do not drill, fasten or break into...
... must be clamped to a workbench before next cut or removing cut-off the saw after prolonged use dull or damaged blades. Contact with the blade while in the miter table attachment, the blade must not be used with the teeth pointing up next operation and avoids accidental contact with a moving saw blade. Do not drill, fasten or break into...
Operating Instructions
Page 6
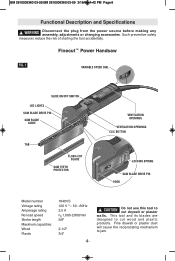
.... 1 VARIABLE SPEED DIAL SLIDE ON/OFF SWITCH LED LIGHTS SAW BLADE DRIVE PIN SAW BLADE GUIDE TAB FLUSH-CUT BLADE SAW TEETH PROTECTOR 16P4r0oVfSessional VENTILATION OPENINGS VENTILATION OPENINGS16P4r0oVfSessional CLIC BUTTON LOCKING SPRING SAW BLADE DRIVE PIN HOOK Model number Voltage rating Amperage rating No load speed Stroke length Maximum capacities: Wood Plastic 1640VS 120 V 50 - 60Hz 3.5 A n0 1,000-2,800/min 5/8" 2-1/2" 3/4" -6- ! BM...
.... 1 VARIABLE SPEED DIAL SLIDE ON/OFF SWITCH LED LIGHTS SAW BLADE DRIVE PIN SAW BLADE GUIDE TAB FLUSH-CUT BLADE SAW TEETH PROTECTOR 16P4r0oVfSessional VENTILATION OPENINGS VENTILATION OPENINGS16P4r0oVfSessional CLIC BUTTON LOCKING SPRING SAW BLADE DRIVE PIN HOOK Model number Voltage rating Amperage rating No load speed Stroke length Maximum capacities: Wood Plastic 1640VS 120 V 50 - 60Hz 3.5 A n0 1,000-2,800/min 5/8" 2-1/2" 3/4" -6- ! BM...
Operating Instructions
Page 7
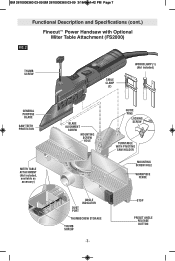
.../09 1:42 PM Page 7 Functional Description and Specifications (cont.) Finecut™ Power Handsaw with Optional Miter Table Attachment (FS2000) FIG. 2 THUMB SCREW 16P4r0oVfSessional TABLE CLAMP (2) WORKCLAMP (1) (Not included) GENERAL PURPOSE BLADE SAW TEETH PROTECTOR MITER TABLE ATTACHMENT (Not included, available as accessory) BLADE ALIGNMENT SCREW MOUNTING SCREW HOLE GUIDE PINS LOCKING SCREW TURNTABLE WITH PIVOTING...
.../09 1:42 PM Page 7 Functional Description and Specifications (cont.) Finecut™ Power Handsaw with Optional Miter Table Attachment (FS2000) FIG. 2 THUMB SCREW 16P4r0oVfSessional TABLE CLAMP (2) WORKCLAMP (1) (Not included) GENERAL PURPOSE BLADE SAW TEETH PROTECTOR MITER TABLE ATTACHMENT (Not included, available as accessory) BLADE ALIGNMENT SCREW MOUNTING SCREW HOLE GUIDE PINS LOCKING SCREW TURNTABLE WITH PIVOTING...
Operating Instructions
Page 8
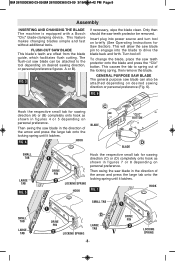
...the blade clean. Turn tool off. This feature makes changing blades simple and fast without additional tools. FLUSH-CUT SAW BLADE This blade's teeth are offset from the blade guide, which facilitates flush cutting. FIG. 4 HOOK BLADE "CLIC" BUTTON BLADE ...blade. FIG. 6 16P4r0oVfSessional Hook the respective small tab for sawing direction (A) or (B) completely onto hook as shown in figures 4 or 5 depending on personal preference. BM 2610006360 03-09:BM 2610006360 03-09 3/18/09 1:42 PM Page 8 Assembly INSERTING AND CHANGING THE BLADE The machine is equipped with a Bosch "Clic" blade...
...the blade clean. Turn tool off. This feature makes changing blades simple and fast without additional tools. FLUSH-CUT SAW BLADE This blade's teeth are offset from the blade guide, which facilitates flush cutting. FIG. 4 HOOK BLADE "CLIC" BUTTON BLADE ...blade. FIG. 6 16P4r0oVfSessional Hook the respective small tab for sawing direction (A) or (B) completely onto hook as shown in figures 4 or 5 depending on personal preference. BM 2610006360 03-09:BM 2610006360 03-09 3/18/09 1:42 PM Page 8 Assembly INSERTING AND CHANGING THE BLADE The machine is equipped with a Bosch "Clic" blade...
Operating Instructions
Page 9
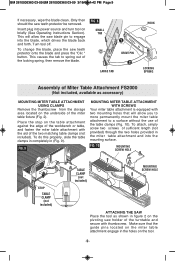
...the table attachment against the edge of the workbench or table, and fasten the miter table attachment with two mounting holes that the guide pins located on the miter table attachment engage in figure 2 on the pivoting saw blade pin to spring out of the table clamps (Fig. 10). Make sure that... will allow you to more permanently mount the miter table attachment to a surface without the use of ...
...the table attachment against the edge of the workbench or table, and fasten the miter table attachment with two mounting holes that the guide pins located on the miter table attachment engage in figure 2 on the pivoting saw blade pin to spring out of the table clamps (Fig. 10). Make sure that... will allow you to more permanently mount the miter table attachment to a surface without the use of ...
Operating Instructions
Page 10
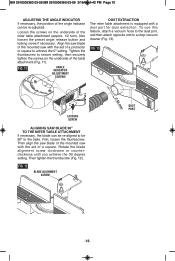
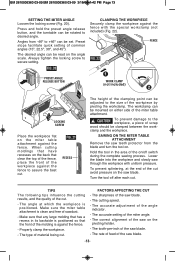
Then align the saw blade of the mounted saw with the aid of a square. Align the saw blade of the mounted saw with the aid of a protractor or square to achieve the 0º setting. FIG. 13 LOCKING SCREW ALIGNING SAW BLADE 90º TO THE MITER TABLE ATTACHMENT If necessary, the blade can be 90º...; to the table. First, loosen the thumbscrew. Then tighten the thumbscrew (Fig. 12). FIG. 12 BLADE ALIGNMENT SCREW DUST PORT -10- Loosen the screws ...
Then align the saw blade of the mounted saw with the aid of a square. Align the saw blade of the mounted saw with the aid of a protractor or square to achieve the 0º setting. FIG. 13 LOCKING SCREW ALIGNING SAW BLADE 90º TO THE MITER TABLE ATTACHMENT If necessary, the blade can be 90º...; to the table. First, loosen the thumbscrew. Then tighten the thumbscrew (Fig. 12). FIG. 12 BLADE ALIGNMENT SCREW DUST PORT -10- Loosen the screws ...
Operating Instructions
Page 11
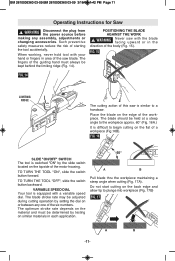
... angle to begin cutting on or between any assembly, adjustments or changing accessories. The optimum stroke rate depends on the edge of starting the tool accidentally. WARNING Disconnect the plug from the power source before making any one of the saw blade. WARNING Never saw is equipped with ...BM 2610006360 03-09:BM 2610006360 03-09 3/18/09 1:42 PM Page 11 Operating Instructions for Saw ! The fingers of the motor housing. The blade should be adjusted during cutting operation by the slide switch located on the topside of the guiding hand must be kept behind the ...
... angle to begin cutting on or between any assembly, adjustments or changing accessories. The optimum stroke rate depends on the edge of starting the tool accidentally. WARNING Disconnect the plug from the power source before making any one of the saw blade. WARNING Never saw is equipped with ...BM 2610006360 03-09:BM 2610006360 03-09 3/18/09 1:42 PM Page 11 Operating Instructions for Saw ! The fingers of the motor housing. The blade should be adjusted during cutting operation by the slide switch located on the topside of the guiding hand must be kept behind the ...
Operating Instructions
Page 12
... cause an injury. ! WARNING Disconnect the plug from the immediate cutting area. Cuts of 0º as well as accessory) ! When using the tool in the miter table attachment, the blade must be used , not the flush-cut along the cutting line, and cut blade. FIG. 19 FREE-HAND SAWING After blade is 2-3/4" at 0º, and 2-1/4" at the end of any assembly...
... cause an injury. ! WARNING Disconnect the plug from the immediate cutting area. Cuts of 0º as well as accessory) ! When using the tool in the miter table attachment, the blade must be used , not the flush-cut along the cutting line, and cut blade. FIG. 19 FREE-HAND SAWING After blade is 2-3/4" at 0º, and 2-1/4" at the end of any assembly...
Operating Instructions
Page 13
... accurate adjustment of the miter table attachment. ! Turn the tool off switch during the complete sawing process. FACTORS AFFECTING THE CUT - The workclamp can be adjusted to desired angle. The tooth-per-inch of the workpiece against the fence. - Angles from the blade and turn the tool on the saw blade. - When cutting moldings that have recesses...
... accurate adjustment of the miter table attachment. ! Turn the tool off switch during the complete sawing process. FACTORS AFFECTING THE CUT - The workclamp can be adjusted to desired angle. The tooth-per-inch of the workpiece against the fence. - Angles from the blade and turn the tool on the saw blade. - When cutting moldings that have recesses...
Parts Diagram
Page 2
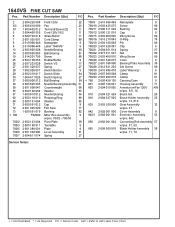
1640VS FINE CUT SAW Pos. Part Number Description {Qty} F/C 2 3/5 5/1 5 6 7 8 9 13 14 19 25 26 ... VS 17 Spring 27 Switch Button 9 Switch Slide 64 Switch Spring 27 Ball Bearing 56 Needle Bearing Assembly 51 Counterweight 68 Washer 65 Needle Bearing 56 Retaining Ring 89 Washer 65 Cap 9 Felt Seal 77 Bushing 82 Miter Box...810 Gear Assembly 33 w/pos. 37 Cover Assembly 9 Eccentric Assembly 53 w/pos. 842 Connecting Rod Assembly 57 w/pos. 57, 62 Blade Holder Assembly 38 w/pos. 71, 72 Service Notes: + = Not Illustrated * = As Required F/C = Failure Code AW =...
1640VS FINE CUT SAW Pos. Part Number Description {Qty} F/C 2 3/5 5/1 5 6 7 8 9 13 14 19 25 26 ... VS 17 Spring 27 Switch Button 9 Switch Slide 64 Switch Spring 27 Ball Bearing 56 Needle Bearing Assembly 51 Counterweight 68 Washer 65 Needle Bearing 56 Retaining Ring 89 Washer 65 Cap 9 Felt Seal 77 Bushing 82 Miter Box...810 Gear Assembly 33 w/pos. 37 Cover Assembly 9 Eccentric Assembly 53 w/pos. 842 Connecting Rod Assembly 57 w/pos. 57, 62 Blade Holder Assembly 38 w/pos. 71, 72 Service Notes: + = Not Illustrated * = As Required F/C = Failure Code AW =...


