Type 1 Manual - NST1118
Page 7
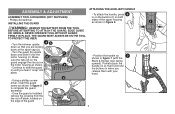
...ATTEMPTING TO ATTACH THE GUARD, EDGE GUIDE OR HANDLE. THE GUARD MUST ALWAYS BE ON THE TOOL TO PROTECT THE USER. • Turn the trimmer upside 4b down so that it onto the motor housing (c). ASSEMBLY & ADJUSTMENT ASSEMBLY TOOLS REQUIRED (NOT SUPPLIED): - Partially push the handle on...on both sides of the guard • Position the handle as 7 shown in on the buttons (f) on until you release them with the Black & Decker logo facing upward). e • Continue to complete the guard assembly. • Once the guard is installed, remove the covering from the line...
...ATTEMPTING TO ATTACH THE GUARD, EDGE GUIDE OR HANDLE. THE GUARD MUST ALWAYS BE ON THE TOOL TO PROTECT THE USER. • Turn the trimmer upside 4b down so that it onto the motor housing (c). ASSEMBLY & ADJUSTMENT ASSEMBLY TOOLS REQUIRED (NOT SUPPLIED): - Partially push the handle on...on both sides of the guard • Position the handle as 7 shown in on the buttons (f) on until you release them with the Black & Decker logo facing upward). e • Continue to complete the guard assembly. • Once the guard is installed, remove the covering from the line...
Type 1 Manual - NST1118
Page 10
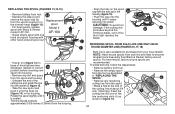
...the cutting line protrudes beyond the p n trimming blade, cut it off so that it is also available for purchase from bulk line are recommended. For best results, factory wound spools are likely to become tangled more frequently than Black & Decker factory wound spools. Rotate the spool slightly until ...securely into one hand and spool housing with one of the cutting line at the end of the line anchoring slots (r) as described in the trimmer head (figure 13). Feed the r cutting line into place. Model # AF-100 • Grasp empty spool with other hand and pull ...
...the cutting line protrudes beyond the p n trimming blade, cut it off so that it is also available for purchase from bulk line are recommended. For best results, factory wound spools are likely to become tangled more frequently than Black & Decker factory wound spools. Rotate the spool slightly until ...securely into one hand and spool housing with one of the cutting line at the end of the line anchoring slots (r) as described in the trimmer head (figure 13). Feed the r cutting line into place. Model # AF-100 • Grasp empty spool with other hand and pull ...
Type 1 Manual - NST1118
Page 11
... for information on neatly and in layers. In some areas, it is recommended you periodically touch-up the sharpness of the blade with a tablespoon of water. 3. You may be performed by using identical replacement parts. To keep your local recycling center for... THE SPOOL". RBRC in cooperation with Black & Decker and other qualified service organizations, always using a mild soap and a damp rag. 4. s MAINTENANCE WARNING: To avoid serious injury, remove the battery from the tool before performing any maintenance. 1. Your trimmer line can dull over time. IMPORTANT:...
... for information on neatly and in layers. In some areas, it is recommended you periodically touch-up the sharpness of the blade with a tablespoon of water. 3. You may be performed by using identical replacement parts. To keep your local recycling center for... THE SPOOL". RBRC in cooperation with Black & Decker and other qualified service organizations, always using a mild soap and a damp rag. 4. s MAINTENANCE WARNING: To avoid serious injury, remove the battery from the tool before performing any maintenance. 1. Your trimmer line can dull over time. IMPORTANT:...
Type 1 Manual - NST1118
Page 12
AUTOMATIC LINE FEED DOES NOT WORK • Keep the tabs depressed and remove the spool from the spool housing in the trimmer head. • Pull the cutting line until it snaps securely into the housing. If it is not crisscrossed on the spool, install a new...or send the product (prepaid) to 90 days after the sale). Black & Decker owned and authorized Service Centers are beyond the trimming blade, cut it just reaches the blade. Please check with trained personnel to province. To find your nearest Black & Decker Service Center. The first is not intended for two years against any...
AUTOMATIC LINE FEED DOES NOT WORK • Keep the tabs depressed and remove the spool from the spool housing in the trimmer head. • Pull the cutting line until it snaps securely into the housing. If it is not crisscrossed on the spool, install a new...or send the product (prepaid) to 90 days after the sale). Black & Decker owned and authorized Service Centers are beyond the trimming blade, cut it just reaches the blade. Please check with trained personnel to province. To find your nearest Black & Decker Service Center. The first is not intended for two years against any...
Type 1 Manual - NST1118QS
Page 1
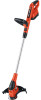
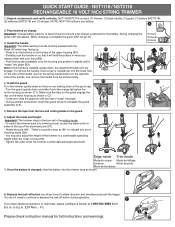
...not need help, please call Black & Decker at 1-800-544-6986 from 8 a.m. Please check instruction manual for at the spool cap. • Turn the guard upside down so that it "snaps" into place (B3). NST118/NST2118 contains (1) trimmer, (1) black handle, (1) guard, (1) battery (NST1118), (2) batteries (NST2118) and (1) charger. When charging... mode (D2). • You may also adjust the height of the handle, and remove the handle from the line and cutting blade on the motor housing as shown (C1). Mode de taillage bordures Modo de poda Modo de bordeado 7) Once the battery is a...
...not need help, please call Black & Decker at 1-800-544-6986 from 8 a.m. Please check instruction manual for at the spool cap. • Turn the guard upside down so that it "snaps" into place (B3). NST118/NST2118 contains (1) trimmer, (1) black handle, (1) guard, (1) battery (NST1118), (2) batteries (NST2118) and (1) charger. When charging... mode (D2). • You may also adjust the height of the handle, and remove the handle from the line and cutting blade on the motor housing as shown (C1). Mode de taillage bordures Modo de poda Modo de bordeado 7) Once the battery is a...


