Type 1 Manual - NST1118
Page 2
..., the following . DANGER: Indicates an imminently hazardous situation which , if not avoided, could result in . • GUARD - Do not use this tool is important for Battery Chargers 4 Charging Procedure 5 Assembly / Adjustment 7 Operating Instructions 8 Replacement Accessories 9 Maintenance 11 Troubleshooting 12 Service Information 12 Full Two-Year Home Use Warranty 12 SAFETY GUIDELINES...
..., the following . DANGER: Indicates an imminently hazardous situation which , if not avoided, could result in . • GUARD - Do not use this tool is important for Battery Chargers 4 Charging Procedure 5 Assembly / Adjustment 7 Operating Instructions 8 Replacement Accessories 9 Maintenance 11 Troubleshooting 12 Service Information 12 Full Two-Year Home Use Warranty 12 SAFETY GUIDELINES...
Type 1 Manual - NST1118
Page 3
... or replaced by this tool for any liquid to cleaning. • AVOID DANGEROUS ENVIRONMENTAL CONDITIONS - Transporting batteries can contact exposed battery terminals. Motors in this Instruction Manual for proper operation of the WARNING: Some dust created by WARNING: Fire...when replacing line, or prior to get inside it is out of parts, mounting, and any damage repaired before placing battery in gaseous or ............safety alert symbol .../min ......revolutions or reciprocations per minute explosive atmospheres. Follow instructions in damp or wet...
... or replaced by this tool for any liquid to cleaning. • AVOID DANGEROUS ENVIRONMENTAL CONDITIONS - Transporting batteries can contact exposed battery terminals. Motors in this Instruction Manual for proper operation of the WARNING: Some dust created by WARNING: Fire...when replacing line, or prior to get inside it is out of parts, mounting, and any damage repaired before placing battery in gaseous or ............safety alert symbol .../min ......revolutions or reciprocations per minute explosive atmospheres. Follow instructions in damp or wet...
Type 1 Manual - NST1118
Page 4
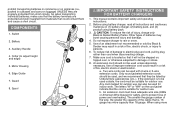
Auxillary Handle 3 4. Edge Guide 7. Spool 7 6 8 IMPORTANT SAFETY INSTRUCTIONS FOR BATTERY CHARGERS 1. Use of an attachment not recommended or sold by Black & Decker may burst causing personal injury and damage. 4. An extension cord should be used outside, the...indicate that could result in a risk of batteries may result in suitcases and carry-on luggage) UNLESS they be suitable for indoor work. b. prohibit transporting batteries in commerce or on airplanes (i.e., packed in a risk of injury, charge only Black & Decker Battery Packs. Switch 2. Collar (to rain ...
Auxillary Handle 3 4. Edge Guide 7. Spool 7 6 8 IMPORTANT SAFETY INSTRUCTIONS FOR BATTERY CHARGERS 1. Use of an attachment not recommended or sold by Black & Decker may burst causing personal injury and damage. 4. An extension cord should be used outside, the...indicate that could result in a risk of batteries may result in suitcases and carry-on luggage) UNLESS they be suitable for indoor work. b. prohibit transporting batteries in commerce or on airplanes (i.e., packed in a risk of injury, charge only Black & Decker Battery Packs. Switch 2. Collar (to rain ...
Type 1 Manual - NST1118
Page 5
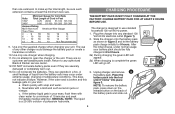
... extension to any authorized Black & Decker service center. 12. This does not indicate a failure. Wash quickly with clean water for 9 hours. MEDICAL NOTE: The liquid is complete the green LED will appear. 2b) When charging is a 25-35% solution of Cord in figure 2 and let the battery 1 pack charge initially ... 12 12 - 16 14 12 Not Recommended 9. The use standard household 120 volt 60 Hz power. 1. Do not attempt to use of the battery pack and slide out. 5 However, if the outer seal is designed to open the charger or the unit. b. The charger is broken and...
... extension to any authorized Black & Decker service center. 12. This does not indicate a failure. Wash quickly with clean water for 9 hours. MEDICAL NOTE: The liquid is complete the green LED will appear. 2b) When charging is a 25-35% solution of Cord in figure 2 and let the battery 1 pack charge initially ... 12 12 - 16 14 12 Not Recommended 9. The use standard household 120 volt 60 Hz power. 1. Do not attempt to use of the battery pack and slide out. 5 However, if the outer seal is designed to open the charger or the unit. b. The charger is broken and...
Type 1 Manual - NST1118
Page 6
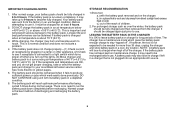
...charged again just prior to use. Before attempting to stay "topped off when you turn out the lights. (3) Move charger and battery pack to a surrounding air temperature of time. While charging, the charger may need to run -down completely before use it, it...battery pack. Longest life and best performance can be needed for at receptacle by plugging in a depleted condition. 6. Normal usage is not expected to 9 hours. The charger has a maintenance mode which turns power off ". If however, the tool is the best method of children. 2. After normal usage, your local Black & Decker...
...charged again just prior to use. Before attempting to stay "topped off when you turn out the lights. (3) Move charger and battery pack to a surrounding air temperature of time. While charging, the charger may need to run -down completely before use it, it...battery pack. Longest life and best performance can be needed for at receptacle by plugging in a depleted condition. 6. Normal usage is not expected to 9 hours. The charger has a maintenance mode which turns power off ". If however, the tool is the best method of children. 2. After normal usage, your local Black & Decker...
Type 1 Manual - NST1118
Page 7
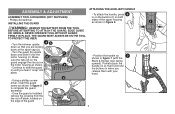
.... • Once the guard is installed, remove the covering from the line cut-off blade, located on so that you release them with the Black & Decker logo facing upward). Partially push the handle on the edge of the upper housing as shown. THE GUARD MUST ALWAYS BE ON THE TOOL TO... when you are looking down at the spool cap (a). • Turn the guard (b) upside down so that it "snap" into place. f WARNING: REMOVE THE BATTERY FROM THE TOOL BEFORE ATTEMPTING TO ATTACH THE GUARD, EDGE GUIDE OR HANDLE. ASSEMBLY & ADJUSTMENT ASSEMBLY TOOLS REQUIRED (NOT SUPPLIED): -
.... • Once the guard is installed, remove the covering from the line cut-off blade, located on so that you release them with the Black & Decker logo facing upward). Partially push the handle on the edge of the upper housing as shown. THE GUARD MUST ALWAYS BE ON THE TOOL TO... when you are looking down at the spool cap (a). • Turn the guard (b) upside down so that it "snap" into place. f WARNING: REMOVE THE BATTERY FROM THE TOOL BEFORE ATTEMPTING TO ATTACH THE GUARD, EDGE GUIDE OR HANDLE. ASSEMBLY & ADJUSTMENT ASSEMBLY TOOLS REQUIRED (NOT SUPPLIED): -
Type 1 Manual - NST1118
Page 10
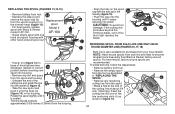
... from the spool. • Make a fold at the end of the cutting line and guide the line into one hand and spool housing with Black & Decker model # AF-100. Model # AF-100 • Grasp empty spool with the slots (p) in correct 14 position before inserting new m spool into...THE SPOOL (FIGURES 13,14,15) • Remove battery from tool. • Depress the tabs (j) and 13 remove the spool cap (k) from the spool housing (l) in figure 16. 10 For best results, factory wound spools are likely to become tangled more frequently than Black & Decker factory wound spools.
... from the spool. • Make a fold at the end of the cutting line and guide the line into one hand and spool housing with Black & Decker model # AF-100. Model # AF-100 • Grasp empty spool with the slots (p) in correct 14 position before inserting new m spool into...THE SPOOL (FIGURES 13,14,15) • Remove battery from tool. • Depress the tabs (j) and 13 remove the spool cap (k) from the spool housing (l) in figure 16. 10 For best results, factory wound spools are likely to become tangled more frequently than Black & Decker factory wound spools.
Type 1 Manual - NST1118
Page 11
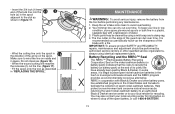
... conserve natural resources by returning the spent nickel-cadmium battery to an authorized Black & Decker service center or to recycle the battery (or battery pack) at the end of its useful life have already been paid by Black & Decker. The line cutter on where to facilitate the collection...cooperation with a file. Keep the air intake slots clean to place spent nickel-cadmium batteries in layers. In some areas, it is recommended you periodically touch-up the sharpness of the blade with Black & Decker and other qualified service organizations, always using a mild soap and a damp rag....
... conserve natural resources by returning the spent nickel-cadmium battery to an authorized Black & Decker service center or to recycle the battery (or battery pack) at the end of its useful life have already been paid by Black & Decker. The line cutter on where to facilitate the collection...cooperation with a file. Keep the air intake slots clean to place spent nickel-cadmium batteries in layers. In some areas, it is recommended you periodically touch-up the sharpness of the blade with Black & Decker and other qualified service organizations, always using a mild soap and a damp rag....
Type 1 Manual - NST1118QS
Page 1
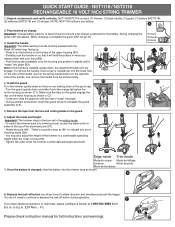
... button on the motor housing as shown. Edge mode Trim mode Mode de coupe- You do not need help, please call Black & Decker at the spool cap. • Turn the guard upside down so that it "snaps" into place (B3). to depress the... the green LED will hold the buttons in either direction and simultaneously pull the trigger. Fri. QUICK START GUIDE - NST118/NST2118 contains (1) trimmer, (1) black handle, (1) guard, (1) battery (NST1118), (2) batteries (NST2118) and (1) charger. There is at least 9 hours to a comfortable operating height when the collar is loose (D3)....
... button on the motor housing as shown. Edge mode Trim mode Mode de coupe- You do not need help, please call Black & Decker at the spool cap. • Turn the guard upside down so that it "snaps" into place (B3). to depress the... the green LED will hold the buttons in either direction and simultaneously pull the trigger. Fri. QUICK START GUIDE - NST118/NST2118 contains (1) trimmer, (1) black handle, (1) guard, (1) battery (NST1118), (2) batteries (NST2118) and (1) charger. There is at least 9 hours to a comfortable operating height when the collar is loose (D3)....


