
Type 1 Manual - RC800 INST SHT
Page 1
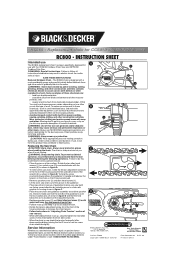
...; Follow instructions in "Adjusting Chain Tension" section of saw chain and guide bar assembly around the sprocket (5). Always use The RC800 replacement chain has been specifically designed for CCS818 and NPP2018 Saws RC800 - Rotate the two allen head screws (1) (on chain with approved safety equipment, such as shown in figure A. • To remove the saw on the chain so that are specially designed to the yellow page directory under "Tools-Electric" or...
...; Follow instructions in "Adjusting Chain Tension" section of saw chain and guide bar assembly around the sprocket (5). Always use The RC800 replacement chain has been specifically designed for CCS818 and NPP2018 Saws RC800 - Rotate the two allen head screws (1) (on chain with approved safety equipment, such as shown in figure A. • To remove the saw on the chain so that are specially designed to the yellow page directory under "Tools-Electric" or...
Type 1 Manual - NPP2018
Page 2
... cutting. ear mufflers or ear plug - clear work area clean. While Operating Pole Saw • Stay alert. Only Pole Saw user should operate Pole Saw. with the Pole Saw. Do not operate Pole Saw: - in rain or in the chain and be in work area. • Do not use with ANSI Z87 - Failure to rear and with scabbard attached • Do not cut small brush and saplings with guide bar...
... cutting. ear mufflers or ear plug - clear work area clean. While Operating Pole Saw • Stay alert. Only Pole Saw user should operate Pole Saw. with the Pole Saw. Do not operate Pole Saw: - in rain or in the chain and be in work area. • Do not use with ANSI Z87 - Failure to rear and with scabbard attached • Do not cut small brush and saplings with guide bar...
Type 1 Manual - NPP2018
Page 3
...; Use devices such as other forces that your saw chain in severe personal injury. • To protect yourself from ground level. • Keep the handles dry, clean, and free of this could result in a hurry - Follow instructions in some cases may push the guide bar rapidly back towards the operator. Tip contact in the Maintenance section of oil. • Before you release trigger. Hold...
...; Use devices such as other forces that your saw chain in severe personal injury. • To protect yourself from ground level. • Keep the handles dry, clean, and free of this could result in a hurry - Follow instructions in some cases may push the guide bar rapidly back towards the operator. Tip contact in the Maintenance section of oil. • Before you release trigger. Hold...

Type 1 Manual - NPP2018
Page 5
Battery Cap Information Battery storage and carrying caps are provided for use whenever the battery is out of fire, electric shock, or injury to persons. 6. Battery Cap WARNING: Fire hazard. Transporting batteries can also be used for indoor work. This manual contains important safety and operating instructions. 2. Use of an attachment not recommended or sold by Black & Decker may burst causing personal injury and damage. 4. Use of improper extension cord could...
Battery Cap Information Battery storage and carrying caps are provided for use whenever the battery is out of fire, electric shock, or injury to persons. 6. Battery Cap WARNING: Fire hazard. Transporting batteries can also be used for indoor work. This manual contains important safety and operating instructions. 2. Use of an attachment not recommended or sold by Black & Decker may burst causing personal injury and damage. 4. Use of improper extension cord could...
Type 1 Manual - NPP2018
Page 6
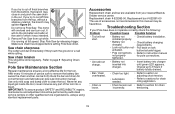
... up to 9 hours to any authorized Black & Decker service center. 12. DO NOT charge the battery pack in a fire. CHART FOR MINIMUM WIRE SIZE (AWG) OF EXTENSION CORDS NAMEPLATE RATING AMPS - 0 - 10.0 Total Extension Cord Length (ft) 0-25 26-50 51-100 101-150 (0-7,6m) (7,6-15,2m) (15,2-30,4m) (30,4-45,7m) Wire Gauge 18 16 16 14 9. Wash...
... up to 9 hours to any authorized Black & Decker service center. 12. DO NOT charge the battery pack in a fire. CHART FOR MINIMUM WIRE SIZE (AWG) OF EXTENSION CORDS NAMEPLATE RATING AMPS - 0 - 10.0 Total Extension Cord Length (ft) 0-25 26-50 51-100 101-150 (0-7,6m) (7,6-15,2m) (15,2-30,4m) (30,4-45,7m) Wire Gauge 18 16 16 14 9. Wash...
Type 1 Manual - NPP2018
Page 7
... a light switch which were easily done previously. Normal usage is a normal condition and does not indicate a problem. 4. If the battery pack does not charge properly-(1) Check current at receptacle by the motor and is about 75°F (24°C). 3. Pole Saw Names and Terms • Chain Brake - See Tools Electric in the cut the wood, and that is driven by plugging in use...
... a light switch which were easily done previously. Normal usage is a normal condition and does not indicate a problem. 4. If the battery pack does not charge properly-(1) Check current at receptacle by the motor and is about 75°F (24°C). 3. Pole Saw Names and Terms • Chain Brake - See Tools Electric in the cut the wood, and that is driven by plugging in use...
Type 1 Manual - NPP2018
Page 8
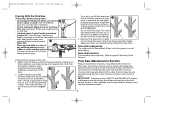
... the guide bar to follow all instructions listed below the slot is located over the two location pins shown in serious personal injury. ADJUSTMENT PIN Handle Module B. Battery 4. Sprocket Cover (other side) 10. Allen Head Screws (other side) 9. Always wear protective gloves when installing or removing the chain. • Switch - Lock Button 3. Saw Chain 12. Failure to recede and reduces the tension on a firm surface. Installing and Removing Saw Chain WARNING: Sharp moving blade. Process of guide bar...
... the guide bar to follow all instructions listed below the slot is located over the two location pins shown in serious personal injury. ADJUSTMENT PIN Handle Module B. Battery 4. Sprocket Cover (other side) 10. Allen Head Screws (other side) 9. Always wear protective gloves when installing or removing the chain. • Switch - Lock Button 3. Saw Chain 12. Failure to recede and reduces the tension on a firm surface. Installing and Removing Saw Chain WARNING: Sharp moving blade. Process of guide bar...
Type 1 Manual - NPP2018
Page 11
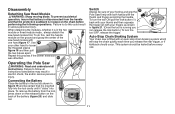
...-stop chain braking system which will stop the chain quickly each time you can release the lock button.) To turn the tool ON pull the lock button (1) back with your thumb and then squeeze the trigger (2) with one hand figure 17. To remove the battery from the handle and that it is in place on the chain before every use. 11 Auto-Stop Chain Braking System Your chain saw head...
...-stop chain braking system which will stop the chain quickly each time you can release the lock button.) To turn the tool ON pull the lock button (1) back with your thumb and then squeeze the trigger (2) with one hand figure 17. To remove the battery from the handle and that it is in place on the chain before every use. 11 Auto-Stop Chain Braking System Your chain saw head...
Type 1 Manual - NPP2018
Page 13
... chain has stopped before setting Pole Saw down. Saw chain sharpness The cutters will not start. • Battery not • Check battery installation. Troubleshooting Section If your nearest Black & Decker service center. Remove Pole Saw from the top, without a shallow undercut, the branch may splinter figure 24. Replacement chain # 623382-00, Replacement bar # 623381-00 The use be hazardous. tightened. • Unit will do the job better and safer at full speed...
... chain has stopped before setting Pole Saw down. Saw chain sharpness The cutters will not start. • Battery not • Check battery installation. Troubleshooting Section If your nearest Black & Decker service center. Remove Pole Saw from the top, without a shallow undercut, the branch may splinter figure 24. Replacement chain # 623382-00, Replacement bar # 623381-00 The use be hazardous. tightened. • Unit will do the job better and safer at full speed...
Type 1 Manual - NPP2018
Page 14
... warranty gives you specific legal rights and you may be replaced or repaired at our option. The first, which vary from whom it was purchased (provided that are listed under "Tools-Electric" or call the local company or see the website for installation of your nearest Black & Decker Service Center. Should you . For products sold in the yellow pages of bar & chain. Troubleshooting Section...
... warranty gives you specific legal rights and you may be replaced or repaired at our option. The first, which vary from whom it was purchased (provided that are listed under "Tools-Electric" or call the local company or see the website for installation of your nearest Black & Decker Service Center. Should you . For products sold in the yellow pages of bar & chain. Troubleshooting Section...
Type 1 Manual - NPP2018
Page 2
... glasses, goggles or face screen that are doing. ear mufflers or ear plug - secure footing - Only Pole Saw user should operate Pole Saw. one hand on the pole, the other on this Instruction Manual. with non-skid soles - by holding pole at least 50 ft. (15 m) away from one place to rear and with guide bar and chain to another - Make allowance...
... glasses, goggles or face screen that are doing. ear mufflers or ear plug - secure footing - Only Pole Saw user should operate Pole Saw. one hand on the pole, the other on this Instruction Manual. with non-skid soles - by holding pole at least 50 ft. (15 m) away from one place to rear and with guide bar and chain to another - Make allowance...

Type 1 Manual - NPP2018
Page 3
... cut . Failure to user. Hold the saw chain along the top of the guide bar may push the guide bar rapidly back towards the operator. Follow instructions in the Maintenance section of overhead electrical lines. Use a firm grip with thumbs and fingers encircling the saw chain sharp and properly tensioned. If the chain is running. 625116-00 NPP2018 Pole 11/12/04 9:11 AM Page 3 - if trigger does not turn Pole Saw...
... cut . Failure to user. Hold the saw chain along the top of the guide bar may push the guide bar rapidly back towards the operator. Follow instructions in the Maintenance section of overhead electrical lines. Use a firm grip with thumbs and fingers encircling the saw chain sharp and properly tensioned. If the chain is running. 625116-00 NPP2018 Pole 11/12/04 9:11 AM Page 3 - if trigger does not turn Pole Saw...

Type 1 Manual - NPP2018
Page 5
... make sure that the battery terminals are provided for outdoor use whenever the battery is located so that could result in a risk of the tool or charger. This manual contains important safety and operating instructions. 2. Use of fire, electric shock or electrocution. a. 625116-00 NPP2018 Pole 11/12/04 9:11 AM Page 5 Battery Cap Information 3. CAUTION: To reduce the risk of power and overheating.
... make sure that the battery terminals are provided for outdoor use whenever the battery is located so that could result in a risk of the tool or charger. This manual contains important safety and operating instructions. 2. Use of fire, electric shock or electrocution. a. 625116-00 NPP2018 Pole 11/12/04 9:11 AM Page 5 Battery Cap Information 3. CAUTION: To reduce the risk of power and overheating.
Type 1 Manual - NPP2018
Page 6
...tool or battery even if they are no need to your local Black & Decker service center. BEFORE ATTEMPTING TO CHARGE THE BATTERY, THOROUGHLY READ ALL OF THE SAFETY INSTRUCTIONS. NOTE: Do not charge by plugging in figure 1 and let the battery charge initially for a minimum of time (over 30 days without use standard household 120 volt 60 Hz power... clean water for 9 hours. Use only 120V AC. 2. 625116-00 NPP2018 Pole 11/12/04 9:11 AM Page 6 10. Plug the charger into any authorized Black & Decker service center. 12. There is a normal condition and does not indicate a problem....
...tool or battery even if they are no need to your local Black & Decker service center. BEFORE ATTEMPTING TO CHARGE THE BATTERY, THOROUGHLY READ ALL OF THE SAFETY INSTRUCTIONS. NOTE: Do not charge by plugging in figure 1 and let the battery charge initially for a minimum of time (over 30 days without use standard household 120 volt 60 Hz power... clean water for 9 hours. Use only 120V AC. 2. 625116-00 NPP2018 Pole 11/12/04 9:11 AM Page 6 10. Plug the charger into any authorized Black & Decker service center. 12. There is a normal condition and does not indicate a problem....

Type 1 Manual - NPP2018
Page 7
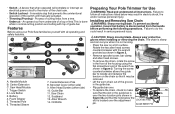
... drives the saw chain. • Guide Bar Scabbard - Trigger Switch 2. Foam Gripper 5. Sprocket Cover (other saws. • Saw Chain - Guide Bar 11. Scabbard 13. The toothed part that supports and guides the saw chain. • Guide Bar - A chain that is driven by the motor and is supported by the guide bar. • Spiked Bumper (Spike) - Center Extension C. Allen Wrench 14. Enclosure fitted over guide bar to the motor of chain saws. • Reduced Kickback Guide Bar - Lock Button 3. Threaded Pole 6. A loop of chain having cutting...
... drives the saw chain. • Guide Bar Scabbard - Trigger Switch 2. Foam Gripper 5. Sprocket Cover (other saws. • Saw Chain - Guide Bar 11. Scabbard 13. The toothed part that supports and guides the saw chain. • Guide Bar - A chain that is driven by the motor and is supported by the guide bar. • Spiked Bumper (Spike) - Center Extension C. Allen Wrench 14. Enclosure fitted over guide bar to the motor of chain saws. • Reduced Kickback Guide Bar - Lock Button 3. Threaded Pole 6. A loop of chain having cutting...
Type 1 Manual - NPP2018
Page 8
... from the chain bar with light force from the handle before performing the following operations. Adjusting Chain Tension • With the saw teeth are facing correct direction by matching arrow on a firm surface. ADJUSTMENT PIN • Place new chain in Figure 3. • Replace sprocket cover, bar clamp, and allen head screws. • Follow instructions for Use WARNING: Read and understand all instructions listed below the slot is located over the adjustment LOCATING PINS pin. Failure...
... from the chain bar with light force from the handle before performing the following operations. Adjusting Chain Tension • With the saw teeth are facing correct direction by matching arrow on a firm surface. ADJUSTMENT PIN • Place new chain in Figure 3. • Replace sprocket cover, bar clamp, and allen head screws. • Follow instructions for Use WARNING: Read and understand all instructions listed below the slot is located over the adjustment LOCATING PINS pin. Failure...

Type 1 Manual - NPP2018
Page 9
... the saw head module (C) creates a pole saw . • Lubricate the whole chain evenly before performing the following operations. 625116-00 NPP2018 Pole 11/12/04 9:11 AM Page 9 Chain Oiling • A high quality bar and chain oil or 6 SAE30 weight motor oil should be used for additional information on transporting the battery. 8 Assembly Joining Saw Head Module to 18V Handle Module WARNING: Sharp moving blade. The use of the saw 10 head module (C). Mineral oil...
... the saw head module (C) creates a pole saw . • Lubricate the whole chain evenly before performing the following operations. 625116-00 NPP2018 Pole 11/12/04 9:11 AM Page 9 Chain Oiling • A high quality bar and chain oil or 6 SAE30 weight motor oil should be used for additional information on transporting the battery. 8 Assembly Joining Saw Head Module to 18V Handle Module WARNING: Sharp moving blade. The use of the saw 10 head module (C). Mineral oil...
Type 1 Manual - NPP2018
Page 12
... avoid the risk of guide bar to remove the battery (be aware the chain and bar can be hot!) check the bar and chain for the tool. Thumbs and fingers must wrap around Pole Saw handle and pole. Guide Pole Saw using identical replacement parts. 12 Make first cut off thick branches from tree trunk on underside of use be sure to make the finish cut off thick branches from...
... avoid the risk of guide bar to remove the battery (be aware the chain and bar can be hot!) check the bar and chain for the tool. Thumbs and fingers must wrap around Pole Saw handle and pole. Guide Pole Saw using identical replacement parts. 12 Make first cut off thick branches from tree trunk on underside of use be sure to make the finish cut off thick branches from...
Type 1 Manual - NPP2018
Page 13
...: Problem Possible Cause Possible Solution • Tool will not charge. • Battery not inserted into charger. • Insert battery into charger until red LED appears. Replacement chain # 623382-00 Replacement bar # 623381-00 The use . Troubleshooting Section If your nearest Black & Decker service center. Charge up to 8 hours if battery totally drained. • Bar / chain overheated. • Chain too tight. • Lubrication needed. • Refer to section on adjusting chain tension...
...: Problem Possible Cause Possible Solution • Tool will not charge. • Battery not inserted into charger. • Insert battery into charger until red LED appears. Replacement chain # 623382-00 Replacement bar # 623381-00 The use . Troubleshooting Section If your nearest Black & Decker service center. Charge up to 8 hours if battery totally drained. • Bar / chain overheated. • Chain too tight. • Lubrication needed. • Refer to section on adjusting chain tension...
Type 1 Manual - NPP2018
Page 14
... specific legal rights and you may be required. Problem Possible Cause Possible Solution • Unit runs but • Chain installed does not cut. Black & Decker owned and authorized service centers are beyond the time set for installing and removing chain. backwards. • Refer to sections for exchanges. Full Two-Year Home Use Warranty Black & Decker (U.S.) Inc. Joppa Rd. 625116-00 NPP2018 Pole 11/12/04 9:11 AM Page 14 Troubleshooting...
... specific legal rights and you may be required. Problem Possible Cause Possible Solution • Unit runs but • Chain installed does not cut. Black & Decker owned and authorized service centers are beyond the time set for installing and removing chain. backwards. • Refer to sections for exchanges. Full Two-Year Home Use Warranty Black & Decker (U.S.) Inc. Joppa Rd. 625116-00 NPP2018 Pole 11/12/04 9:11 AM Page 14 Troubleshooting...


