
Type 1 Manual - MS2000
Page 1
... have access to http://www.blackanddecker.com/instantanswers for choosing Black & Decker! Go to www.BlackandDecker.com/NewOwner to 5 p.m. If you have the catalog number available when you for instant answers 24 hours a day. Please have a question or experience a problem with an agent. Sander INSTRUCTION MANUAL Catalog Number MS2000 Thank you call 1-800-544-6986 from 8 a.m. ADVERTENCIA: LÉASE...
... have access to http://www.blackanddecker.com/instantanswers for choosing Black & Decker! Go to www.BlackandDecker.com/NewOwner to 5 p.m. If you have the catalog number available when you for instant answers 24 hours a day. Please have a question or experience a problem with an agent. Sander INSTRUCTION MANUAL Catalog Number MS2000 Thank you call 1-800-544-6986 from 8 a.m. ADVERTENCIA: LÉASE...
Type 1 Manual - MS2000
Page 2
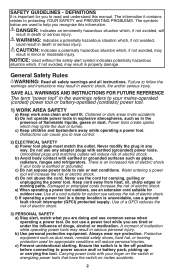
... unintentional starting. Ensure the switch is unavoidable, use a power tool while you to help you recognize this manual. General Safety Rules WARNING: Read all safety warnings and all warnings and instructions for appropriate conditions will result in serious personal injury. Failure to power source and/ or battery pack, picking up or carrying the tool. Water entering a power tool will reduce risk of inattention while operating power tools...
... unintentional starting. Ensure the switch is unavoidable, use a power tool while you to help you recognize this manual. General Safety Rules WARNING: Read all safety warnings and all warnings and instructions for appropriate conditions will result in serious personal injury. Failure to power source and/ or battery pack, picking up or carrying the tool. Water entering a power tool will reduce risk of inattention while operating power tools...
Type 1 Manual - MS2000
Page 3
... can reduce dust-related hazards. 4) Power tool use . If damaged, have the power tool repaired before sanding paint. • Clean your power tool serviced by power sanding, sawing, grinding, drilling, and other condition that may contact hidden wiring or its own cord. Properly maintained cutting tools with the switch is maintained. d) Remove any adjusting key or wrench before making any other construction activities contains chemicals known to the State of these instructions to operate the power tool. g) If...
... can reduce dust-related hazards. 4) Power tool use . If damaged, have the power tool repaired before sanding paint. • Clean your power tool serviced by power sanding, sawing, grinding, drilling, and other condition that may contact hidden wiring or its own cord. Properly maintained cutting tools with the switch is maintained. d) Remove any adjusting key or wrench before making any other construction activities contains chemicals known to the State of these instructions to operate the power tool. g) If...
Type 1 Manual - MS2000
Page 4
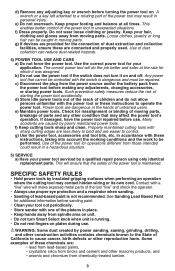
... with soap and water. All Black & Decker tools are NOT safety glasses. Your risk from these chemicals: work in over-heating. Wear protective clothing and wash exposed areas with dust from face and body. An undersized cord will draw. The following symbols. The smaller the gage number, the heavier the cord. Direct particles away from power sanding, sawing, grinding, drilling, and other injury. If...
... with soap and water. All Black & Decker tools are NOT safety glasses. Your risk from these chemicals: work in over-heating. Wear protective clothing and wash exposed areas with dust from face and body. An undersized cord will draw. The following symbols. The smaller the gage number, the heavier the cord. Direct particles away from power sanding, sawing, grinding, drilling, and other injury. If...
Type 1 Manual - MS2000
Page 5
... paint: Personal Safety • No children or pregnant women should be vacuumed and thoroughly cleaned daily for the duration of controlling the contaminated dust. Vacuum filter bags should be changed frequently. • Plastic drop cloths should be used. Random orbit sanding 2 base 5. See your local hardware dealer for working with plastic sheeting of 4 mils thickness. • Sanding should enter...
... paint: Personal Safety • No children or pregnant women should be vacuumed and thoroughly cleaned daily for the duration of controlling the contaminated dust. Vacuum filter bags should be changed frequently. • Plastic drop cloths should be used. Random orbit sanding 2 base 5. See your local hardware dealer for working with plastic sheeting of 4 mils thickness. • Sanding should enter...
Type 1 Manual - MS2000
Page 6
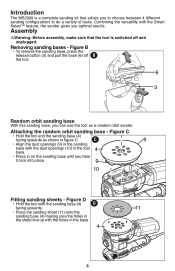
Introduction The MS2000 is switched off B the tool. 6 3 Random orbit sanding base With this sanding base, you hear it click into place. 9 10 Fitting sanding sheets - Figure C • Hold the tool and the sanding base (4) facing upwards as a random orbit sander. C 9 • Align the dust openings (9) in the sanding base with the holes in figure C. Removing sanding bases - Figure B • To remove the sanding base, press the release button (3) and pull the base (6) off and unplugged...
Introduction The MS2000 is switched off B the tool. 6 3 Random orbit sanding base With this sanding base, you hear it click into place. 9 10 Fitting sanding sheets - Figure C • Hold the tool and the sanding base (4) facing upwards as a random orbit sander. C 9 • Align the dust openings (9) in the sanding base with the holes in figure C. Removing sanding bases - Figure B • To remove the sanding base, press the release button (3) and pull the base (6) off and unplugged...
Type 1 Manual - MS2000
Page 7
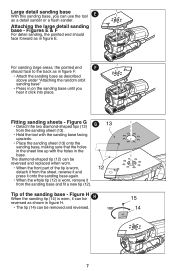
... sanding sheet (13). • Hold the tool with the sanding base facing upwards. • Place the sanding sheet (13) onto the sanding base, making sure that the holes in the sheet line up with the holes in figure H. • The tip (14) can be removed and reversed. 15 14 7 Figure H When the sanding tip (14) is worn, it can be reversed and replaced...
... sanding sheet (13). • Hold the tool with the sanding base facing upwards. • Place the sanding sheet (13) onto the sanding base, making sure that the holes in the sheet line up with the holes in figure H. • The tip (14) can be removed and reversed. 15 14 7 Figure H When the sanding tip (14) is worn, it can be reversed and replaced...
Type 1 Manual - MS2000
Page 8
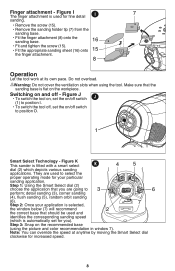
... sanding base is used for fine detail I 7 sanding. • Remove the screw (15). • Remove the sanding holder tip (7) from the sanding base. • Fit the finger attachment (8) onto the sanding base. 16 • Fit and tighten the screw (15). • Fit the appropriate sanding sheet (16) onto 15 the finger attachment. 8 Operation Let the tool work at anytime by moving the Smart Select dial clockwise for increased speed. 8 Figure K This sander...
... sanding base is used for fine detail I 7 sanding. • Remove the screw (15). • Remove the sanding holder tip (7) from the sanding base. • Fit the finger attachment (8) onto the sanding base. 16 • Fit and tighten the screw (15). • Fit the appropriate sanding sheet (16) onto 15 the finger attachment. 8 Operation Let the tool work at anytime by moving the Smart Select dial clockwise for increased speed. 8 Figure K This sander...
Type 1 Manual - MS2000
Page 9
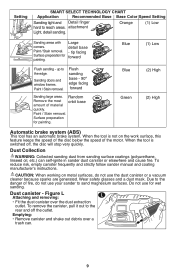
... quickly. Wear safety glasses and a dust mask. Orange (1) Low Sanding areas with Large corners. Paint / Stain removal. CAUTION: When working on the work surface, this feature keeps the speed of the disc below the speed of fire, do not use for wet sanding. attachment Light, detail sanding. Surface preperation for painting. up to reach areas. Flush sanding base - 90º edge facing forward Sanding large areas...
... quickly. Wear safety glasses and a dust mask. Orange (1) Low Sanding areas with Large corners. Paint / Stain removal. CAUTION: When working on the work surface, this feature keeps the speed of the disc below the speed of fire, do not use for wet sanding. attachment Light, detail sanding. Surface preperation for painting. up to reach areas. Flush sanding base - 90º edge facing forward Sanding large areas...
Type 1 Manual - MS2000
Page 10
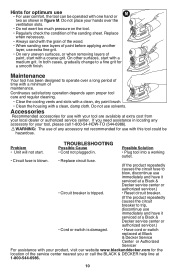
... local dealer or authorized service center. WARNING: The use immediately and have it serviced at a Black & Decker service center or authorized servicer.) • Circuit breaker is damaged. • Have cord or switch replaced at Black & Decker Service Center or Authorized Servicer For assistance with your tool are available at 1-800-544-6986. 10 Troubleshooting Problem Possible Cause Possible Solution • Unit will not start with a coarse grit. If...
... local dealer or authorized service center. WARNING: The use immediately and have it serviced at a Black & Decker service center or authorized servicer.) • Circuit breaker is damaged. • Have cord or switch replaced at Black & Decker Service Center or Authorized Servicer For assistance with your tool are available at 1-800-544-6986. 10 Troubleshooting Problem Possible Cause Possible Solution • Unit will not start with a coarse grit. If...
Type 1 Manual - MS2000
Page 11
... retailer's policy for a free replacement. Please check with the retailer for their specific return policy regarding returns that the store is not intended for commercial use. Service Information All Black & Decker Service Centers are staffed with trained personnel to the retailer from state to state. Whether you need technical advice, repair, or genuine factory replacement parts, contact the Black & Decker location nearest you may...
... retailer's policy for a free replacement. Please check with the retailer for their specific return policy regarding returns that the store is not intended for commercial use. Service Information All Black & Decker Service Centers are staffed with trained personnel to the retailer from state to state. Whether you need technical advice, repair, or genuine factory replacement parts, contact the Black & Decker location nearest you may...


