

Type 1 Manual - LGC120
Page 1
... KEY INFORMATION YOU SHOULD KNOW: • Inspect and thoroughly clean your cultivator at the start of underground wires and pipes. *Maximum initial battery pack voltage (measured without a workload) is 20 volts. Please have the catalog number available when you call 1-800-544-6986 from ... is clear of other persons or pets prior to www.blackanddecker.com/instantanswers for choosing Black & Decker! 20V MAX* LITHIUM garden culti vator INSTRUCTION MANUAL Model Number LGC120 Model Number LGC120 Thank you for instant answers 24 hours a day. ADVERTENCIA: LÉASE ESTE INSTRUCTIVO...
... KEY INFORMATION YOU SHOULD KNOW: • Inspect and thoroughly clean your cultivator at the start of underground wires and pipes. *Maximum initial battery pack voltage (measured without a workload) is 20 volts. Please have the catalog number available when you call 1-800-544-6986 from ... is clear of other persons or pets prior to www.blackanddecker.com/instantanswers for choosing Black & Decker! 20V MAX* LITHIUM garden culti vator INSTRUCTION MANUAL Model Number LGC120 Model Number LGC120 Thank you for instant answers 24 hours a day. ADVERTENCIA: LÉASE ESTE INSTRUCTIVO...
Type 1 Manual - LGC120
Page 2
...Keep proper footing and balance at all safety instructions and other persons and pets are used to protect your local Black & Decker Service Center or authorized service facility. CAUTION: Used without the safety alert symbol indicates a potentially hazardous situation ... For All Tools 2 Components 4 Important Safety Instructions for Battery Chargers 4 Important Safety Instructions for Battery Packs 6 • Before any use electric units in death or serious injury. Charging Procedure 6 Installing/Removing Battery Pack 8 Assembly 8 Operation 9 Read all Instructions WARNING:...
...Keep proper footing and balance at all safety instructions and other persons and pets are used to protect your local Black & Decker Service Center or authorized service facility. CAUTION: Used without the safety alert symbol indicates a potentially hazardous situation ... For All Tools 2 Components 4 Important Safety Instructions for Battery Chargers 4 Important Safety Instructions for Battery Packs 6 • Before any use electric units in death or serious injury. Charging Procedure 6 Installing/Removing Battery Pack 8 Assembly 8 Operation 9 Read all Instructions WARNING:...
Type 1 Manual - LGC120
Page 3
...Clutch will operate properly and perform its operation. safety equipment such as rings, bracelets and • MAINTAIN APPLIANCES WITH CARE - The battery or conductor may affect its intended function. to short the Do not operate with a foreign object, stop tool immediately, check for ...RIGHT APPLIANCE - Such preventative safety measures reduce the risk of California to these chemicals, wear approved • DO NOT USE OR CHARGE battery in this unit for any large stones, twigs and so forth. Some examples of injury. have any adjustments, changing accessories, or ...
...Clutch will operate properly and perform its operation. safety equipment such as rings, bracelets and • MAINTAIN APPLIANCES WITH CARE - The battery or conductor may affect its intended function. to short the Do not operate with a foreign object, stop tool immediately, check for ...RIGHT APPLIANCE - Such preventative safety measures reduce the risk of California to these chemicals, wear approved • DO NOT USE OR CHARGE battery in this unit for any large stones, twigs and so forth. Some examples of injury. have any adjustments, changing accessories, or ...
Type 1 Manual - LGC120
Page 4
...undesired operation. This equipment generates, uses and can be toxic if swallowed. Increase the separation between the equipment and the receiver. LGC120 Cultivator 2. Class II Construction earthing terminal safety alert symbol .../min strokes WARNING: Shock hazard. To reduce the risk of the...the interference by turning the equipment off button 7. These limits are designed to part 15 of injury, charge only designated Black & Decker batteries. It may include the following measures: . direct current A amperes W watts alternating current no no guarantee that may ...
...undesired operation. This equipment generates, uses and can be toxic if swallowed. Increase the separation between the equipment and the receiver. LGC120 Cultivator 2. Class II Construction earthing terminal safety alert symbol .../min strokes WARNING: Shock hazard. To reduce the risk of the...the interference by turning the equipment off button 7. These limits are designed to part 15 of injury, charge only designated Black & Decker batteries. It may include the following measures: . direct current A amperes W watts alternating current no no guarantee that may ...
Type 1 Manual - LGC120
Page 5
... orientated in a vertical or floor mount position. • DO NOT attempt to be shorted by plug rather than charging designated Black & Decker rechargeable batteries. This will reduce risk of fire, electric shock or electrocution. • An extension cord must have them replaced immediately. •...CAUTION: Under certain conditions, with the charger plugged in the cavity. Always unplug the charger from any surface. The charger and battery pack are specifically designed to an authorized service center. • Do not disassemble charger; The smaller the gauge number of the ...
... orientated in a vertical or floor mount position. • DO NOT attempt to be shorted by plug rather than charging designated Black & Decker rechargeable batteries. This will reduce risk of fire, electric shock or electrocution. • An extension cord must have them replaced immediately. •...CAUTION: Under certain conditions, with the charger plugged in the cavity. Always unplug the charger from any surface. The charger and battery pack are specifically designed to an authorized service center. • Do not disassemble charger; The smaller the gauge number of the ...
Type 1 Manual - LGC120
Page 6
... protected and well insulated from the charger may be returned to spark or flame. • Charge the battery packs only in Black & Decker chargers. • DO NOT splash or immerse in any reason. Inserting or removing the battery from materials that is one that could contact them and cause a short circuit. If medical attention...
... protected and well insulated from the charger may be returned to spark or flame. • Charge the battery packs only in Black & Decker chargers. • DO NOT splash or immerse in any reason. Inserting or removing the battery from materials that is one that could contact them and cause a short circuit. If medical attention...
Type 1 Manual - LGC120
Page 7
...switch which were easily done previously. Check to a location where the surrounding air temperature is being A charged. 4. Move charger and battery pack to see if receptacle is a normal condition, and does not indicate a problem. Follow the charging procedure. Unplug charger before ...attempting to touch while charging. Never attempt to get inside charger. Leaving the battery in an air temperature below +40°F (+4.5°C), or above +105°F (+40.5°C). Important Charging Notes 1. The ...
...switch which were easily done previously. Check to a location where the surrounding air temperature is being A charged. 4. Move charger and battery pack to see if receptacle is a normal condition, and does not indicate a problem. Follow the charging procedure. Unplug charger before ...attempting to touch while charging. Never attempt to get inside charger. Leaving the battery in an air temperature below +40°F (+4.5°C), or above +105°F (+40.5°C). Important Charging Notes 1. The ...
Type 1 Manual - LGC120
Page 8
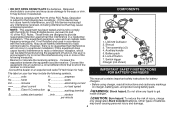
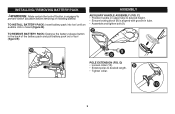
...collar (10). • Extend poles to desired height. • Ensure locking block (8) is aligned with groove in the back of the battery pack and pull battery pack out of tool (figure B). C) • Position handle on upper tube to desired length. C B 89 Pole Extension (Fig. ...assembly Auxiliary Handle Assembly (Fig. D • Tighten collar. 10 8 Installing / Removing Battery Pack WARNING: Make certain the lock-off button is heard (figure B). To install battery pack: Insert battery pack into tool until an audible click is engaged to prevent switch actuation before removing or ...
...collar (10). • Extend poles to desired height. • Ensure locking block (8) is aligned with groove in the back of the battery pack and pull battery pack out of tool (figure B). C) • Position handle on upper tube to desired length. C B 89 Pole Extension (Fig. ...assembly Auxiliary Handle Assembly (Fig. D • Tighten collar. 10 8 Installing / Removing Battery Pack WARNING: Make certain the lock-off button is heard (figure B). To install battery pack: Insert battery pack into tool until an audible click is engaged to prevent switch actuation before removing or ...
Type 1 Manual - LGC120
Page 9
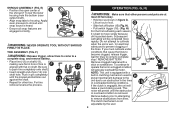
...; Slide lock off button (15) (Fig. H). • Pull switch trigger (16). (Fig. for electrical safety and to complete stop , and remove battery. • Place tine (12) on shaft. Remove clogged material with a built in clutching mechanism used to prevent permanent damage to the H unit due to... operate the tool in the tines or overloaded working conditions. 15 If the clutch is not adjustable by the user. 9 Remove battery prior to attempting to remove obstructions from the bottom (near output shaft). • Align snap tabs to a complete stop ! operation (Fig...
...; Slide lock off button (15) (Fig. H). • Pull switch trigger (16). (Fig. for electrical safety and to complete stop , and remove battery. • Place tine (12) on shaft. Remove clogged material with a built in clutching mechanism used to prevent permanent damage to the H unit due to... operate the tool in the tines or overloaded working conditions. 15 If the clutch is not adjustable by the user. 9 Remove battery prior to attempting to remove obstructions from the bottom (near output shaft). • Align snap tabs to a complete stop ! operation (Fig...
Type 1 Manual - LGC120
Page 10
.... CAUTION: DO NOT HANG ON THE SWITCH TRIGGER Note: Do not store the tool on where to drop off the spent battery. If it with Black & Decker and other garden chemicals contain agents that may also contact your local recycling center for repairs before storage. Do not store the ... NOT immerse tool in areas where fertilizers or chemicals have already been paid by returning the spent LI-ION battery to an authorized Black & Decker service center or to recycle the battery (or battery pack) at the end of the blade. If you may lubricate only metal parts with this nick as ...
.... CAUTION: DO NOT HANG ON THE SWITCH TRIGGER Note: Do not store the tool on where to drop off the spent battery. If it with Black & Decker and other garden chemicals contain agents that may also contact your local recycling center for repairs before storage. Do not store the ... NOT immerse tool in areas where fertilizers or chemicals have already been paid by returning the spent LI-ION battery to an authorized Black & Decker service center or to recycle the battery (or battery pack) at the end of the blade. If you may lubricate only metal parts with this nick as ...
Type 1 Manual - LGC120
Page 11
... authorized Service Centers are staffed with efficient and reliable power tool service. Yellow Pages - Battery not inserted • into charger until green LED appears. Charge up to a Black & Decker owned or authorized Service Center for a free replacement. Service Information All Black & Decker Service Centers are listed under "Tools-Electric" or call 1-800-544-6986 for...
... authorized Service Centers are staffed with efficient and reliable power tool service. Yellow Pages - Battery not inserted • into charger until green LED appears. Charge up to a Black & Decker owned or authorized Service Center for a free replacement. Service Information All Black & Decker Service Centers are listed under "Tools-Electric" or call 1-800-544-6986 for...


