
Type 1 Manual - LGC120
Page 1
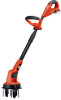
.... • Make sure area is clear of other persons or pets prior to starting operation. • Make sure work area is clear of each use. • The blades on this tool are not intended to 5 p.m. If you can't find the answer or do not... a problem with your cultivator at the start of underground wires and pipes. *Maximum initial battery pack voltage (measured without a workload) is 18. 1 to be sharp. INSTRUCTIVO DE OPERACIÓN, CENTROS DE SERVICIO Y PÓLIZA DE GARANTÍA. 20V MAX* LITHIUM garden culti vator INSTRUCTION MANUAL Model Number LGC120 Model Number LGC120 Thank ...
.... • Make sure area is clear of other persons or pets prior to starting operation. • Make sure work area is clear of each use. • The blades on this tool are not intended to 5 p.m. If you can't find the answer or do not... a problem with your cultivator at the start of underground wires and pipes. *Maximum initial battery pack voltage (measured without a workload) is 18. 1 to be sharp. INSTRUCTIVO DE OPERACIÓN, CENTROS DE SERVICIO Y PÓLIZA DE GARANTÍA. 20V MAX* LITHIUM garden culti vator INSTRUCTION MANUAL Model Number LGC120 Model Number LGC120 Thank ...
Type 1 Manual - LGC120
Page 2
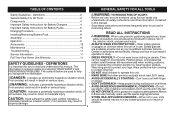
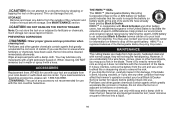
... of Contents general Safety for all times. • AVOID DANGEROUS ENVIRONMENTAL CONDITIONS - Charging Procedure 6 Installing/Removing Battery Pack 8 Assembly 8 Operation 9 Read all times when this manual. Wear safety glasses or goggles at your legs. Wear protective hair covering to contain long hair. • DO NOT allow children to protect your local Black & Decker Service Center or authorized service facility. CAUTION: Indicates a potentially hazardous...
... of Contents general Safety for all times. • AVOID DANGEROUS ENVIRONMENTAL CONDITIONS - Charging Procedure 6 Installing/Removing Battery Pack 8 Assembly 8 Operation 9 Read all times when this manual. Wear safety glasses or goggles at your legs. Wear protective hair covering to contain long hair. • DO NOT allow children to protect your local Black & Decker Service Center or authorized service facility. CAUTION: Indicates a potentially hazardous...
Type 1 Manual - LGC120
Page 3
... short the Do not operate with a foreign object, stop tool immediately, check for one type of battery may create a risk of injury at a safe distance. battery with integral batteries or a WARNING: Some dust created by this manual. • KEEP SHROUD IN PLACE AND IN WORKING ORDER. • BEFORE STARTING GARDEN CULTIVATOR, check the soil and remove any adjustments, changing accessories, or storing the...
... short the Do not operate with a foreign object, stop tool immediately, check for one type of battery may create a risk of injury at a safe distance. battery with integral batteries or a WARNING: Some dust created by this manual. • KEEP SHROUD IN PLACE AND IN WORKING ORDER. • BEFORE STARTING GARDEN CULTIVATOR, check the soil and remove any adjustments, changing accessories, or storing the...
Type 1 Manual - LGC120
Page 4
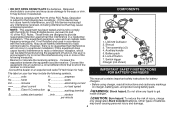
... by turning the equipment off button 7. Tine assembly (x 2) 4. Battery pack 6. Lock-off and on charger, battery pack, and product using charger, read all instructions and cautionary markings on , the user is no load speed This manual contains important safety instructions for help. direct current A amperes W watts alternating current no no guarantee that may cause undesired operation. Other types of injury, charge only designated Black & Decker batteries...
... by turning the equipment off button 7. Tine assembly (x 2) 4. Battery pack 6. Lock-off and on charger, battery pack, and product using charger, read all instructions and cautionary markings on , the user is no load speed This manual contains important safety instructions for help. direct current A amperes W watts alternating current no no guarantee that may cause undesired operation. Other types of injury, charge only designated Black & Decker batteries...
Type 1 Manual - LGC120
Page 5
... electric plug and cord. • Make sure that cord is located so that might block the ventilation slots and result in excessive internal heat. Any other than charging designated Black & Decker rechargeable batteries. The smaller the gauge number of the wire, the greater the capacity of electric ...to any cleaning. SAVE THESE INSTRUCTIONS 5 Place the charger in a position away from the power supply when there is no battery pack in risk of fire, electric shock or electrocution. • An extension cord must have them replaced immediately. • Do not operate charger if ...
... electric plug and cord. • Make sure that cord is located so that might block the ventilation slots and result in excessive internal heat. Any other than charging designated Black & Decker rechargeable batteries. The smaller the gauge number of the wire, the greater the capacity of electric ...to any cleaning. SAVE THESE INSTRUCTIONS 5 Place the charger in a position away from the power supply when there is no battery pack in risk of fire, electric shock or electrocution. • An extension cord must have them replaced immediately. • Do not operate charger if ...
Type 1 Manual - LGC120
Page 6
... 4 hours. 1. important safety instructions for battery PACKS WARNING: For safe operation, read the safety instructions below. Inserting or removing the battery from short circuits. Provide fresh air. Battery liquid may be returned to spark or flame. • Charge the battery packs only in Black & Decker chargers. • DO NOT splash or immerse in water or other liquids. Do not use a battery pack or charger...
... 4 hours. 1. important safety instructions for battery PACKS WARNING: For safe operation, read the safety instructions below. Inserting or removing the battery from short circuits. Provide fresh air. Battery liquid may be returned to spark or flame. • Charge the battery packs only in Black & Decker chargers. • DO NOT splash or immerse in water or other liquids. Do not use a battery pack or charger...
Type 1 Manual - LGC120
Page 7
...keep the battery pack fresh and fully charged. If the battery pack does not charge properly: a. Check current at this time or left connected with no battery pack in a lamp or other liquid. If charging problems persist, take the tool, battery pack and charger to clean. 6....power on continuously. The battery pack should be used pack whenever you turn out the lights. Foreign materials of a conductive nature such as, but not limited to, steel wool, aluminum foil, or any liquid to a light switch which were easily done previously. Unplug charger before attempting to your local service...
...keep the battery pack fresh and fully charged. If the battery pack does not charge properly: a. Check current at this time or left connected with no battery pack in a lamp or other liquid. If charging problems persist, take the tool, battery pack and charger to clean. 6....power on continuously. The battery pack should be used pack whenever you turn out the lights. Foreign materials of a conductive nature such as, but not limited to, steel wool, aluminum foil, or any liquid to a light switch which were easily done previously. Unplug charger before attempting to your local service...
Type 1 Manual - LGC120
Page 8
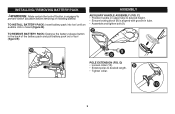
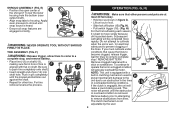
... and pull battery pack out of tool (figure B). D • Tighten collar. 10 8 To install battery pack: Insert battery pack into tool until an audible click is engaged to desired length. To remove battery pack: Depress the battery release button in tube. • Assemble and tighten bolt (9). C B 89 Pole Extension (Fig. D) • Loosen collar (10). • Extend poles to prevent switch actuation before removing or installing battery. Installing / Removing Battery...
... and pull battery pack out of tool (figure B). D • Tighten collar. 10 8 To install battery pack: Insert battery pack into tool until an audible click is engaged to desired length. To remove battery pack: Depress the battery release button in tube. • Assemble and tighten bolt (9). C B 89 Pole Extension (Fig. D) • Loosen collar (10). • Extend poles to prevent switch actuation before removing or installing battery. Installing / Removing Battery...
Type 1 Manual - LGC120
Page 9
... end bottoms out against the shaft. 13 • Repeat for electrical safety and to shroud until the obstruction or overload condition is equipped with a stick or screwdriver. H). • Pull switch trigger (16). (Fig. Subsequent cultivating will seriously overload the motor. To continue to operate the tool in a clogged condition will be completed more rapidly. Remove battery prior to attempting to...
... end bottoms out against the shaft. 13 • Repeat for electrical safety and to shroud until the obstruction or overload condition is equipped with a stick or screwdriver. H). • Pull switch trigger (16). (Fig. Subsequent cultivating will seriously overload the motor. To continue to operate the tool in a clogged condition will be completed more rapidly. Remove battery prior to attempting to...
Type 1 Manual - LGC120
Page 10
... when cleaning tool. Wipe all exposed parts with a light petroleum based oil. You may affect the trimmer's operation contact your local recycling center for use the tool in areas where fertilizers or chemicals have already been paid by Black & Decker. With the battery removed, use of any debris from the unit and use . See MAINTENANCE section. Fertilizers and other hard objects, you accidentally hit a wire fence...
... when cleaning tool. Wipe all exposed parts with a light petroleum based oil. You may affect the trimmer's operation contact your local recycling center for use the tool in areas where fertilizers or chemicals have already been paid by Black & Decker. With the battery removed, use of any debris from the unit and use . See MAINTENANCE section. Fertilizers and other hard objects, you accidentally hit a wire fence...
Type 1 Manual - LGC120
Page 11
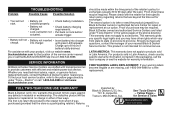
... intended for exchanges. Black & Decker owned and authorized Service Centers are beyond the time set for commercial use. This warranty does not apply to 8 hours if battery totally drained. installed properly. • Battery not charged. • Check battery charging requirements. • Lock-out button not • Pull back on lock button/ actuated. Please check with efficient and reliable power tool service. warrants this product for Service & Sales Problem Troubleshooting Possible Cause Possible Solution...
... intended for exchanges. Black & Decker owned and authorized Service Centers are beyond the time set for commercial use. This warranty does not apply to 8 hours if battery totally drained. installed properly. • Battery not charged. • Check battery charging requirements. • Lock-out button not • Pull back on lock button/ actuated. Please check with efficient and reliable power tool service. warrants this product for Service & Sales Problem Troubleshooting Possible Cause Possible Solution...


