
Type 1 Manual - HT18
Page 1
... Black & Decker! to operate the trimmer, the lock button must first be pulled back (see figure E) then squeeze trigger. 1 SAVE THIS MANUAL FOR FUTURE REFERENCE. KEY INFORMATION YOU SHOULD KNOW: • To insure extension cord does not come loose see figure D for instant answers 24 hours a day. POUR LE FRANÇAIS, VOIR LA COUVERTURE ARRIÈRE. HEDGE TRIMMER INSTRUCTION MANUAL Model Numbers...
... Black & Decker! to operate the trimmer, the lock button must first be pulled back (see figure E) then squeeze trigger. 1 SAVE THIS MANUAL FOR FUTURE REFERENCE. KEY INFORMATION YOU SHOULD KNOW: • To insure extension cord does not come loose see figure D for instant answers 24 hours a day. POUR LE FRANÇAIS, VOIR LA COUVERTURE ARRIÈRE. HEDGE TRIMMER INSTRUCTION MANUAL Model Numbers...
Type 1 Manual - HT18
Page 2
... 2 General Safety Rules 2 Hedge Trimmer Safety Rules 3 Extension Cords 4 Components 5 Assembly Instructions 5 Operating Instructions 6 Trimming Instructions 6 Maintenance 7 Accessories 7 Service Information 8 Two-Year Home Use Warranty 8 Troubleshooting 9 SAFETY GUIDELINES - DANGER: Indicates an imminently hazardous situation which , if not avoided, may result in minor or moderate injury. Cluttered or dark areas invite accidents. c) Keep children and bystanders away while operating a power tool. Unmodified plugs and matching outlets will...
... 2 General Safety Rules 2 Hedge Trimmer Safety Rules 3 Extension Cords 4 Components 5 Assembly Instructions 5 Operating Instructions 6 Trimming Instructions 6 Maintenance 7 Accessories 7 Service Information 8 Two-Year Home Use Warranty 8 Troubleshooting 9 SAFETY GUIDELINES - DANGER: Indicates an imminently hazardous situation which , if not avoided, may result in minor or moderate injury. Cluttered or dark areas invite accidents. c) Keep children and bystanders away while operating a power tool. Unmodified plugs and matching outlets will...

Type 1 Manual - HT18
Page 3
.... • Use both hands when operating the hedge trimmer. f) Keep cutting tools sharp and clean. A moment of inattention while operating power tools may result in serious personal injury. c) Disconnect the plug from the power tool before connecting to power source and/or battery pack, picking up or carrying the tool. A moment of inattention and off . c) Prevent unintentional starting the power tool accidentally. Check for operations different from the cutter blade. Such...
.... • Use both hands when operating the hedge trimmer. f) Keep cutting tools sharp and clean. A moment of inattention while operating power tools may result in serious personal injury. c) Disconnect the plug from the power tool before connecting to power source and/or battery pack, picking up or carrying the tool. A moment of inattention and off . c) Prevent unintentional starting the power tool accidentally. Check for operations different from the cutter blade. Such...
Type 1 Manual - HT18
Page 4
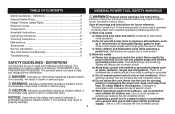
... cut by insulated gripping surfaces only, because the cutter blade may include the following table shows the correct size to use depending on your tool may contact hidden wiring or its own cord. During operation the cord may make exposed metal parts of the power tool "live " wire may be hidden in loss of power and overheating. Contact with the cutter blade stopped. Minimum Gauge for Cord Sets...
... cut by insulated gripping surfaces only, because the cutter blade may include the following table shows the correct size to use depending on your tool may contact hidden wiring or its own cord. During operation the cord may make exposed metal parts of the power tool "live " wire may be hidden in loss of power and overheating. Contact with the cutter blade stopped. Minimum Gauge for Cord Sets...
Type 1 Manual - HT18
Page 5
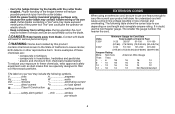
... partially run into the plug blades in the back of the extension cord into the trimmer housing (figure A). Hook the loop formed by doubling the cord, over the cord retainer tab, as shown in the trimmer's housing. Cord Retainer 4 6 2 57 3 1 ASSEMBLY INSTRUCTIONS ASSEMBLY TOOLS REQUIRED (NOT SUPPLIED): - Guard 3. The trimmer is built into the openings on the side of the trimmer housing behind the guard. • Insert the remaining four screws into...
... partially run into the plug blades in the back of the extension cord into the trimmer housing (figure A). Hook the loop formed by doubling the cord, over the cord retainer tab, as shown in the trimmer's housing. Cord Retainer 4 6 2 57 3 1 ASSEMBLY INSTRUCTIONS ASSEMBLY TOOLS REQUIRED (NOT SUPPLIED): - Guard 3. The trimmer is built into the openings on the side of the trimmer housing behind the guard. • Insert the remaining four screws into...
Type 1 Manual - HT18
Page 6
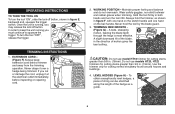
... electrical outlet immediately, before inspecting or repairing cord. 2. TRIMMING NEW GROWTH (Figure G) - Do not use model HT18 trimmer for cutting normal shrubbery found around houses and buildings. If you cut or damage the cord, unplug it over a hedge being trimmed. To obtain exceptionally level hedges, a piece of string can be stretched along the length of the blade, 0-15 in both hands and turn the tool ON. Use...
... electrical outlet immediately, before inspecting or repairing cord. 2. TRIMMING NEW GROWTH (Figure G) - Do not use model HT18 trimmer for cutting normal shrubbery found around houses and buildings. If you cut or damage the cord, unplug it over a hedge being trimmed. To obtain exceptionally level hedges, a piece of string can be stretched along the length of the blade, 0-15 in both hands and turn the tool ON. Use...

Type 1 Manual - HT18
Page 7
... blade is no need to clean the unit. Such usage might be hazardous. 7 I ) - There is bent, housing cracked, or handles broken or if you may affect the trimmerʼs operation contact your local Black & Decker Service Center for damage. Never let any part of metals. Use only mild soap and a damp cloth to remove this nick as long as it for repairs before servicing, cleaning or removing...
... blade is no need to clean the unit. Such usage might be hazardous. 7 I ) - There is bent, housing cracked, or handles broken or if you may affect the trimmerʼs operation contact your local Black & Decker Service Center for damage. Never let any part of metals. Use only mild soap and a damp cloth to remove this nick as long as it for repairs before servicing, cleaning or removing...

Type 1 Manual - HT18
Page 8
....blackanddecker.com. Whether you need technical advice, repair, or genuine factory replacement parts, contact the Black & Decker location nearest you have other rights which vary from whom it was purchased (provided that are missing, call 1-800-544-6986 for a free replacement. Should you . LATIN AMERICA: This warranty does not apply to province. Please check with efficient and reliable power tool service. warrants this product...
....blackanddecker.com. Whether you need technical advice, repair, or genuine factory replacement parts, contact the Black & Decker location nearest you have other rights which vary from whom it was purchased (provided that are missing, call 1-800-544-6986 for a free replacement. Should you . LATIN AMERICA: This warranty does not apply to province. Please check with efficient and reliable power tool service. warrants this product...
Type 1 Manual - HT18
Page 9
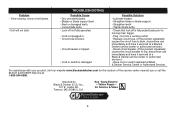
... location of the service center nearest you or call the BLACK & DECKER help line at Black & Decker Service Center or Authorized Servicer. Problem • Slow running, noisy or hot blades. • Unit will not start. Imported by Black & Decker (U.S.) Inc., 701 E. Towson, MD 21286 U.S.A. See ʻTools-Electricʼ - Possible Solution • Lubricate blades. • Straighten blade or blade support. • Straighten teeth. • Tighten blade bolts. • Check that lock off not fully operated. • Cord...
... location of the service center nearest you or call the BLACK & DECKER help line at Black & Decker Service Center or Authorized Servicer. Problem • Slow running, noisy or hot blades. • Unit will not start. Imported by Black & Decker (U.S.) Inc., 701 E. Towson, MD 21286 U.S.A. See ʻTools-Electricʼ - Possible Solution • Lubricate blades. • Straighten blade or blade support. • Straighten teeth. • Tighten blade bolts. • Check that lock off not fully operated. • Cord...


